Test Your Webhooks Locally with ngrok
Time to read: 4 minutes
October 14, 2013
Written by

If you’re a Twilio developer, chances are good that you’ve configured a Twilio number to send an HTTP GET or POST to your web app when you receive an incoming call or text. If you haven’t done that yet, you might want to read this first! I’ll fire up an NES emulator and play Tecmo Bowl while you check it out.

Ah, back so soon! I was just about to score my seventh touchdown with Bo Jackson on an inside zone, but I suppose we can get back to business. As you just read (or already knew) Twilio and other web services use the webhook callback pattern for evented interaction between two systems connected over the Internet (in this case, Twilio and your incredible web application). This is great when both systems are deployed on the public internet, but what about when you’re developing locally? How is Twilio supposed to talk to the Ruby on Rails app running on localhost? Developing on Twilio would be much, much faster if we could connect our phone numbers with the dev environment we run on localhost.
There are a number of services which facilitate exposing your localhost to the internet, but one that we use a lot here at Twilio is ngrok. ngrok is a free tool that lets you put the web app running on your local machine on the Internet. Today, I’d like to show you how use it to facilitate local Twilio development.
Step One: Download ngrok
ngrok is a Go program, distributed as a single executable file for all major desktop platforms. This is super rad – no additional frameworks to install or other dependencies. Grab the version for your development system of choice and simply unzip the file somewhere on your computer.
Step Two: Write a web application that serves TwiML
The next step is to write a web application that can respond to inbound calls and texts to your Twilio number! To tell Twilio how to handle an incoming call or message, you need to respond with an XML document that contains TwiML tags. Any web framework that lets you respond to HTTP requests and render XML will work.
As an example, here’s a tiny Sinatra application, written in Ruby, that will respond to a GET request to “/inbound” with a valid TwiML response:
To run this Ruby application, you will need to have Ruby and the Sinatra gem installed. On the Mac, you already have Ruby installed. To install Sinatra, enter the command “gem install sinatra” in a Terminal window to install the Sinatra web framework. Windows and Linux will require a little more setup.
To start a local HTTP server running this code, open up a Terminal window and create a file called “app.rb”. Place the code above in this file and save it. Run the code in your Terminal window with the command “ruby app.rb”. You should now have a Ruby web server running on local port 4567 – visiting http://localhost:4567/inbound in a web browser should produce an XML document containing the following valid TwiML:
Step Three: Put your app on the interwebs with ngrok
In a Terminal window, navigate to the directory where you unzipped ngrok. Going forward you may want to add ngrok to your system path. That would allow you to access the ngrok command from any directory, but for now we will run the ngrok utility directly from this location.
We now need to start ngrok, telling it which port we want to expose to the public Internet. In the Terminal, type ./ngrok 4567 on Linux and Mac, and just ngrok 4567 on Windows. After starting up, you should see something like the following:
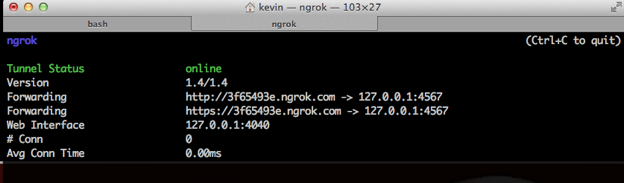
See that URL on the ngrok domain? That’s the brand new home of your local web app on the public Internet. In a browser window, open up https://[your generated ID].ngrok.io/inbound – this should display the same XML found at http://localhost:4567/inbound – verify this is the case.
Now, we can configure our Twilio number to hit our laptop when it receives an inbound call or text.
Step Four: Configure Twilio to work with our local machine
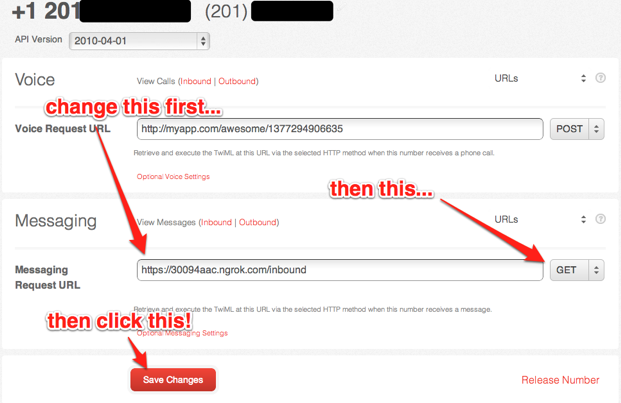
In your Twilio account dashboard, go to your list of incoming numbers and choose one to work with. Enter your ngrok URL, including the “/inbound” route, in the Messaging Request URL field as shown. Also, make sure to change the HTTP request type to a “GET” rather than a “POST”. Save your changes.
Okay, now it’s time to watch the magic happen! Open up the text message app on your phone, and send a text to your Twilio number. If all went according to plan, you should receive a reply from the app running on your local machine!

Next Steps
We’re only scratching the surface of what’s possible with ngrok. Here are some other things you might want to check out:
- Go to http://localhost:4040 – wait, what! That’s right my friend, you are looking at detailed request logging for all traffic going through your ngrok URL.
- If you sign up for an account at ngrok.com, you can reserve a custom subdomain, and configure HTTP basic authentication for access to your tunnel. Highly recommend you do so.
- Check out the docs for more uses and information.
- Pay something for the project, if you can, to support the site and development on it. Big ups to Shreve for making such an amazing product.
Aside from making local Twilio development a snap, ngrok is great for sharing demos of an in-development website, or maybe capturing inbound HTTP traffic to your API server. I hope you enjoy using it as much as we do.


Related Resources
Twilio Docs
From APIs to SDKs to sample apps
API reference documentation, SDKs, helper libraries, quickstarts, and tutorials for your language and platform.
Resource Center
The latest ebooks, industry reports, and webinars
Learn from customer engagement experts to improve your own communication.
Ahoy
Twilio's developer community hub
Best practices, code samples, and inspiration to build communications and digital engagement experiences.