Add SMS Notifications to Your Rails App Using Twilio
Time to read: 10 minutes
April 04, 2018
Written by

Anyone living in NYC with a car knows the pain that is Alternate Side Parking rules. There’s the need to always to be conscious of which side of the street your car is parked on, to run out at the most inopportune times to move it to the other side of the street, and occasionally the opportunity to be blocked in by someone double-parking. All of these, and more, are part of what New York drivers have to put up with on a weekly cycle.

To help me deal with it, I created @AlterSideBot, a Twitter Bot that retweets whenever Alternate Side Parking rules are suspended so I know I don’t have to worry on those days.
The idea hit on and followers kept coming in… but it had its limitations. First of all, most people aren’t glued to their Twitter feeds, and one tweet can easily get lost in the noise. Not to mention that many people don’t even use Twitter (or use it rarely enough) so my bot wouldn’t be helpful to them at all.
For this reason, I decided to add SMS functionality to my Twitter bot, so people could subscribe to receive SMS notifications to their phones.
The app was a fantastic success; within a few days I had over 100 subscribers. I had a lot of fun making it, so I figured I’d write up the process.
For the sake of this tutorial I won’t go into the making of the Twitter bot (that’s a whole blog post in itself), instead, we will create a much simpler app where people can subscribe to receive cat facts.
What you’ll need
- A computer running MacOS or Linux (if you’re using Windows 10 you can follow this guide to install Rails)
- Rails version 5 or higher
- A Twilio account (you can sign up for a free trial here) with a phone number that can send/receive SMS’s
- A telephone that can send/receive SMS messages so you can test your app out
Building the Rails Cat Facts app
Getting started
Let’s start by creating our Rails app. In your terminal run rails new cat_facts. This will generate a template for a basic Rails app called Cat Facts. When your terminal finishes doing what it’s doing type cd cat_facts to go into the root directory of your app.
Open the newly created cat_facts directory in your favorite editor, and let’s get going.
Give me the facts
We will start by creating our CatFact model, the nerve engine of our app.
In your terminal run rails generate model cat_fact fact:string. This should generate a CatFact model that has a fact attribute where we will store our facts, as well as a migration that should look like this:
Double check that everything looks the way it should and run rails db:migrate to create the database table.
Now let’s generate the controller by running rails generate controller cat_facts index create this will generate a CatFactsController with an index and a create action.
The controller will have also created routes for our app at GET cat_facts/index and GET cat_facts/create. That’s more complex than we need, let’s go to config/routes.rb and replace the contents of that file with the following:
That will give us a route at GET /cat_facts where we will display all the facts and a POST /cat_facts route we can use to create new Cat Facts.
An App with a View
Let us now build out our view. Put the following in app/views/cat_facts/index.html.erb:
This will give us a form to create new Cat Facts.
Under that put the following:
This will let us see a list of all the facts we created.
Let us now build out our controller. In app/controllers/cat_facts_controller.rb edit the index method to look like the following:
And the create method as follows:
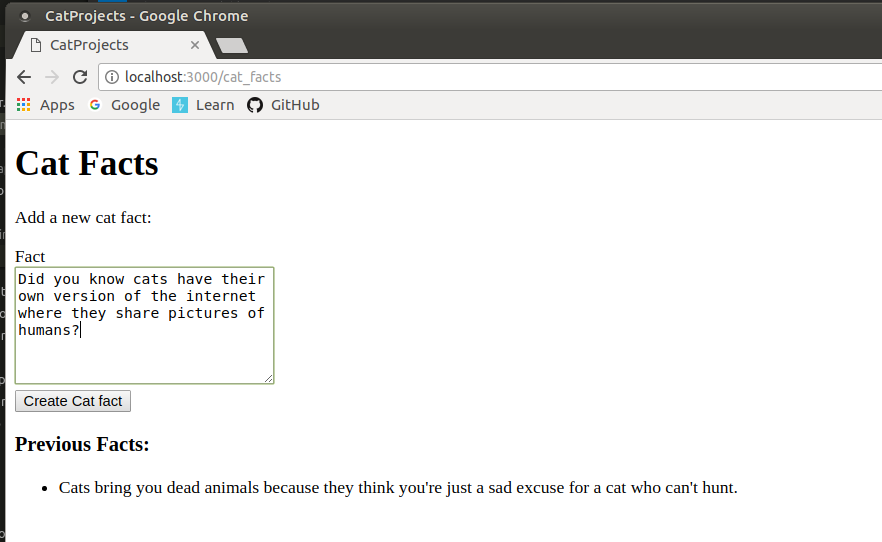
We can now test this out. Run rails server in your terminal. Open up a browser and go to http://localhost:3000/cat_facts, you should see a form for new cat facts. If you put in a fact and hit submit you should see it appear below the form.
Adding SMS notifications
Now that we have the base of our app working we can connect it to our Twilio account and let people subscribe to receive notifications.
Configure our app
First let’s add the twilio-ruby gem so our app can talk to Twilio. In your Gemfile add the following line: gem 'twilio-ruby' and then run bundle install in your terminal.
Next, we will have to give our app your Twilio credentials. Log in to your Twilio account and go to the console. At the top left, you will see your Account SID and Auth Token, take note of them for the next step.

In your app, create a file in config/initializers called twilio.rb and paste the following code:
Make sure you replace ACCOUNT_SID and AUTH_TOKEN with the Account SID and Auth token you saved in the last step (if you are planning on uploading the code to GitHub or the like do not commit your token and SID, instead consider using environment variables).
Next, let’s set up a route for Twilio to interact with our app. In your terminal type: rails generate controller twilio sms. This will give our app a route at get ‘/twilio/sms’ along with a corresponding TwilioController with an sms action.
In config/routes.rb let’s change the get ‘/twilio/sms’ route to post ‘/twilio/sms’.
Configure Twilio
Now we need to tell Twilio where to find your app, but in order to do that we need to expose our app to the internet. We will do that using ngrok.
To check if you already have ngrok installed on your computer type ngrok help in your terminal. If a list of commands shows up in the terminal you are good to go, if you got an error ngrok: command not found you will need to download and install ngrok here.
Once you have ngrok installed open up another terminal and type ngrok http 3000. You should see something similar to this in your terminal:
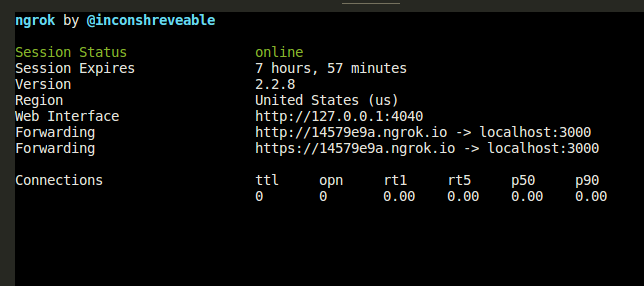
This means that ngrok opened up a window to port 3000 on your localhost and exposed it to the internet at the URL it shows by “Forwarding” (which will be different than the one in the screenshot above).
Now go back to your Twilio Dashboard and click on “Manage Numbers” in the Phone Numbers section, and then click on the phone number you will be connecting to our app.
Under the Messaging section, by “A Message Comes In” choose “Webhook”. In the field next to Webhook put in the URL ngrok gave you followed by /twilio/sms (so it should look like https://ngrokurl.ngrok.io/twilio/sms replacing ngrokurl with the URL in your terminal) and choose “HTTP POST” then hit “Save”.

Now Twilio will forward any incoming messages to the ngrok route we specified, which will in turn forward it to our localhost at port 3000. Let’s configure our app to respond.
TwiML-dee TwiML-dum
The Twilio API communicates using TwiML (which stands for Twilio Markup Language. A markup scheme similar to XML) using verbs like <Message> to send text messages and <Say> to send voice. Thankfully, the Twilio gem we installed will handle creating the TwiML for us using the Twilio::TwiML class. Let’s use it to create our app’s responses.
In app/controllers/twilio_controller.rb let’s put the following code in the TwilioController:
What that does is set a variable response to a TwiML Response object that contains the text “Hello World” in the body. We then render that response object as XML. The result is an XML response that looks like this:

Let’s test it out; type rails server in your console (if you still have your rails server running from earlier shut it down and restart it so our latest changes take effect), then send an SMS to your Twilio number. You should receive a text message in response with the text “Hello World”. Neat no?
(Confession: seeing my phone light up for the first time with a text message I had sent using code was one of those moments that reminded me why I fell in love with coding in the first place!)
It’s all about the cats!
Of course, as cool as that was, we are building a Cat Facts app, not a Hello World app, so let’s change our TwiML object to return content that’s a bit more dynamic.
Let’s change our response object to look as follows:
If you send an SMS to your Twilio number now, you should receive a response with the latest Cat Fact you added to your app.
We now have an app that users can text whenever they want and receive the latest cat facts in response. How cool is that?!
Subscribe!
But our users want more; they don’t want to have to keep texting us in the hope that we added a new fact, they want to be able to subscribe to receive notifications as soon as new cat facts come out!
To do that we will need to add some logic to our app so it can parse incoming text messages and respond accordingly.
We could put all that logic in our sms controller action, but that would make for a pretty fat controller. Instead, we will put it in a helper method.
But before we get there, we need to have a way of storing our subscribers in our database.
In your terminal type: rails generate model subscriber phone_number. That will give us a Subscriber model with a phone_number attribute. Run rails db:migrate in your terminal to add that table to our database.
Now we can build a helper method that will help us parse users’ text messages so that they can subscribe to our app.
Let’s think of what we want our users to be able to do.
Users should be able to:
- Send a message SUBSCRIBE to subscribe to our app
- Send FACT if they want to get the latest cat fact
- Send UNSUBSCRIBE if they want to stop receiving notifications
(who would want to stop getting cat facts? I know! That said, please don’t make a subscription-based app where users can’t unsubscribe easily)
Parsing messages
To do that we will build a method that can analyze the incoming text message, see what it says, and return an appropriate response.
Go to app/helpers/twilio_helper.rb and put the following method in the TwilioHelper Module:
What that does is define a parse_sms method that takes in an SMS as an argument (really just the params hash twilio sent along with the GET request). The method then passes the body of the SMS to a switch statement that checks it. If the body of the SMS says SUBSCRIBE it will subscribe the incoming number, if it says UNSUBSCRIBE it will unsubscribe that number, and if it says FACT it will return the latest cat fact.
In each case, the method returns a helpful message. If the incoming text didn’t match any of those, a helpful message is returned with the available commands.
Now let’s update our sms controller as follows:
What we’re doing is we’re taking the incoming params and passing them to the parse_sms method we defined earlier.
We then take the string we got back from parse_sms and create a TwiML response object and using the response as the body. We then convert the TwiML object to XML and send it back to Twilio.
But does it work?
Let’s test it out. Fire up your rails server again if you shut it down and text SUBSCRIBE to your Twilio number. You should soon receive a response that your number has been subscribed. If you now go to your rails console and run Subscriber.last.phone_number your phone number should come up.
Almost done!
The only thing we have left now is to set our app up to send notifications to our subscribers whenever we add a new cat fact.
Let’s go to app/models/cat_fact.rb and in our CatFact class let’s add the following method:
That method iterates through all of our subscribers and uses the Twilio REST API to send each of them a text message with the given cat fact as the body (don’t forget to replace YOUR_TWILIO_PHONE_NUMBER with your actual Twilio number using the format “+19876543210”).
All we have to do now is tell our CatFact class to call this method every time a new CatFact is created. Add the following near the top of your CatFact class:
Now every time an instance of CatFact is created the notify_subscribers method will be called, and all of our subscribers will be notified.
Putting it all together
We are now ready to test out our app and see if it works as intended.
- Fire up your
rails server(if it isn’t still running) - In your browser navigate to http://localhost:3000/cat_facts
- Fill out the form with a new cat fact and hit Create
- You (along with anyone else who subscribed to your app) should receive a text message with your new fact!
Conclusion
That was really cool, feel free to play around with it and see what other features you can add (for example, in my Alternate Side Parking bot users can call in to get the latest status as well).
The Twilio documentation is very friendly and easy to use, they even have a game called TwilioQuest to help you get started!
If you want to see the code for the app we just built, you can check out the repo on GitHub.
And as a final reminder, if you live in NYC feel free to follow @AlterSideBot or text SUBSCRIBE to 347-404-5618 to get SMS notifications whenever Alternate Side Parking rules are suspended.
Yechiel Kalmenson is a father and husband. When he isn’t busy with his family, he’s a full-stack developer using PHP, Ruby, JavaScript, and others to make the world a better place. See some of the other stuff he’s written on RabbiOnRails.io. Please feel free to contact him through his website: https://yechiel.me/contact or on Twitter @yechielk


Related Resources
Twilio Docs
From APIs to SDKs to sample apps
API reference documentation, SDKs, helper libraries, quickstarts, and tutorials for your language and platform.
Resource Center
The latest ebooks, industry reports, and webinars
Learn from customer engagement experts to improve your own communication.
Ahoy
Twilio's developer community hub
Best practices, code samples, and inspiration to build communications and digital engagement experiences.