Add Filters to Your Twilio Video Conference Application Using FaceAPI, React Hooks, and TypeScript
Time to read: 8 minutes
April 28, 2021
Written by
Reviewed by

Have you ever tried adding a filter to your face on a popular social media app? Maybe you’ve had the fun experience of adding a silly hat, cool glasses, or cat ears to your selfie or video chat.
If you have tried one of these filters, perhaps you have also wondered how this technology works. These apps rely on face detection software to locate your face in the photo or video input and map images over specific parts of the face.
In this tutorial, you will learn how to add filters with face detection to a video conference application written in TypeScript using Twilio Programmable Video, React, React Hooks, and FaceAPI.
Prerequisites
You will need the following to complete this tutorial:
- A Twilio account (if you use this link, you’ll get an additional $10 credit)
- NPM 6
- Node.js 14
- Git
- A terminal emulator application
- Your favorite code editor
Project setup
For this tutorial, you won’t be building all by yourself—a basic video chat repository has been set up for you to work upon, so the first step is to clone this repository from GitHub. To do so, open up a terminal window, navigate to where you want to store the project, and clone the repo as follows:
This repository is composed of two main folders: final and start. Final contains the finished version of the application in case you want to see it in action right away. If you choose to build it step by step, then the start folder contains just the video conference capabilities without any filtering or face detection code.
The overall structure of the application is based on the one described in this other post, but this one is written in TypeScript and uses React Functional Components to give React Hooks the opportunity to shine.
First of all, you need to set up your Twilio credentials. To do so, duplicate the start/.env.example file in the same folder and rename it .env. Then, in your favorite code editor, fill in your own values for TWILIO_ACCOUNT_SID, TWILIO_API_KEY, and TWILIO_API_SECRET.
You can find your Account SID in the Twilio Console, and the API Key and Secret pair can be generated in the API Keys section of the console.
Next, install the required dependencies. Return to the terminal window and run the following commands from the root folder of the project:
If you’re impatient to see what you’re building, then also perform the previous steps on the final folder.
The basics of FaceAPI
A cool feature of this tutorial is that you are not only adding filters, but also implementing face detection. This allows filters to align with the face—something that you may have seen in a number of social media apps.
To make that possible, you’ll be using a face recognition tool called FaceAPI.
FaceAPI works on top of TensorFlow in order to provide AI-powered face detection, description, and recognition for browsers and Node.js.
Install FaceAPI
You can install face-api using npm. To do so, open up a second terminal window and navigate to the root folder of the cloned repository. Then install the dependency like this:
Understand face detection
Now that you have installed FaceAPI, you’re probably eager to get started using it. Before moving on to those steps, take a look at the code below to understand how to use FaceAPI in your project. For this tutorial, you'll only be using the feature that allows your app to detect where faces are in a given input source.
The first thing you need to do to perform face detection is to load the required models using faceapi.nets. You can do that with the following line:
Then you can use the faceapi.detectAllFaces() function to get all the faces in a given input, which can be an image or even an HTML element (such as video).
As a result, you get an object from which you can get properties such as the x and y coordinates or the width of all the face areas:
Using this information in conjunction with the HTML <canvas> element and the window.requestAnimationFrame function, you can draw a custom media element that aligns with the face, just like the popular filters people use on most social media apps.
Load FaceAPI models
Now that you understand the basics of face detection using FaceAPI, you can start setting up the application.
To make things easier, a folder with FaceAPI models has already been added to the public folder inside the start folder, so all you have to do is update the start/src/App.tsx file as follows:
This code allows the models to be loaded when you open the application. Now you can focus on adding the relevant code for manipulating the stream.
Manipulate the stream using HTML canvas
Once you have identified all the faces in an input stream, you can use a <canvas> element to programmatically draw whatever you want on top of them. Since this is an application written in React and it uses Functional Components, you need to figure out a way to manipulate the DOM after it has been rendered.
For this task you can use Hooks—more specifically the useEffect hook, which replaces the ol’ reliable componentDidMount lifecycle method of Class Components.
You also need a way to persist DOM information so that you can programmatically manipulate the canvas element or call window.requestAnimationFrame. Since this is beyond standard React rendering, it makes sense to rely on Hooks here as well. Conveniently, the useRef hook is a perfect match for this.
To get the ball running, open the start/src/Track.tsx file and add some references. Since the Track component is used for both audio and video tracks, you'll want to add HTML elements for both. While you’re at it, also refactor the DOM manipulation a bit, like this:
Now you can add all the FaceAPI and canvas magic. Start by importing the face-api library. Then, add an inner function called drawFilter to the already existing useEffect hook.
After that, set the drawFilter function as a listener for when the video element starts playing.
Since you’re messing around with window.requestAnimationFrame and also adding listeners, you need a way to clean things up and prevent memory leaks.
When using React Functional Components, you can’t use the componentWillUnmount lifecycle method as you would do it with a Class Component.
Here comes Hooks to save the day again. The useEffect hook supports returning a function that can be used as a replacement for the componentWillUnmount method, so you can update the Track component like this:
Let’s see how the application looks right now. Start the application by running npm start, wait for the browser to load, type your name in the input field, and click the Join Room button to enter the video room. After a couple of seconds, you should see something like this:
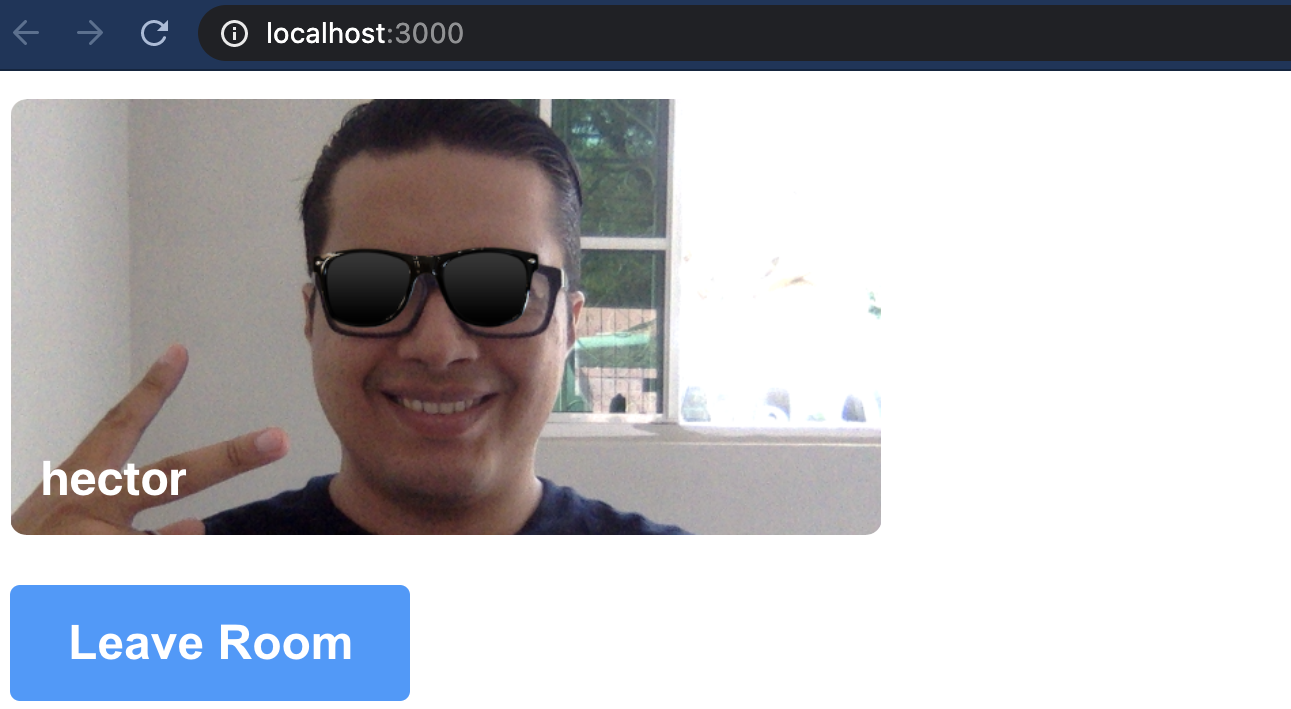
That’s a really fancy effect if you ask me!
Select a filter
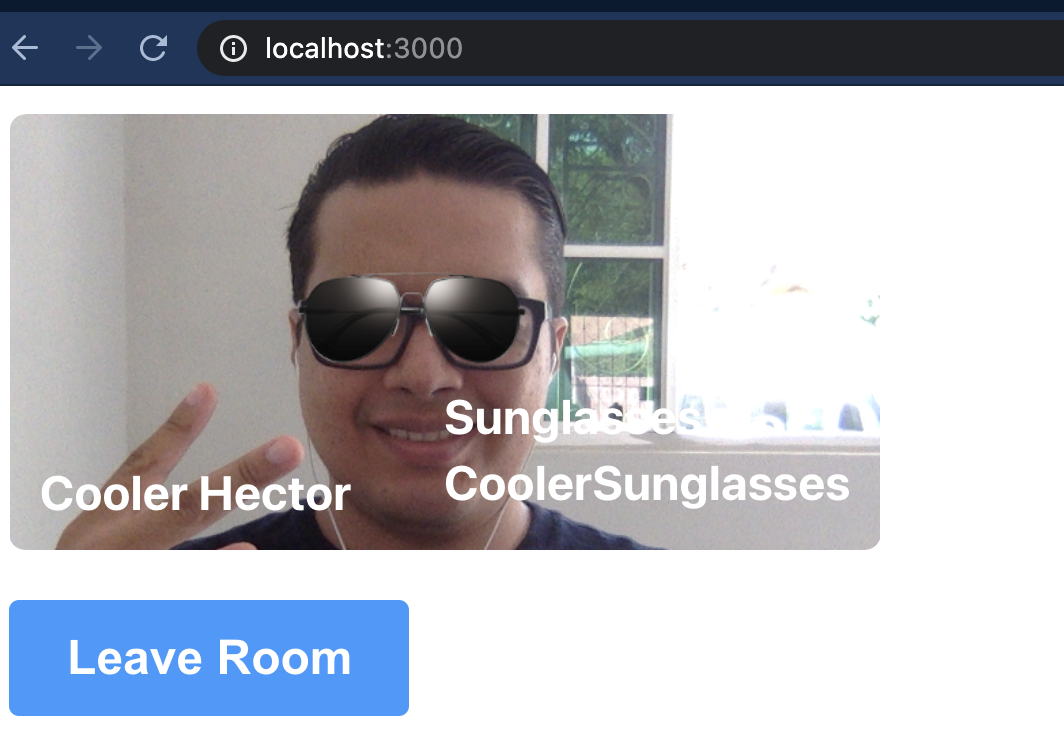
At this point, you’re able to apply a hardcoded filter named Sunglasses to a Twilio video track locally. However, what has made filters popular is the variety of options available and how each user can have a different one. While you won’t be adding that many options as part of this tutorial, you can at least allow users of your application to select between two different filters. To make things simple, the new filter will be the same type of filter as before but will use a different image.
Create a new file under start/src and name it FilterMenu.tsx. Then add the following code to the file:
What you’re doing here is defining two types of filters: Sunglasses and CoolerSunglasses. Then you render these in a list that will trigger a changeFilter handler that is passed as a property to the component.
Next, add the newly created filter to the start/src/Participant.tsx file. You will also set the selected filter in the state of the component so that whenever a user selects a different one, the UI can be re-rendered to reflect the change.
Notice the additional filter property in the Track component. Since you’re now sending an additional parameter, make sure to update Track’s props attribute type like this:
Also, replace the following line in the Track component as follows:
You’re so close to being able to switch between two filters! Only one thing is left to do. By default, useEffect is set to run on every render. In some cases, this may not be desirable. To prevent this, in addition to the anonymous function, you can pass useEffect a second parameter: an empty array. This will make it so that the code inside the useEffect block will only be run once.
You can also use that array to skip running the useEffect hook unless a specific property has changed. In this case, now that you’re changing the filter, you’ll want to also re-run the hook and update the Track component when that change happens.
So make sure you add props.filter value to the empty array as follows:
Return to your browser and take a look at your video app. Try clicking the filter names to switch filters. Now you can look even fancier!
Note that all of this is happening locally, so you will need a way to let the other participants know about what filter a user has selected so it can be applied on each end. To do so, you can use the Twilio DataTrack API, which allows you to send arbitrary data, such as the filter information, to the other participants of the call.
Send filter information
In order to send filter information, the first thing you need to do is to set up the DataTrack channel. You can do this by creating a new LocalDataTrack instance and then publishing it to the room using the publishTrack() method.
Open the start/src/App.tsx file and update it with the following code:
Next, you will need to make sure that every user adds the DataTrack to their list of local tracks. You also need to actually use this DataTrack to send along filter information every time it changes, as well as receive and update the filter information accordingly for every other participant of the video call.
All this magic happens in the start/src/Participant.tsx file, so open and update that file with the following code:
You may notice that there is a new property being sent to the Track component. This is the setFilter mutate function. Now that you’re sending filter information through the DataTrack, you also want to listen for these messages and update accordingly on each end of the video call. So while you’re at it, update the start/src/Track.tsx file with the following code:
And that's it! Now you can run the application and look fancy with the available filters.
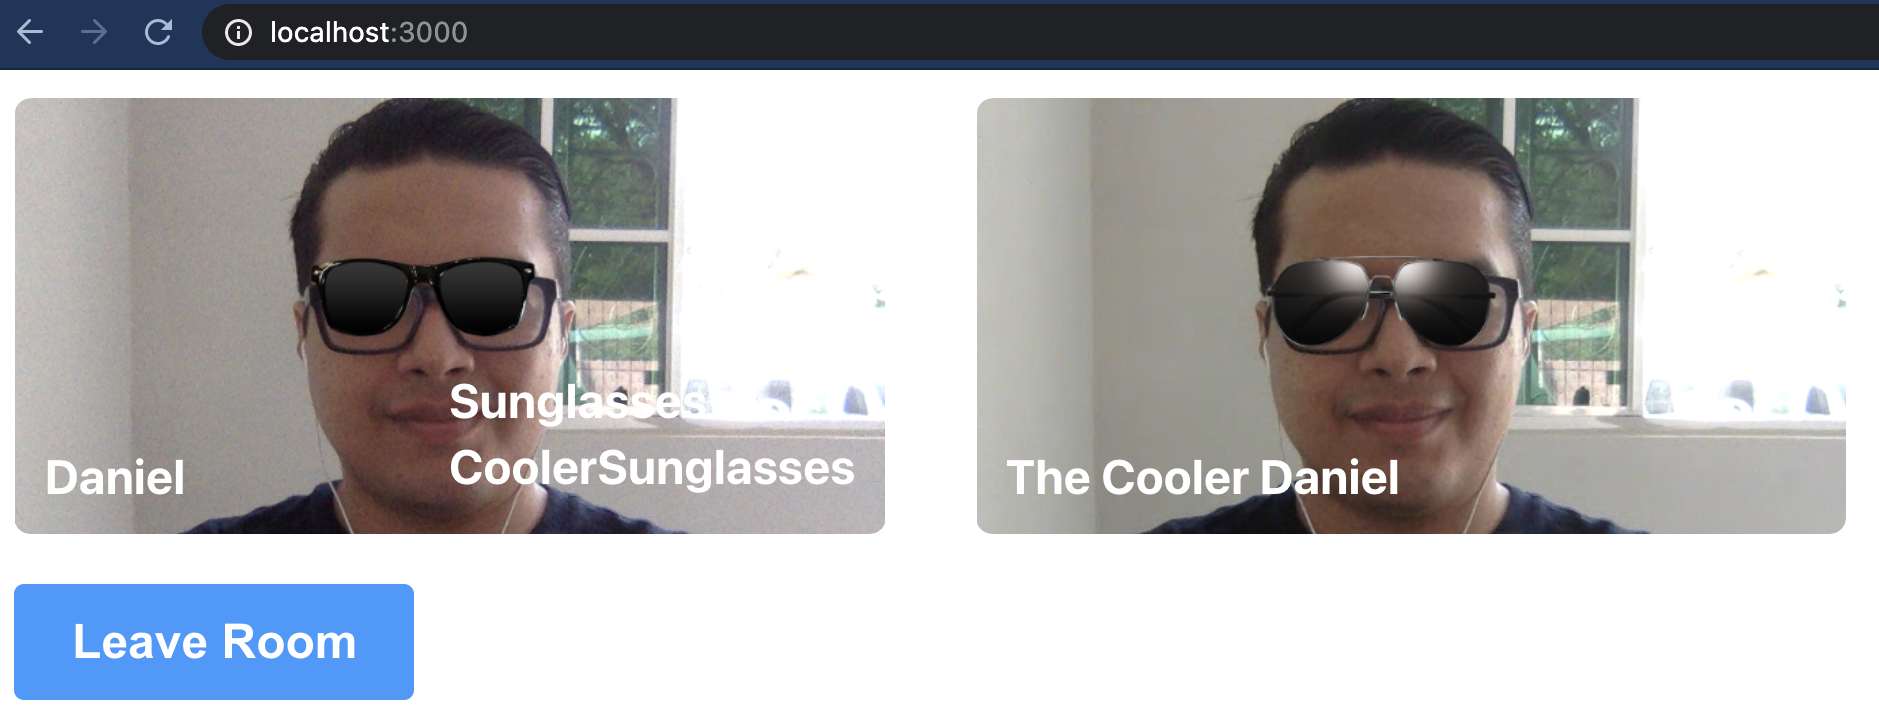
While you may recognize the hidden meme reference, it also happens that Daniel is my middle name!
Conclusion
Thanks to powerful tools such as FaceAPI and TensorFlow, adding face detection capabilities to web applications is simple. When used in conjunction with other cool web building blocks such as HTML Canvas, React, and React Hooks, you are able to build powerful applications with modern features. All this is made possible thanks to the Twilio Programmable Video and DataTrack APIs.
You can find the complete code in the Github repository. Feel free to follow me on Twitter.
Héctor is a computer systems engineer from El Salvador. When he is not at the computer, he is playing music, playing video games, or spending time with his loved ones.


Related Resources
Twilio Docs
From APIs to SDKs to sample apps
API reference documentation, SDKs, helper libraries, quickstarts, and tutorials for your language and platform.
Resource Center
The latest ebooks, industry reports, and webinars
Learn from customer engagement experts to improve your own communication.
Ahoy
Twilio's developer community hub
Best practices, code samples, and inspiration to build communications and digital engagement experiences.