Build an Appointment Bot using Twilio SMS and Google Calendar API with C# and ASP.NET Core

December 08, 2022
Written by
Similoluwa Adegoke
Contributor
Opinions expressed by Twilio contributors are their own
Reviewed by

Build an Appointment Bot using Twilio SMS & Google Calendar API with C# and ASP.NET Core

Let’s say you run a business where people have to make a call to schedule an appointment with you. When the call comes in, you have to check your calendar and make sure the date and time your customer suggests are available. If the date and time is available, you confirm the appointment, otherwise, you circle around to find an alternative date and time that's available.

But what if you could automate this by allowing your customers to make appointments with you using SMS? In this tutorial, you will build an SMS Scheduling System that allows your customers to make an appointment with your business and have this appointment sync with your Google Calendar. You will build this solution using Twilio SMS, Google Calendar API and .NET.

Prerequisites

You will need the following things to follow along

You can find the source code on this GitHub repository.

Solution Overview

The goal of the app is to have a customer send a text message to your Twilio Phone Number, and based on your existing schedule, it can either schedule an appointment for them, which creates an event in your Google Calendar, or tell the person you are not available for that date and time.

The app will contain these components:

  1. The Google Calendar integration, where you will connect your Google Calendar to the app, thereby giving it the authority to create a Google Calendar event for you.
  2. The Twilio SMS integration, where you will write the webhook to extract an appointment from a user’s message with all the details necessary

Create a Project in Google Developer Console.

In this section, you will create a Google Cloud project that configures the OAuth flow to request access to the Google Calendar of the business owner. This access will give you the ability to interact with the user’s calendar through the Google Calendar API.

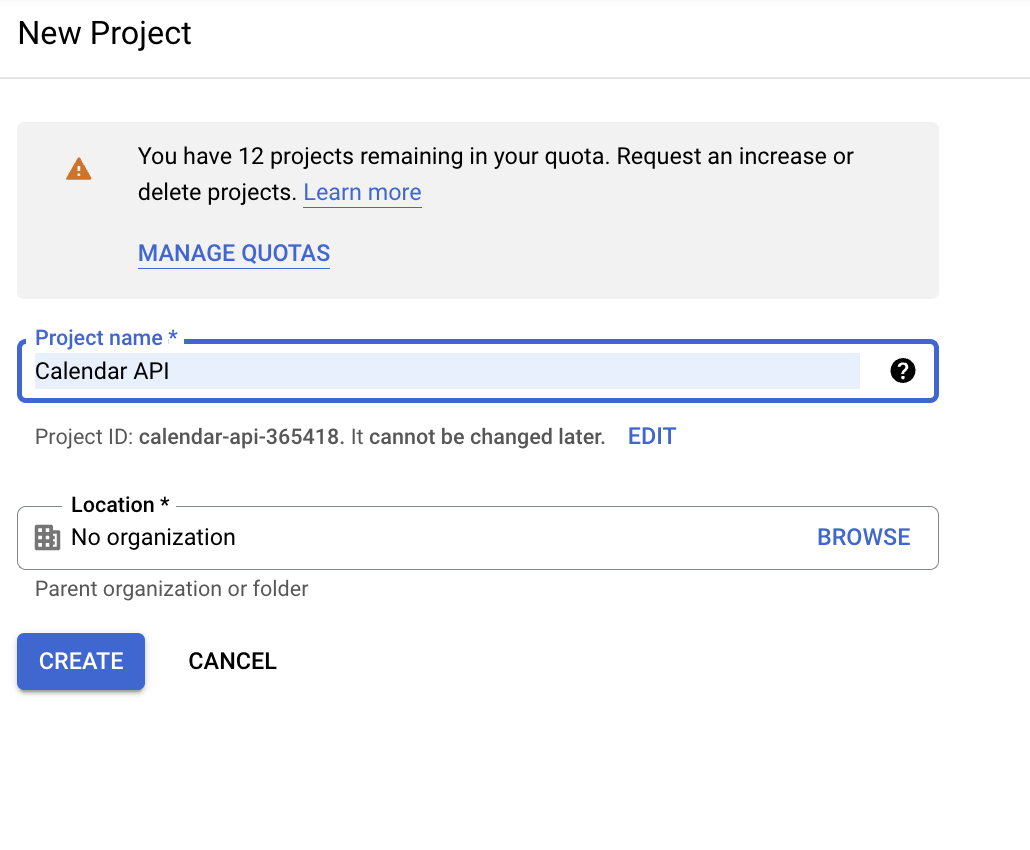
Log on to the Google Cloud Console, and create a new project.

The new project form with a project name field and a location field.

After the project has been created, click on the + ENABLE APIS AND SERVICES button. This redirects you to a search page for finding different Google APIs. Search for "Google Calendar", select the Google Calendar API, and enable it.

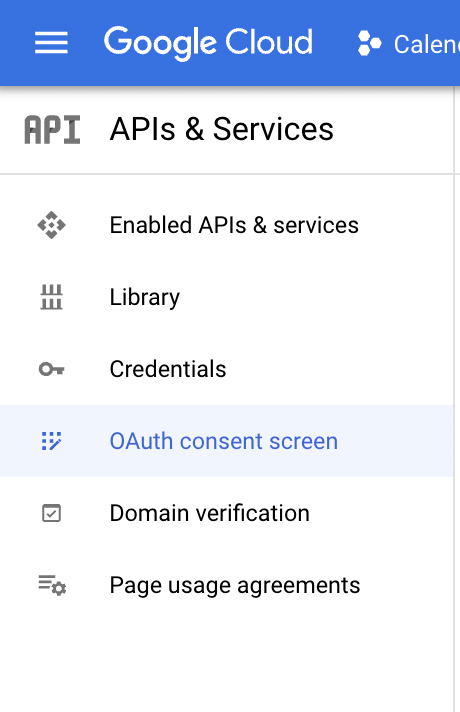
Next, you have to configure the Consent Screen.

The Consent Screen is the screen that shows the user the details of your app, the various access that your app needs, and your app policies. This access may include permission to access their Calendar, YouTube, etc.

On the left navigation panel, select the OAuth consent screen link.

Google Cloud Console navigation showing OAuth consent screen link.

The first page shows an option to select a User Type.  Select the External option and click the Create button to continue.

The next page shows you a form to fill out more details about your application. For the sake of this tutorial, fill out the App name and User support email in the App Information section. Then fill out the developer contact information - at the tail end. Then click the Save and Continue button.

Next, you will add the different scopes (permissions) that you need for your app. Click on the Add or Remove Scopes button. Add …/auth/userinfo.email, .../auth/userinfo.profile, and openid scopes.  

Table listing different scopes. Three scopes are selected: ".../auth/userinfo.email", ".../auth/userinfo.profile", and "openid".

Then, filter by Google Calendar API and select the .../auth/calendar scope.

Scope table filtered by Google Calendar API and the ".../auth/calendar" scope is selected.
 

Click the Update Button to add your selection. Then, click on the Save and Continue button.

Next, add your own Google Account email address. This will be the account and associate Google Calendar that you'll give access to the application. 

Only Google accounts that are added as test users can give their consent to your app while in "Testing" status. Once you go live, anyone with a valid Google account can give their consent.

Finally, click on the Save and Continue button to complete the registration.

Then, create the credentials for your app. Use the left panel to navigate to the Credentials section and Create OAuth Client ID using the Create Credentials button at the top bar.

Select Web Application when asked about the Application type,  then proceed to enter the application name, add http://localhost:8080 to the Authorized redirect URIs  the URIs

The Authorized redirect URIs are where you want the response of the OAuth flow to be sent - in this application it should go to the homepage.  

Once you click the Create button, you are shown the Client ID and Client Secret. Take note of the Client ID and Client Secret, as you'll need them later.

Build the User Configuration Razor Page

In this section, you will build the User Configuration Page which will allow you to do two things:

  1. Connect your Google account to the app, thereby giving you the access token needed to modify your Google Calendar
  2. Configure the days and time slots you will be taking appointments.

To begin, create an ASP.NET Core Razor Pages project with the following command, and open it in your code editor.  

dotnet new webapp -o TwilioSmsScheduler 

Setup Google Credentials.

Set up the Google credentials you took note of earlier. Firstly,  add the client secret  using the Secrets Manager:

dotnet user-secrets init 
dotnet user-secrets set "GoogleApi:Secret" "[CLIENT_SECRET]" 

Replace [CLIENT_SECRET] with the Client Secret you took note of earlier.

Then add the other properties like the client ID, redirect URL, and scopes in the appsettings.json to look like the one shown below:


{
  …,
  "GoogleApi": {
    "AuthBaseUrl": "https://accounts.google.com/o/oauth2/v2/auth",
    "RequestTokenUrl": "https://oauth2.googleapis.com/token",
    "ClientID": "[GOOGLE_API_CLIENT_ID]",
    "RedirectUrl": "http://localhost:8080",
    "Scope": "https:/www.googleapis.com/auth/calendar email openid", 
    "CalendarUrl": "https://www.googleapis.com/calendar/v3/calendars/primary/events"
  }

Replace [GOOGLE_API_CLIENT_ID] with the Client ID you took note of earlier.

Storing the User Configurations

When the user grants access to their Google Calendar, you'll need to retrieve an access token, refresh token, and expiry time. These values need to be persisted somewhere so they can be used when a text message comes in. Additionally, the open hours and days also need to be stored somewhere. For the sake of the demo, this information will be stored in memory, using the singleton pattern. In production, you would store this in some data store and expand the application to support more than one business user and phone number.

Create the UserConfiguration class and update the code like below:

namespace TwilioSmsScheduler;

public class UserConfiguration
{
    public static UserConfiguration Instance { get; } = new();

    public string OpeningTime { get; set; }
    public string ClosingTime { get; set; }
    public string CheckedDays { get; set; }
    public string AccessToken { get; set; }
    public string RefreshToken { get; set; }
    public DateTime ExpiryDateTime { get; set; }
}

Now, you will update the Index Page and create the UI for managing the user configuration.

User Configuration UI

Update the Index.cshtml with the following code:


@page
@model IndexModel
@{
    ViewData["Title"] = "Home page";
}
<div>
    <h1>User Configuration</h1>
    <h2>Step - 1</h2>
    @if (Model.IsConnected)
    {
        <div class="alert alert-secondary">
            <p>
                You have connected your app to your google account. <br>
                Click on the button below if you want to connect another google account.
            </p>
        </div>
    }
    <p>By clicking on the button below you are connecting your google account to this app:</p>
    <a class="btn btn-danger" href="@Model.RedirectLink">
        Connect your Google account
    </a>
</div>
<div>
    <h2>Step - 2</h2>
    @if (Model.IsWorkHourSet)
    {
        <div class="alert alert-secondary">
            <p>
                You have set the work hours and days. <br>
                You can modify the work hours and days by filling the form below.
            </p>
        </div>
    }
    <p>Specify your work hours</p>
    <form class="row g-3" method="post">
        <div class="col-md-4">
            <label for="opening-time" class="form-label">Opening Time</label>
            <input type="time" class="form-control" name="OpeningTime" id="opening-time" required>
        </div>
        <div class="col-md-4">
            <label for="closing-time" class="form-label">Closing Time</label>
            <input type="time" class="form-control" name="ClosingTime" id="closing-time" required>
        </div>
        <div class="col-md-8">
            <label>Available Days:</label><br>
            @foreach (var day in Model.AllDays)
            {
                <div class="form-check form-check-inline">
                    <input class="form-check-input" type="checkbox" name="CheckedDays" id="checked-day-@day" value="@day">
                    <label class="form-check-label" for="checked-day-@day">@day</label>
                </div>
            }
        </div>
        <button class="btn btn-danger col-md-8" type="submit">
            Confirm
        </button>
    </form>
</div>

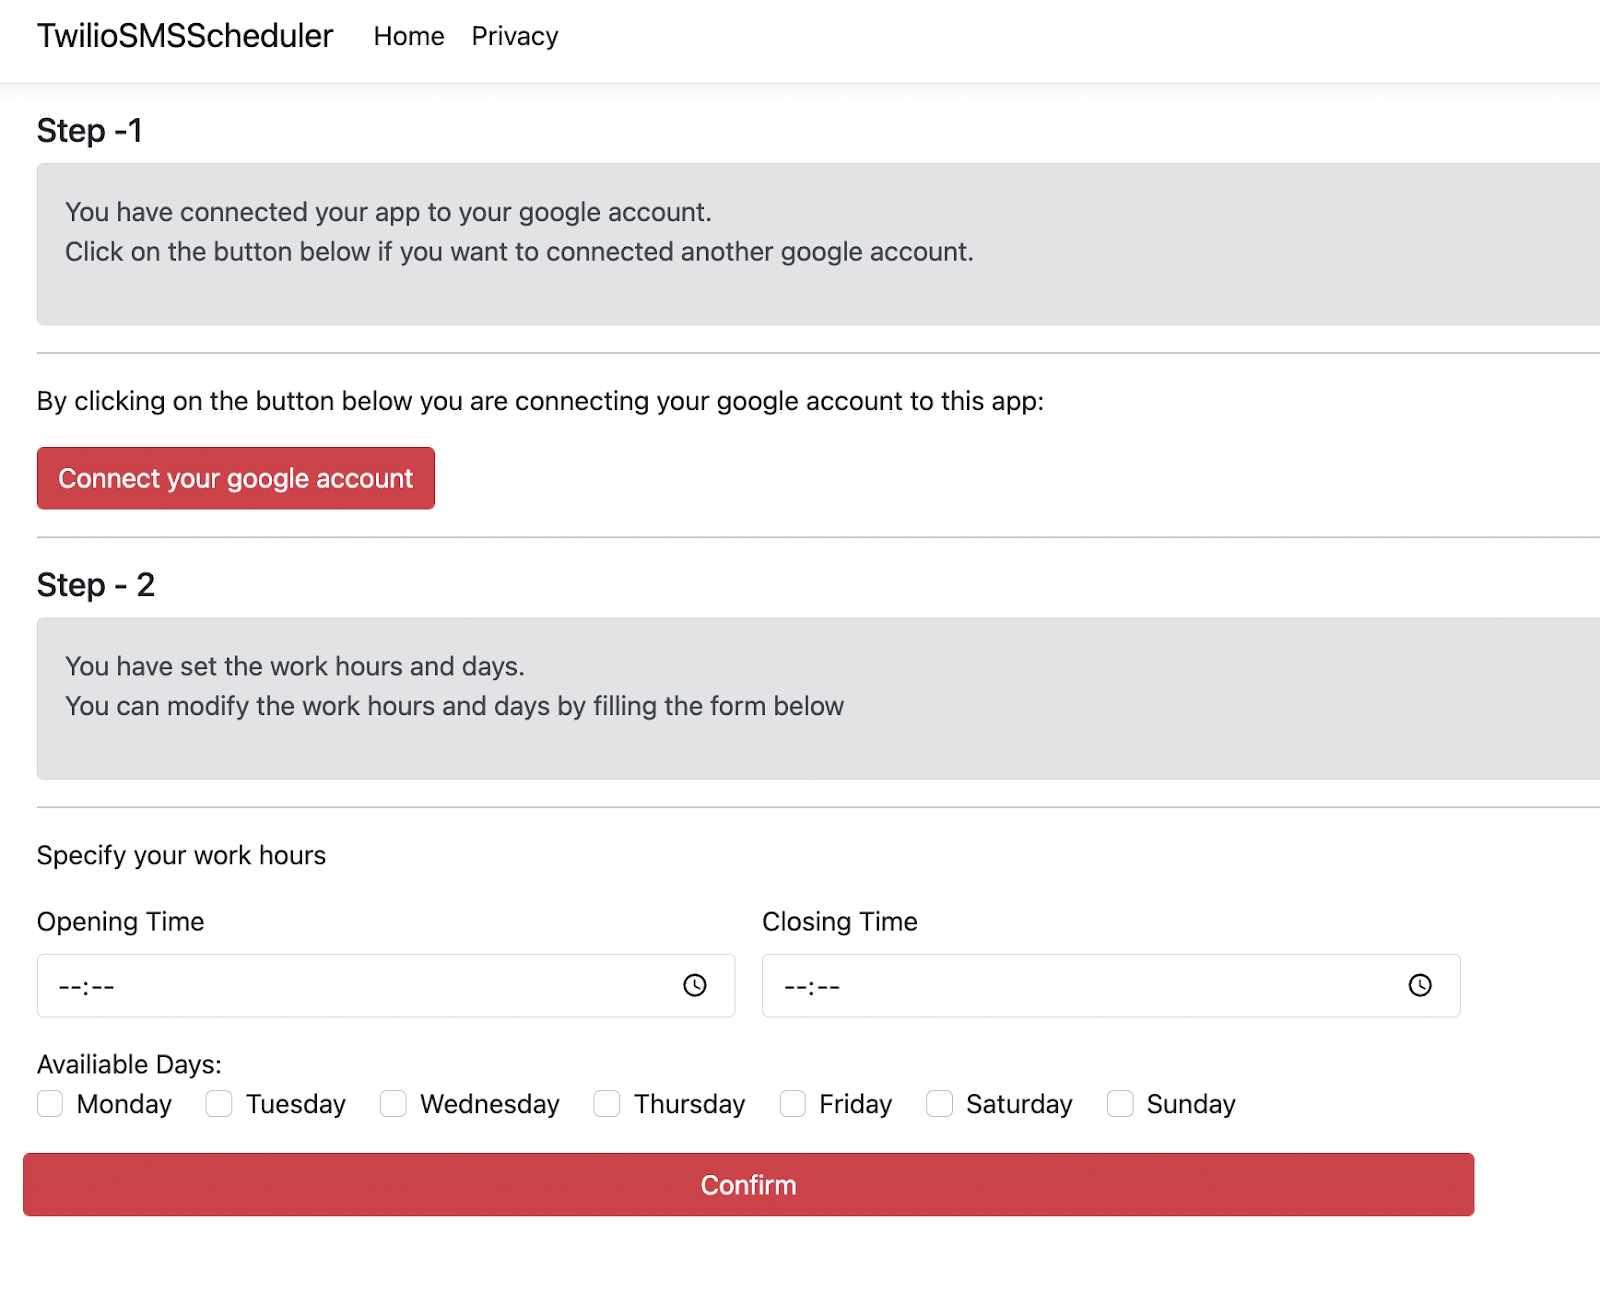
The Index.cshtml file creates a button that redirects to the consent screen for you to log into your Google account. The redirect link, @Model.RedirectLink, is generated from the code behind using the Google credentials.

Also on the Index page is the form to set the opening time and closing time and check the available days. The form is also posted and saved into the configuration singleton.

Here is the code that generates the redirect link and handles the form:

using Microsoft.AspNetCore.Mvc;
using Microsoft.AspNetCore.Mvc.RazorPages;
using Newtonsoft.Json;

namespace TwilioSmsScheduler.Pages;

public class IndexModel : PageModel
{
    private readonly ILogger<IndexModel> logger;
    private readonly IConfiguration configuration;
    private readonly HttpClient httpClient;
    private readonly string clientId, redirectUrl, scope, authBaseUrl, clientSecret, requestTokenBaseUrl;
    private readonly UserConfiguration userConfig;

    public IndexModel(ILogger<IndexModel> logger, IConfiguration configuration, HttpClient httpClient)
    {
        this.logger = logger;
        this.configuration = configuration;
        this.httpClient = httpClient;

        authBaseUrl = this.configuration["GoogleApi:AuthBaseUrl"];
        clientId = this.configuration["GoogleApi:ClientID"];
        redirectUrl = this.configuration["GoogleApi:RedirectUrl"];
        scope = this.configuration["GoogleApi:Scope"];
        clientSecret = this.configuration["GoogleApi:Secret"];
        requestTokenBaseUrl = this.configuration["GoogleApi:RequestTokenUrl"];
        userConfig = UserConfiguration.Instance;
        IsConnected = !string.IsNullOrEmpty(userConfig.RefreshToken);
        IsWorkHourSet = !string.IsNullOrEmpty(userConfig.OpeningTime);
    }

    [BindProperty] public List<string> CheckedDays { get; set; }

    public string[] AllDays { get; } =
    {
        "Monday", "Tuesday", "Wednesday", "Thursday", "Friday", "Saturday", "Sunday"
    };

    public bool IsConnected { get; set; }
    public bool IsWorkHourSet { get; set; }
    public string RedirectLink { get; set; }

    public async Task OnGet(string code)
    {
        RedirectLink = authBaseUrl +
                       $"?client_id={clientId}&" +
                       $"redirect_uri={redirectUrl}" +
                       "&response_type=code" +
                       $"&scope={scope}" +
                       "&access_type=offline";

        if (code == null) return;       
    }

    public async Task OnPost()
    {
        var form = await Request.ReadFormAsync();
        userConfig.OpeningTime = form["OpeningTime"];
        userConfig.ClosingTime = form["ClosingTime"];
        userConfig.CheckedDays = string.Join(",", form["CheckedDays"]);

        IsWorkHourSet = true;
    }
}

The redirect link to the consent screen is generated on the OnGet method based on the Google identity docs by passing the different parameters that are required and specified in the documentation. The OnGet method also accepts a string parameter, but it is not currently in use as it comes into play when you want to receive a response from the Google API.

Recall, during the Google credentials setup, a redirect URI was provided. This redirect URI provided for the sake of this tutorial was the same as the base URL (http://localhost:8080), hence the page that will receive the response from Google must be the index/home page.  

The OnPost method is hit when you submit the form and retrieves the different fields from the form uses userConfig to persist the necessary information.

Finally, add the code to OnGet to receive the Google OAuth response and makes a request for the tokens you will need to access the Google Calendar API.


        if (code == null) return;
        
        var requestTokenUrl = requestTokenBaseUrl +
                              $"?client_id={clientId}" +
                              $"&client_secret={clientSecret}" +
                              $"&code={code}" +
                              "&grant_type=authorization_code" +
                              $"&redirect_uri={redirectUrl}";

        var response = await httpClient.PostAsync(requestTokenUrl, null);

        if (!response.IsSuccessStatusCode)
        {
            return;
        }

        var content = await response.Content.ReadAsStringAsync();
        dynamic jsonObj = JsonConvert.DeserializeObject(content);

        userConfig.AccessToken = jsonObj["access_token"];
        userConfig.RefreshToken = jsonObj["refresh_token"];
        userConfig.ExpiryDateTime = DateTime.Now.AddSeconds(int.Parse((string) jsonObj["expires_in"]));

        IsConnected = true;

When Google sends a response to your app, the string parameter, code, is no longer null, and it is used to make a request to the Google API using the  requestTokenUrl which returns with a token object that contains the access token, refresh token, expiry date.

After the JSON properties are extracted from the response, the individual properties are accessed using the JSON accessor pattern. The expiring date is expressed in a C# DateTime object by adding seconds to the current DateTime.

To ensure the app runs on port 8080, edit the launch setting, Properties/launchSettings.json, and update the applicationUrl property with the port number:

   "applicationUrl": "http://localhost:8080", 

Run the app to test. Remember to log in with the test Google account that you added when setting up the project in Google console.

Next, you will write the SMS Webhook.

Build the SMS Webhook

The SMS webhook is a web API controller that will (i) receive the customer SMS, (ii) extract an appointment from it and (iii) proceed to add it to the user’s calendar. The details of the appointment would include time, date and a short description.

Here is an example of a message you might be receiving from your customer,  "Hello, I would like to make an appointment for a full body massage on the 3rd of November at 10 am". This message then uses an algorithm to extract the necessary details that are needed to create the appointment and also the same format needed to create an event on a Google Calendar.  Here is the resulting structure below.

{
    "summary":"A Full Body Massage",
    "description": "an appointment for a full body massage on the 3rd of November at 10 am",
    "colorId":"3",
    "start": {
        "dateTime": "2022-11-03T10:00:00+01:00"
    },
    "end": {
        "dateTime": "2022-11-03T11:00:00+01:00"
    }
}

The time is specified in a 24 hour format with the time zone appended to the end of the time e.g. +01:00 indicates a timezone of UTC+1

To begin, install the following Twilio package to build the Twilio messaging response.

dotnet add package Twilio.AspNet.Core

Next, update the Program.cs to add access for mapping API controllers with the following line of code.


app.MapRazorPages();
app.MapControllers();

Extract Appointment from SMS

To begin the extraction, create an AppointmentDetails class in a file to describe the structure of the appointment details and Google Calendar event.

using Newtonsoft.Json;

namespace TwilioSmsScheduler;

public class AppointmentDetails
{
    [JsonProperty(PropertyName = "summary")]
    public string Summary { get; set; }
    
    [JsonProperty(PropertyName = "description")]
    public string Description { get; set; }
    
    [JsonProperty(PropertyName = "colorId")]
    public int ColorId { get; set; }
    
    [JsonProperty(PropertyName = "start")]
    public CalendarDateTime Start { get; set; }
    
    [JsonProperty(PropertyName = "end")]
    public CalendarDateTime End { get; set; }
}

public class CalendarDateTime
{
    [JsonProperty(PropertyName = "dateTime")]
    public DateTime DateTime { get; set; }
    
    [JsonProperty(PropertyName = "timeZone")]
    public string TimeZone { get; set; }
}

These classes will also be used to submit the data to the Google Calendar API in the expected format, hence the usage of the [JsonProperty] to configure the correct property names.

Then create an AppointmentDetailsExtractor class and update it with the code below:

using System.Globalization;
using System.Text.RegularExpressions;

namespace TwilioSmsScheduler;

public static class AppointmentDetailsExtractor
{
    public static AppointmentDetails Extract(string smsBody, string timeZone, string senderPhoneNo)
    {
        const string appointmentTemplate = "make an appointment for";
        const string timeTemplate = "on the";
        string[] positionQualifier = {"rd", "st", "nd", "th"};
        var monthNames = DateTimeFormatInfo.CurrentInfo.MonthNames;

        var appointmentSummary = Regex.Match(smsBody, @$"{appointmentTemplate}(.+?){timeTemplate}").Groups[1].Value;
        var appointmentDate = Regex.Match(smsBody, @"on the (.+?) at").Groups[1].Value;
        var appointmentTime = smsBody.Substring(smsBody.LastIndexOf("at")).Replace("at", "").ToUpper();

        smsBody = smsBody.Replace("I would", senderPhoneNo);
        var appointmentDateArray = appointmentDate.Split(" ");

        var appointmentDay = appointmentDateArray[0];
        for (var i = 0; i < positionQualifier.Length; i++)
        {
            appointmentDay = appointmentDay.Replace(positionQualifier[i], "");
        }

        var monthNumber = 0;
        for (var i = 0; i < monthNames.Length; i++)
        {
            if (monthNames[i].ToUpper().Contains(appointmentDateArray[2].ToUpper()))
            {
                monthNumber = i + 1;
            }
        }

        appointmentTime = appointmentTime.Replace("AM", "-AM").Replace(" ", "");
        appointmentTime = appointmentTime.Replace("PM", "-PM").Replace(" ", "");
        appointmentTime = appointmentTime.Replace("NOON", "-PM");

        var resultAppointmentTime = $"{DateTime.Now.Year}" +
                                    $"-{monthNumber.ToString().PadLeft(2, '0')}" +
                                    $"-{appointmentDay.PadLeft(2, '0')}" +
                                    $" {appointmentTime.PadLeft(5, '0')}";

        var date = DateTime.ParseExact(
            resultAppointmentTime, 
            "yyyy-MM-dd hh-tt",
            CultureInfo.InvariantCulture
        );

        return new AppointmentDetails
        {
            Summary = appointmentSummary,
            Description = smsBody,
            ColorId = 3,
            Start = new CalendarDateTime
            {
                DateTime = date,
                TimeZone = timeZone
            },
            End = new CalendarDateTime
            {
                DateTime = date.AddHours(1),
                TimeZone = timeZone
            }
        };
    }
} 

The AppointmentDetailsExtractor.Extract method is the implementation of the extractor algorithm that takes in the smsBody, timezone, and the senderPhoneNo. Through a series of manipulation that involves regular expressions, string manipulations, and data conversions, the summary, day, month, year and time component are extracted from the message. The method then returns an object of type AppointmentDetails.

The appointment details extractor algorithm that is used in this tutorial expects the message to be formatted in a specific way, which is not flexible enough to handle all possible input from users. For production purposes, an algorithm based on Natural Language Processing would be a better fit.

SMS Webhook API Controller

Then create the webhook API controller, Api/WebhookController.cs, and add the following code:

using System.Globalization;
using System.Net.Http.Headers;
using System.Xml;
using Microsoft.AspNetCore.Mvc;
using Newtonsoft.Json;
using Twilio.AspNet.Core;
using Twilio.TwiML;

namespace TwilioSmsScheduler.Api;

[ApiController]
[Route("api/[controller]")]
public class WebhookController : ControllerBase
{
    private readonly ILogger<WebhookController> logger;
    private readonly HttpClient httpClient;
    private readonly string clientId, clientSecret, requestTokenBaseUrl, calendarUrl;

    public WebhookController(IConfiguration configuration, ILogger<WebhookController> logger, HttpClient httpClient)
    {
        this.logger = logger;
        this.httpClient = httpClient;
        clientId = configuration["GoogleApi:ClientID"];
        clientSecret = configuration["GoogleApi:Secret"];
        requestTokenBaseUrl = configuration["GoogleApi:RequestTokenUrl"];
        calendarUrl = configuration["GoogleApi:CalendarUrl"];
    }

    [HttpPost]
    public async Task<IActionResult> IncomingMessage()
    {
        string messageBody = Request.Form["Body"];
        string messageFrom = Request.Form["From"];

        var userConfig = UserConfiguration.Instance;
        
        // Extract appointment
        var utcOffset = TimeZoneInfo.Local.BaseUtcOffset;
        var timeZone = "UTC" + (utcOffset > TimeSpan.Zero ? "+" : "-") + utcOffset.ToString(@"h\:mm");
       
        var appointmentDetails = AppointmentDetailsExtractor.Extract(messageBody, timeZone, messageFrom);

        // Check days and time 
        var dateTimeOpen = DateTime.ParseExact(userConfig.OpeningTime, "HH:mm", CultureInfo.InvariantCulture);
        var dateTimeClose = DateTime.ParseExact(userConfig.ClosingTime, "HH:mm", CultureInfo.InvariantCulture);

        var dayOfWeek = appointmentDetails.Start.DateTime.DayOfWeek.ToString();

        if (!userConfig.CheckedDays.Split(",").Contains(dayOfWeek))
        {
            var response = new MessagingResponse();
            response.Message($"Business does not take appointment on {dayOfWeek}");
            return new TwiMLResult(response);
        }

        if (!(appointmentDetails.Start.DateTime.TimeOfDay >= dateTimeOpen.TimeOfDay &&
              appointmentDetails.End.DateTime.TimeOfDay <= dateTimeClose.TimeOfDay))
        {
            return new MessagingResponse()
                .Message($"Business only takes appointment between {dateTimeOpen.TimeOfDay} and {dateTimeClose.TimeOfDay}")
                .ToTwiMLResult();
        }

        var accessToken = await GetAccessToken(userConfig);

        // Insert event into the Google Calendar
        var requestBody = new StringContent(JsonConvert.SerializeObject(appointmentDetails));
        httpClient.DefaultRequestHeaders.Authorization = new AuthenticationHeaderValue("Bearer", accessToken);
        var createCalendarResponse = await httpClient.PostAsync(calendarUrl, requestBody);
        var createCalendarBody = await createCalendarResponse.Content.ReadAsStringAsync();

        if (!createCalendarResponse.IsSuccessStatusCode)
        {
            logger.LogError("Failed to create calendar event: {CreateCalendarBody}", createCalendarBody);
            return new MessagingResponse()
                .Message("An error occurred while trying to create an appointment for you. Kindly try again later.")
                .ToTwiMLResult();
        }

        return new MessagingResponse()
            .Message($"An appointment has been created for you. We expect to see you soon on {appointmentDetails.Start.DateTime}")
            .ToTwiMLResult();
    }

private async Task<string> GetAccessToken(UserConfiguration userConfig)
    {
        // Use existing token if not expired
        if (DateTime.Now <= userConfig.ExpiryDateTime)
        {
            return userConfig.AccessToken;
        }

        // Get new token if expired
        var refreshTokenUrl = $"{requestTokenBaseUrl}" +
                              $"?client_id={clientId}" +
                              $"&client_secret={clientSecret}" +
                              "&grant_type=refresh_token" +
                              $"&refresh_token={userConfig.RefreshToken}";

        var response = await httpClient.PostAsync(refreshTokenUrl, null);

        if (!response.IsSuccessStatusCode)
        {
            logger.LogError("Refreshing token failed: {RefreshTokenResponseBody}",
                await response.Content.ReadAsStringAsync());
            throw new Exception("Refreshing token failed");
        }

        var content = await response.Content.ReadAsStringAsync();
        dynamic jsonObj = JsonConvert.DeserializeObject(content);

        var expirySeconds = int.Parse(jsonObj["expires_in"]);
        userConfig.ExpiryDateTime = DateTime.Now.AddSeconds(expirySeconds);

        userConfig.AccessToken = jsonObj["access_token"];
        return userConfig.AccessToken;
    }
}

The WebhookController injects a number of objects and serves a single HTTP POST method, IncomingMessage,  that receives the SMS and retrieves the content using the Request object. Then the UserConfiguraton instance is retrieved to get the necessary details, which is used in the GetAccessToken method to get the access token from the Google API.

Thereafter, the AppointmentDetailsExtractor.Extract method extracts the details of the schedule from the message and checks if the appointment date and time falls within days and time that you have previously selected. If the appointment is within your settings, a request is sent to the Google Calendar API to create an event and a message is sent back to the user.

Prevent Appointment conflicts

To prevent appointment conflicts, you need to get all events that are on the day of the request appointment date. The request to get the events for that day in your calendar returns a JSON response which is deserialized to objects of classes you will create next.

The Google Calendar API responds with the following documented format. Since you only need some of the data from the response, only the necessary properties are defined in the upcoming classes.

Create the CalendarResponse class and add the following code to it:

using Newtonsoft.Json;

namespace TwilioSmsScheduler;

public class Start
{
    [JsonProperty(PropertyName = "dateTime")]
    public DateTime DateTime { get; set; }
    
    [JsonProperty(PropertyName = "timeZone")]
    public string TimeZone { get; set; }
}

public class End
{
    [JsonProperty(PropertyName = "dateTime")]
    public DateTime DateTime { get; set; }
    
    [JsonProperty(PropertyName = "timeZone")]
    public string TimeZone { get; set; }
}

public class Item
{
    [JsonProperty(PropertyName = "start")]
    public Start Start { get; set; }
    
    [JsonProperty(PropertyName = "end")]
    public End End { get; set; }
}

public class CalendarResponse
{
    [JsonProperty(PropertyName = "items")]
    public List<Item> Items { get; set; }
}

Then update the IncomingMessage method in the WebhookController file to make a call to the Google Calendar API to check if there is already an existing event on the appointment date. If there is one, a corresponding message is sent back to the user.


        var requestBody = new StringContent(JsonConvert.SerializeObject(appointmentDetails));
        httpClient.DefaultRequestHeaders.Authorization =
            new AuthenticationHeaderValue("Bearer", accessToken);

        // Check if no event exist in that date and time
        var appointmentDate = appointmentDetails.Start.DateTime.Date;
        var eventsForDayUrl = calendarUrl +
                              $"?timeMin={XmlConvert.ToString(appointmentDate, XmlDateTimeSerializationMode.Utc)}" +
                              $"&timeMax={XmlConvert.ToString(appointmentDate.AddDays(1).AddTicks(-1), XmlDateTimeSerializationMode.Utc)}";
        var eventsResponse = await httpClient.GetAsync(eventsForDayUrl);
        var eventsBody = await eventsResponse.Content.ReadAsStringAsync();
        if (!eventsResponse.IsSuccessStatusCode)
        {
            logger.LogError("Failed to get all events: {EventsResponseBody}", eventsBody);
            return new MessagingResponse()
                .Message("An Error occurred while trying to create an appointment for you. Kindly try again later.")
                .ToTwiMLResult();
        }

        var deserializedEvents = JsonConvert.DeserializeObject<CalendarResponse>(eventsBody);
        if (deserializedEvents.Items
            .Where(m => m.Start != null && m.End != null)
            // Check for exact matches or overlapping matches
            .Any(m => m.Start.DateTime < appointmentDetails.End.DateTime
                       && m.End.DateTime > appointmentDetails.Start.DateTime))
        {
            return new MessagingResponse()
                .Message("There is already an appointment for this time slot. Kindly select another time.")
                .ToTwiMLResult();
        }

        var createCalendarResponse = await httpClient.PostAsync(calendarUrl, requestBody);

Configure the SMS Webhook

To begin testing, start the app with the dotnet run command and then run the following ngrok command:

ngrok http 8080 

ngrok generates a Forwarding URL that exposes the http://localhost:8080 over the internet. The generated URL is what you will use in the Twilio Console. The full URL of the webhook will look like https://7626-41-184-42-209.eu.ngrok.io/api/Webhook.

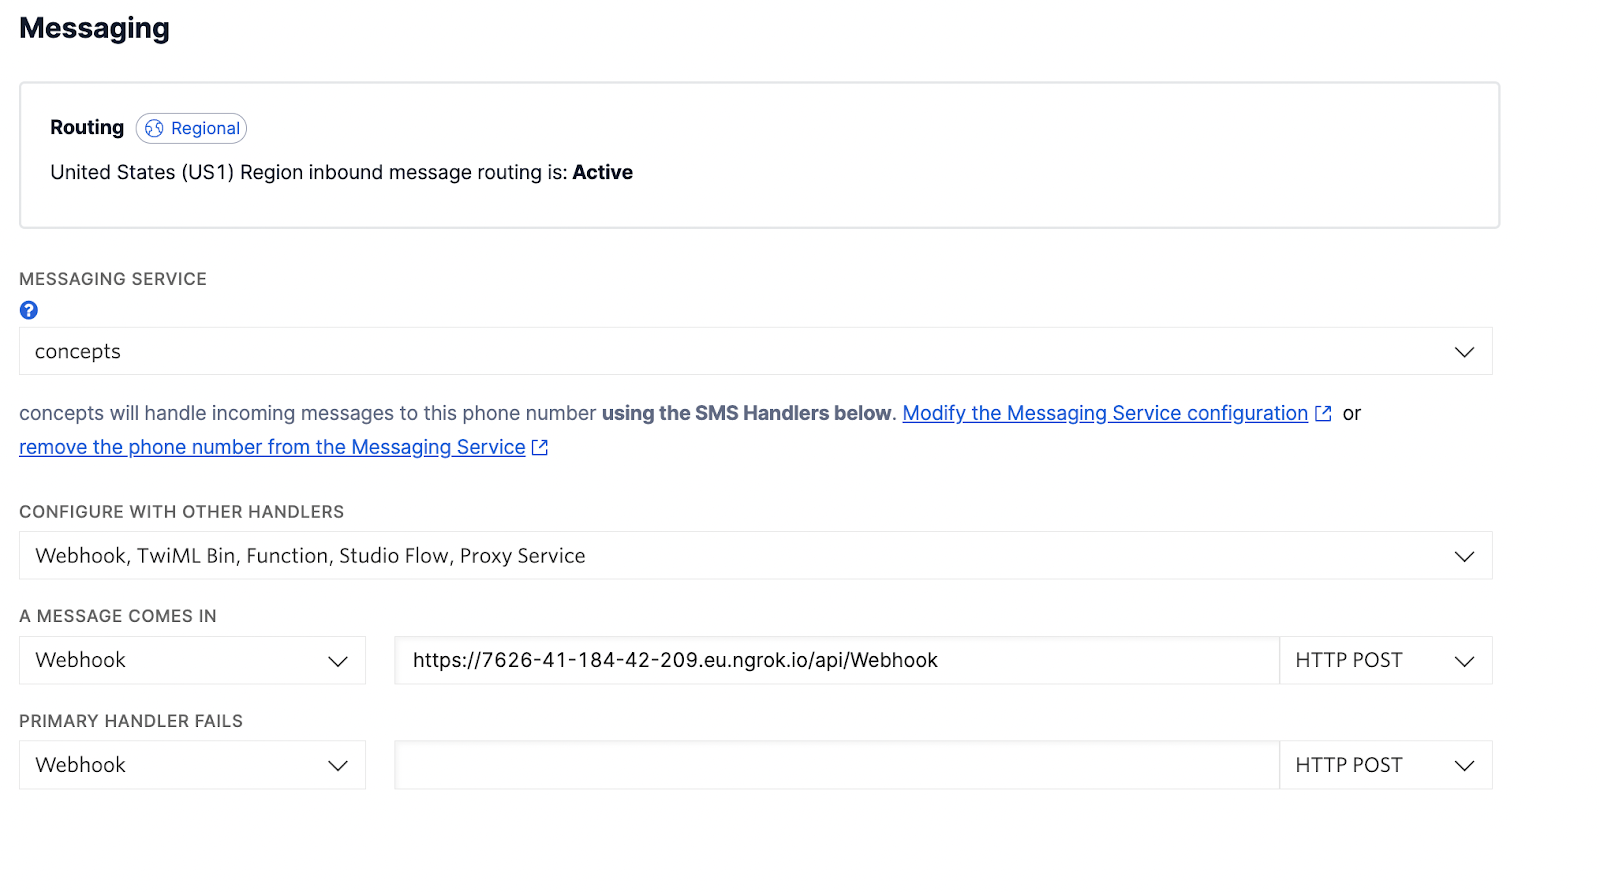
Log on to the Twilio Console. Click on Explore Products option on the left panel and search for the Phone Number feature under the Super Network section. Click on the Phone Number option. This opens up a list of Active Numbers. Click on the Twilio Phone Number that you wish to use. Once the new page opens, navigate to the messaging section, and update the Webhook for the A MESSAGE COMES IN section with the ngrok URL.

The Messaging section of the Twilio Phone Number configuration form.  You can see under "A MESSAGE COMES IN", a dropdown is set to "Webhook", followed by a text field with the ngrok forwarding URL and path to the webhook, followed by a dropdown set to "HTTP POST".

Next, navigate to your app running locally on port 8080 to set up your account.

Twilio Scheduling App running on localhost port 8080

Then, send a text message: "Hello, I would like to make an appointment for a full body massage on the 10th of November at 2 pm" to your Twilio number.

An SMS conversation where correspondent 1 says "Hello, I would like to make an appointment for a full body massage on the 10th of November at 2 pm", and correspondent 2 responds with "An appointment has been created for you. We expect to see you soon on 10/11/2022 14:00:00"
An SMS conversation where correspondent 1 says "Hello, I would like to make an appointment for a full body massage on the 3rd of November at 10 am", and correspondent 2 responds with "There is already an appointment for this time slot. Kindly select another time.""

Conclusion

In this tutorial, you have connected a Google account to your app giving you access to your Google Calendar, and then you added a number of other configurations like the days of the week and work hours. Then you proceeded to write a method that extracted details of an appointment from the SMS that the customer sent, and finally created an event for yourself in the Google Calendar.

To continue learning, here are a couple of tutorials you can check out:

Check out the full code on GitHub.

Similoluwa Adegoke is a Software Engineer who currently works in Banking. His day-to-day bothers from working with new technologies to updating legacy code. If Simi is not coding or writing, he is watching tv shows and playing video games. Simi can be reached at adegokesimi[at]gmail.com