How to Set Up a MySQL Database in Java Spring Boot
Time to read: 8 minutes
November 07, 2022
Written by
Reviewed by
In this article, you will learn how to spin up a MySQL database and connect it to a Java Spring Boot project. You will also use Postman's desktop application to send requests to the application.
Tutorial requirements
- Refer to this Twilio article to set up a Java Spring Boot application that can be hosted on the web.
- IntelliJ IDEA Community Edition for convenient and fast Java project development work. The community edition is sufficient for this tutorial.
- Java Development Kit (JDK) version 11.
- ngrok, also known as a handy utility to connect the development version of the Java application running on your system to a public URL that Twilio can connect to.
- MySQL is the database service you’ll use to store the employee data and access in your application through REST APIs. You can follow the guide for detailed steps to setup MySQL with MySQL Workbench.
- The MySQL command-line client.
- Postman desktop application to test the APIs. During installation, create a free account when prompted.
Set up the database and access credentials
The database that we will use for this tutorial is MySQL. Create a username and password for yourself during installation as you will use the credentials during the tutorial and later in the application.
Use the following command to login to the MySQL database server.
The -u is a flag that shows you provide the username and the -p flag prompts for the password once you press enter.
After the login has been successful, use the following command to create and select a database for the project.
The database is named "quotes_database" for the purpose of this tutorial, however you can change it if you wish.
Grant yourself the permission to interact with the database with the following commands. Change the username and password accordingly:
Set the MySQL details in Spring Boot
Navigate to the pom.xml file to add the following dependencies between the <dependencies></dependencies> tags:
The following dependencies were added in order to incorporate SQL data into the project:
- Spring Data JPA is required to access the data from the database. JPA (Java Persistence API) is a Java Specification that maps Java objects to database entities, also known as ORM (Object Relational Mapping). The Spring Data JPA is an abstraction over JPA that provides utility methods for various operations on databases such as creating, deleting, and updating a record. It eliminates the need of writing queries as you do with JDBC.
- A MySQL Driver is required to connect with the MySQL database.
Save the file.
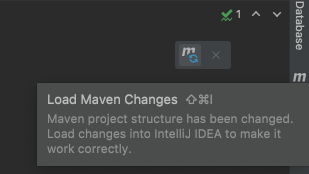
Look at the top-right corner of the IntelliJ IDEA and find the little icon with an "M" shape. Click it to load Maven changes.
Locate the application.properties file under the directory's resource folder. This file contains the properties that the Spring Boot will use to configure the application.
Copy and paste the following text into the file:
Remember to change the username and password accordingly, if they were different from the credentials used in this tutorial.
The spring.datasource.url will use a MYSQL_HOST environment variable if defined, otherwise it will connect to localhost:3306. Be sure to change the <YOUR_DATABASE_NAME> if not using the same database name "quotes_database".
Create your first table in the MySQL database
The table will have a one-to-one relationship where each varchar data type is associated with its own ID that auto increments.
For this example, the quote_string variable can only hold 255 characters so the quotes cannot exceed that limit.
Copy and paste the following lines to the MySQL window:
You can run the command describe quotes; to confirm that the table is created correctly:
Populate the database with a couple of quotes by running the following command in the MySQL terminal:
Add subpackages to the project
Create the additional packages by right-clicking on the java.com.example.x subfolder within main where "x" stands for the repo name, such as "javadb". Select the options New > Package and repeat the process for each of the package names below:
- model
- repository
- controller
These subpackages will help organize the code structure for the project.
Create the model class
Right click on the model subfolder and create a new Java class named Quote.java. This file will store the getter and setter functions that will retrieve the data for us upon request. Copy and paste the following code into the file:
The model defines the columns and data types used in the MySQL table. IntelliJ IDEA has built in functions to conveniently generate getter and setter functions when you right click on the variable names id and quote.
However, here is the code if you wish to copy and paste it instead:
GenerationType.IDENTITY is a primary key generation strategy used in the database identity column which generates a unique primary key starting from 1 and incrementing every time a new row is inserted into the table.
Since the quoteID column is already created for us using the auto-incrementing strategy, a setter function is not necessary for the ID.
Create the repository class
Create a class named "QuoteRepository" under the repository package created earlier and replace the code with the following contents:
The @Repository on the class indicates that the class is a data repository that will contain CRUD operations.
Two parameters are passed to the QuoteRepository interface, which includes the model class and the data type of the primary key. This interface allows us to retrieve, update, and delete records from the Quotes table.
This interface also defines methods such as findByID(), findAll() , deleteById(), to operate on the database. The implementation of these methods is provided by the default implementation class called JpaRepository.
A MySQL query is added within the QuoteRepository interface to assist the interface in creating a getter function that retrieves a quote containing a string word passed into the parameter.
Create a controller class
Create a class named QuoteController under the controller package created earlier, and replace the code with the contents below:
Let's break down the code. The @RestController annotation on the class tells Spring Boot that this class is a controller. A private QuoteRepository object is created and injected as a dependency within this class.
A few routes are created in this controller file, and each of them start off with the "quotes" argument of the URL slug.
When the user creates a GET request to the /quotes route, it is expected to retrieve a list of quotes from the MySQL database. However, an optional @RequestParam annotation is included in this function that extracts a query parameter, if a value is added after the "search" key value. If there is a string value appended to the "?search" URL then the QuoteRepository will create a function that will retrieve and return a quote that contains the string parameter that was passed in.
Furthermore, if a user wanted to retrieve a quote from a specific ID, they would have to append a number after the /quotes route. A ResponseEntity for a string object is created and will run through the quoteRepository to return the appropriate quote, otherwise it will return an error message since it's not found.
Alternatively, a POST request could be made on the /quotes route in order to add a quote to the database. This function takes in a @RequestBody parameter and is used to map the request body of the endpoint to the method parameter.
And similar to retrieving a quote with a specific ID, another POST request is created with the /quotes/{quoteId} route so that the deleteById() function can be called on the quoteRepository.
Run the spring boot application
If you have not done so already, navigate to the JavadbApplication.java file to click on the green play button next to the public class definition. Select the Run option.
Wait a few seconds for the project to build, download the project's dependencies, and compile.
Here is the completed code in a GitHub repository for your reference.
Execute the CRUD operations in Postman
Postman is an application that helps in developing, testing, and documenting APIs. Create a free account if you have not done so already.
You’ll create a workspace in Postman which can be used to collaborate with teammates on projects. Each workspace can have one or more collections containing folders with a set of APIs defined.
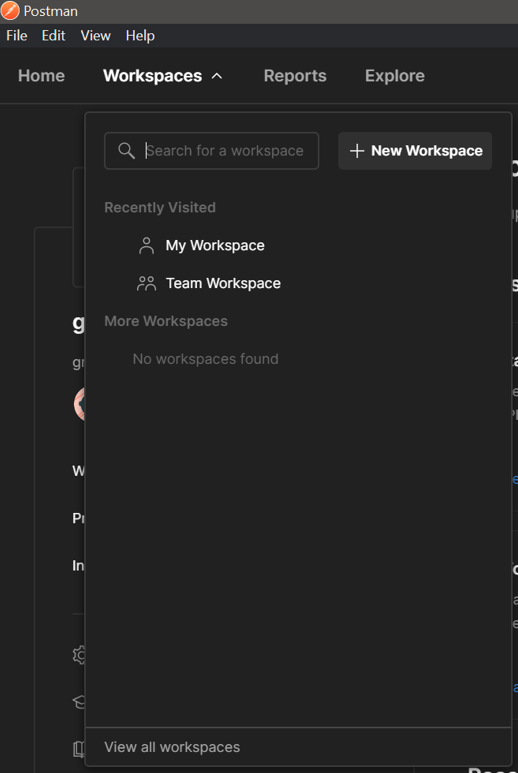
Create a workspace in Postman by selecting the Workspace dropdown and click on New workspace.
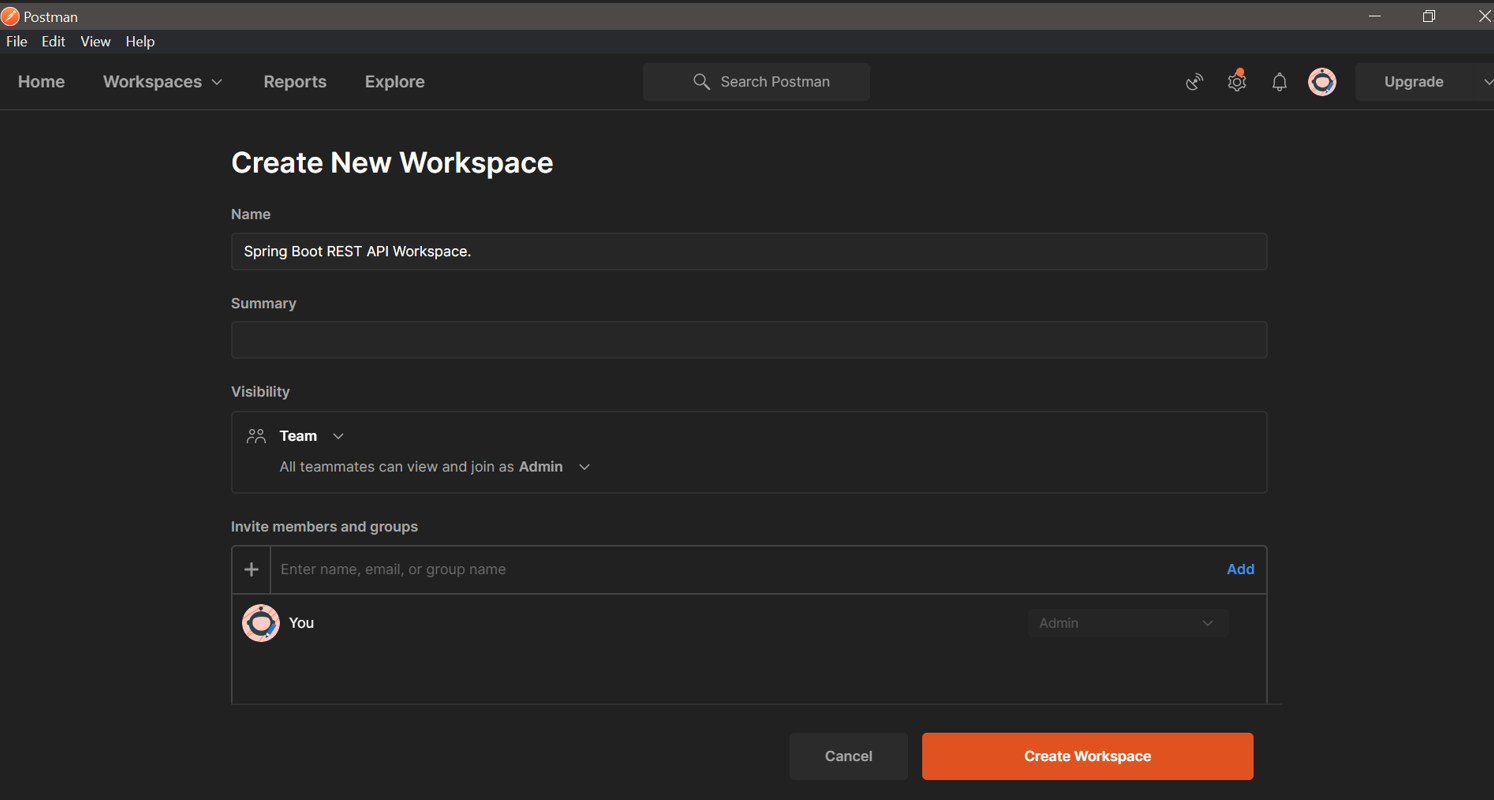
Enter the name of the workspace such as "Spring Boot REST API Workspace".
The Visibility section lets you choose whether you want to make the
workspace visible to your teammates or yourself. You can choose either option for this article. Click on the Create Workspace button on the bottom left hand corner.
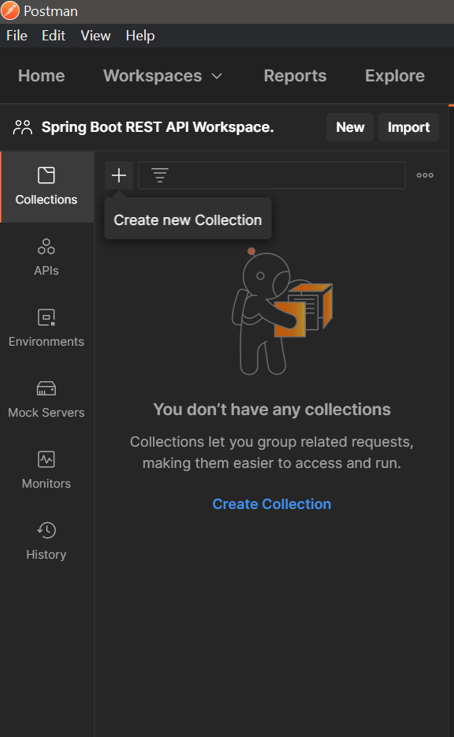
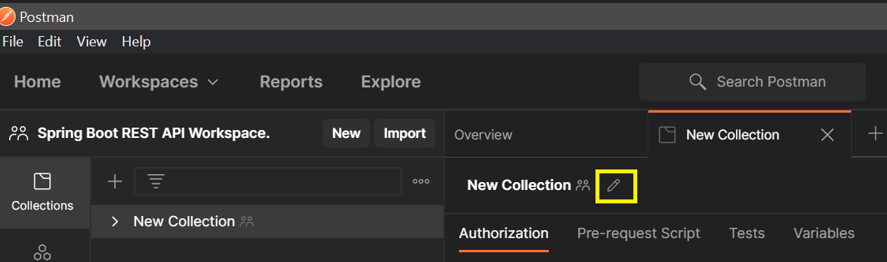
Click on Create new Collection icon in the left panel.
Click on the Edit icon beside the collection name and enter "Quotes collection”.
Next, you’ll create and test requests in your collection for each of the four REST APIs created in your Spring Boot application.
Create and test GET requests in Postman
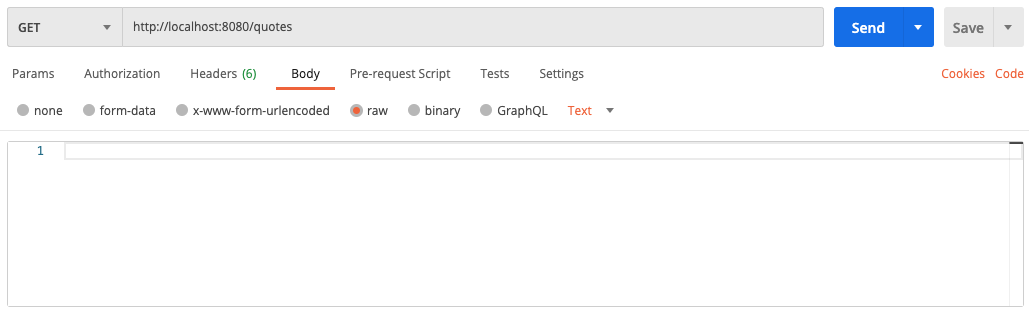
In the left panel, click on View more actions for the collection you created, select Add request. Give the request name as “Read Quote” and change the HTTP method to GET.
In the Enter Request URL field, enter “http://localhost:8080/quotes”. The endpoint /quotes, is preceded by the server and port where the application is running. If the application is running in a different port, replace 8080 in the URL.
Leave the Body field empty and click Send.
The output at the bottom of the request should look like following:
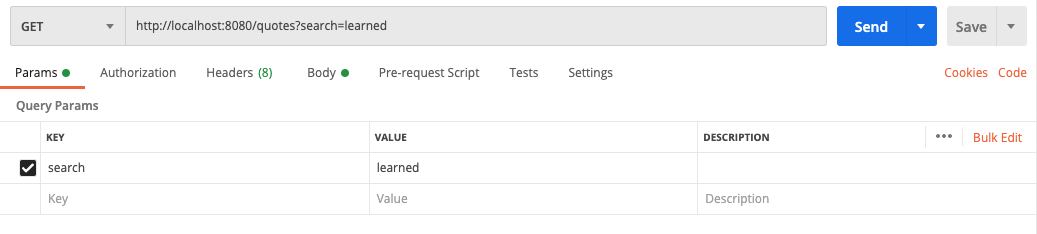
Add another GET request to test out the alternative search option with the getContainingQuote() function. Replace the URL in the text box with the optional parameters appending the quotes endpoint – "http://localhost:8080/quotes?search=learned". Type "search" under Key and "learned" under value so that Postman can execute the command with the appropriate argument values as seen below:
The output should be as follows:
If you would like to check a quote with a specific ID, you can append the ID number to the end of the endpoint as seen in the QuoteController.java file "/quotes/{quoteId}". This will be tested out in the next section.
Create and test POST requests in Postman
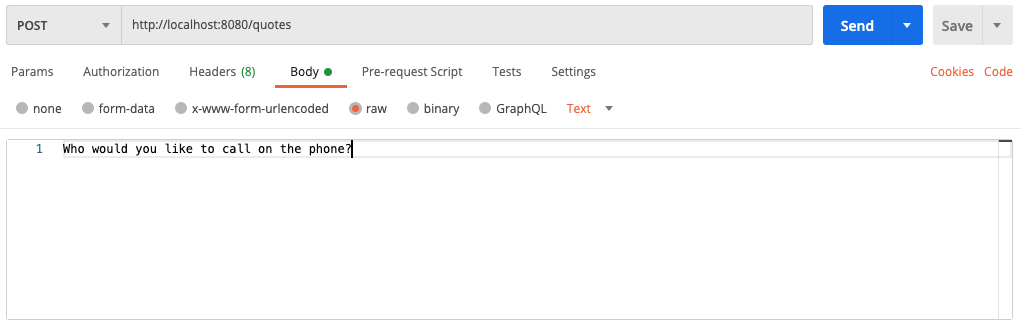
Manually add quotes from the Postman interface by creating and selecting an ADD request. Since the ID is automatically incremented in the database, the only information you need to provide is in the request body.
Navigate to the Body tab, choose the raw checkbox with Text as the request body format. Add in a quote such as "Who would you like to call on the phone?". Click on Save then Send, similar to the image below:
Below is the response you get in Postman to reflect your newly added ID in the quotes database:
Return to the MySQL terminal to check that the quote was successfully added to the database by executing the following query:
Running the GET request from the previous section on "http://localhost:8080/quotes/7" will return the exact quote in the Body section at the bottom of the Postman screen.
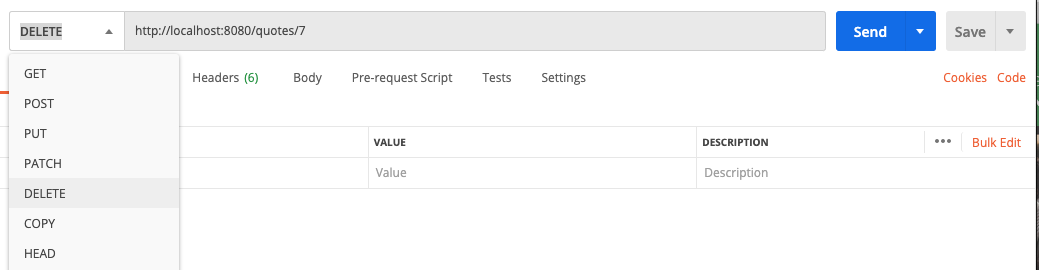
Delete data from the database with Postman
Flip that GET request to a DELETE to delete the recently added quote from the database. Keep the URL "http://localhost:8080/quotes/7" that was shared above since it conveniently has the most recent ID number.
Once the Postman dashboard matches the image below, click Send:
Return to the MySQL terminal to check that the quote was successfully deleted from the database by executing the following query:
What's next for setting up a database for a Spring Boot project?
Congratulations on learning how to set up a database for a Java Spring Boot project. Challenge yourself by expanding on this project directory. Send out SMS with the quotes from the database or create an SMS dashboard in Java with Spring Boot. You can also make a cat clicker game with Java and store points in this database.
Let me know what you're building with Twilio and Java by reaching out to me over email.
Diane Phan is a software engineer on the Developer Voices team. She loves to help programmers tackle difficult challenges that might prevent them from bringing their projects to life. She can be reached at dphan [at] twilio.com or LinkedIn.


Related Resources
Twilio Docs
From APIs to SDKs to sample apps
API reference documentation, SDKs, helper libraries, quickstarts, and tutorials for your language and platform.
Resource Center
The latest ebooks, industry reports, and webinars
Learn from customer engagement experts to improve your own communication.
Ahoy
Twilio's developer community hub
Best practices, code samples, and inspiration to build communications and digital engagement experiences.