Build an Audio Livestream App with Twilio Live

November 22, 2021
Written by
Mia Adjei
Twilion
Reviewed by

Build an Audio Livestream App with Twilio Live

This article is for reference only. We're not onboarding new customers to Programmable Video. Existing customers can continue to use the product until December 5, 2024.


We recommend migrating your application to the API provided by our preferred video partner, Zoom. We've prepared this migration guide to assist you in minimizing any service disruption.

The amount of online audio content and livestreams is increasing every day. More and more, people are tuning into audio for news, music, fitness, study, and entertainment. So if you have been thinking about creating something in the audio space, maybe you have considered building your own live audio application.

Perhaps you've already explored Twilio Live to livestream your video feed or create a live screen share. But did you know you can use Twilio Live to create an audio-only experience as well?

In this tutorial, you will learn how to build an audio livestream application with Twilio Live and React, and then deploy it using Twilio Functions and the Twilio Serverless Toolkit. This will allow you to start sharing your live audio with your friends and community right away. In this project, you'll also use the Twilio Paste design system to quickly build and style your components.

If you've checked out my colleague Miguel Grinberg's article on how to deploy a React application with Twilio Serverless, maybe you already know how to do part of what you'll be learning in this tutorial. We'll get into the rest as we work through building the project together.

Let's get started!

Setup and prerequisites

To complete this project, you will need:

To continue with this project, you will need to have the Twilio CLI and Serverless Toolkit installed on your machine. If you have already set this up during a previous project, feel free to skip to the next section. Otherwise, run the following commands in your terminal to complete the installation:

# Install the Twilio CLI
npm install -g twilio-cli

# Install the Twilio Serverless Toolkit
twilio plugins:install @twilio-labs/plugin-serverless

# Connect the Twilio CLI to your Twilio account — you will need your Account SID and Auth Token, which can be found in the Twilio Console (https://console.twilio.com)
twilio login

Now you are ready to create your application.

Create a new React application

To get started, create a new React application called react-audio-livestream by running the following command in your terminal:

npx create-react-app react-audio-livestream
cd react-audio-livestream

Next, run the following command to create a new serverless project inside your React app:

twilio serverless:init serverless --empty

If you see a message like the following in your terminal asking whether you would like to install the serverless plugin:

     ? Would you like to install the plugin? (y/N)

just type y to continue.

Once you have done this, you will see a new directory in your project called serverless, which contains two other directories: serverless/assets and serverless/functions. For this project, you will be placing the back end code for managing livestream resources in serverless/functions.

You will also see a file called serverless/.env. This file contains your environment variables. If you open serverless/.env in your code editor, you will see that your ACCOUNT_SID has already been filled in, and that there is a space for you to fill in the AUTH_TOKEN. For this project, you will not need the AUTH_TOKEN, so feel free to remove this line.

In the file, add two new variables for API_KEY_SID and API_KEY_SECRET just below your value for ACCOUNT_SID:

API_KEY_SID=XXXXXXXXX
API_KEY_SECRET=XXXXXXXXX

Then, create a new API Key from the Twilio Console, and replace the placeholder text with your values for these variables.

Install dependencies

Now that you have the React app set up, it's time to install the other dependencies you'll need for this project. For this project, you will need:

Install them now by running the following command in your terminal:

yarn add @twilio-paste/core @twilio-paste/icons @twilio/live-player-sdk twilio-video prop-types

You can run the application in development mode with the following command:

yarn start

After you have done this, you will be able to see the app you are building at http://localhost:3000/.

Now you are ready to start building out the application's components.

Create the key components

For this project, you will need the following 6 main components:

  • App.js: Where users of your app will enter their username to log in and get started.
  • Dashboard.js: The main dashboard for your users.
  • ManageStream.js: Where the streamer can control their livestream.
  • VideoRoom.js: Where the users who are streaming will share their audio.
  • Participant.js: For each participant sharing their audio in the livestream.
  • StreamPlayer.js: The player component for each livestream.

Even though this livestream does not contain video, you will still need to create a video room to stream your audio into. This audio will be mixed and streamed out by an Audio Mixer, which you'll create later in the tutorial.

src/App.js was already created for you when you set up the React app. Create the other 4 components above in the src directory as well. If you are on a Mac or Linux machine, you can run the following command to create the files:

touch src/Dashboard.js src/ManageStream.js src/Participant.js src/VideoRoom.js src/StreamPlayer.js

Open src/App.js in your code editor. Delete the code in this file and replace it with the following code:

import { useState } from 'react';

import { Theme } from '@twilio-paste/core/theme';
import { Box } from '@twilio-paste/box';
import { Grid, Column } from '@twilio-paste/core/grid';
import { Label } from '@twilio-paste/core/label';
import { Input } from '@twilio-paste/core/input';
import { Button } from '@twilio-paste/core/button';
import { Card } from '@twilio-paste/core/card';
import { Heading } from '@twilio-paste/core/heading';

import Dashboard from './Dashboard';

const App = () => {
  const [username, setUsername] = useState(null);

  const handleSubmit = (event) => {
    event.preventDefault();
    setUsername(event.target.username.value);
  }

  return (
    <Theme.Provider theme='default'>
      <Grid gutter='space30'>
        <Column span={10} offset={1}>
          {username ?
            <Dashboard username={username} setUsername={setUsername} />
          :
          <Box margin='space100'>
            <Card padding="space100">
              <form onSubmit={handleSubmit}>
                <Heading as='h2' variant='heading30'>Sign In</Heading>
                <Box marginBottom='space30'>
                  <Label htmlFor='username' required>Username</Label>
                  <Input
                    aria-describedby='username_help_text'
                    id='username'
                    name='username'
                    type='text'
                    placeholder='username123'
                    required/>
                </Box>
                <Button variant='primary' type='submit'>Sign In</Button>
              </form>
            </Card>
          </Box>
          }
        </Column>
      </Grid>
    </Theme.Provider>
  )
};

export default App;

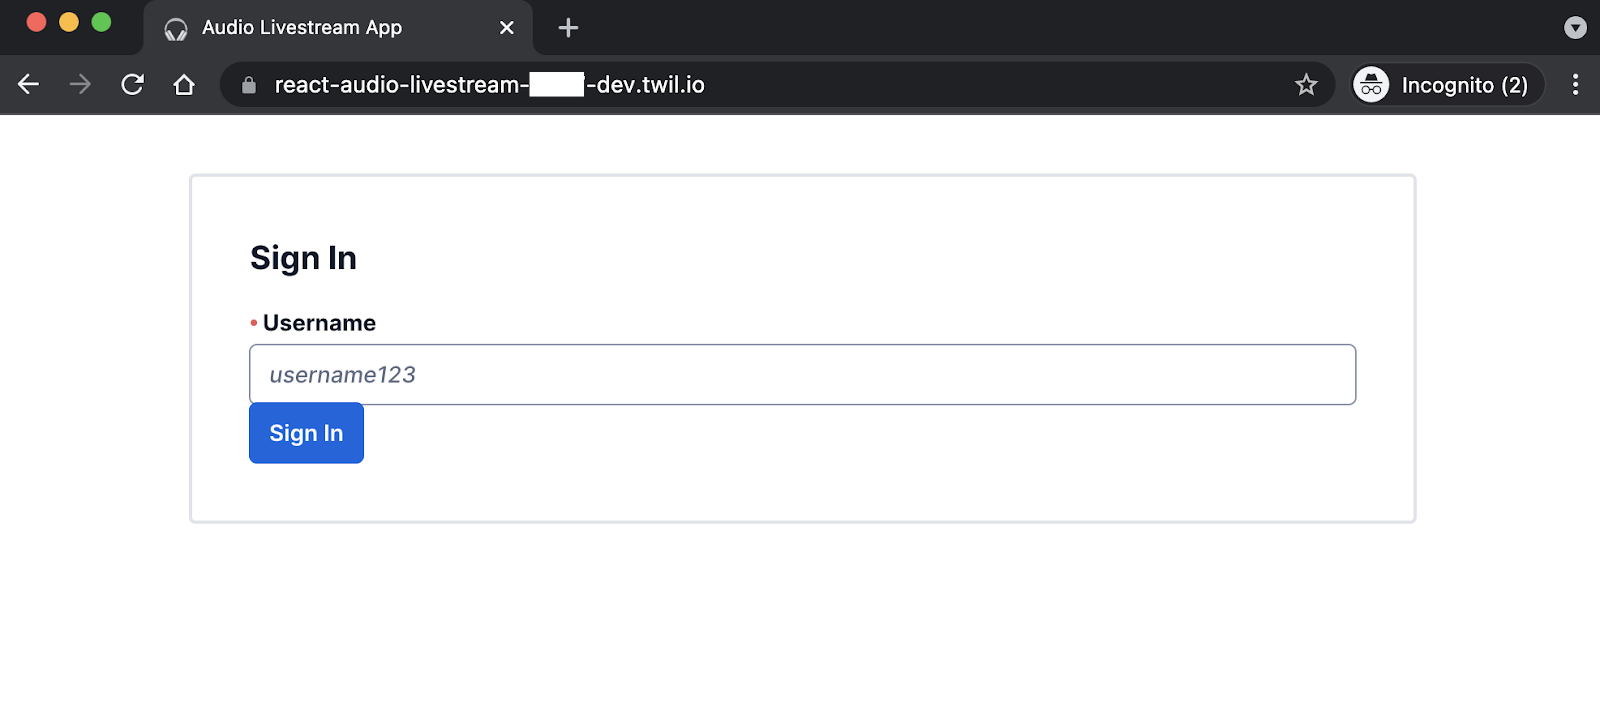
In this component, you create a login form for the user for when they arrive at your application. If the user is not yet logged in, they will see a login form that will let them enter a username, and this username will be saved in the app's state. If the user is already logged in, they will see their Dashboard instead. This entry point will be seen by both streamers and audience members.

Build the dashboard

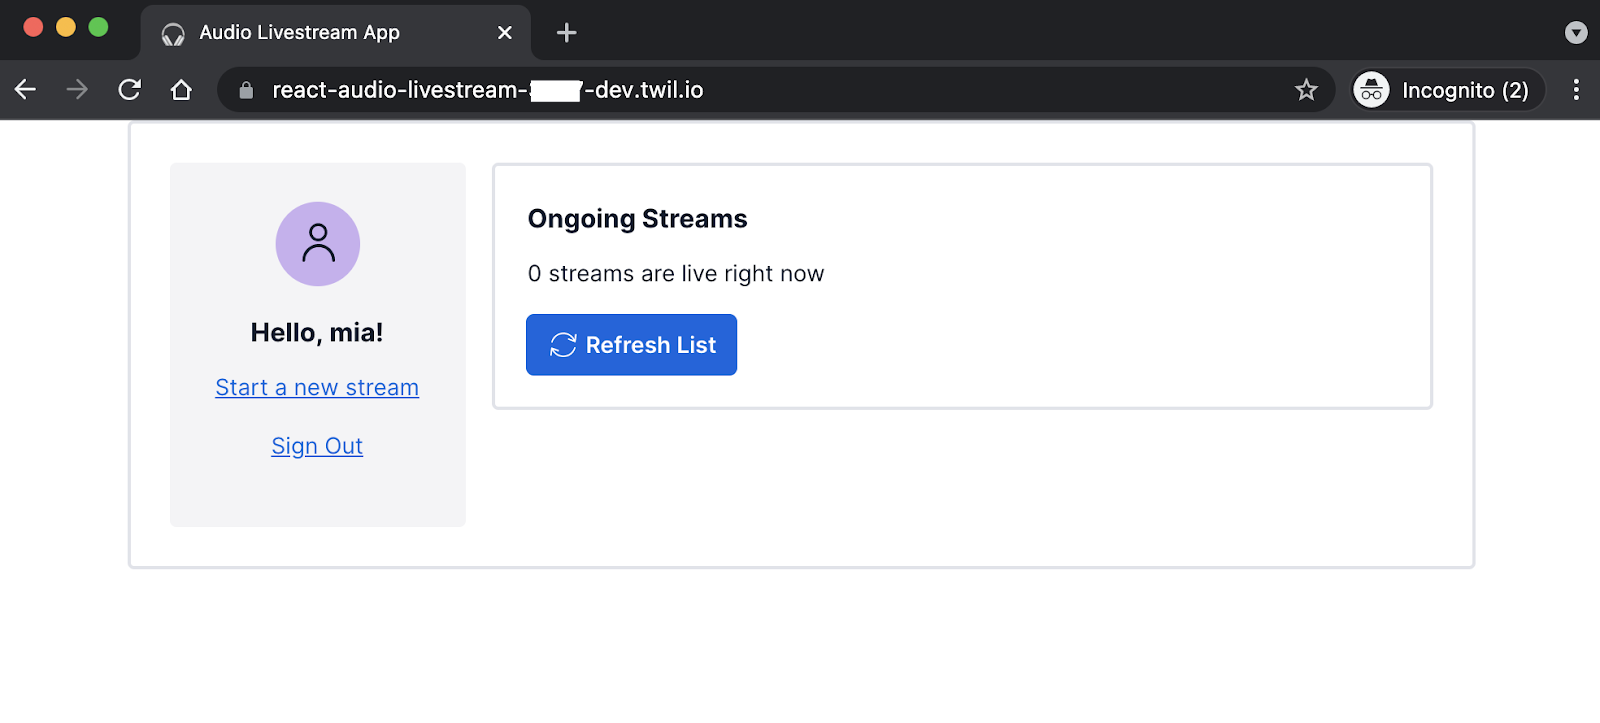
Now it's time to create the Dashboard component. When a user has logged in, they will see a sidebar section that contains links that allow them to switch between streamer and audience mode. All users start out in audience mode — when they first arrive at the Dashboard, this component will list the ongoing streams that a user can play. If a user clicks the link to create a new stream, they will be shown a component that will allow them to control this stream and stream out their audio.

Now that you know what you will build, open src/Dashboard.js and add the following code to the file:

import { useState, useEffect } from 'react';

import { Flex } from '@twilio-paste/core/flex';
import { Box } from '@twilio-paste/core/box';
import { Card } from '@twilio-paste/core/card';
import { Button } from '@twilio-paste/core/button';
import { Heading } from '@twilio-paste/core/heading';
import { Grid, Column } from '@twilio-paste/core/grid';
import { Anchor } from '@twilio-paste/core/anchor';
import { Text } from '@twilio-paste/core/text';
import { Avatar } from '@twilio-paste/core/avatar';
import { UserIcon } from '@twilio-paste/icons/esm/UserIcon';
import { Alert } from '@twilio-paste/core/alert';
import { LoadingIcon } from '@twilio-paste/icons/esm/LoadingIcon';

import StreamPlayer from './StreamPlayer';
import ManageStream from './ManageStream';

const Dashboard = ({username, setUsername}) => {
  const [streamList, setStreamList] = useState([]);
  const [isStreaming, setIsStreaming] = useState(false);
  const [isLoading, setIsLoading] = useState(false);
  const [info, setInfo] = useState(null);
  const [error, setError] = useState(null);

  return (
    <Card padding='space70' width='50%'>
      <Grid gutter='space30'>
        <Column span={3}>
          <Box backgroundColor='colorBackground' padding='space70' borderRadius='borderRadius20' textAlign='center'>
            <Flex hAlignContent='center' marginBottom='space50'>
              <Avatar size='sizeIcon100' name='avatar' icon={UserIcon}/>
            </Flex>
            <Heading as='h3' variant='heading40'>Hello, {username}!</Heading>
            <Box marginBottom='space50'>
              {!isStreaming &&
                <Anchor onClick={() => setIsStreaming(true)}>
                  Start a new stream
                </Anchor>
              }
              {isStreaming &&
                <Anchor onClick={() => setIsStreaming(false)}>
                  Watch a stream
                </Anchor>
              }
            </Box>
            <Box marginBottom='space50'>
              <Anchor onClick={() => setUsername(null)}>
                Sign Out
              </Anchor>
            </Box>
          </Box>
        </Column>
        <Column span={9}>
          {error &&
            <Alert onDismiss={() => setError(null)} variant='error'>
              <Text as='span'>{error}</Text>
            </Alert>
          }
          {info &&
            <Alert onDismiss={() => setInfo(null)} variant='neutral'>
              <Text as='span'>{info}</Text>
            </Alert>
          }
          {/* TODO: The streamer-created livestream will go here! */}
          {/* TODO: List of other livestreams will go here! */}

        </Column>
      </Grid>
    </Card>
  );
};

export default Dashboard;

For the Dashboard component, after importing the Paste components you will use here, you set up state variables for the streamList, whether or not a user isStreaming, whether or not a component isLoading, and details about the info or error states. The left-side menu greets the logged-in user and contains the links for switching between audience and streamer mode, as well as a Sign Out link that will return the user to the login form. The right-side section will contain the list of ongoing streams if the user is in audience mode, or show the livestream manager component if they are in streamer mode.

Build the streamer experience

For users who want to create their own new audio livestream, you will need to add both endpoints that will allow you to manage the livestream resources as well as a component to call these endpoints in the UI.

You will create the endpoints using Twilio Functions. Create two new files inside the serverless/functions directory: serverless/functions/startStream.js and serverless/functions/endStream.js. You can probably tell from their names what these endpoints are meant to do.

Open serverless/functions/startStream.js in your code editor and add the following JavaScript code to create a new audio livestream:

const twilio = require('twilio');

exports.handler = async function(context, event, callback) {
  if (!event.streamName) {
    const response = new twilio.Response();
    response.setStatusCode(401);
    response.setBody({
      message: 'Missing stream name',
    });
    return callback(null, response);
  }

  if (!event.username) {
    const response = new twilio.Response();
    response.setStatusCode(401);
    response.setBody({
      message: 'Missing user identity',
    });
    return callback(null, response);
  }

  const twilioClient = context.getTwilioClient();

  // Create the video room, player streamer, and audio mixer
  let room;
  try {
    room = await twilioClient.video.rooms.create({
      uniqueName: event.streamName,
      audioOnly: true,
      type: 'group'
    });

  } catch (error) {
    const response = new twilio.Response();
    response.setStatusCode(400);
    response.setBody({
      message: 'Cannot create room',
      error: error
    });
    return callback(null, response);
  }

  const playerStreamer = await twilioClient.media.playerStreamer.create({video: false});

  const mediaProcessor = await twilioClient.media.mediaProcessor.create({
    extension: 'audio-mixer-v1',
    extensionContext: JSON.stringify({
      identity: 'audio-mixer-v1',
      room: {
        name: room.sid
      },
      outputs: [
        playerStreamer.sid
      ],
    })
  });

  // Create an access token
  const token = new twilio.jwt.AccessToken(context.ACCOUNT_SID, context.API_KEY_SID, context.API_KEY_SECRET);

  // Create a video grant
  const videoGrant = new twilio.jwt.AccessToken.VideoGrant({
    room: event.streamName
  });

  // Add the video grant and the user's identity to the token
  token.addGrant(videoGrant);
  token.identity = event.username;

  return callback(null, {
    streamDetails : {
      roomId: room.sid,
      streamName: event.streamName,
      playerStreamerId: playerStreamer.sid,
      mediaProcessorId: mediaProcessor.sid
    },
    token: token.toJwt()
  });
}

In this function, you pass in the name of the livestream you want to create and the username of the logged-in user. The endpoint will then create the video room from which the host will stream their audio, a PlayerStreamer that will provide the ability to send the streamed audio out to a web or mobile app, and the livestream itself, which is the output of an Audio Mixer running on a MediaProcessor. The endpoint also provides an Access Token for the streamer to join the video room they will be streaming from.

By default, Media Processor resources are created with a maximum duration time of 5 minutes. The maxDuration option can be added to the create() call above to specify a different maximum duration in seconds.

Learn more about how these different resources work together to produce a livestream by visiting the Twilio Live overview here.

Now that you have the endpoint for starting a livestream, open serverless/functions/endStream.js in your code editor and add the following code to end a livestream:

const twilio = require('twilio');

exports.handler = async function(context, event, callback) {
  if (!event.streamDetails) {
    const response = new twilio.Response();
    response.setStatusCode(401);
    response.setBody({
      message: 'Missing stream details',
    });
    return callback(null, response);
  }

  const streamName  = event.streamDetails.streamName;
  const roomId  = event.streamDetails.roomId;
  const playerStreamerId = event.streamDetails.playerStreamerId;
  const mediaProcessorId = event.streamDetails.mediaProcessorId;

  const twilioClient = context.getTwilioClient();

  // End the player streamer, media processor, and video room
  await twilioClient.media.mediaProcessor(mediaProcessorId).update({status: 'ended'});
  await twilioClient.media.playerStreamer(playerStreamerId).update({status: 'ended'});
  await twilioClient.video.rooms(roomId).update({status: 'completed'});

  return callback(null, {
    message: `Successfully ended stream ${streamName}`
  });
}

This function takes the details of the livestream and ends all of its associated resources. In order to avoid unnecessary charges to your Twilio account, it is very important to remember to shut off any livestream resources after you are finished streaming.

You can learn more about livestream resource management by visiting the Twilio Live documentation page for billing and resource management.

Now that you have functions for starting and ending a livestream, it's time to add logic to the component that will be calling these endpoints. Open src/ManageStream.js in your code editor and paste in the following code:

import { useState, useEffect } from 'react';

import { Box } from '@twilio-paste/core/box';
import { Button } from '@twilio-paste/core/button';
import { Input } from '@twilio-paste/core/input';
import { Flex } from '@twilio-paste/core/flex';
import { Heading } from '@twilio-paste/heading';
import { Card } from '@twilio-paste/core/card';
import { Column, Grid } from '@twilio-paste/core/grid';
import { Label } from '@twilio-paste/core/label';
import { Badge } from '@twilio-paste/core/badge';

import { connect } from 'twilio-video';
import VideoRoom from './VideoRoom';

const ManageStream = ({username, setError}) => {
  const [room, setRoom] = useState(null);
  const [streamDetails, setStreamDetails] = useState(null);
  const [isLive, setIsLive] = useState(false);
  const [isLoading, setIsLoading] = useState(false);

  return (
    <Card padding='space70'>
      <Grid gutter='space30'>
        <Column span={8}>
          {!isLive &&
            <Box>
              <form onSubmit={startStream}>
                <Heading as='h4' variant='heading30'>Create a Stream</Heading>
                <Label htmlFor='streamName' required>Name your stream</Label>
                  <Input
                    aria-describedby='stream_name_help_text'
                    id='streamName'
                    name='streamName'
                    type='text'
                    placeholder='My first livestream'
                    required/>
                  <Button variant='primary' type='submit' disabled={isLoading}>Start Stream</Button>
              </form>
            </Box>
          }
          {isLive &&
            <Card>
              <Flex display='inline-flex'>
              <Heading as='h4' variant='heading30'>
                {streamDetails.streamName}
                <Badge variant='default' as='span'>LIVE</Badge>
              </Heading>
              </Flex>
              <VideoRoom streamDetails={streamDetails} room={room} />
              <form onSubmit={endStream}>
                <Button variant='destructive' type='submit' disabled={isLoading}>End Stream</Button>
              </form>
            </Card>
          }
        </Column>
      </Grid>
    </Card>
  )
}

export default ManageStream;

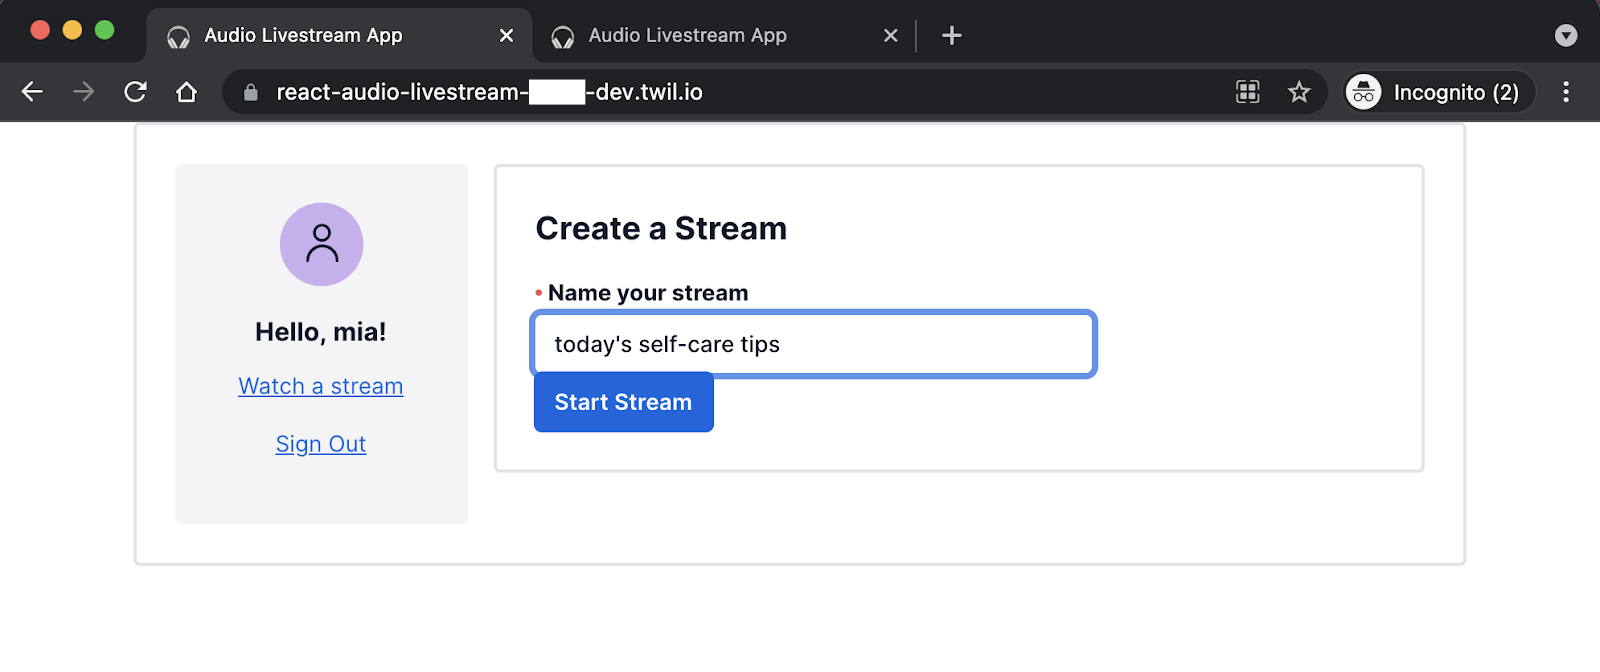
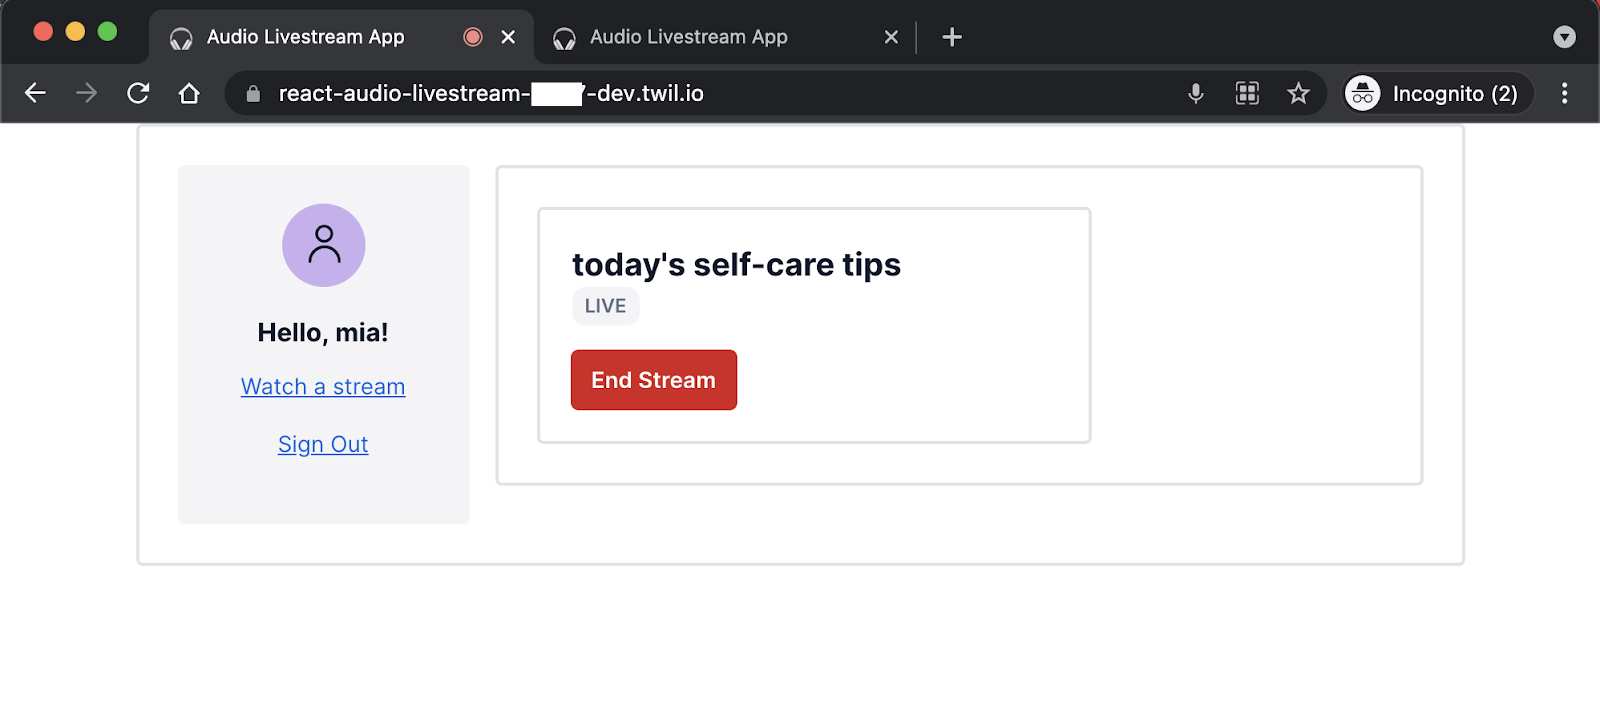
This component will allow the streaming user to start and end the livestream. In this component, there are state variables for the video room, the streamDetails for the stream once it is created, whether a user's stream currently isLive, and whether the component isLoading. Before a stream isLive, the user will see a form that will allow them to name their livestream. Once the stream is live, the UI will change to show the in-progress stream as well as a button for the user to end the stream when they are finished.

Just below the state variables but before the return statement, add the following code that will call the /startStream and endStream endpoints:

  const startStream = async (event) => {
    // Call to the backend to create all the resources and start the stream (audio only)
    event.preventDefault();

    const streamName = event.target.streamName.value;

    // While waiting for the API response, setting isLoading to true disables the button
    setIsLoading(true);

    try {
      const response = await fetch('/startStream', {
        method: 'POST',
        headers: {
          'Content-Type': 'application/json',
        },
        body: JSON.stringify({
          streamName: streamName,
          username: username
        })
      });

      const result = await response.json();

      // Get the details back from the server and the token for the video room
      setStreamDetails(result.streamDetails);

      // Join the video room with audio only
      const videoRoom = await connect(result.token, {
        name: result.streamDetails.roomId,
        audio: true
      });

      setRoom(videoRoom);
      setIsLive(true);
      setIsLoading(false);

    } catch (error) {
      console.log(error)
      setError(error);
    }
  }

  const endStream = async (event) => {
    event.preventDefault();
    setIsLoading(true);

    // Disconnect from the video room
    room.disconnect();

    // Call to the backend to end all the resources and stop the stream
    try {
      const response = await fetch('/endStream', {
        method: 'POST',
        headers: {
          'Content-Type': 'application/json',
        },
        body: JSON.stringify({
          streamDetails: streamDetails
        })
      });

      const result = await response.json();
      setIsLive(false);
      setStreamDetails(null);
      setIsLoading(false);

    } catch (error) {
      console.log(error)
      setError(error);
    }
  }

You saw earlier that when a user creates a new livestream, this creates a video room. In the startStream() function, once the streamDetails are received from the back end, this function will connect the user to the video room and set isLive to true. Once the user has finished streaming and clicks the End Stream button, they will be disconnected from the video room and isLive will be set to false.

Now that you are set up to handle the different livestream resources, you'll need to add code to the src/VideoRoom.js component so that the participants in the livestream can share their audio. Open this file in your code editor and add the following code to it:

import { useState, useEffect } from 'react';

import { Box } from '@twilio-paste/box';
import Participant from './Participant';

const VideoRoom = ({ room }) => {
  const [participants, setParticipants] = useState([]);

  useEffect(() => {
    const participantConnected = participant => {
      setParticipants(previousParticipants => [...previousParticipants, participant]);
    };

    const participantDisconnected = participant => {
      setParticipants(previousParticipants =>
        previousParticipants.filter(p => p !== participant)
      );
    }

    room.on('participantConnected', participantConnected);
    room.on('participantDisconnected', participantDisconnected);
    room.participants.forEach(participantConnected);

  }, [room]);

  return (
    <Box className='room'>
      <Box className='participants'>
        <Participant
          key={room.localParticipant.identity}
          participant={room.localParticipant} />
        { participants.map((participant) =>
            <Participant
              key={participant.identity}
              participant={participant} />
          )
        }
      </Box>
    </Box>
  );
}

export default VideoRoom;

If you have worked through a React and Twilio Video tutorial before, this code may look familiar. The state variable here tracks the participants who have joined the room. When a new participant connects, this variable will update to include them. Each participant will have their own Participant component which contains their audio tracks. The Audio Mixer will also join the chat as a silent participant.

Open src/Participant.js now and add the following code:

import { useState, useEffect, useRef} from 'react';
import { Box } from '@twilio-paste/core/box';

const Participant = ({ participant }) => {
  const [audioTracks, setAudioTracks] = useState([]);
  const audioRef = useRef();

  const trackpubsToTracks = (trackMap) => {
    Array.from(trackMap.values())
      .map((publication) => publication.track)
      .filter((track) => track !== null);
  }

  useEffect(() => {
    setAudioTracks(trackpubsToTracks(participant.audioTracks));

    const trackSubscribed = (track) => {
      setAudioTracks((audioTracks) => [...audioTracks, track]);
    };

    const trackUnsubscribed = (track) => {
      setAudioTracks((audioTracks) => audioTracks.filter((a) => a !== track));
    };

    participant.on('trackSubscribed', trackSubscribed);
    participant.on('trackUnsubscribed', trackUnsubscribed);

    return () => {
      setAudioTracks([]);
      participant.removeAllListeners();
    };
  }, [participant]);

  useEffect(() => {
    if (audioTracks != null) {
      const audioTrack = audioTracks[0];
      if (audioTrack) {
        audioTrack.attach(audioRef.current);
        return () => {
          audioTrack.detach();
        };
      }
    }
  }, [audioTracks]);

  return (
    <Box className='participant'>
      <audio ref={audioRef} autoPlay={true} muted={true} />
    </Box>
  );
};

export default Participant;

This component handles a participant's audio tracks. As long as their audio track is turned on and is not null, this audio track will be shared to the video room. After the participant leaves the video chat, their audio track will be removed. No one will be sharing video, but if you wanted to add video to this application later on, this is the component where you would also handle the user's video tracks as well.

Now that you have the video room set up to receive participants and be a part of the ManageStream component, you just need to add one more section to complete the streamer side of the experience.

Return to src/Dashboard.js and scroll down to the return statement. Just below the alert notification sections, replace the first TODO line ({/* TODO: The streamer-created livestream will go here! */}) with the following code that will show the ManageStream component if the user is in streaming mode:


  {info &&
    <Alert onDismiss={() => setInfo(null)} variant='neutral'>
      <Text as='span'>{info}</Text>
    </Alert>
  }
  {isStreaming &&
    <ManageStream username={username} setError={setError} setInfo={setInfo}/>
  }

The streamer experience is now ready. The next section will show you how to build the audience experience.

Build the audience experience

For the audience experience, first you will want to show the user which streams are available for them to tune in to. In order to do this, you will need to create a new function that will list the streams that are currently ongoing.

Create and open a new file called serverless/functions/listStreams.js. This file will hold the function for listing the ongoing audio livestreams. Inside that file, add the following code:

const twilio = require('twilio');

exports.handler = async function(context, event, callback) {
  const twilioClient = context.getTwilioClient();

  // Get a list of the current media processors
  const mediaProcessorList = await twilioClient.media.mediaProcessor.list({status: 'started'});

  // Filter them by which ones are audio only
  const audioLivestreams = mediaProcessorList.filter(mp => mp.extension === 'audio-mixer-v1');

  let streamList = [];

  for (let stream of audioLivestreams) {
    const extensionContext = JSON.parse(stream.extensionContext);
    const playerStreamerId = extensionContext.outputs[0];
    const roomId = extensionContext.room.name;
    const room = await twilioClient.video.rooms(roomId).fetch();
    const streamName = room.uniqueName;

    const streamDetails = {
      streamName,
      playerStreamerId
    }

    streamList.push(streamDetails)
  }

  return callback(null, {
    streamList
  });
}

Here, you list the current audio-only livestreams and get a list of their details, which will be returned to the client side. These details include the name of the stream and the IDs of the related livestreaming resources.

To display these livestreams for the user, you will want to call this endpoint when the user arrives at their Dashboard. Open src/Dashboard.js and add the following function just below the state variables:

  const getStreamList = async () => {
    setIsLoading(true);

    try {
      const response = await fetch('/listStreams', {
        method: 'GET',
        headers: {
          'Content-Type': 'application/json',
        },
      });

      const result = await response.json();
      setStreamList(result.streamList);
      setIsLoading(false);

    } catch (error) {
      console.log(error)
      setError(`Unable to get stream list`);
    }
  }

This function will call the /listStreams endpoint you just wrote and set the stream list in the component's state.

Just below this function, add the following useEffect hook, which will call getStreamList() when this component loads:

  // When the component loads, get the list of ongoing streams
  useEffect(() => {
    getStreamList();
  }, []);

Now, just below where you added a section for the streamer experience, scroll down to the second TODO statement ({/* TODO: List of other livestreams will go here! */}) and replace it with the following code for the audience experience:

  {!isStreaming &&
    <Box marginBottom='space50'>
      <Card>
        <Heading as='h3' variant='heading40'>Ongoing Streams</Heading>
        <Box marginBottom='space50'>{streamList.length} streams are live right now</Box>
        {streamList.map((streamDetails) => {
          return (
            <StreamPlayer username={username} streamDetails={streamDetails} key={streamDetails.playerStreamerId} setError={setError} setInfo={setInfo}></StreamPlayer>
          )
        })}

        <Button variant='primary' type='submit' disabled={isLoading} onClick={getStreamList}>
          <LoadingIcon decorative={false} title='Refresh button' />
          Refresh List
        </Button>

      </Card>
    </Box>
  }

In this code, you can see that a new section has been created to show the Ongoing Streams by creating a new StreamPlayer component for each stream in the list. There is also a refresh button that will allow users to call the /listStreams endpoint again to get the most updated list.

Now you'll need to add the code for the StreamPlayer component. Open src/StreamPlayer.js in your code editor and add the following code to it:

import { useState, useEffect } from 'react';
import { Player } from '@twilio/live-player-sdk';

import { Box } from '@twilio-paste/core/box';
import { Button } from '@twilio-paste/core/button';
import { Flex } from '@twilio-paste/core/flex';
import { Heading } from '@twilio-paste/heading';
import { PauseIcon } from '@twilio-paste/icons/esm/PauseIcon';
import { PlayIcon } from '@twilio-paste/icons/esm/PlayIcon';
import { VolumeOnIcon } from '@twilio-paste/icons/esm/VolumeOnIcon';
import { VolumeOffIcon } from '@twilio-paste/icons/esm/VolumeOffIcon';

const StreamPlayer = ({username, streamDetails, setError, setInfo}) => {
  const [player, setPlayer] = useState(null);
  const [volume, setVolume] = useState(50);
  const [isPlaying, setIsPlaying] = useState(false);
  const [isLoading, setIsLoading] = useState(false);

  return (
    <Box backgroundColor='#e6edf7' padding='space60' marginBottom='space70'>
      <Heading as='h4'>{streamDetails.streamName}</Heading>
      {isPlaying ?
        <Box>
          <Box>
            {player.audioElement}
          </Box>
          <Flex>
            <VolumeOffIcon decorative={false} title='Pause stream button' />
            <input type='range' min='1' max='100' onChange={(e) => setVolume(e.target.value)}/>
            <VolumeOnIcon decorative={false} title='Pause stream button' />
          </Flex>
          <Button onClick={pauseStream}>
            <PauseIcon decorative={false} title='Pause stream button' />
            Pause Stream
          </Button>
        </Box>
        :
        <Button onClick={playStream}>
          <PlayIcon decorative={false} title='Play stream button' disabled={isLoading}/>
          Play Stream
        </Button>
      }
    </Box>
  )
}

export default StreamPlayer;

In this component, you will use the Twilio Live Player SDK to display the livestream for the listener. Here, you have created state variables for the player itself, the volume of the audio, whether the stream currently isPlaying, and whether or not the component isLoading.

If a stream is not yet playing, users will see a Play Stream button that, on click, will start playing the stream. Once the stream is playing, the Play Stream button will change to a Pause Stream button, which, on click, will pause the stream. Users will also be able to set the volume of the livestream by sliding the range input.

Similar to how the streaming user needs an access token in order to start streaming from the video room, an audience member will also need an access token to start listening to the stream playback. In order to get this access token, you will need to create another function for your back end.

Create and open a new file called serverless/functions/audienceToken.js. Inside this file, add the following code, which will create an access token with a Playback Grant for the audience member:

const twilio = require('twilio');

exports.handler = async function(context, event, callback) {
  if (!event.username) {
    const response = new twilio.Response();
    response.setStatusCode(401);
    response.setBody({
      message: 'Missing user identity',
    });
    return callback(null, response);
  }

  if (!event.playerStreamerId) {
    const response = new twilio.Response();
    response.setStatusCode(401);
    response.setBody({
      message: 'Missing stream details',
    });
    return callback(null, response);
  }

  const twilioClient = context.getTwilioClient();

  // Create an access token
  const token = new twilio.jwt.AccessToken(context.ACCOUNT_SID, context.API_KEY_SID, context.API_KEY_SECRET);

  // Create a playback grant and attach it to the access token
  const playbackGrant = await twilioClient.media.playerStreamer(event.playerStreamerId).playbackGrant().create({ttl: 60});

  const wrappedPlaybackGrant = new twilio.jwt.AccessToken.PlaybackGrant({
    grant: playbackGrant.grant
  });

  token.addGrant(wrappedPlaybackGrant);
  token.identity = event.username;

  return callback(null, {
    token: token.toJwt(),
  });
}

Now, in src/StreamPlayer.js, just below the state variables, add the following getToken() function, which will call the /audienceToken endpoint you just wrote:

const getToken = async () => {
  try {
    const response = await fetch('/audienceToken', {
      method: 'POST',
      headers: {
        'Content-Type': 'application/json',
      },
      body: JSON.stringify({
        username: username,
        playerStreamerId: streamDetails.playerStreamerId
      })
    });

    const data = await response.json();
    return data.token

  } catch (error) {
    setError('Unable to get token');
  }
}

Now that you are able to get the access token for the audience member, add the following playStream() function just below getToken():

const playStream = async () => {
  setIsLoading(true)
  const accessToken = await getToken();

  try {
    const {
      host,
      protocol,
    } = window.location;

    const livePlayer = await Player.connect(accessToken, {playerWasmAssetsPath: `${protocol}//${host}/livePlayer`});

    livePlayer.play();

    livePlayer.on(Player.Event.StateChanged, (state) => {
      if (state === Player.State.Ended) {
        setIsPlaying(false);
        setInfo(`Stream has ended — please refresh the stream list`);
      }
    })

    setPlayer(livePlayer);
    setIsPlaying(true);
    setIsLoading(false);

  } catch (error) {
    console.log(error);
    setError('Unable to connect to livestream');
  }
}

This is the function that will be called when a user clicks the Play Stream button. It will call getToken() to get an access token for the audience member and then use that token to connect to the player SDK. It also sets a listener for when the stream the user has chosen ends — once this happens, a notification will appear for the listener to let them know the stream is over and that they should refresh the stream list.

Just below playStream(), add the following pauseStream() function, which will allow the user to pause the livestream when they click the Pause Stream button:

const pauseStream = () => {
  player.disconnect();
  setIsPlaying(false);
}

And to control the volume, add the following code just below the state variables:

useEffect(() => {
  if (player != null) {
    player.setVolume(volume/100);
  }

}, [volume, player]);

This useEffect hook will allow users to set the volume of the stream by moving the volume slider.

There is just one more part you need for the audience experience. In order to use the Player SDK, you will need to include the SDK files in your application. To do this, run the following commands in your terminal to copy the Player SDK files from node_modules to a new directory called public/livePlayer:

mkdir public/livePlayer
cp node_modules/@twilio/live-player-sdk/dist/build/twilio-live-player-wasmworker* public/livePlayer/
cp node_modules/@twilio/live-player-sdk/dist/build/twilio-live-player.min.js public/livePlayer/

These files will be rolled into your application's build folder when you deploy the app using the Serverless Toolkit in the next step.

Deploy your application!

You're almost there! Just a few more steps until your application is deployed and you can test it out.

Open the package.json file at the root of your project. Just below the build script, add a deploy script as follows:


  "scripts": {
    "start": "react-scripts start",
    "build": "react-scripts build",
    "deploy": "react-scripts build && mkdir build/assets && cp build/index.html build/assets && twilio serverless:deploy --service-name react-audio-livestream --cwd serverless --assets-folder ../build",
    "test": "react-scripts test",
    "eject": "react-scripts eject"
  },

If you have worked through Miguel's tutorial on deploying a React application with serverless, you might already know how this deploy script works. If you'd like to read a detailed explanation of this line, check out his article, specifically the "Deploy the project to the cloud" section.

Now you can deploy your application by simply running the command in your terminal:

yarn deploy

Try it out now! After a few seconds, you will see the output of this command in your terminal. In the list of deployment details, find the root domain in this list:

Deployment Details
Domain: react-audio-livestream-1234-dev.twil.io

If you paste this URL into your browser, you will see your application there! You can even share this link with a friend if you want to test out the application together.

If you make changes to your application and want to redeploy it, you can do this by running the command yarn deploy --override-existing-project .

Test an audio livestream

Open the application's URL in your browser. Enter your username and sign in.

Sign in page
You will see your dashboard there. To start a new livestream, click the Start a new stream link.

User dashboard, with 0 ongoing streams

Enter a stream name in the input field and click Start Stream.

"Create a stream" page, with "today&#x27;s self care tips" entered as the stream name

After a few seconds, your livestream will begin! You will see a LIVE badge appear when you are live!

Stream is live, with a LIVE badge above the "End Stream" button

You may see a notification from your browser asking whether this application can use your microphone. Click Allow to allow this permission.

Now open the URL in a second tab and sign in with a different name.

When the page loads, the application will call the API to list the ongoing livestreams. After a few seconds, you will see the livestream you created in the first tab.

List of ongoing streams, with 1 active stream

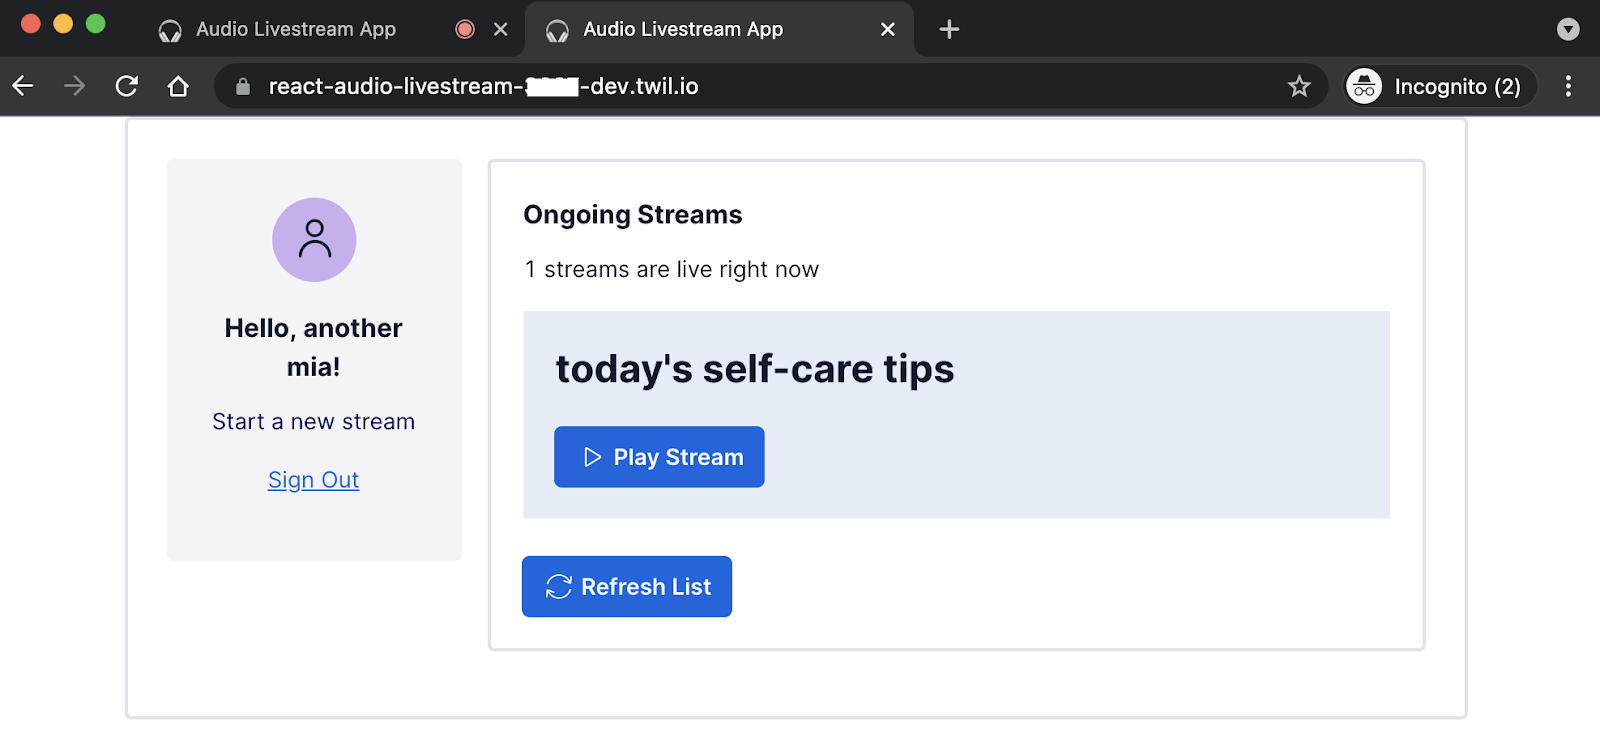
Click on the Play Stream button to start listening to the stream.

Ongoing stream has been joined. Volume slider and "Pause Stream" button are visible

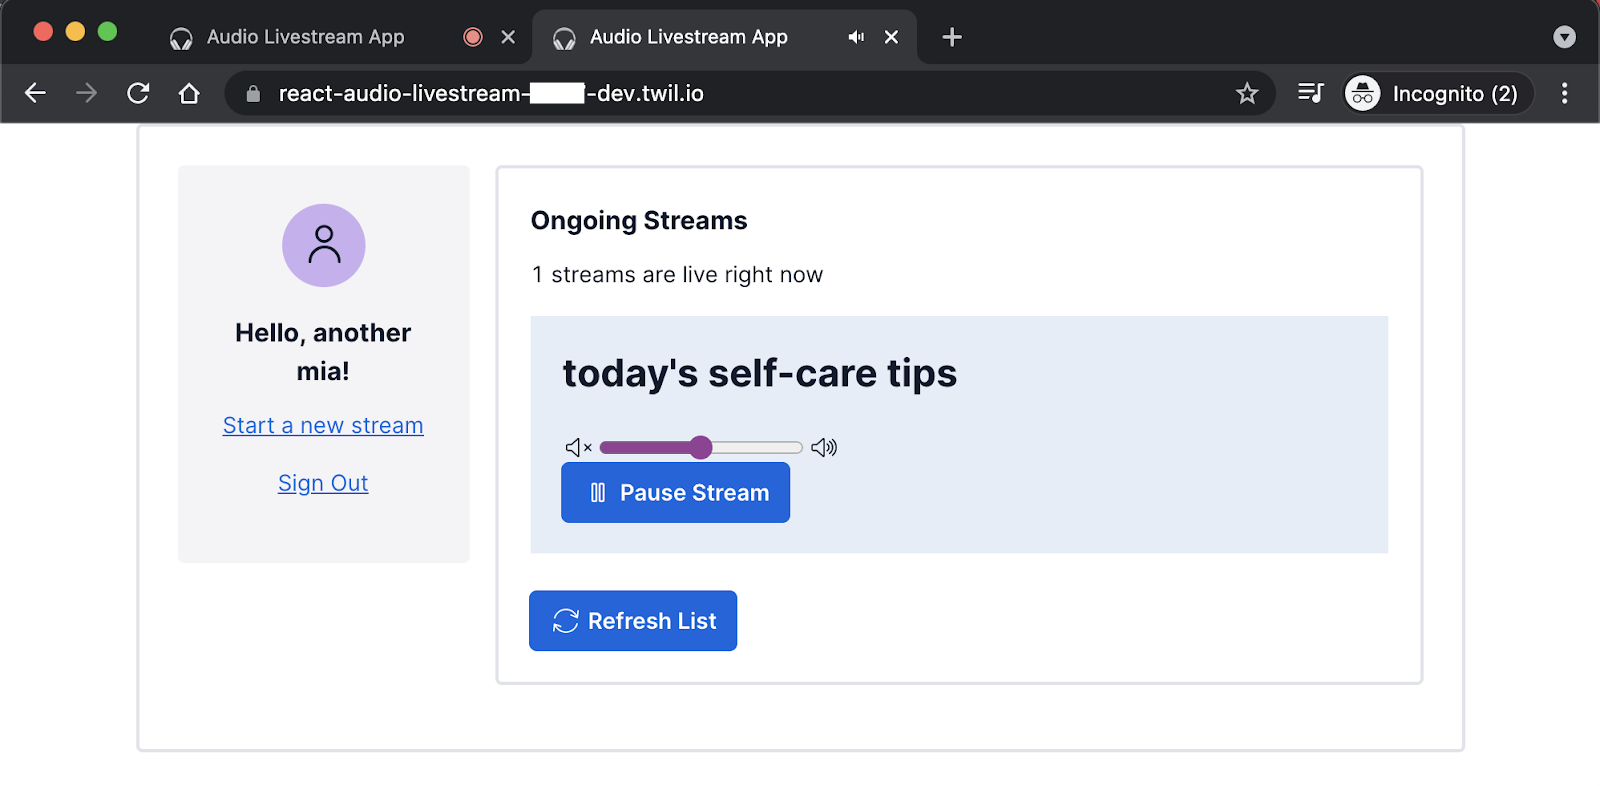
Once you are connected, try speaking into the microphone. You will hear your audio returned back to you at a slight delay.

You can also test this with a friend and have them start to listen to the livestream for a fuller experience.

Try sliding the volume slider to change the stream's volume. Feel free to try pausing and playing the stream again. When you're finished testing this application, don't forget to click the End Stream button.

If you want to undeploy your application, you can delete the deployment with the following command, passing in the service's SID, which can be found in the deployment details from the previous step.

twilio api:serverless:v1:services:remove --sid ZSXXXXXXXXXXXXXXXXXXXXXXXXXXXXXXXX

What's next for audio livestreaming?

You now have your own audio livestreaming application that you can use whenever you want! If you plan to share this more widely, you will probably want to add some sort of password protection and user management system so that you can be mindful of how your resources are being used and who is using them.

If you want to take a look at the code in its entirety, you can view the repository on GitHub here.

There are so many different project ideas that this application can be a starting point for — from guided tours to language interpretation to live podcast episodes to sharing your comedy routine. What kind of live audio project do you have in mind?

If you're curious to try out other Twilio Live projects, maybe you can try out livestreaming your video feed or creating a live screen share.

I can't wait to see what you build with Twilio Live!

Mia Adjei is a Software Developer on the Developer Voices team. They love to help developers build out new project ideas and discover aha moments. Mia can be reached at madjei [at] twilio.com.