Build a Chat App with Twilio Conversations and Svelte
Time to read: 10 minutes
July 23, 2021
Written by
Reviewed by

In this article you will learn how to build a chat app using the Twilio Conversations API and the Svelte JavaScript framework. The Conversations API gives you the power to create chat apps that bring your users together over multiple channels: chat, SMS, WhatsApp.
This API is the next incarnation of Programmable Chat, which will be sunset in 2022.
Prerequisites
To get started with this tutorial, you’ll need the following:
- Node.js installed on your machine, along with a package manager like
npmoryarn - A free Twilio account (sign up with this link and get $10 in free credit when you upgrade your account)
The Structure of the Chat App
How to handle the backend
This app has both a frontend and a backend. The backend is used to generate an Access Token that you’ll need to request from your frontend in order to make use of the Twilio Conversations JavaScript SDK.
Because the frontend portion of this tutorial is significant, I won’t cover the steps to generate an Access Token here. Don’t worry, though. There are a number of other articles on the Twilio blog that go into great detail on generating tokens.
Since your backend is separate from your frontend, you can use any backend language to write the code that generates your Access Token. Here’s are a couple of links to help you out (be sure to follow any instructions specific to Chat or Conversations in each article):
Once you’ve written the code to generate an Access Token and are running your backend server locally, take note of the endpoint you created and keep it handy, you’ll need it in order to make the proper request from your frontend in a later steps. It will probably look something like http://localhost:3000/token for JavaScript users, or http://localhost:5000/token for Python users.
Scaffold the frontend
Open your terminal, navigate to a suitable place, and run the following commands to scaffold a new Svelte app:
These commands will create a new directory called client and populate it with some barebones project files. All of the included dependencies will also be installed.
Now that a basic frontend has been created, it’s time to talk about how it will be structured.
The basic chat app will have five components:
App: the top-most component that controls logging in and retrieving an Access TokenChat: renders all of the pieces that make up the chat experienceConversation: renders all the different messages in the conversationConversationInput: controls typing and sending new messages to the conversationMessage: renders an individual message inside theConversationcomponent
Chat, Conversation, ConversationInput, and Message are all sub-components. This means that they are used, or consumed, by other components.
For example, Chat is a child of App. The Conversation and ConversationInput components are both children of Chat. Message is a sub-component of Conversation.
You’ll be building this project from the top down, starting with the App component. This means you’ll be importing components or seeing references to them before you’ve created them. That’s okay, just keep it in mind as you go!
Build out the frontend
Create your shared state
Svelte has a functionality called Svelte stores that allows you to have a global, shared state among all your components. This limits the need to pass data up and down your component chain, and makes it possible for sibling components to communicate with one another.
You’ll be taking advantage of Svelte stores as you build this app, and before writing any components, you’ll set that up.
Create a new file in the src folder of your Svelte project called stores.js.
Both of the state variables you’re going to include in your shared state are writable stores. This means that components that consume the state variable are also allowed to update it, or write to it.
Svelte also has readable stores which are only “read only”, and derived stores, which are derived from other state values and automatically updated when those other state values change.
At the top of stores.js, paste in the following line:
Beneath the import, create your two state variables:
These lines create two state variables, activeConversation (with an initial value of null) and identity (with an initial value of an empty string).
activeConversation will represent the chat conversation the local user is currently engaged in, and identity represents the local user’s name, or online identity.
The variables are exported from the file, and will need to be imported by any component that should consume them.
Save and close this file, you won’t need it any further.
Edit the App component
If you look inside the client/src folder, you’ll see a file called App.svelte. This file was automatically generated for you when you scaffolded your frontend.
Open this file in your favorite text editor and delete all of the contents inside.
The first step is to import the Twilio Conversations Client SDK. To do this, copy and paste the following code at the top of the file:
If this looks unfamiliar to you, that’s okay. <svelte:head> is a special Svelte functionality that allows you to import scripts and handle other functionalities in the compiled document’s <head></head> tags.
Below the <svelte:head> code, add empty <script></script> tags. This is where the functionality for your App component will go.
Paste the following imports inside the <script></script> tags:
This code imports the Chat component, which you haven’t built yet (so this will throw an error if your Svelte server is currently running), along with the two shared state variables you just created.
Below your script tags, add the templated HTML for the App component:
This code controls how the App component will appear in the browser. It checks to see if the shared state variable activeConversation is falsey. If so, it will display a text input to collect the user’s identity and a button to begin the conversation.
You might notice a few strange pieces of syntax, for example, the $ that prefixes the activeConversation and identity state variables. This is how you reference store variables in Svelte.
In Svelte, you can also bind form inputs to variables, which is what is happening on line 5 in the code above. The bind directive creates a two way bind between the text input and the identity store variable.
Whenever someone types in the form, the value of identity will be set to the current value of the form. In return, the text input value will always match the value of identity. This creates a seamless experience for the user. You can use bind on many form elements and other things in Svelte, not just text inputs.
Finally, on the <button> element, you’ll notice an on:click directive. This indicates that when the button is clicked by a user, a function called getAccessToken() will be executed in response. You’ll write this function now.
Back inside your <script></script> tags, beneath the imports, add the code for the getAccessToken() function:
Take note of line 2 in the code block above; this is where your Svelte app fetches the Access Token from your backend. As mentioned earlier, your backend API endpoint might be different from what’s shown here. Be sure to replace it if it’s not the same.
After fetching the Access Token, this code creates a new instance of the Twilio client. It then attempts to create a new Conversation called chat.
If this Conversation already exists on your Conversation service already, it will throw an error and jump to the catch block where your client will update the activeConversation global state variable to this Conversation object.
If the attempt to create the Conversation is successful, however, then the code will proceed with joining the newly created Conversation, updating the activeConversation state variable and then adding two users to the Conversation: user1 and user2. user1 and user2 are fake users you can use to test your app later.
With that, your App component is finished. Save and close the file.
Create the Chat component
In the App component, you imported another component called Chat. Now you’ll build that component. Create a new file in client/src called Chat.svelte.
The Chat component is there to control the chat interface. It’s a container for all the different elements of the interface.
At the top of the file, add the following code:
This will import the activeConversation variable from your stores file, and will also import two new components: Conversation and ConversationInput. You will create these two components in subsequent steps.
Below this code, add the following:
Finally, add some styling below the templated HTML:
Save and close the Chat.svelte file.
Create the Conversation component
The Conversation component has more complexities than the components you’ve written so far.
This component will utilize two Svelte lifecycle methods: onMount(), which runs when the component is rendered the first time, and afterUpdate(), which runs every time the component re-renders after a state change.
Your first step is to add your component’s <script></script> tags and import these two lifecycle methods:
Then, import the activeConversation state and the Message component (not yet created):
Below the imports while still inside the <script></script> tags, initialize two local state variables:
The div variable will be bound in an upcoming step to the HTML element that will contain all the individual messages. The messages variable will hold all the messages in the conversation.
Now you’re ready to create the onMount() lifecycle method. Add the following code beneath the two variables you just created:
This code will only run when the component is rendered for the first time. At that time, it will fetch all the existing messages in the chat conversation (or really, whatever Conversation is in the activeConversation state variable), and will add all those messages to the local state variable messages.
An event listener is also created on the activeConversation, so that any time a new message is added to the conversation later, that message will also be added to the local messages state.
Below the onMount() method, add the afterUpdate() method:
This method runs every time the component is updated due to a state change. In other words, whenever a message is added to the local messages state, the component will rerender.
At that time, the afterUpdate() method will run and scroll the div variable, which will be shortly bound to the HTML element containing all the individual messages, to the bottom. This is so the user always sees the most recent message and doesn’t have to manually scroll down in the chat window.
Below the <script></script> tags, add the component’s templated HTML:
You can see on line 1 of the code above that the <div> element is bound to the div variable. Inside the <div> element, the code loops through all the messages in the local messages state and renders each one individually via the Message component, which you’ll write later.
The last step in the Conversation component is to add some styling. Paste the following code below everything you’ve added so far:
Build the ConversationInput component
Now that you’ve created the component that controls the chat messages within a conversation, you need to be able to actually add a new message. That’s where the ConversationInput component comes in.
This component consists mostly of a text input that the user will use to type and send their message.
Create a new file in client/src called ConversationInput.svelte.
At the top of the file, paste in the following code:
This code inside the <script></script> tags imports the activeConversation variable, creates a local state variable called message, and creates a function called handleKeydown().
Below the <script></script> tags, is another special Svelte element, <svelte:window> that allows you add event listeners to the window object. In this case, you’re adding a listener that’s waiting for a keydown event. The reason for this is because your users should be able to submit messages to the chat by pressing the enter or return key.
The handleKeydown() function is called every time the window detects a key press. It checks if the key that was pressed was the enter key, and if so, it sends the message (stored in the local message state) to the chat. After sending the message, it resets the local message state to an empty string.
The local message state variable is bound to the text input (line 19 above) where the user types their message. As you learned earlier in this tutorial, this binding means that the variable is always equal to the current value of the text input, and vice versa.
Because of the binding, when the message variable is reset to an empty string in the handleKeydown() function, the bound text input will also be emptied and made ready for the next message to be typed.
Below all of this code, add some styling:
Save and close the ConversationInput.svelte file.
Add the Message component
Inside of the client/src folder, create a new file called Message.svelte. This file will house your final component, the Message component. This component is responsible for rendering a single message, whose contents are received as a prop from its parent component, Conversation.
Paste the following code into the file:
This code imports the identity shared state variable and then declares its prop value, message, which will hold the message’s contents.
It then checks if the author of the message matches the local user’s identity. If the identities match, then the userOrigin variable is set to local, otherwise, it’s set to remote. This is used for styling the message appropriately; the local user’s messages should appear on the right side of the chat window, and remote users’ messages should appear on the left.
Finally, this code renders the message.
Below all of this code, add your styles:
Save and close this file - it’s time to test the app!
Try out the chat app
Before checking anything in the browser, make sure that your local server for both your backend and frontend are running. Start each one in a separate terminal window.
For your frontend, run the following command to start your Svelte server:
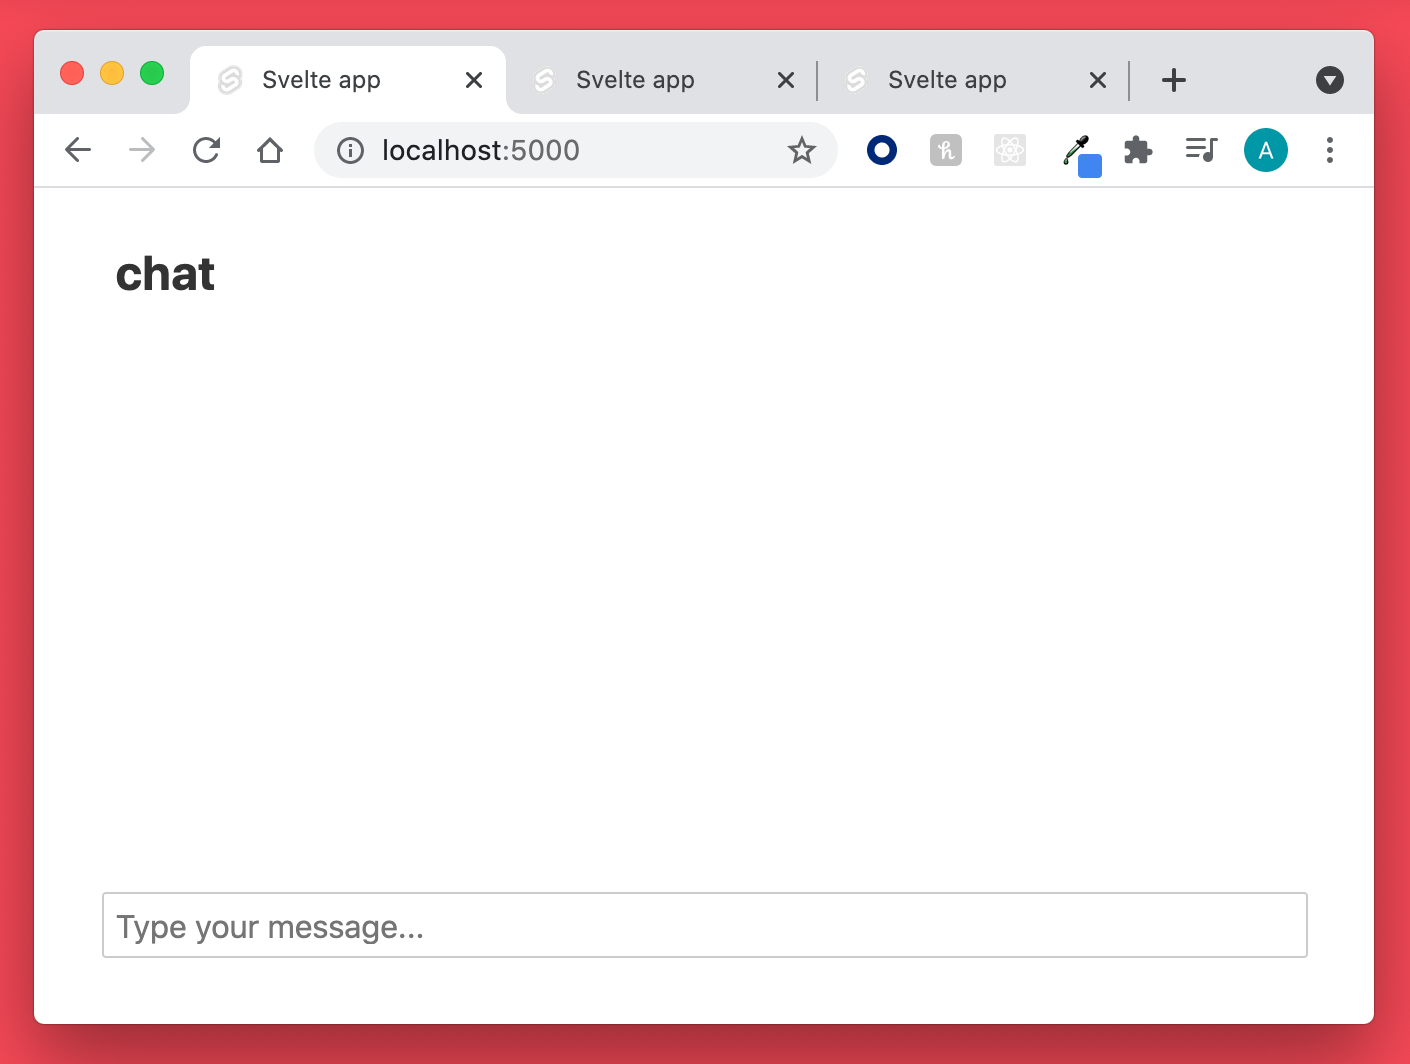
Open http://localhost:5000 in your browser.
Enter your name in the input field and then click the Get Chatting button.
Clicking this button will trigger your app to fetch the Access Token, create the new conversation, and add two users to it: user1 and user2. It will then render the Chat component, taking you into the chat interface:
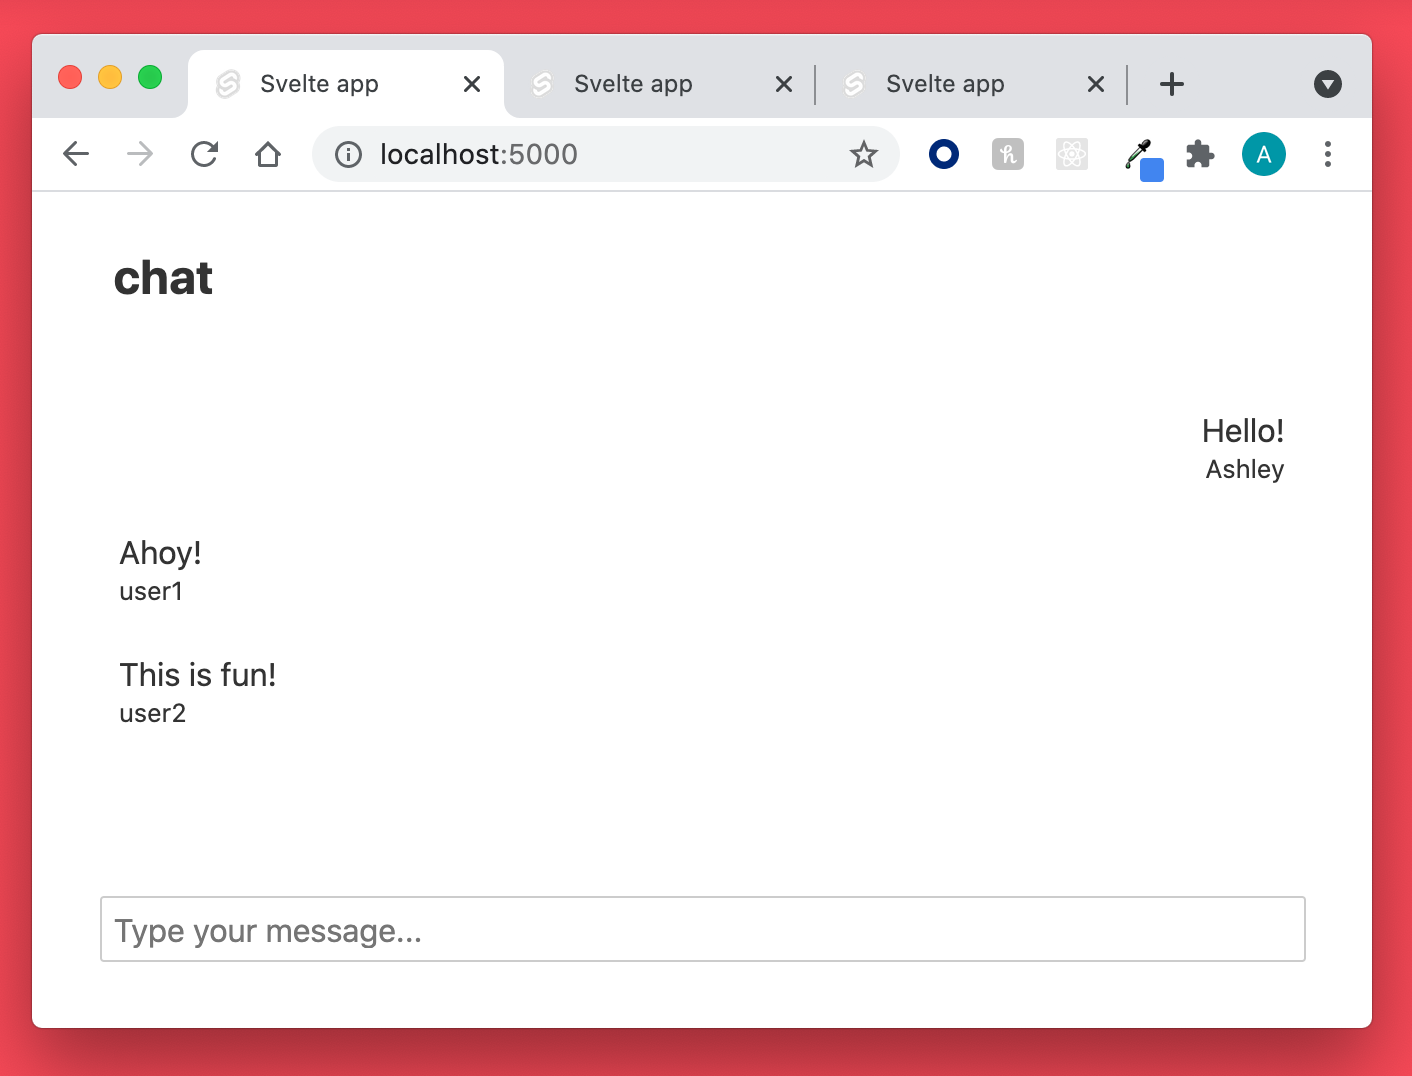
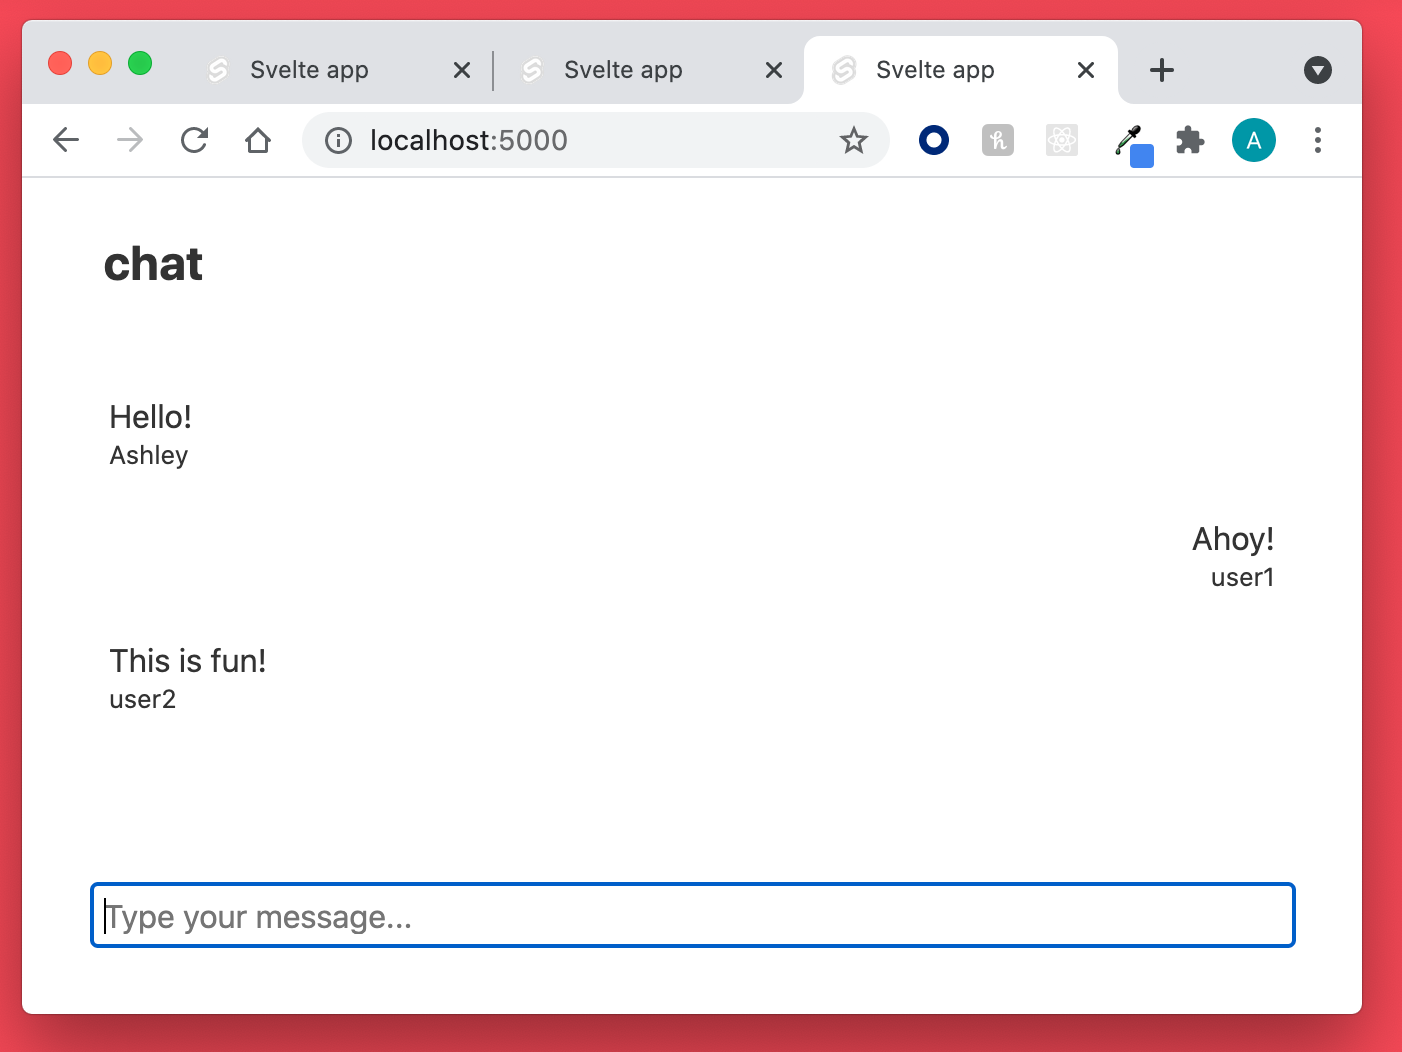
At this point only the identity you entered, along with the identities user1 and user2 will be able to access this chat conversation, because all conversations are private in the Twilio Conversations API.
That means, when you join the conversation as another user in a different browser tab to test out your app, you can only join as one of those three users.
In a new tab, join the conversation again as user1, and then in a third tab, join once more as user2.
Add messages from each user and have fun chatting back and forth!
Next steps
Now that you’ve built a chat app with Twilio Conversations and Svelte, you can try expanding it by letting your users display their online status. If you’re new to Svelte you could also read about the differences between Svelte and React.
Let me know what you’re building on Twitter, and happy chatting!
Ashley is a JavaScript Editor for the Twilio blog. To work with her and bring your technical stories to Twilio, find her at @ahl389 on Twitter. If you can’t find her there, she’s probably on a patio somewhere having a cup of coffee (or glass of wine, depending on the time).


Related Resources
Twilio Docs
From APIs to SDKs to sample apps
API reference documentation, SDKs, helper libraries, quickstarts, and tutorials for your language and platform.
Resource Center
The latest ebooks, industry reports, and webinars
Learn from customer engagement experts to improve your own communication.
Ahoy
Twilio's developer community hub
Best practices, code samples, and inspiration to build communications and digital engagement experiences.