Build a Contact Form in Node.js with SendGrid
Time to read: 5 minutes
January 13, 2022
Written by
Reviewed by

Contact forms on web applications are essential as it’s great for signups, customer engagement, or even getting feedback from visitors. There are many solutions when it comes to creating contact forms such as using embedded forms. And although embedded forms are easy to implement, building out your own form allows you to have complete transparency and customization of the form and its processing.
A great solution to send out emails through contact forms is Twilio Sendgrid. SendGrid offers deliverability, scalability and even in-depth metrics and analytics when it comes to email-based solutions such as contact forms. In this post, you’ll learn how to build a basic contact form with SendGrid to let your visitors contact you which can be incorporated into your Node application.
Prerequisites
Here is what you will need to complete this tutorial:
- Node.js installation
- A free Twilio SendGrid account. Sign up here to send up to 100 emails per day completely free of charge.
- An email address to test out this project
Configure Your Environment
In this section, you will first configure your environment by setting up your SendGrid account, and building the scaffolding for your Node.js application.
Generate your SendGrid API key
Start off by logging into your SendGrid account and heading to the API Keys section. Click the blue “Create API Key” button on the top right.

Choose whatever name you’d like for your API key and click the blue “Create & View” button. Copy your API key and store it in a safe place.
Build the app structure
In your terminal or command prompt, navigate to your preferred directory, and run the following commands:
This will create a directory and initialize a new Node.js web application. This Node.js application will serve as a server where the form will be hosted on.
Next install the dependencies for the web application:
You’ll use the @sendgrid/mail package to connect with the SendGrid API with your API key to send out emails whenever users contact you through the form. dotenv is used to access environment variables, which is where you will store your SendGrid API key. Lastly, express is a backend framework that will be used to spin up a web server and will also be used to grab the inputs from the POST request to the server during the submission process of the form.
Next, you’ll need to create three new files in your contact-form directory: index.js, form.html, and .env. The index.js will be the backend of your application, the form.html file will hold the stylized form in html which will be displayed on your web server and the .env will securely hold your SendGrid API key.
Your SendGrid API key you created earlier can be securely stored in the .env file. In your preferred text editor, open up the .env file and copy and paste the following into it:
Once copied in the .env file, replace the XXXXXXX placeholders with your actual API key.
Build out the application
In this section, you will build out the index.js file and form.html. The index.js will spin up the web server and display the contents within the form.html file. Once the form is displayed, and the user clicks the submit button, the input data will be sent back to the server - which is the index.js file - where it will be processed and sent out as an email to the point of contact.
Setup the web server
Open the index.js file you just created and add the following code to the top:
This code will import and initialize the dependencies you installed earlier.
At the bottom of the file, add the following code:
This line uses Express to run a server on port 3000 where the form will be hosted on.
Create the contact form
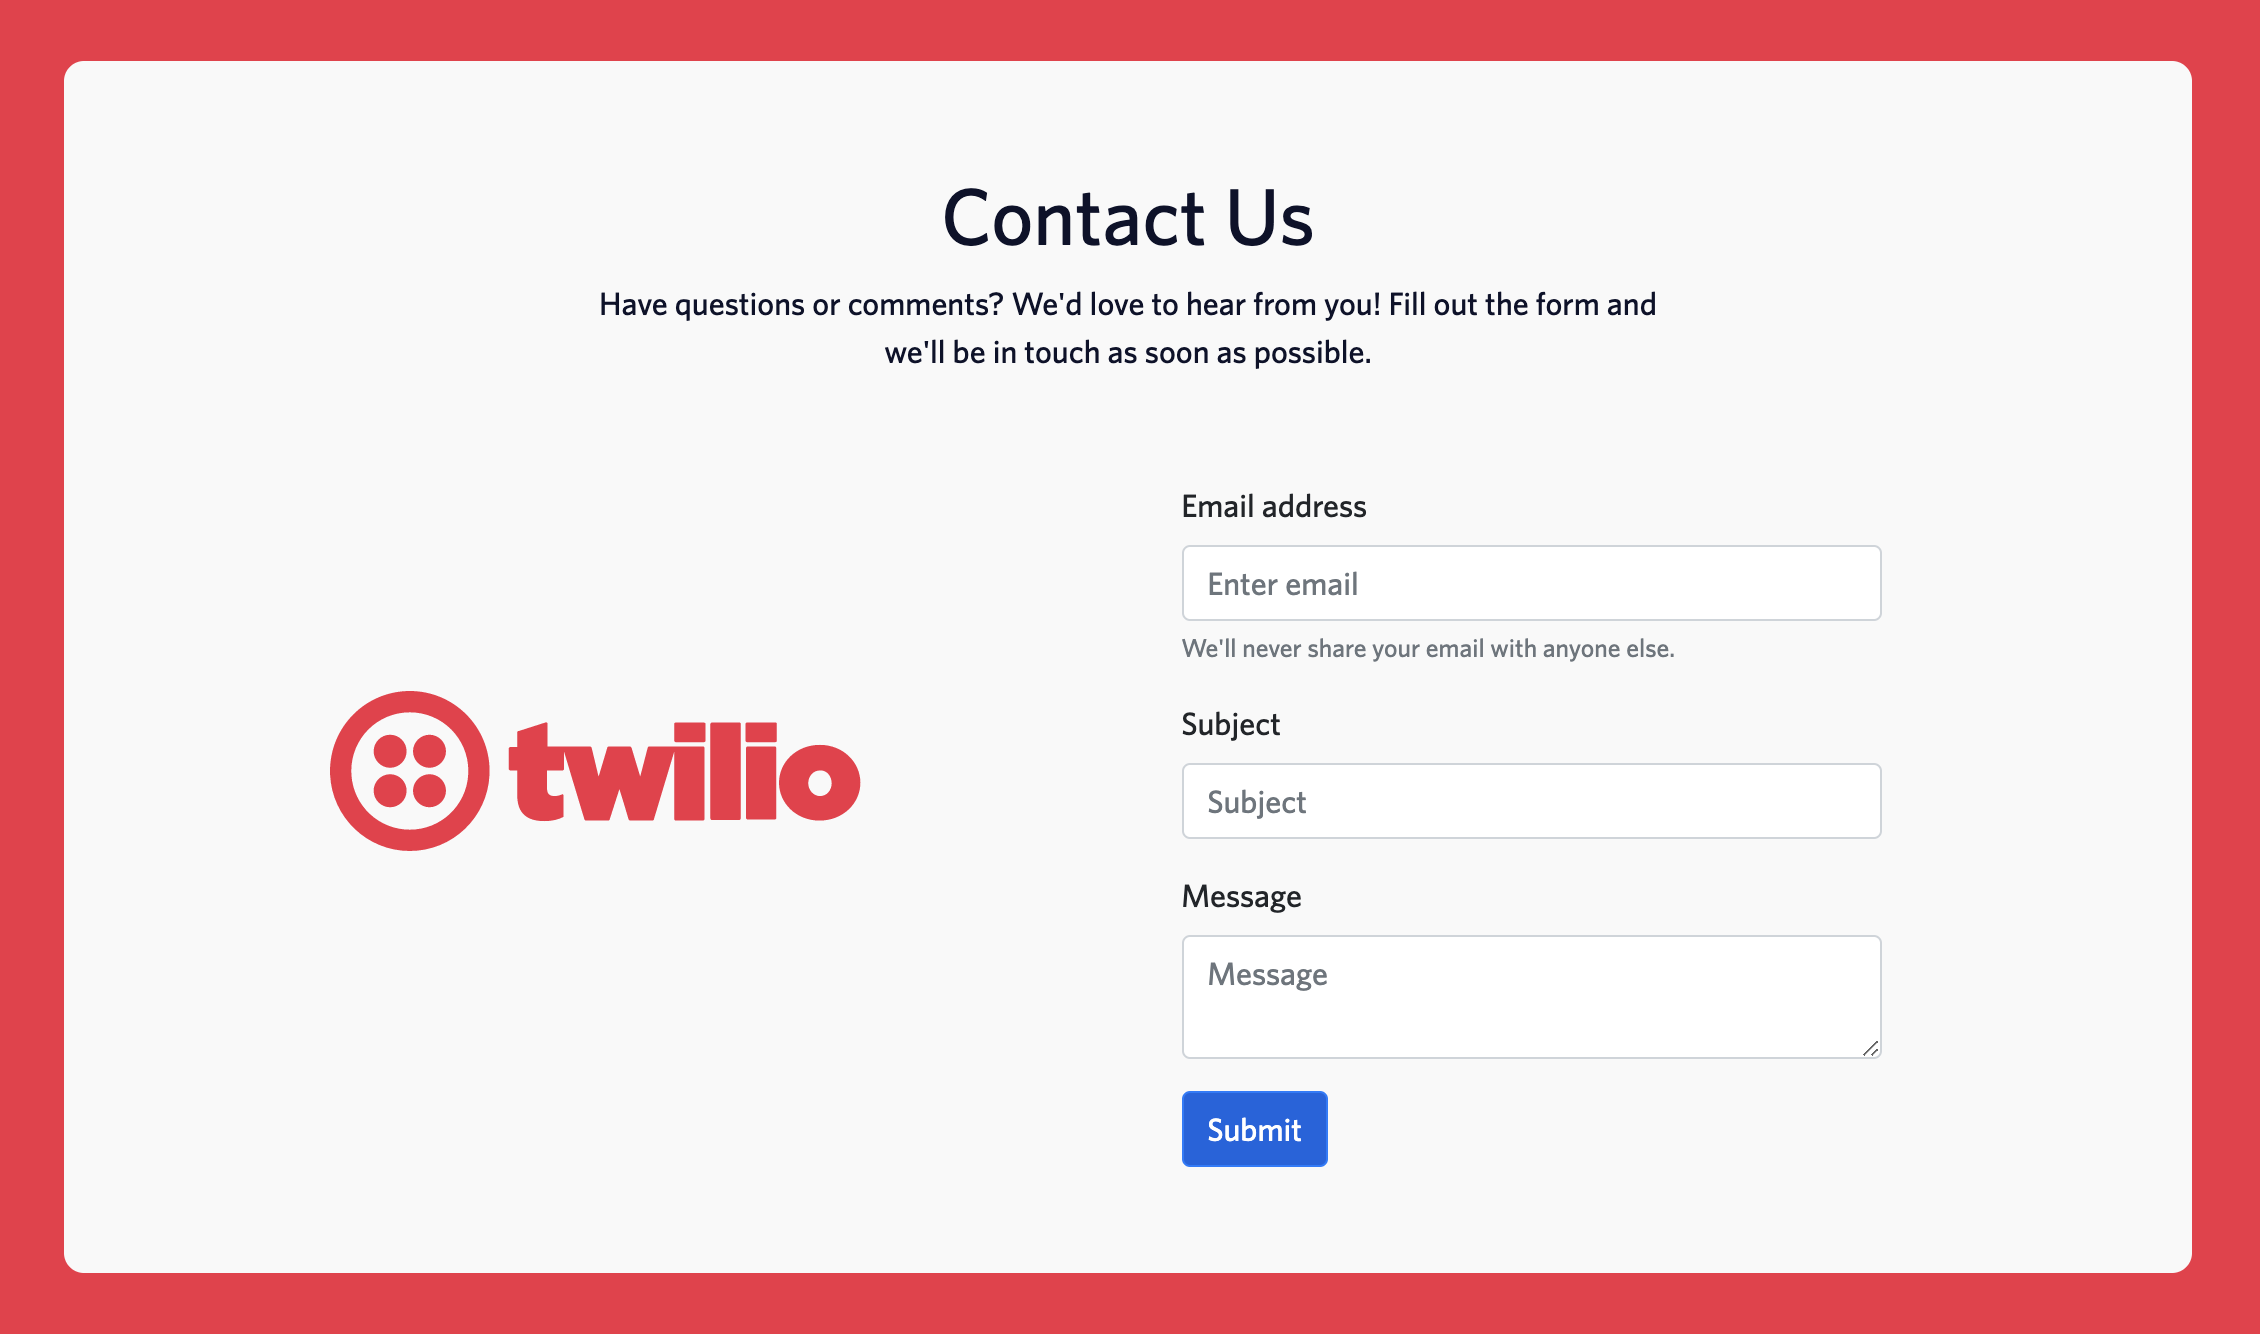
Now that you have the server set up, you’ll need to create the form that will be displayed on the frontend before we run it.
Open up the form.html file and insert the following code at the top:
This section includes the <head> element which will store the metadata for your form. The first highlighted line imports a css stylesheet from Bootstrap and the second highlighted line imports the Whitney font that is used here at Twilio! Both of these are used to stylize the form and make it more appealing for the users.
Below this, add the following:
The rest of the code shown above will display the page which consists of a card showing the contact form. The highlighted line above shows the <form> element - its attributes show that it will send out a POST request to the /contact route on the server with data from the inputs.
Save the file and head over to your index.js file and insert the highlighted code below the initialized packages:
The highlighted code displays the contents of the form.html file on the main page of the server ( / route).
Now let's see how the form looks on the browser. Save the file and on your terminal, enter the following command:
Your terminal should display that the app is listening on port 3000 which means your application is up and running and is being hosted on port 3000. To view the form, open up your preferred browser and enter in the following link on the URL bar: http://localhost:3000/. You should then be presented with the contact form. Pretty neat, right?
Feel free to adjust or play around with the css and formatting on the form.html file to cater the form to your needs.
Currently, the form is static and can’t process the data within the fields. The next step is to build out a route which will process the incoming data from the form.
Process the form submission
Once the user clicks the submit button after entering in their email, subject and message, the data is then sent as the body of a POST request to the /contact route where the data will be processed. This data will then be parsed from the body and used to the send out an email using SendGrid
In the index.js file, add in the following highlighted code:
Once copied into your file, don’t forget to replace the RECIPIENT_EMAIL and the SENDER_EMAIL placeholders with the actual email.
Once the user has submitted the contact form, the application will request and redirect the user and the data to this function which is the /contact route. The input data from the form is sent in the body of the request and can be found in the req.body object. This code will then attempt to send an email to the recipient - in this case it should be someone like the website owner - with the email address, subject and message from the form.
Save the file, and you should finally be ready to test it out! On your terminal, enter in the following command:
Head back to your browser and refresh the contact form. If you left the form, here is the URL to where it is hosted: http://localhost:3000/. Enter in an email address, subject and a message and click Submit. In a few seconds you should receive an email regarding a contact request.
Next Steps
And that's it! You just created a contact form in Node.js with Twilio SendGrid that can easily be placed on your web application. With the ease and reliability of using SendGrid, the possibilities are endless!
If you enjoyed this tutorial and want to continue building, expand the application by integrating a database to store the contact information of users. And if you’re looking to dig into what SendGrid has to offer, you can use SendGrids Email List Management to add users to a contact list. Happy building!
Dhruv Patel is a Developer on Twilio’s Developer Voices team. You can find Dhruv working in a coffee shop with a glass of cold brew or he can either be reached at dhrpatel [at] twilio.com or LinkedIn.


Related Resources
Twilio Docs
From APIs to SDKs to sample apps
API reference documentation, SDKs, helper libraries, quickstarts, and tutorials for your language and platform.
Resource Center
The latest ebooks, industry reports, and webinars
Learn from customer engagement experts to improve your own communication.
Ahoy
Twilio's developer community hub
Best practices, code samples, and inspiration to build communications and digital engagement experiences.