Build a Legislation Tracking Bot with Node.js, Express, and Twilio Programmable Messaging
Time to read: 8 minutes
June 14, 2022
Written by
Reviewed by

It’s important to keep up to date with high-impact bills in your state and across the nation. However, tracking bills and monitoring their status can be difficult if you don’t know where to look.
By utilizing the LegiScan API and Twilio’s Programmable Messaging API, you can create an SMS bill-tracking bot that will search for bills relevant to keywords that you designate within a few guided messages.
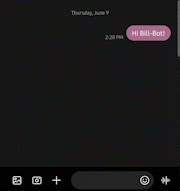
Check out the bot in action!
Prerequisites
To follow along with this tutorial, you will need the following:
- A free or paid Twilio account. If you are new to Twilio, click here to sign up for a free Twilio account and get a $10 credit when you upgrade!
- A Twilio phone number
- Node.js and npm
- Ngrok: this is a tool to speed up application testing by connecting your local server to the internet
- A personal phone number
Setting up your developer environment
To get started, open your terminal window and navigate to the directory where you will be creating this application. Copy and paste the commands below into your terminal and hit enter:
These commands create a new directory (named bill-bot), navigate into it, initialize a new Node.js project, install the required dependencies, and create the files index.js and .env.
The six dependencies installed were:
twilio, to make use of Twilio’s Messaging APIdotenv, to store your important credentials and access them as environment variablesexpress, to build your serverexpress-session, to keep track of which step of the bot a user is currently atnodemon, to run your server locally and automatically restart it when changednode-fetch, to utilize the fetch API in your Node.js environment
You will be coding in two files for this tutorial: index.js and .env. In index.js, you will write the code for your backend that interprets all messages and responds accordingly. In .env, you will be storing your access credentials for the LegiScan API.
Getting your LegiScan credentials
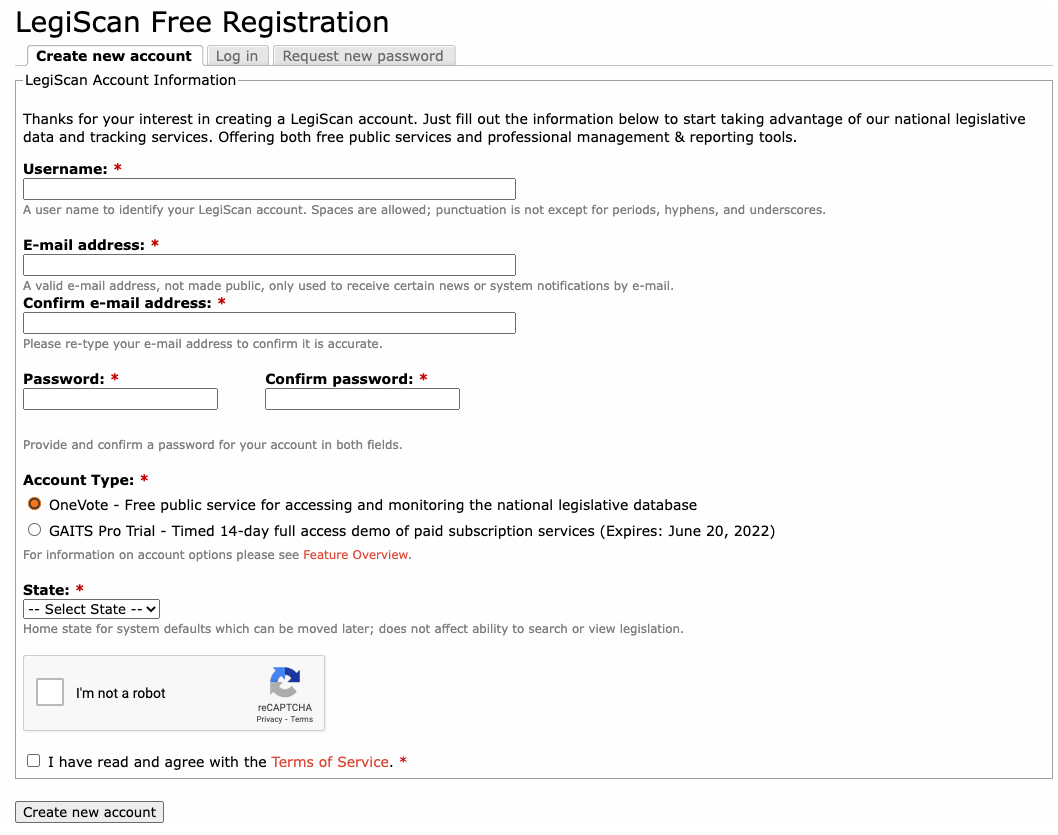
To use the LegiScan API, you must first create an account to get your API key. Be sure to fill out all the required information and sign up for the free account type.
After signing up for an account, you will need to go to the email address you entered and verify your account by clicking a verification link in LegiScan’s welcome email.
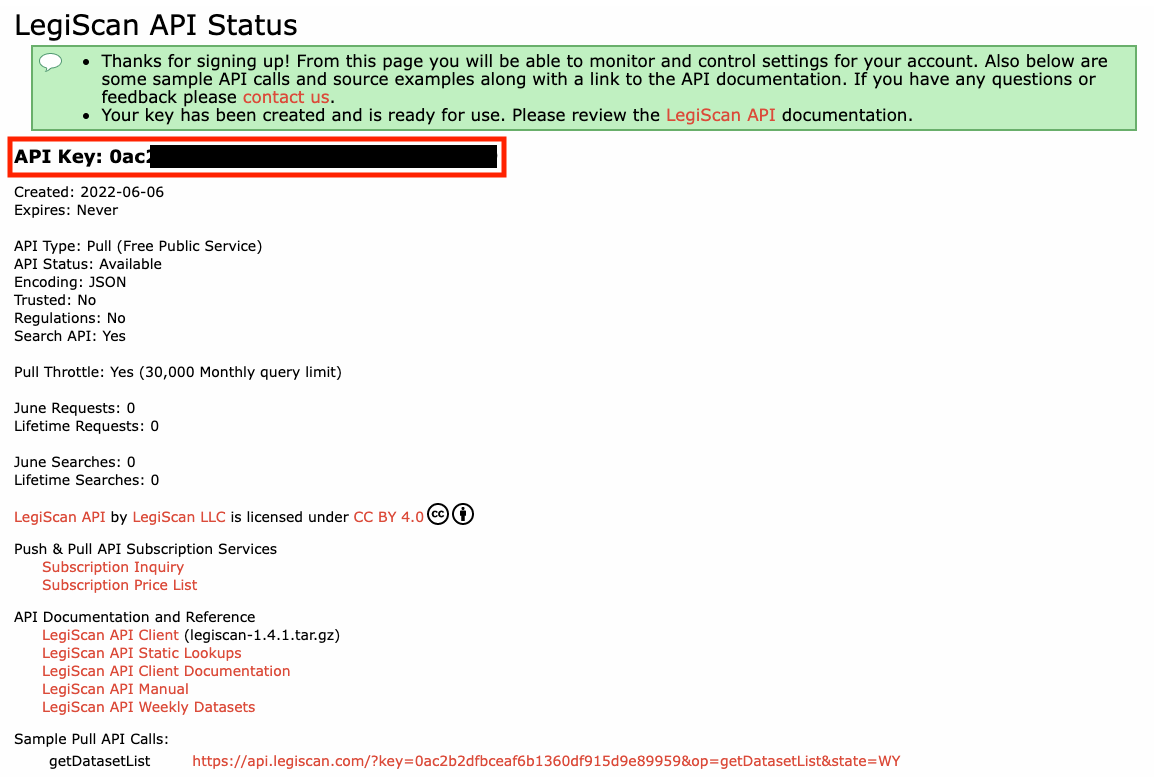
Back on the LegiScan homepage, click on LegiScan API in the navigation bar on the top of the page. If your account was verified successfully, then you will need to fill out a form to register for an API key. After submitting that, the next page should include the API key that you will use in this tutorial.
Keep the API key accessible and open the .env file you created earlier in the code editor of your choice. Inside .env, copy and paste the line below:
Replace XXXXXX with your LegiScan API key and switch to the index.js file.
Handling incoming text messages
The index.js file will be responsible for handling all incoming messages and providing the proper responses for the bot. To get started writing your backend, copy and paste the code below into index.js:
The code above initializes the fetch, dotenv, express, and express-session packages installed earlier. It also initializes the legiscanKey environment variable and imports the MessagingResponse object from the twilio package.
Now that you’ve initialized the necessary packages, you need to also include middleware to parse incoming text messages and JSON data. You also need to enable sessions for users, which will be important for performing searches later. To do so, copy and paste the highlighted lines of code below your existing code in index.js:
Finally, you need to set up routes that will process all incoming messages. Again, copy and paste the highlighted lines of code below your existing code in index.js:
You now have the basic layout of the backend for your bot complete. This code creates a /webhook route that listens at port 3000 on your local server with a POST endpoint which currently does nothing. Now, you need to write code to get the bot to do something.
Developing your routes
The functionality of the bot can be broken down into the following steps:
- Introduce the bot
- Designate a location
- Choose the bill category
- Search for relevant legislation information
Introduce the bot
You will want to give users a brief description of the bot that they will be using and guide them to the next step. Modify your /webhook route like so:
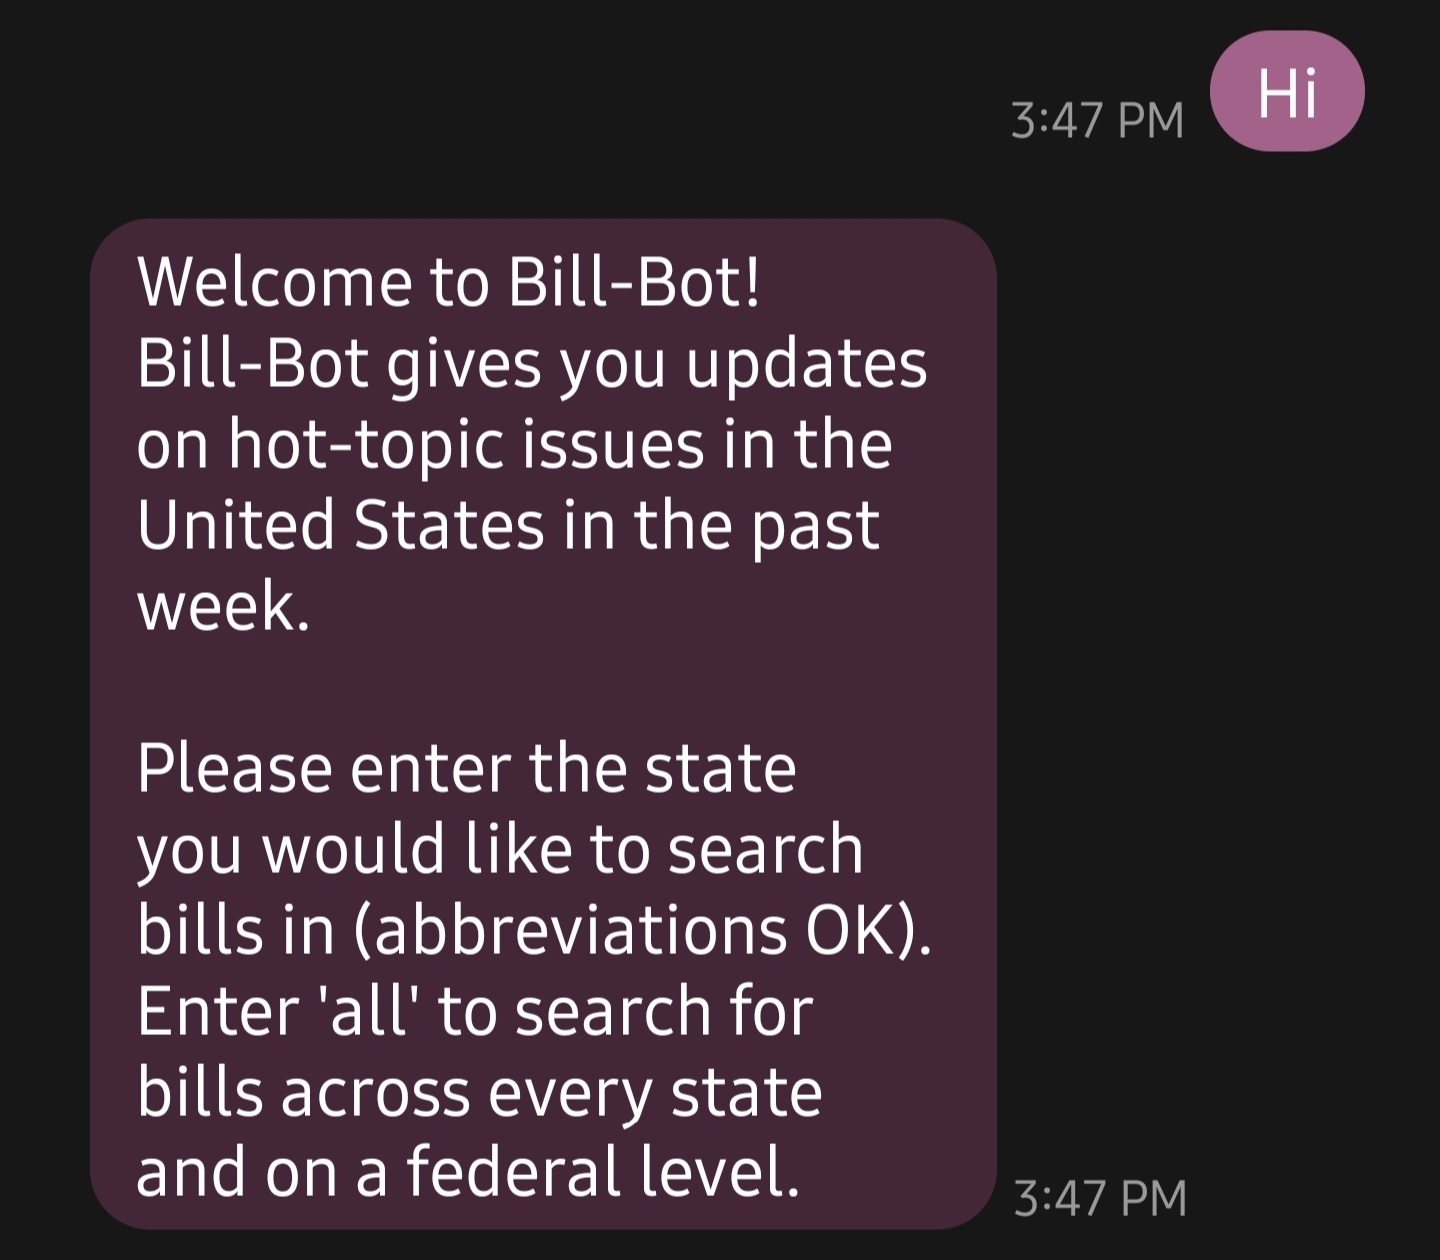
This newly added code will let the bot send a response back when anyone sends a text message to it. This is done by creating a new MessagingResponse object and utilizing the message property to send a message.
Next, the bot will also prompt the user to designate the location they would like to look up bills in. If you were able to text the number right now (you will set up a phone number for your bot after completing the code for the backend), you would get this response:
The bot works! Now, how would you read an incoming text message and get the correct state?
Designate a location
First, you will need to define every state name and relate them to their proper abbreviation in order to fit within the LegiScan API parameters. One way to do this is by creating a new variable called states which is an object with 50 properties; one for each state.
Every property has a state abbreviation as its key, and the corresponding state name for its value. Copy and paste the highlighted text below the line you initialized the MessagingResponse variable:
With your states object set up, create a new route to handle the state selection portion of your code by copying and pasting the highlighted lines of code between your /webhook route and listener:
Now the bot can read the incoming text message. By using express-session, the bot can also store the state abbreviation as a variable for later once the bot needs to perform a search. Using the states object from earlier, the bot can correctly interpret either a state name or abbreviation if given. If a user enters “all”, then it can set the proper query parameter to search across every state legislation as well as federal legislation.
However, if you were to text the bot now, it would only send the first message again and nothing more. To fix this issue, the redirect property of a MessagingResponse can be used.
It would make sense at first glance to add response.redirect(‘/state’) to the /webhook route, but only doing that would provide this response:
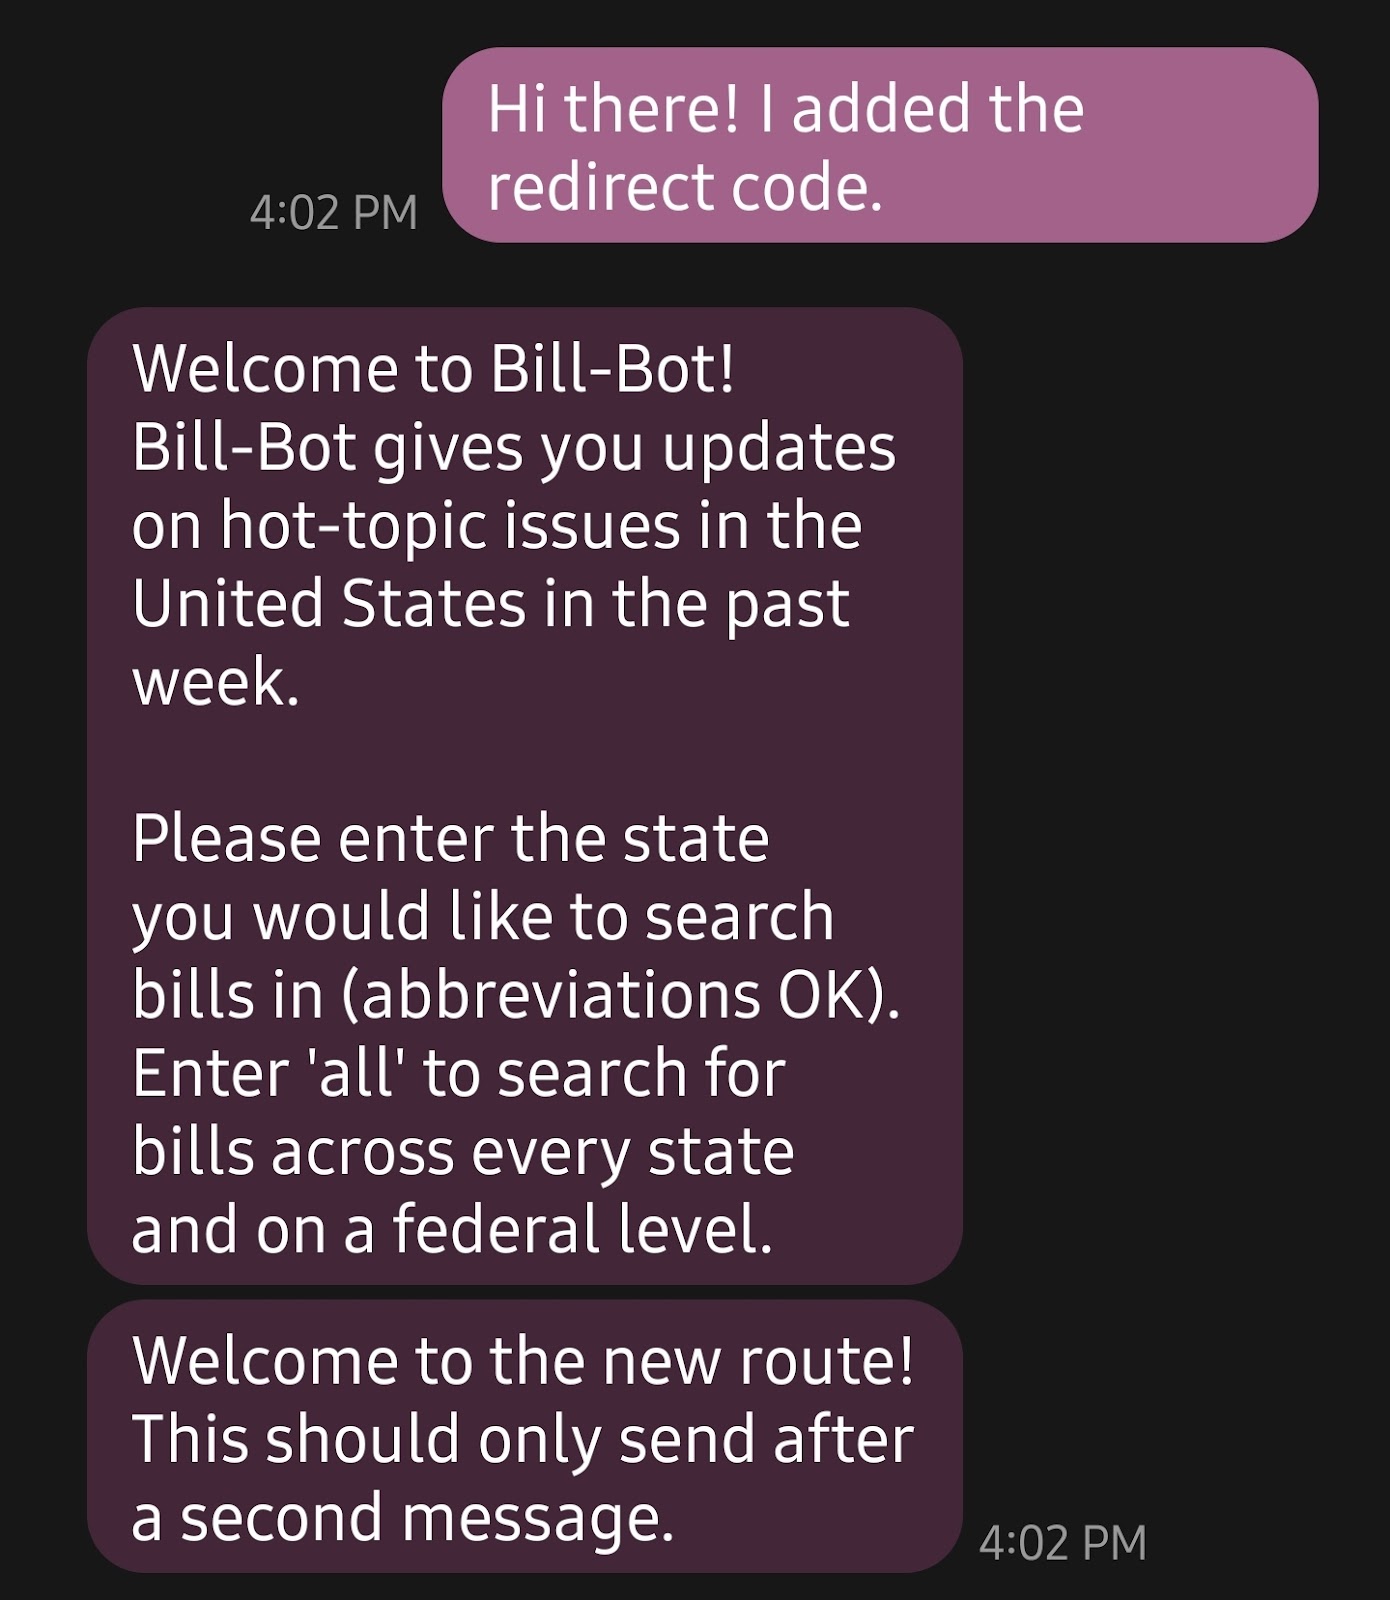
As you can see, the bot correctly redirects to the /state route but reads the input immediately. One way this can be circumvented is by introducing yet another variable to the user session called menuState. This new variable will track which step of the bot a user is in and then redirect them accordingly.
First, replace the /webhook route with the code below:
When a message gets sent to your server, it will always go through the /webhook route first.
Depending on the value of menuState and whether it exists or not, the user is then redirected to the appropriate route. Line 25 of this code block is an example of how the server will allow the user to progress through the menu.
Additionally, this code references a new /category route that will allow users to pick the legislation category and a new /search route that will search for and display the relevant legislation. You’ll build these two routes after the /state route is finished.
Next, modify the /state route by including the highlighted lines in your code:
The /state route will now allow users to progress to the next route, /category. Additionally, if the user provides an invalid state name or abbreviation, then they will not be able to progress past this step until they do so. If you were able to text the bot now, this is what it would look like:
Choose the bill category
Now, below the /state route and above the listener, add the highlighted lines of code:
For this tutorial, you will be adding two keywords: privacy, which will search for legislation related to personal information privacy, and trans, which will search for legislation related to transgender individuals and gender-affirming care. After you complete this tutorial, you will be able to add your own keywords and legislation!
In the newly created /category route, add the following code:
This block of code adds a query variable to a user’s session, then changes it based on the keyword sent to the bot. Information on how to structure your LegiScan API queries can be found here in case you would like help creating your own query.
All that’s left now is to perform the search.
Search for relevant legislation information
Now, for your app, you need to figure out how you want to parse the JSON data that returns from the query. You can either play around with the API yourself to get an idea of what you want returned to the user, or utilize the LegiScan API user manual.
For the purposes of this tutorial, you will be searching for information on the 5 most relevant bills in the past week and sending a detailed message to the user. Below the /category route and above the listener, add the final route (/search).
The lines of code above will perform a search using the fetch API and return a message containing the bill parameters you specified for this tutorial. Additionally, req.session.destroy() will remove the user’s session from the server and allow them to perform another search with the bot.
All that’s left is to connect your local server to the internet using ngrok, and then forward all incoming text messages to your Twilio phone number towards your server by configuring the phone number’s webhook.
Server tunneling with ngrok
The first step to connecting your local server endpoints to your Twilio phone number is by connecting it to the internet. In a production environment, you would have your bot deployed on the cloud or through a physical server.
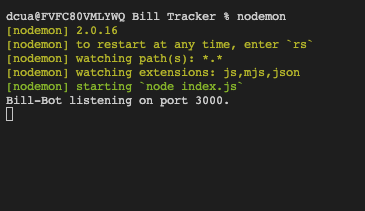
Head back to your terminal, make sure you’re still in your project’s working directory, and run the following command:
If the nodemon package was installed correctly, your screen should look like this:
Now, open a new terminal window and navigate to the same working directory of your project. Run the following command:
If ngrok was installed correctly, the terminal should now look like this:
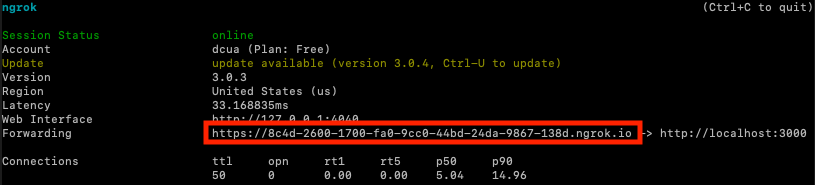
Until ngrok is terminated, all requests to the forwarding URL (boxed in red) will be forwarded to your local server at port 3000. This forwarding URL is randomly generated, so if you need to restart ngrok you will need to connect the newly created URL to your Twilio phone number again.
Configuring your Twilio phone number webhook
Now, you need to connect your local server via the forwarding URL to your Twilio phone number.
In the Active numbers section of your Twilio console (assuming you created a free account and bought a phone number), click the phone number you will use for Bill-Bot.
Scroll down to the Messaging section and put your forwarding URL in the textbox under the label “A MESSAGE COMES IN”. You will also need to add /webhook to the end of your URL to ensure the message goes to the correct route. The URL you enter should look something like this: https://xxxx.ngrok.io/webhook.
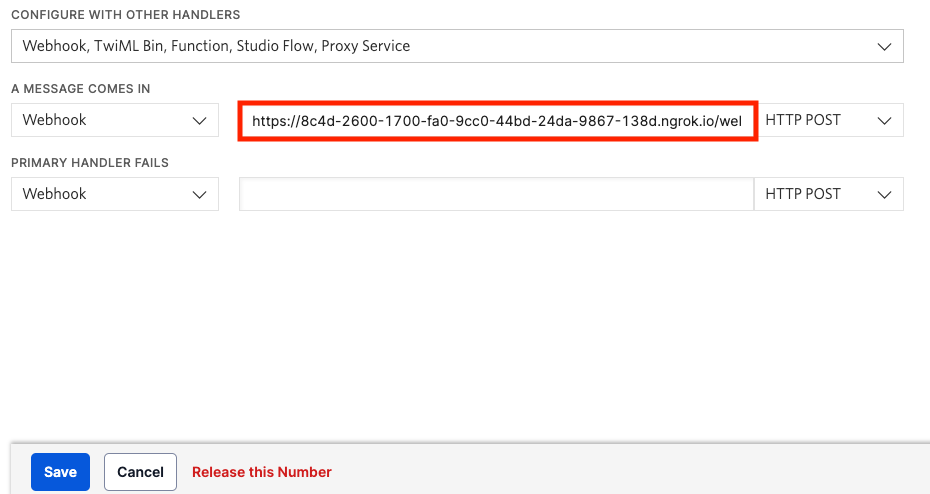
Be sure that the left dropdown menu is on Webhook and the right dropdown menu is on HTTP POST. Finally, click the blue button labeled Save.
You can now send a message to your Twilio phone number and interact with the bot. Try it out now by texting “Ahoy!” to your Twilio number.
What’s next?
Congratulations! You just finished creating a bill-tracking bot through Twilio’s SMS API, now try customizing it or adding some new features. Maybe you want to add message scheduling to your bot? Perhaps you want to try creating a chatbot with a no-code solution using Twilio Studio? Try seeing what you can add to your bot or create a brand new one while utilizing one of Twilio’s many APIs.
If you decided you’ve had enough coding for today, consider being an activist! Use your voice to educate others, advocate for legislation, and stand up for things you believe in. You can also engage in community service, volunteer for a good cause, or create public awareness for political issues in any way you can.

I can’t wait to see what you build next!
Dainyl Cua is a Developer Voices Intern on Twilio’s Developer Network. They would love to talk at any time and help you out. They can be reached through email via dcua[at]twilio.com or through LinkedIn.


Related Resources
Twilio Docs
From APIs to SDKs to sample apps
API reference documentation, SDKs, helper libraries, quickstarts, and tutorials for your language and platform.
Resource Center
The latest ebooks, industry reports, and webinars
Learn from customer engagement experts to improve your own communication.
Ahoy
Twilio's developer community hub
Best practices, code samples, and inspiration to build communications and digital engagement experiences.