Build a WhatsApp Flashcard Bot With Python, Flask and Twilio
Time to read: 11 minutes
January 14, 2020
Written by

A flashcard is one of the most tried and true study tools, helping anyone from medical students to language learners all approach their goal of memorizing facts and figures. Software like Anki or Memrise have provided countless features and robust settings that make digital flashcards increasingly useful. However, there are plenty of times where you might not be able to pull up one of the more robust applications and need something more lightweight to study with.
For example, when your cell signal is good enough for texting, but cannot load a full-featured web application. Or perhaps you’re in an airplane that doesn’t allow various websites, but does allow you to text phone numbers down on the ground.
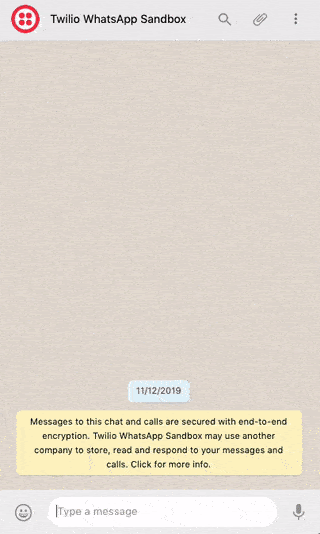
This tutorial will show you how to make a basic flashcard bot for WhatsApp or SMS to get you started on your way to reviewing flashcards wherever you are. You can see an example of what we’ll be building below:
Tutorial Requirements
To follow this tutorial you need the following components:
- Python 3.6 or newer. If your operating system does not provide a Python interpreter, you can go to python.org to download an installer.
- Flask. We will create a web application that responds to incoming WhatsApp messages with it.
- SQLite. A very simple database that we will use to store flashcards.
- ngrok. We will use this handy utility to connect the Flask application running on your system to a public URL that Twilio can connect to. This is necessary for the development version of the chatbot because your computer is likely behind a router or firewall, so it isn’t directly reachable on the Internet. If you don’t have ngrok it installed, you can download a copy for Windows, MacOS or Linux.
- A smartphone with an active phone number and WhatsApp installed. This tutorial works with standard SMSes as well if you prefer that over WhatsApp.
- A Twilio account. If you are new to Twilio create a free account now. You can review the features and limitations of a free Twilio account.
Configure the Twilio WhatsApp Sandbox
Note: as mentioned above, this tutorial works for both SMS and WhatsApp. This section is only necessary if you would like to use WhatsApp. If you would like to use SMS, follow the instructions under the section “Configure Twilio’s Programmable SMS” in the Build a SMS Chatbot tutorial.
Twilio provides a WhatsApp sandbox where you can easily develop and test your application. Once your application is complete you can request production access for your Twilio phone number, which requires approval by WhatsApp.
Let’s connect your smartphone to the sandbox. From your Twilio Console, select Programmable SMS and then click on WhatsApp. The WhatsApp sandbox page will show you the sandbox number assigned to your account, and a join code.
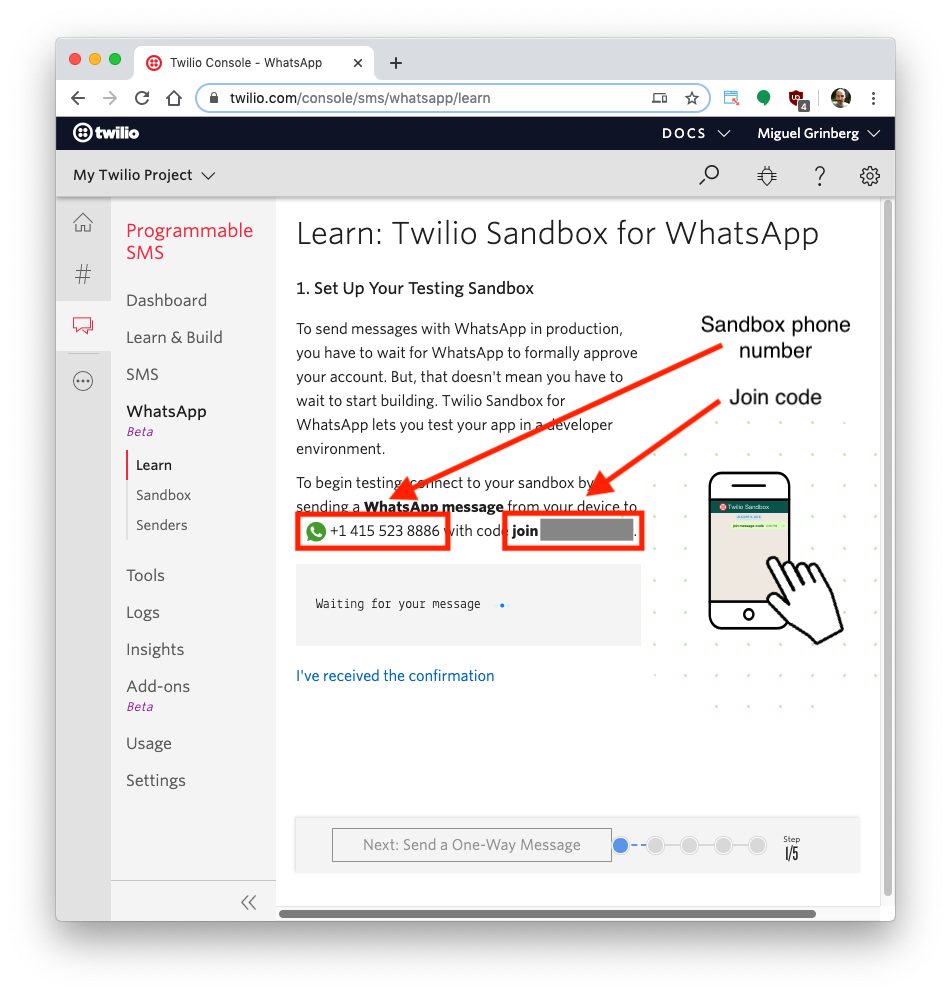
To enable the WhatsApp sandbox for your smartphone send a WhatsApp message with the given code to the number assigned to your account. The code is going to begin with the word join, followed by a randomly generated two-word phrase. Shortly after you send the message you should receive a reply from Twilio indicating that your mobile number is connected to the sandbox and can start sending and receiving messages.
Note that this step needs to be repeated for any additional phones you’d like to have connected to your sandbox.
Create a Python Virtual Environment
Following Python best practices, we are going to make a separate directory for our flashcard bot project, and inside it we are going to create a virtual environment. We then are going to install the Python packages that we need for our chatbot on it.
If you are using a Unix or Mac OS system, open a terminal and enter the following commands to do the tasks described above:
For those of you following the tutorial on Windows, enter the following commands in a command prompt window:
The last command uses pip, the Python package installer, to install the four packages that we are going to use in this project, which are:
- The Flask framework, to create the web application
- The Twilio Python Helper library, to work with the Twilio APIs
- The Flask-SQLAlchemy library, to interface with a database
- The Flask-Migrate library, to help us maintain the aforementioned database
For your reference, at the time this tutorial was released these were the versions of the above packages and their dependencies tested:
Creating a Flashcard Bot
Huzzah! You’re all set up. Let’s take a look at what our flashcard bot is going to be doing. At its most basic, a flashcard has front and back sides. A user looks at the front and guesses what is on the back. Since this is a digital flashcard, if they’re correct, the user moves on to the next flashcard, and if not, the user might try again until they guess it correctly.
This means we need to have three main capabilities with our flashcard bot:
- Registering a user: we need to be able to differentiate between users’ (aka phone numbers) flashcards.
- Creating flashcards: by default, the bot doesn’t have any flashcards created.
- Reviewing flashcards: the fun part of the bot.
Getting Started with Twilio and Python
If this is your first bot with Twilio and Python, I recommend first going through Miguel Grinberg’s Build a WhatsApp Chatbot With Python, Flask and Twilio tutorial. It describes all of the foundational information needed to grasp how Flask, Twilio, and webhooks fit together. The rest of this tutorial assumes a basic understanding of what is presented there and builds on top of it to create another type of bot.
Flashcard Bot Setup
First, let’s create a config.py file in the flashcard-bot folder. This will hold our database configuration. Next, in your flashcard-bot folder, create a new sub-folder called app and inside of it create three blank Python files: __init__.py, models.py, and routes.py.
- __init__.py stores the basic app setup
- models.py stores our User and Flashcard database models
- routes.py stores the webhook that Twilio calls.
The config.py File
Copy the following into the config file. This tells the Flask app where to look for our SQLite database. Make sure to change the SECRET_KEY value to something unique!
The app/__init__.py File
Let’s start looking at the __init__.py file. This file has all of the setup needed to make our Flask application run. Pay attention to the _update_db(obj) method. We’ll be using this a lot when we start building the webhook, as it is used to update our database when the user makes changes.
One thing that may seem peculiar is the line from app import routes, models at the bottom of this file. We add this line at the bottom to avoid circular dependencies when starting the Flask server. Both the routes.py and models.py files require the app and db objects to be instantiated before the entire file can be loaded by Flask correctly. By placing the import for these files at the bottom, we make sure that all necessary objects are instantiated first.
The app/models.py File
Before we can start building the route, we need to setup our two database tables. We have two basic models:
User: stores a phone number,a link to the flashcards created by that phone number, and which flashcard the user is currently reviewingFlashcard: stores the front and back of each flashcard
Here is what our models.py file looks like.
Note that our first model, User, not only holds the phone number and the flashcards created by the user, but also the current flashcard being reviewed. We store this information since the actual interaction with the user and Twilio doesn’t store state, meaning that if I text my flashcard bot out of the blue, Twilio won’t have stored what I had last texted. It won’t know if I’m reviewing flashcards, creating flashcards, or something else. Hence, we must store some state in the database so we know what actions are allowed.
Keeping that in mind, in addition to the database columns, there are two methods in the model, get_new_review(self) and stop_reviewing(self). These are helper functions to change the state of the user. Note that we have already used our helper function _update_db twice just in this one model.
There are few things of note that you may not have seen in other Flask tutorials that use SQLAlchemy to define its database models, in particular around how the relationship between the User model and the Flashcard model is implemented.
First is the explicit primaryjoin attribute on db.relationship(). We use this because we have multiple relationships between Users and Flashcards and without it we get an AmbiguousForeignKeysError. This is because we are trying to establish two unique relationships between the Users table and the Flashcards table: the user to all of their flashcards and the user to the single flashcard being reviewed. Without an explicitly declared linker between the two tables for each of these relationships, SQLAlchemy cannot figure out how to properly assign the foreign keys. Therefore, to make our relationship unambiguous, we must explicitly define what joins the two tables.
Second, because we have explicitly declared one out of two relationships, we must also be explicit with our second User-to-Flashcard relationship, current_review. This column holds the current flashcard the user is reviewing. In order to make sure that the system knows which review it is, we explicitly set up this relationship to use the current_review_id as the foreign key between the two tables.
The app/routes.py File
Now that we have our models created, it’s time to build out our flashcard bot’s logic! Since we have three main logical sections, we’ll work through them one by one.
At the top of the file, let’s import our functions.
Before we get started on the logic, because we have a lot of branching in our bot, let’s genericize the most important part: sending a response text message. The _send_message() function takes a list of lines, concatenates them with a newline, and sends them back to the user as a Twilio message.
As we will see below in the section on testing, Twilio sends incoming messages to our Flask server by POSTing to a webhook (much like submitting a form via your web browser). This means that we must have a single route exposed that contains the logic we wish to perform on a newly received message. The endpoint can be called anything unique, but for now we’ll call the endpoint /bot. Since this is our only route, it will be callable from https://{hostname}/bot.
The first state we check is if the user exists. We do this by checking if an account has been created with the phone number used to send the message. Note that we can support both WhatsApp and standard SMS with this bot, since we are just looking for the phone number. For the purposes of testing, I’ve added a fallback number of 123. This can be used when testing on your computer rather than with your phone.
Before we get into the actual creation of data, we start by processing the basic “help” command. This command is available regardless of the state the user is in.
Next, we’ll check if the user already has an account created, and if not, prompt them to create one. We also need to check if the user has sent us random commands prior to creating their account. Note that this section terminates before it gets to any other commands if the user has not registered or tries re-registering, since we want to make sure we’re dealing with a legitimate user.
Once a user account has been created, we need to create the interface for creating cards. We do this by having the user issue a start command, which changes the state of the user to allow creating cards. Flashcards will be texted in the form of {front} / {back}. For example, bonjour / hello. The user would be shown bonjour during their review and be expected to text back hello. Finally, when the user is done creating flashcards, a stop command is sent, to reset the user’s state.
The final part, to wrap it all together, is when the user wants to review their flashcards. This uses a similar strategy of changing the state of the user to put them in a “review” mode. At the very end, after the review logic, we put a catch-all, just in case the user sends a command we don’t understand.
The Complete app/routes.py File
Testing the Flashcard Bot
Now that we’ve built the routes and the models of our flashcard bot, it’s time to boot up the server, initialize the database, and send some messages!
Initializing the Database
We initialize the database using the commands from the Flask-Migrate package, which we installed earlier in this tutorial. The setup comprises three steps: creating our database, detecting what new tables or columns need to be made, and then finally migrating those new changes to our database.
Since this will be the first time setting up the database, all three steps will be run in succession. Make sure you’re in the flashcard-bot folder and your virtual environment is active before running the below commands.
After these are run you will see a new migrations folder and a new app.db SQLite database. Inside of the migrations/versions folder are the scripts used to create the database structure we defined in the models.py file above. As you grow and change this flashcard bot to fit your specific needs, you can run the migrate and upgrade commands to update your database’s structure.
Sending Some Test Messages
Time to create some flashcards! Start the bot by running flask run while in the flashcard-bot folder. Your virtual environment should still be active from setting up the database. The output should be something like this:
The service is now running as a private service on port 5000 inside your computer and will sit there waiting for incoming connections. To make this service reachable from the Internet we need to use ngrok.
Open a second terminal window and run ngrok http 5000 to allocate a temporary public domain that redirects HTTP requests to our local port 5000. On a Unix or Mac OS computer you may need to use ./ngrok http 5000 if you have the ngrok executable in your current directory. The output of ngrok should be something like this:
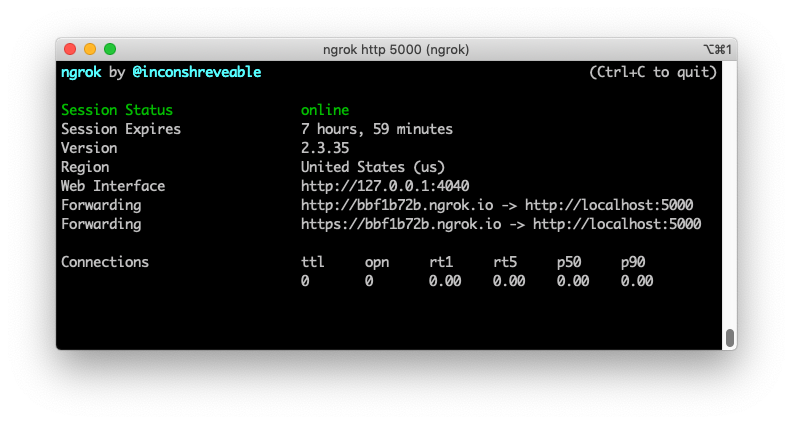
Note the lines beginning with “Forwarding”. These show the public URL that ngrok uses to redirect requests into our service. What we need to do now is tell Twilio to use this URL to send incoming message notifications.
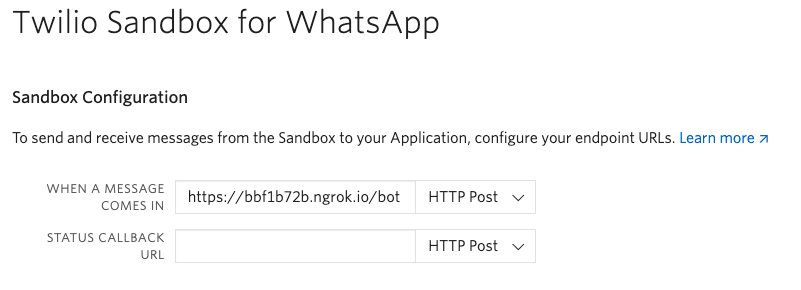
Go back to the Twilio Console, click on Programmable SMS, then on WhatsApp, and finally on Sandbox. Copy the https:// URL from the ngrok output and then paste it on the “When a message comes in” field. Since our chatbot is exposed under the /bot URL, append that at the end of the root ngrok URL. Make sure the request method is set to HTTP Post. Don’t forget to click the red Save button at the bottom of the page to record these changes.
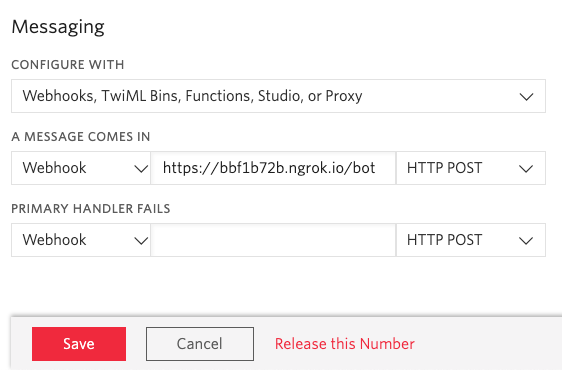
If you want to interact with the bot also over standard SMS, from the Twilio Console, click on Phone Numbers, and then on the phone number that you want to use. Scroll down to the “Messaging” section, copy the https:// URL from the ngrok output and then paste it on the “A message comes in” field. Recall that the chatbot is exposed under the /bot URL, so /bot needs to be appended at the end of the root ngrok URL. Make sure the request method is set to HTTP POST, and don’t forget to save your changes.
Now you can start sending messages to the flashcard bot from the smartphone that you connected to the sandbox. If you’ve forgotten what the flashcard bot can do, send help to find out what commands we’ve programmed in. Otherwise, happy studying!
Keep in mind that when using ngrok for free there are some limitations. In particular, you cannot hold on to an ngrok URL for more than 8 hours, and the domain name that is assigned to you will be different every time you start the ngrok command. You will need to update the URL in the Twilio Console every time you restart ngrok.
If you’d like to use your new flashcard bot in production, take a look over at the SMS chatbot blog post, under the “Notes on Production Deployment”, for details.
Conclusion
Together we’ve built a simple, but effective, flashcard bot. Hopefully it’s gotten new ideas flowing and you can see how powerful a service like Twilio can be with just a few lines of code.
Check out some of the other posts on the Twilio blog for even more cool Python projects!
Parry is a language learner who enjoys making flashcards more than he enjoys studying them. You can find some of the things he's done with his time at https://parryc.com.


Related Resources
Twilio Docs
From APIs to SDKs to sample apps
API reference documentation, SDKs, helper libraries, quickstarts, and tutorials for your language and platform.
Resource Center
The latest ebooks, industry reports, and webinars
Learn from customer engagement experts to improve your own communication.
Ahoy
Twilio's developer community hub
Best practices, code samples, and inspiration to build communications and digital engagement experiences.