Building a Simple SMS Message Application with Twilio and Django
Time to read: 6 minutes
April 01, 2014
Written by


Django is often referred to as a “batteries included” Python web framework due to the many features that come with it out-of-the-box. It is becoming an increasingly popular choice for developers who want to build web applications in Python.
Django is my personal choice when developing web apps as I love the huge collection of contributed libraries and the great community developing the software. When I think about how MVC web frameworks should work; Django fits it almost perfectly. Let’s build a simple application that responds with an SMS message when you send an SMS message to it.
What You’ll Learn
In this post we’re going to use Django to build a simple SMS application:
- Linking a Twilio phone number to your Django web application
- Responding to an SMS message with some basic TwiML
- Using twilio-python to build responses pythonically
- Using Django-twilio to make Django respond securely
Connecting Twilio to a Django View
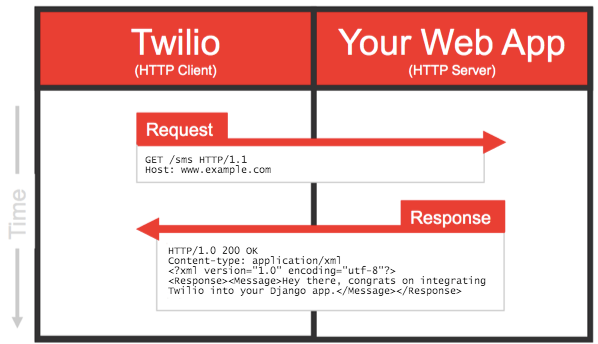
Twilio uses webhooks to talk to our application: when Twilio receives an SMS it sends a HTTP request to a URL on our web application. We then return a response which Twilio transforms into an SMS message or a phone call.
Just like any device in the telephony network, you’re going to need a phone number in order to send and receive SMS. You can head over to the Twilio account portal and get one for free on a trial account. We need to set our URL in the account portal in the Request URL field in our phone number configuration:
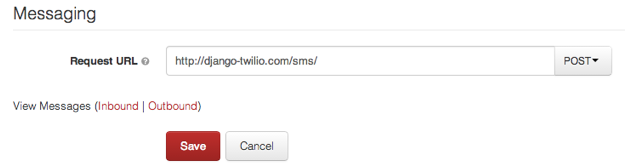
We’ll be using the /sms/ url for this tutorial. If you want to host your local development environment on the web, I recommend using ngrok.
When it receives the request from Twilio, Django will check the URL configuration to decide which view to pass the request information. The view then sends our response back to Twilio.
We’re going to need to start a new Django project for this, so run the following code in terminal to set one up:
We’re using the project name djtwilio (mostly because it sounds like a bad ass disk jockey) but you’re welcome to use your own name for the project. Just remember to substitute djtwilio for your project name throughout the code.
We’ll need to define the urls in our URL configuration before we code anything else, otherwise the request won’t go anywhere:
Here we have set the configuration to link the /sms/ url to the sms_received view. In Django this view can be a function. You can also use class-based views, but for this example we’re using function-based views.
Responding to Twilio requests and Building TwiML
We can now start building our view function in the views.py file:
Django view functions must always take at least one parameter: the request object. This is passed to the function with information such as HTTP header parameters, form POST data and a bunch of other stuff. We’re not interested in this just yet but Django requires it.
Twilio uses TwiML; a collection of XML tags that Twilio interprets as instructions.
This means we can create a string like this:
And Twilio will transform it into an SMS message, just like magic. Here our response is a message with some simple text. TwiML makes these complex telephony actions stupidly simple to implement.
Finally we return our TwiML string in a HttpResponse object. This is the standard method for sending HTTP responses in Django:
Because we are returning XML, HTTP standards say we should set the content type to text/xml. We want to follow the rules of the web, after all.
Startup the server through the command line:
CSRF exemption
Now if you try to send an SMS to the number linked to this view you’ll see an error.
Oh no! Twilio has a great app monitor which keeps track of errors for you, so you can see where things are going wrong. If we look at this error in the app monitor you’ll see this:
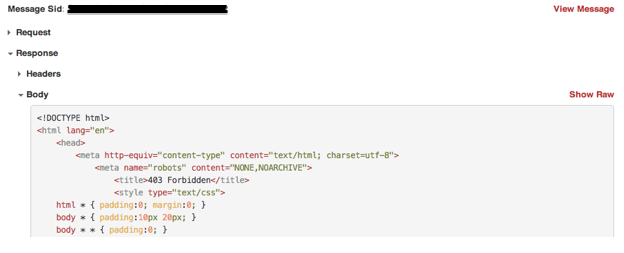
Further investigation of this error will show that we’ve received a 403 forbidden response.
Because Django is strict about security, especially when it comes to HTTP POST requests, it requires a CSRF token to validate the requests. To get around this you need to add a csrf_exempt decorator to the line above your view function:
The Django developers reading this are probably worried about using csrf_exempt on this view as it disables any authentication and security checking. We’d never want to do this in production so we’re just using it as an example here. We’ll provide a Twilio-specific secure solution further on.
The final code (including imports) to reply to an SMS message looks like this:
If we try sending an SMS message to our number now we can see if we get a response.
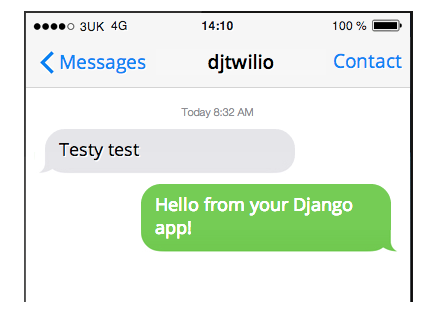
Boom. It works.
Introducing twilio-python
Wouldn’t it be easier if we didn’t have to remember which TwiML verbs to use? Sometimes those strings can be huge and the chances of writing malformed XML increases the bigger the responses get.
Twilio provides helper libraries in a variety of languages such as Python, Ruby, Java and C#. The twilio-python package can help us build TwiML responses with its MessagingResponse class.
We can install twilio-python using pip:
Let’s see how twilio-python can make our previous code example easier.
That gives us cleaner code which is also pretty pythonic too. No need to write any XML: we just add different verbs to a response object and return it when we’re done.
Django-Twilio To The Rescue
The twilio-python package makes is easy to build TwiML, but what about Django-specific features? And what about that big security hole with CSRF tokens? Is there a way we can make it easier to use twilio in Django? There is indeed!
Django-twilio, by Randall Degges, provides a collection of decorators for views that return TwiML or receive information from Twilio. We can use these decorators to clean up the code in our view function even more.
Just like the Twilio python helper library, we can install it with pip:
Here is the previous code example modified one last time to include django-twilio and it’s features:
The twilio_view decorator view provides some major benefits:
1. It ensures requests sent to the view originate from only twilio.com, this prevents attackers from spoofing a request to the view.
2. It turns off CSRF exemption in favour of the security in number 1, which is actually far more secure.
3. It sends your response back in a HttpResponse object with the appropriate content type.
4. Finally, it works in Django debug mode. You can test views just like a normal web page, even with the twilio_view decorator, just set DEBUG = True.
Discovering Twilio Content In The Request
Now that we can reply to an SMS, let’s figure out what Twilio sent to us in the request and reply with a personalised reply. This is one of my favourite features of Twilio: all the data delivered to you looks like a normal HTTP POST or GET request.
At the top of our views, add the new imports:
With Django we can grab content in the request POST headers with the following code:
This looks at the HTTP request data and returns the sms content (the Body value), otherwise it just returns an empty string. We can then send back a personalised message:
So when a I send an SMS message with my name I will get an SMS reply like this:
Hello Paul, how are you today?
The complete code for this, with new lines highlighted:
What’s Next?
We’ve demonstrated the basics of receiving and responding to SMS messages with Twilio and Django. You should now have the foundations required to build complex systems that leverage the telephony system: SMS opt-in/out subscription services, providing surveys via SMS or even SMS text adventure games like zork. Go and explore with the Twilio API and see what you can build; it costs nothing to try it out.
This code for this article can be found on Github, so feel free to fork it and use it as a basis for your own app.
We’ll be continuing this series of posts related to Django in a few weeks by demonstrating how to build conference centres. Until then my fellow Djangonauts: enjoy your new skills.


Related Resources
Twilio Docs
From APIs to SDKs to sample apps
API reference documentation, SDKs, helper libraries, quickstarts, and tutorials for your language and platform.
Resource Center
The latest ebooks, industry reports, and webinars
Learn from customer engagement experts to improve your own communication.
Ahoy
Twilio's developer community hub
Best practices, code samples, and inspiration to build communications and digital engagement experiences.