Building a Disaster Response Contact Center with Twilio Flex
Time to read: 7 minutes
November 11, 2019
Written by

What would you do if you had 48 hours before a major hurricane makes landfall nearby? You’d probably buy water and food, or maybe even evacuate to another location. Building a contact center might not be the first thing that comes to mind, but communications are more important than ever in a disaster. In the crucial few moments immediately before and after disasters strike, a developer who can rapidly build and deploy a contact center can literally save lives and help ensure people at risk can get the help they need right when they need it.
While many communities already have disaster plans in place, the scale and frequency of natural disasters has increased to the point where local nonprofits, communities, and even individual volunteers can find themselves in the thick of things needing to scale up a contact center in hours, not days or months.
In this post, we’ll be walking through the setup of a contact center that could be used during a natural disaster response effort. We’ll cover categorizing inbound calls, routing them to the right team, and integrating different tools into Flex.
Before we start building, it’s important to define who we’re building for. Let’s assume we have three types of callers who will contact our call center during a natural disaster:
- People who need rescue from first responders. We’ll dispatch volunteers to them.
- People who want to donate resources like shelter beds, construction equipment, and rides. We’ll take down the information they give us.
- People who need resources like those being donated. Our volunteers will match them with the right resources.
Inside our call center, let’s assume we have two types of volunteers:
- Dispatchers who communicate with on-the-ground rescuers.
- Donation coordinators who manage and distribute recovery resources.
We want to build a call center that categorizes incoming calls, routes them to the right volunteer, and shows the volunteer the tool they need to handle the call. Ok, so how do we build it? We can break down our setup into three parts:
- We’ll use Twilio Studio to categorize incoming calls into three categories: disaster assistance, making donations, and receiving donation information.
- Next we’ll then use Taskrouter to split our incoming calls into two queues of volunteers: those who can run dispatch and those who can handle donations.
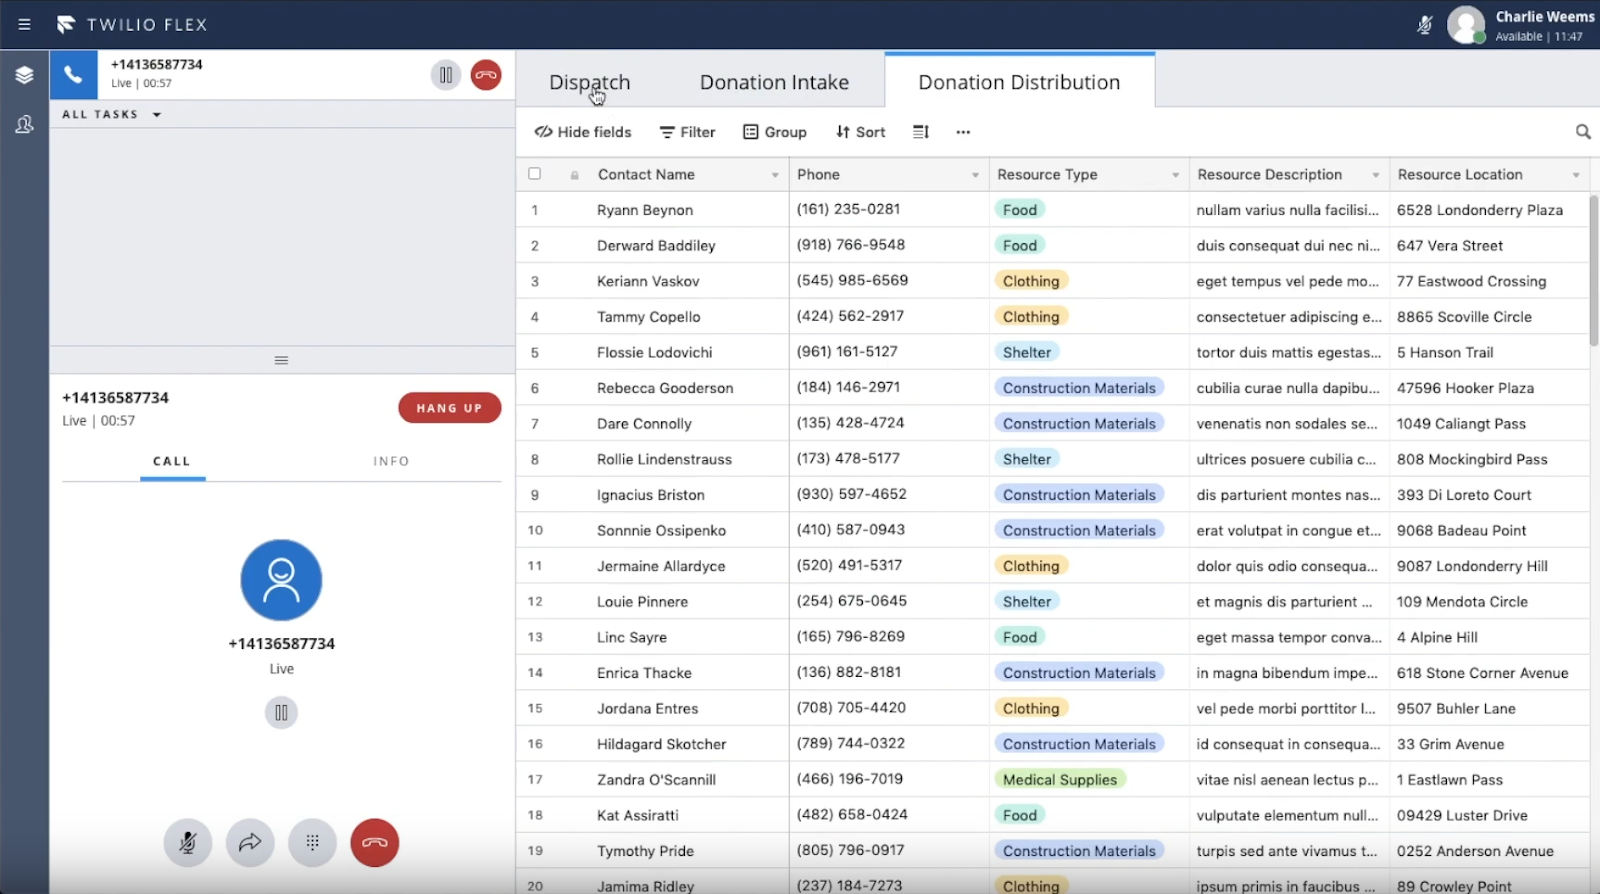
- Once calls are routed to our contact center agents, we’ll show a custom interface for each type of call: the Beacon dispatching platform for rescuers, an Airtable form for accepting donations, and an Airtable spreadsheet for distributing donations.
Configuring an Inbound IVR
Twilio Studio allows us to sort inbound calls before they are transferred to a volunteer. In a disaster situation, it’s best not to put too much friction for the caller up front. We’re going to have a user call in and then press 1 for dispatch, press 2 to donate resources, and press 3 to be connected to resources. You can follow along with the configuration here:
Connecting Inbound Calls to the Right Responder with TaskRouter
In order to allow our Studio flow to send calls to the right people, we need to set up TaskRouter. TaskRouter is a skills-based routing engine that will make sure calls about emergency dispatch go to our emergency dispatch managers, and calls about donation matching go to our donation managers.
Adding Skills to Our Disaster Dispatchers
The first step to using skills-based routing is to add some skills to our workers. To get started quickly, you can define skills in the Flex interface here. For our emergency contact center, we’ll just define two skills: dispatch and donations. Next, we can add these skills to workers by going to the team view, clicking on “Add skill,” and then clicking on the blue plus button.
Here’s an example of what the JSON that represents our user now looks like. Note that we now have “dispatch” and “donations” in our skills array:
The skills listed on our volunteer worker allow TaskRouter to determine who’s available to help with which tasks.
Grouping Our Disaster Dispatchers with TaskQueues
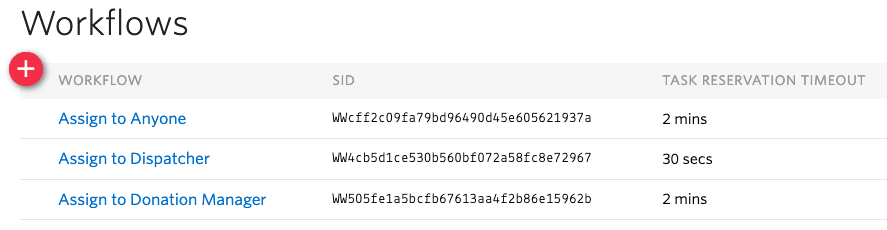
Now that we’ve added attributes to our user, we need to tell Flex how to group our users. We can do this using TaskQueues. You can think of TaskQueues as groups of volunteers with different skills that are lining up to help our inbound callers. To define a TaskQueue, go to your Flex TaskRouter Workspace and then click on “TaskQueues” in the sub menu.

TaskRouter with three TaskQueues configured.
Click on the red “+” button on the top-left to create a new TaskQueue. We can name the first TaskQueue “Dispatchers”. Next, we have to tell the TaskQueue which workers can function as dispatchers. We can do this by setting the queue expression to check if our worker has the dispatch skill. This routing expression should do the trick:
routing.skills HAS "dispatch"
You should see a worker (yourself) appear in the list of matching workers. If you don’t, click on the “Workers” tab in the side menu and make sure the JSON that defines your worker includes the dispatch skill. Another easy mistake to make is forgetting the quotes around “dispatch”. We need those to tell our routing expression that “dispatch” is a string.
Click the red “Save” button and you’ve just created your first TaskQueue! Next, go through the same process except for Donation Managers.
Routing Tasks to Groups with TaskQueues
Now that TaskRouter knows which workers should go into which line, we need to define how these lines (queues) work. This could include which tasks go to which lines, how lines are ordered, how long to wait before passing a call down the line, and how to pass tasks between lines. Follow these steps to configure your Workflow:
- In the sidebar, click on “Workflows” and then click on the red “+” button to make a new Workflow.
- Name your workflow “Assign to Dispatch”.
- Click “Add a Filter”.
- In “Matching Tasks” enter
skill == "dispatch”so that this group of workers only get tasks that require assistance from a dispatcher. - Next to Queue, select “Dispatchers”.
- At the bottom of the page, click “Save”.
Now all tasks that have the skill attribute “dispatch” will be routed to our group of dispatchers. Go ahead and create a workflow for Donation Managers as well.
Setting Task Attributes in Studio
But wait, how do we set the skill attribute on an incoming call task? To configure that we need to go back to Studio. We started with only one “Send to Flex” widget in our Studio Flow, but now we can add another. Connect one widget to the “Dispatch” option that we set in the split block and configure the other widget to “Donations” and “Match”.
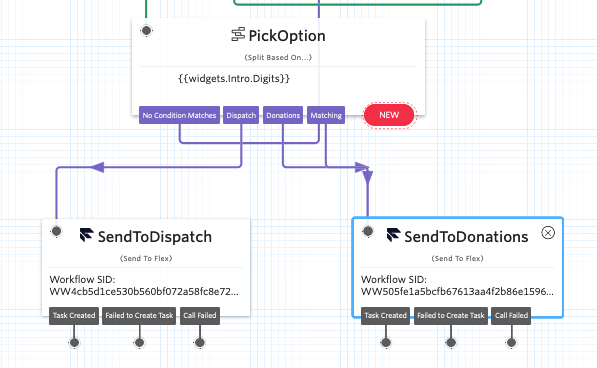
If we click on one of the Send to Flex widgets, we’ll see an input box titled attributes. This can be a JSON blob of data that describes our task. For example, it might look something like:
See that “skill”:”dispatch” attribute? That’s what our workflow will look for with skill == “dispatch”. Once that task is created, calls will be routed to our dispatchers.
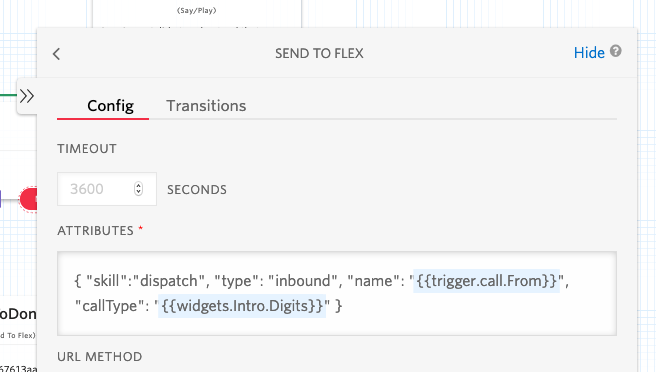
Update both Send to Flex widgets so that their attributes’ fields contain “skill”: “dispatch” and “skill”:“donation” respectively. Make sure to include the quotes around each. Re-publish your Studio flow once you’re finished.
Check That Incoming Calls are Working
Give your emergency contact center a call. You might hear a trial message (“press any dial pad key to execute your code”), then you should hear your IVR directing you to press 1, 2, or 3. Press one of those keys and then open up your Flex agent desktop. You should see an inbound call.
If your call failed to connect, double check to make sure that the attributes on the task that was created by Studio match what your Workflow is expecting. Also, make sure there’s at least one worker (yourself) online and in the TaskQueue you’re trying to reach.
This looks really similar to our initial functionality, but there’s an important difference: if you accept the call and then click on the “Info” panel, the Task queue should either say “Dispatchers” or “Donation Managers”. It took a little configuration, but we’ve now built a contact center that allows two teams of people (up to 50,000 agents) work together to take on three very different types of calls.
Next, let’s see how we can customize the Flex interface to show different tools to our volunteers depending on the task type.
Customizing the Flex Interface for Dispatching and Donations
We want our volunteers to have the right tools handy while they’re on a call. In this video tutorial, we’ll walk through how to add tools like Beacon (for dispatch) and Airtable (for donation coordination) into the Flex interface. Using the routing we set up with TaskRouter, we can determine which interface to show based on what our caller needs help with. Follow along in this live coding demo to see how to customize Flex:
Developing a custom interface component in Flex is done by creating a JavaScript plugin. This quick-start has a more in-depth guide to creating plugins, but the basic steps are:
Here’s the sample code for the plugin built in the video tutorial if you’d like to clone the repo and deploy your own plugin. Disclaimer: this sample plugin has been developed to show what’s possible, it’s not production-ready code. You should do your own testing on any customizations that you make to Flex.
Wrap Up
We’ve covered the basics of how to set up an emergency call center with Flex, but there’s plenty of functionality we haven’t touched on. Here are just a few examples more things you could do with your contact center:
- Add a bot to your Studio IVR to help with common questions.
- Connect Flex to Facebook Messenger to support messages from a Facebook community.
- Configure SSO so that your agents can log in to all of your tools at once.
Finally, if you're building with Flex for a nonprofit or social-impact organization don't forget to apply for Twilio.org's Impact Access Program for a $500 kickstart credit.


Related Resources
Twilio Docs
From APIs to SDKs to sample apps
API reference documentation, SDKs, helper libraries, quickstarts, and tutorials for your language and platform.
Resource Center
The latest ebooks, industry reports, and webinars
Learn from customer engagement experts to improve your own communication.
Ahoy
Twilio's developer community hub
Best practices, code samples, and inspiration to build communications and digital engagement experiences.