Configure a Proxy Number with Delivery Instructions using No Code
Time to read: 9 minutes
August 04, 2022
Written by
Reviewed by

Keeping personal information private is as important as ever, since information thievery and unwanted contact (content warning: harassment, sexual harassment) have become more common. When ordering food online, however, keeping your information private can be difficult.
For example, your driver may need to contact you regarding changes to your order or if they need help getting directions to your door. Instead of giving out your personal number to the delivery app, why not give a proxy number that can provide all that information instead?
In this tutorial, you’ll learn how to configure a proxy number that will provide delivery instructions with Twilio’s no-code solution, Twilio Studio! You’ll be serving up a menu that delivery drivers can interact with to get a gate code, directions to your place, and to call you (via a proxy number) in case there’s a change to your order.
Prerequisites
For this tutorial, you will need:
- A free or paid Twilio account. If you are new to Twilio, click here to sign up for a free Twilio account and get a $10 credit when you upgrade!
- A Twilio phone number.
- A personal phone number.
- A phone that can make and receive phone calls.
Create a Twilio Studio Flow
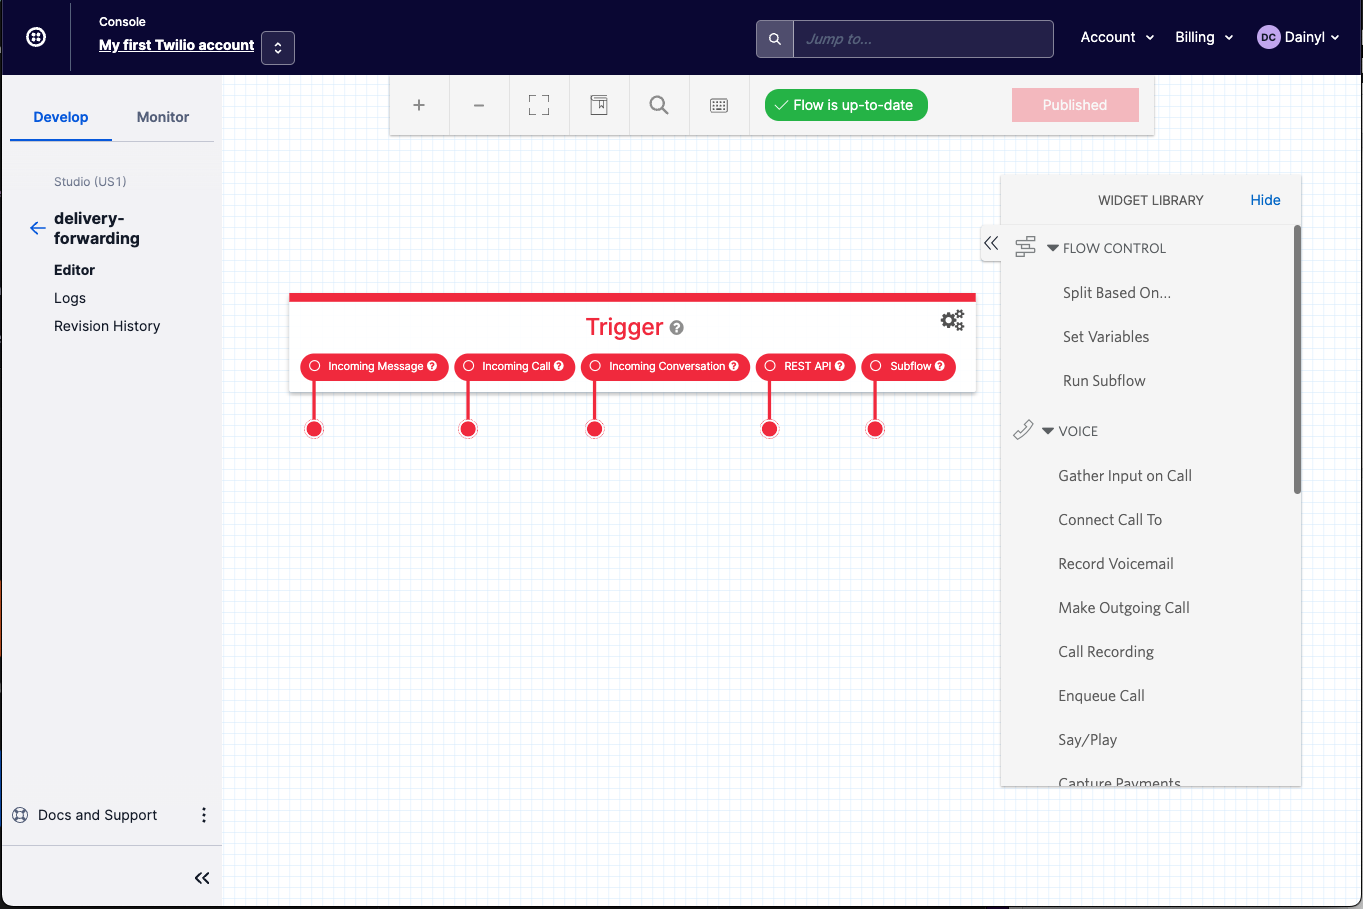
Navigate to the Studio Flows page in your Twilio Console. It can be found by clicking Explore Products on the left hand sidebar, then clicking Developer tools on the left side of the page, then finally by clicking Studio. Next, click on the blue button labeled Create a Flow if you haven’t made a flow before, or the blue button with a white plus symbol if you have made one previously.
A popup should appear asking for you to name your Flow. Type a descriptive name (I named mine delivery-forwarding) then click the blue button labeled Next.
On the next page, click the card that says Start from scratch, if it’s not already selected, then click the blue button labeled Next. You should now be on the page for your Studio Flow.
Develop your Flow
To make developing your Flow a bit easier, tackle each functionality one bit at a time. If you remember from earlier, the proxy number should be able to:
- Forward messages from your delivery driver to your phone number
- Provide a gate code
- Provide directions to your doorstep
- Forward calls to your phone number
All four bullet points will be handled through a text message menu system, with the fourth bullet point additionally handled when your proxy number is called.
Set up your menu
Messages from delivery drivers, if not through the service’s app, are sent through text and straight to your proxy number.
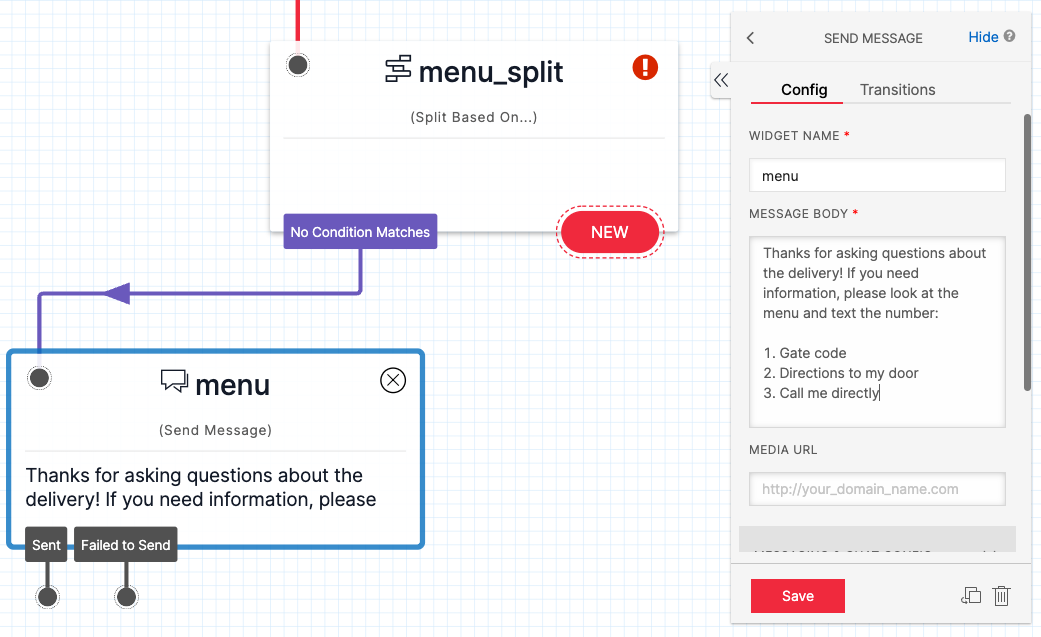
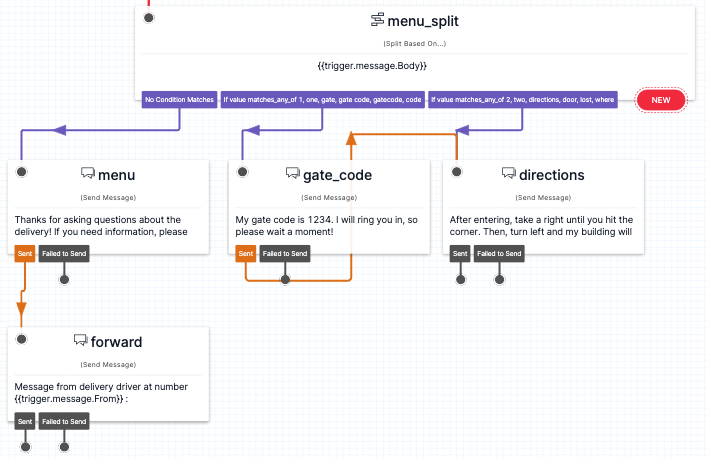
In the WIDGET LIBRARY on the right side of your Flow, and under the FLOW CONTROL dropdown menu, click on Split Based On… and drag it onto your screen. A new widget named split_1 should appear on your page. Click on it and change its name to something more descriptive (I named mine menu_split).
Next, connect the circle extending from the line directly below the Incoming Message Trigger into the gray circle on the top left of your Split Based On… widget.

Delivery drivers will probably not expect a responsive chatting experience, so the first condition to handle is when a user doesn’t select one of the valid options that you will create later. You will want your proxy number to send a message that will provide all possible options that your delivery driver can choose.
Go back to the WIDGET LIBRARY and scroll down to the MESSAGING dropdown menu. Then, click on the Send Message widget and drag it to your Flow, somewhere to the lower left side of the Split Based On… widget. Rename the widget to something descriptive (I named mine menu).
Connect the circle below the No Condition Matches Transitions to the gray circle on the top left of the Send Message widget. Then, click on the freshly connected widget and in the MESSAGE BODY input box, copy and paste the following text:
The newest section of your Flow should now look like this:
Forward messages to your real number
Additionally, you may want to see how your delivery driver is responding to your chatbot. Any messages that do not pertain to your gate code, directions, nor connect you via call should be sent to your number, so that you know what your driver is communicating.
Below your newly finished Send Message widget, create another Send Message widget that will be responsible for forwarding the number of your delivery driver and the message they sent. Click on the freshly created widget and give it a descriptive name (I named mine forward), then in the MESSAGE BODY input box, copy and paste the following text:
Finally, you will need to ensure that the message gets sent to your number. Click the gray box titled MESSAGING & CHAT CONFIG and below the SENDS MESSAGE TO label, enter your number in +E.164 format. Drag the gray circle from the Sent condition under your first Send Message widget to the gray circle in the top left circle of your newest Send Message widget. Your Flow should look like this:

Provide your gate code
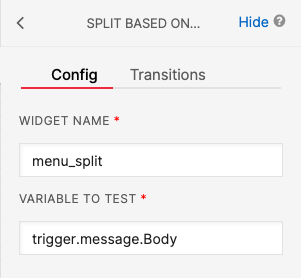
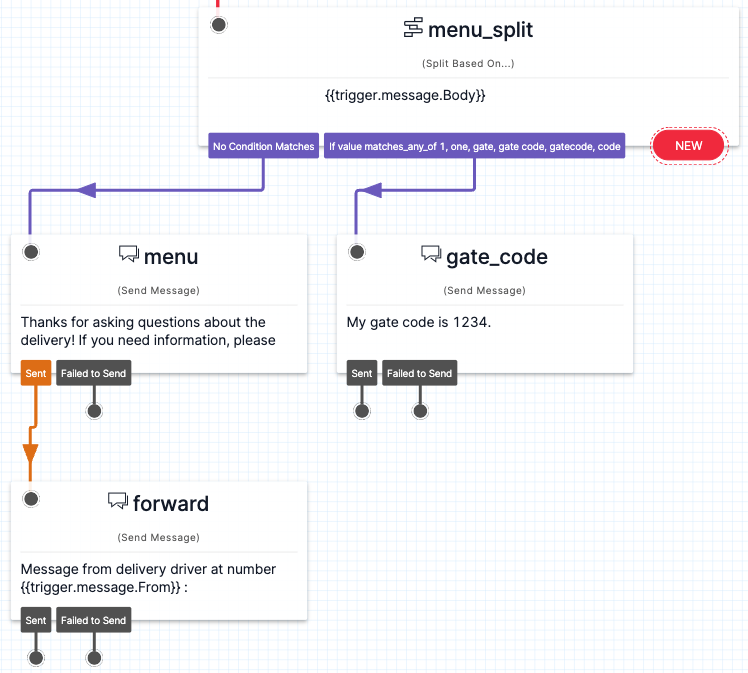
Now, it’s time to add other conditions to consider. Click the red button labeled NEW on the bottom right of the Split Based On… widget. On the right side of the screen, under the Config tab, click on the input field under the VARIABLE TO TEST label and enter the following text:
The body of any incoming message will now be read by this widget and the matching Flow will transition to the proper route that matches the conditions you will now make.
Next, click the Transitions tab and, next to the NEW CONDITION label, click the white button with a blue plus inside of it. A new box with the label IF VALUE EQUAL_TO… will appear. Click the box labeled Equal To and then click on Matches Any Of in the dropdown menu. The box should now be labeled IF VALUE MATCHES_ANY_OF … after you click. Finally, click the box labeled Enter Value… and copy and paste the following text into it:
Any text messages that match one of the words above will be routed to this route from now on. Next, add another Send Message widget, name it something descriptive (I named mine gate_code), and enter your gate code (if you have one).
I entered the following placeholder text:
Finally, drag the circle under the condition you just created in the Split Based On… widget to the gray circle in the top left corner of the Send Message widget you just created. Your proxy number will now send this message once the condition is satisfied!
Your flow should now look like this:
Provide directions
Next, you’ll want to provide directions to your delivery driver so they don’t get lost. Be as descriptive as you can, especially if you live in an apartment complex.
Similar to the last step, click on the red button labeled NEW on the bottom right of the Split Based On… widget. This time, go directly to the Transitions tab and create another condition by clicking the button next to the NEW CONDITION label.
Another box with the label IF VALUE EQUAL_TO… will appear. Click the box labeled Equal To and then click on Matches Any Of in the dropdown menu. The box should now be labeled IF VALUE MATCHES_ANY_OF … after you click. Finally, click on the box labeled Enter Value… and copy and paste the following text into it:
Again, add another Send Message widget, name it something descriptive (I named mine directions), and enter the directions to your doorstep. I entered the following placeholder text:
Finally, drag the circle under the condition you just created in the Split Based On… widget to the gray circle in the top left corner of the Send Message widget you just created.
To make things easier on your driver, you can immediately send the text providing directions after your driver asks for the gate code. To do so, drag the circle under the Sent condition in the bottom left of the Send Message widget that provides the gate code, and connect it to the gray circle in the top left of the Send Message widget that you just created.
Your Flow should now look like so:
All that’s left is to handle call forwarding.
Forward calls to your phone number via menu
The first time where call forwarding needs to occur is when your delivery driver interacts with the third menu item that lets them call you directly. To do so, you will first need to notify them that they are going to be called by your specified Twilio phone number and then they will be connected to your number.
Just like in the other steps, click the red button labeled NEW on the bottom right of the Split Based On… widget. Again, go directly to the Transitions tab and create another condition by clicking the button next to the NEW CONDITION label.
Another box with the label IF VALUE EQUAL_TO… will appear. Click the box labeled Equal To and then click on Matches Any Of in the dropdown menu. The box should now be labeled IF VALUE MATCHES_ANY_OF … after you click. Finally, click on the box labeled Enter Value… and copy and paste the following text into it:
Add the final Send Message widget you’ll be using for this tutorial, name it something descriptive (I named mine redirect_message), and enter a message letting your delivery driver know that they will be speaking with you shortly.
I entered the following placeholder text:
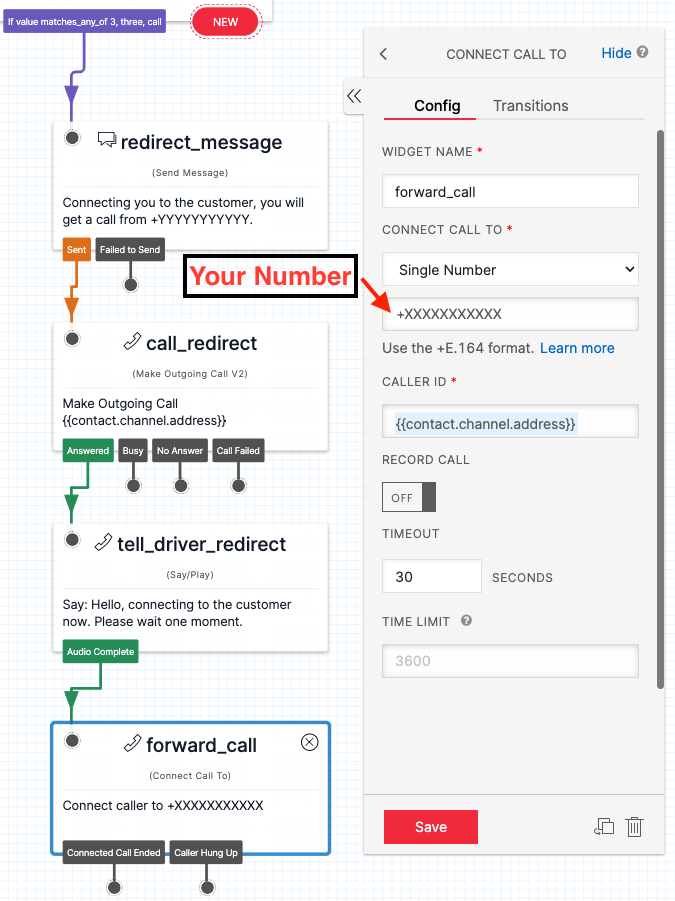
Replace +YYYYYYYYYYY with the Twilio phone number you will use for this tutorial. Then, drag the circle under the condition you just created in the Split Based On… widget to the gray circle in the top left corner of the Send Message widget you just created.
Next, scroll up to the VOICE dropdown menu in the WIDGET LIBRARY and click and drag a Make Outgoing Call widget below the Send Message widget you just finished. Rename it to something descriptive (I named mine call_redirect), and then connect the gray circle under the Sent condition of your recently finished Send Message widget to the top left corner of the Make Outgoing Call widget.
At the moment, the Flow under your most recent Transition should look like this:
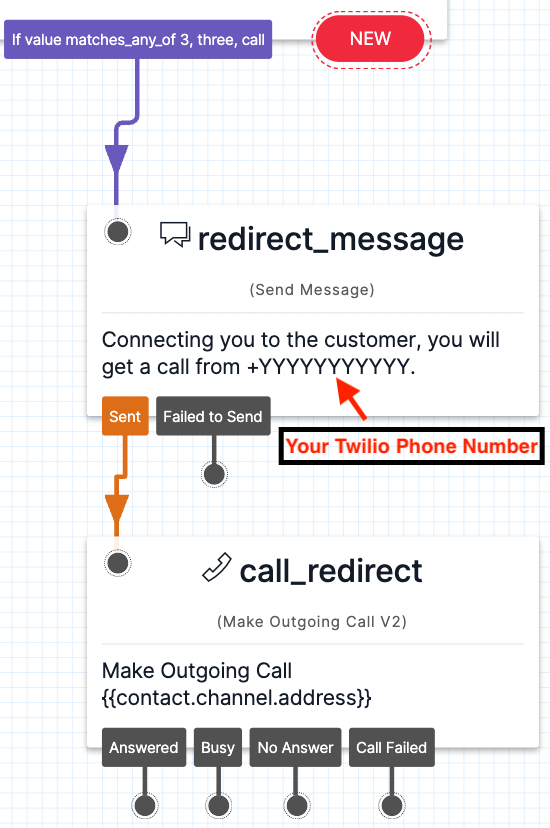
Next, again under the VOICE dropdown menu, click and drag a Say/Play widget below your Make Outgoing Call widget. Click the widget, rename it something descriptive (I named mine tell_driver_redirect), and then in the TEXT TO SAY input box, add some text telling the delivery driver that they will be connected to you in a moment.
I entered the following placeholder text:
Connect the gray circle under the Answered condition of the Make Outgoing Call widget to the top left corner of your Say/Play widget. Now, you need to integrate the actual call forwarding.
Again under the VOICE dropdown menu, click and drag a Connect Call To widget below your Say/Play widget. Click the widget, rename it something descriptive (I named mine forward_call), and then under the CONNECT CALL TO header, in the second input box, put your phone number in +E.164 format.
Finally, connect the gray circle under the Audio Complete condition of the Say/Play widget to the top left corner of your Connect Call To widget. The completed Flow under your final Transition should now look like this:
Forward calls to your phone number via call forwarding
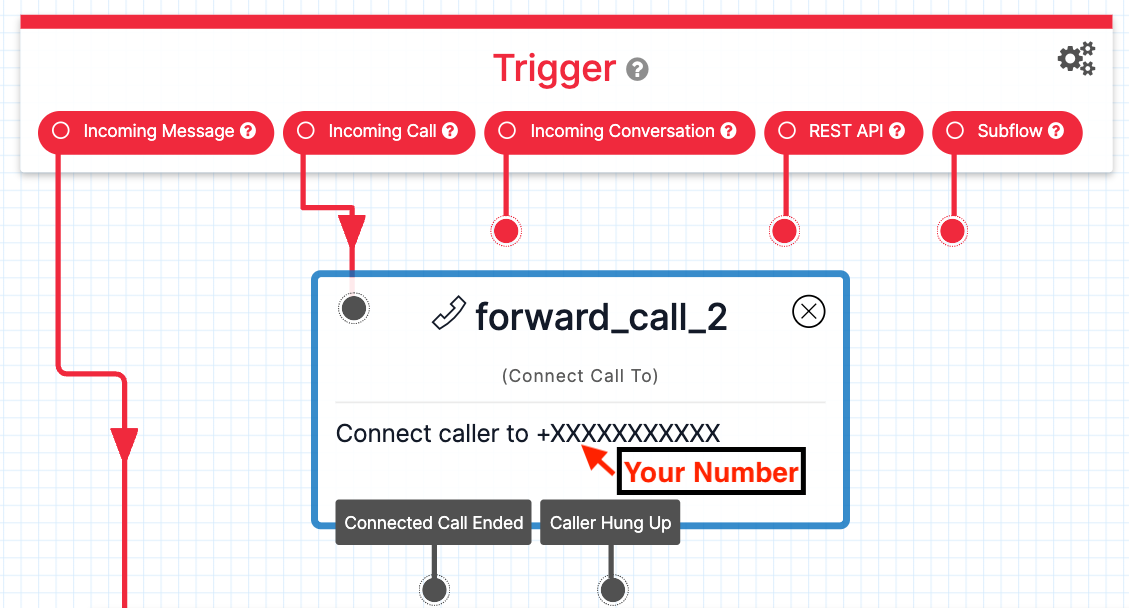
Lastly, handle the case in which your delivery driver calls your specified Twilio phone number directly.
Navigate to the part of your page with the original Trigger widget. Add another Connect Call To widget under the Incoming Call Trigger. Click the widget, rename it something descriptive (I named mine forward_call), and then under the CONNECT CALL TO header, in the second input box, put your phone number in +E.164 format. Lastly, connect the red circle under the Incoming Call trigger and the Flow under it should now look like the following:
Your Flow is now complete! Click the red box on the top of your page labeled Publish, and now add the Flow to your Twilio phone number.
Add the Flow to your Twilio number
Navigate to your Active numbers page by clicking the blue arrow pointing left that is next to your Flow’s name in the left sidebar. Then, click on the Phone Numbers dropdown menu, click on Manage, and finally click on Active numbers, and then click on the Twilio phone number that you are using for this tutorial.
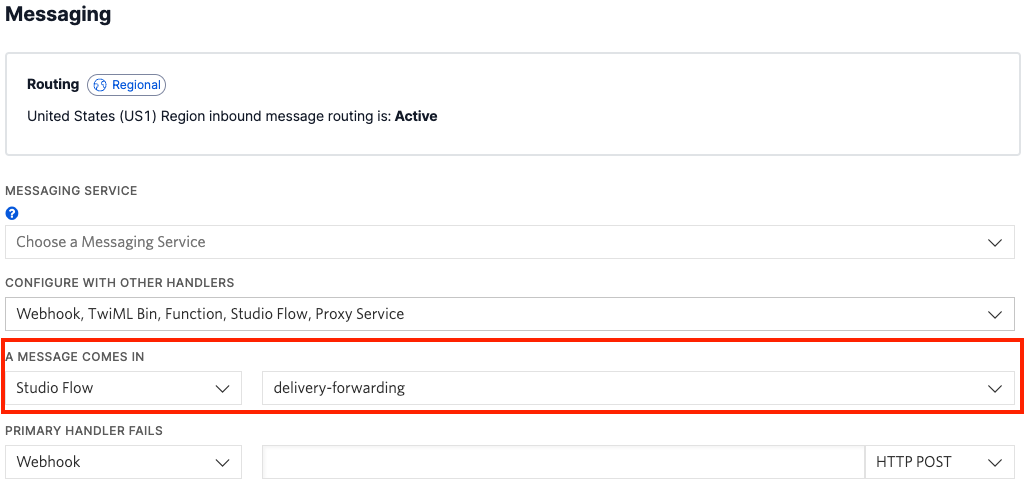
After that, scroll down to the Voice & Fax header, then under A CALL COMES IN, click the dropdown menu that is currently labeled Webhook. Click the menu item that says Studio Flow, then click on the box to the right and select the name of the Studio Flow you just created.

Repeat this process, but this time under the Messaging header and under A MESSAGE COMES IN.
Click the blue button labeled Save on the bottom of your page, and your phone number is now set up!
Conclusion: You’ve configured a proxy number with delivery instructions using no code
Try texting the number to see how it works and be sure to use it in the future. Privacy is an ever growing concern as technology advances and data collection services integrate with more of your daily life, so be careful and understand where your personal information goes. If you run into any issues with messages, you may be able to find useful information in the Programmable Messaging Logs page in your Twilio Console.
What other no-code solutions solve this problem? Check out the Twilio Studio docs and the Twilio Blog posts for Studio to see if you can get some inspiration! Are you in the healthcare industry and want to use Twilio Studio with your patients’ information? Twilio Studio is now HIPAA eligible, so consider it for your next application!
I can’t wait to see what you build!
Dainyl Cua is a Developer Voices Intern on Twilio’s Developer Network. They would love to talk at any time and help you out. They can be reached through email via dcua[at]twilio.com or through LinkedIn.

Related Resources
Twilio Docs
From APIs to SDKs to sample apps
API reference documentation, SDKs, helper libraries, quickstarts, and tutorials for your language and platform.
Resource Center
The latest ebooks, industry reports, and webinars
Learn from customer engagement experts to improve your own communication.
Ahoy
Twilio's developer community hub
Best practices, code samples, and inspiration to build communications and digital engagement experiences.