Distributed sessions in ASP.NET Core
Time to read: 7 minutes
In this article, you will learn what sessions are and how to use them in your ASP.NET Core applications. Then, you will see the limitations of the default session and how to get beyond them by distributing your sessions.
Prerequisites
You will need the following to realize the project in this article:
- An OS that supports .NET (Windows/macOS/Linux)
- .NET 6.0 SDK (newer and older versions may work too)
- A code editor or IDE (Recommended: Visual Studio Code with the C# plugin, Visual Studio, or JetBrains Rider)
- A Redis database. Please refer to the Redis documentation according to your OS.
What are sessions?
The HTTP protocol is, by default, stateless. But sometimes it's essential to hold onto user data while users are browsing your website. This data can help to remember their recent actions. For example, on an e-commerce website, this data can help to store products in a shopping cart.
Sessions are one of the several ways to manage state in an ASP.NET Core application. A session state is a mechanism for the storage of user data across the application. It creates and stores an identifier in a cookie, which is then used to retrieve the session data on the server. A session state keeps the data as long as the cookie is configured to last. The default session state version in ASP.NET Core stores the session data in the memory (RAM) of the web server.
Now, let’s see how to implement a session state in an ASP.NET Core app.
How to add Session State to ASP.NET Core
Create the ASP.NET Core MVC app
The first step is to create the ASP.NET Core MVC app. You can use the terminal and run these commands:
When your app is created, you can run it with this command:
You should have a similar output in your terminal window:
You should be able to see a basic ASP.NET Core MVC template at the link mentioned in your terminal window.
Add the Session middleware to the pipeline
You are all set. You can open the solution in your IDE in order to add the session middleware to the pipeline. Open the program.cs file and add the two lines of code highlighted below:
These two lines of code are sufficient to add a basic session state management to your app. However, it’s possible to override the default behavior by updating the session options.
You can learn more about the session state options in the official Microsoft documentation.
Add data to the session
The sample project in this article will simulate a shopping cart of a bookseller's website. You will use session state to keep the selected books in the cart. The source code is available on GitHub.
First, create the Book.cs file to define your Book class:
Also, add another class called Data in a separate Data.cs file:
The Data class has one property which is a list of books. In a real-world app, the data will come from a data source (a database, a file, etc.). In this example, we’ll assume that the list of books in the Data class plays that role.
You will display the books on the home page. In the Controllers folder, Go to the HomeController.cs file. Update the Index() method as below:
The code above is doing 2 things: Getting all the books and passing them to the home page view. The home page view is strongly typed as it is receiving a list of books as the model. As a result, you need to update the view code by giving it a model. Go to the Views/Home/Index.cshtml file and update its content as follows:
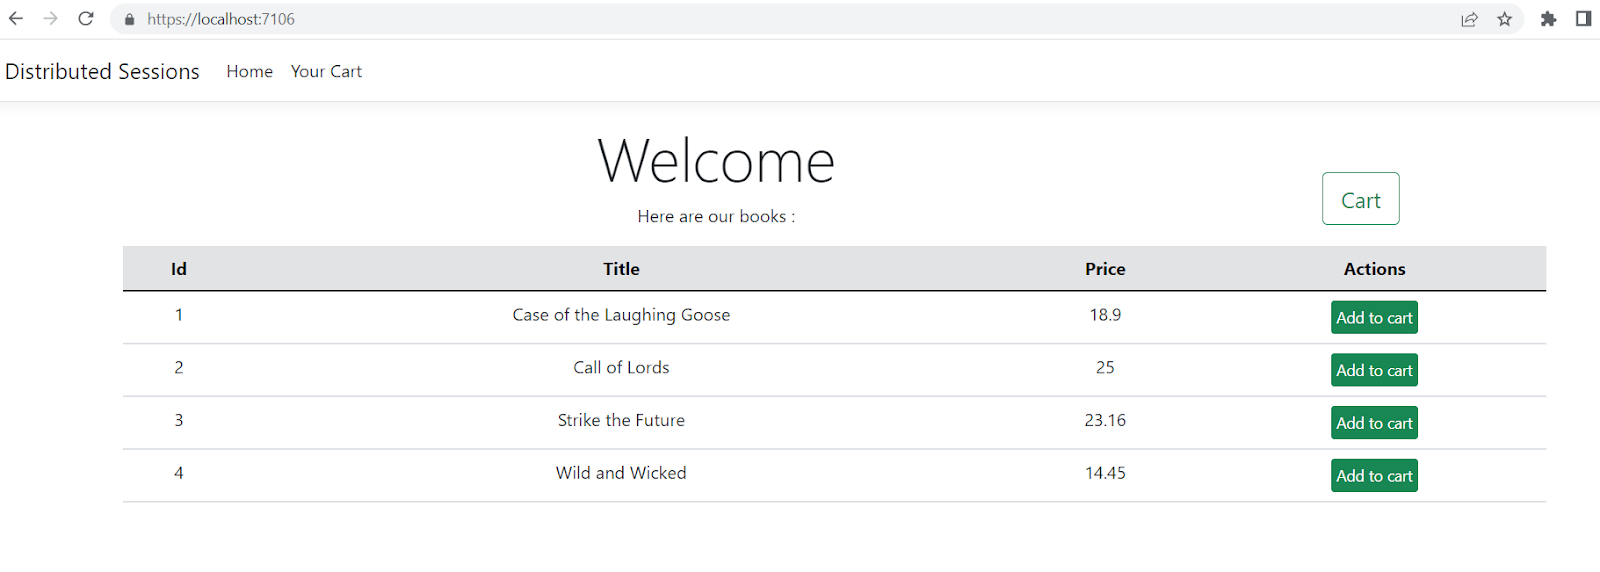
In the command line, navigate to your project folder and run your app with the dotnet run command. At this point, you should be able to see the list of books on the home page of your app like this:

A click on the Add to cart button will add the corresponding book to the cart. You will use the session to accomplish that behavior. In the Controllers folder, create a controller named CartController, with the content below:
The HttpContext, as the name implies, gets the context of the current HTTP request. That is where the session object resides. The session state is saved as a key-value pair. You store and retrieve the data by a key of your choice. A new session cookie will automatically be created if it doesn't exist already. Since the session cookie is stored in the browser, the data in that session is tied to the browser and that browser only. This means two users each using their own browser, do not share the session data.
The Index() action result will get the data from the session and display it in the view. If there is no data in the session, an empty list will be displayed.
If there is data in the session, it will be a JSON formatted string. You will need to convert the JSON into .NET objects, in this case, a list of books. This conversion is called deserialization.
Now, you will develop the functionality to add a book to the cart. For that, create another method in the CartController, called AddToCart.
This code gets the session value string and deserializes it back to a list of books. Then, it adds the selected book to the list, serializes the list to JSON, and saves the JSON back in the session.
After that, you will create the cart page. In the Views folder, create a folder called Cart. In that folder, create an Index.cshtml file, with the content below:
This view is similar to the home page view. It will also take a list of books as a model and will render the list on the page.
Rerun your app. When you click on the Add to cart button in the book list on the home page, you should see the selected book on the Cart page. Now, the data is coming from the session.
Congrats, you’ve successfully implemented basic session management in ASP.NET Core MVC!
Limitations of the default in-memory session
The default in-memory session is great to get started quickly. It stores the data in the memory of the server the app is running on, which is very fast. But there is a drawback. When your web application gets a lot of traffic, you may need to deploy your application to multiple servers and use a load balancer to route traffic to the servers. As users use the application, their HTTP requests will bounce around multiple application servers. As a result, a user could have books in their cart on one server, but when they request another page, their cart is suddenly empty because it was served by another server. This happens because each server has its own session data stored in memory, and the data gets out of sync. In the next section of this article, you’ll learn how to solve this problem with distributed sessions.
How to distribute Session State in ASP.NET Core
A distributed session is a way to persist session data by storing it in a single data store that all instances of your applications use. For your fictional online bookstore, it can help to keep the client’s shopping cart across all instances of your applications.
Now, let’s set up a distributed session in the ASP.NET Core app. To configure your session to be distributed, you have to configure distributed caching in ASP.NET Core, and the session will automatically use the IDistributedCache. There are multiple distributed cache providers that you can use. In this article, you'll configure a Redis database as your distributed caching to store the session data.
Redis is a popular open-source data store that is built for various use cases, including session data management and caching. If you want to learn more about Redis, go to the official documentation page.
Test the connection to Redis
First, test the connection to your Redis server using the redis-cli. If you are running your Redis server locally without requiring authentication, you can simply execute redis-cli to connect to the server. Otherwise, refer to the redis-cli documentation to specify the server location and credentials. Once you are connected to the server, execute the ping command.
If Redis is correctly installed and started, you should have a message “PONG” in your command prompt.
Configure distributed caching with Redis
Now that you have verified your Redis server is fully functional, it’s time to interact with the Redis server. There is a NuGet package designed for that purpose: Microsoft.Extensions.Caching.StackExchangeRedis. To install the package, go to your terminal window and run inside your project folder:
Next, configure the connection string to your Redis database. If you're running the server locally without authentication, you can update the appsettings.Development.json file like this:
6379 is the default port Redis will run on. Change this if you configured your Redis server to use a different port.
Next, put the highlighted code in front of AddSession in Program.cs:
This will configure the IDistributedCache to use the Redis server with the RedisSession connection string.
Rerun your app and add some books to the cart. At this point, the session state data is stored in the Redis database. You can query the data from the redis-cli. First list the keys using the KEYS * command, then copy one of the keys (they are GUIDs). To get the session data, run the following HGET command:
8c4ab198-6b5f-b096-6467-faa42fda2fc4 is the key I copied, so replace that with the key you copied. The result will be hash because multiple values are stored as a hash under this key.
The output will be an encoded version of the JSON string holding the books in your cart, looking like this:
Conclusion
You learned how to store data into session state and how to retrieve it in ASP.NET Core. You also learned how by default the data is stored in the memory of the server and how that can cause issues when running multiple instances of your application behind a load balancer. Finally, you learned how to overcome these issues by distributing your session, in this case using a Redis database to store your session data.
As a parting thought, cloud providers such as AWS, Azure, etc. have competing caching services including hosted Redis servers that make it easy to get a Redis server up and running for your caching and session needs. Happy coding!
Daniel Lawson is a Software Developer and Cloud Enthusiast. He is passionate about C# and AWS. He can be reached on Twitter or LinkedIn.
Related Posts
Related Resources
Twilio Docs
From APIs to SDKs to sample apps
API reference documentation, SDKs, helper libraries, quickstarts, and tutorials for your language and platform.
Resource Center
The latest ebooks, industry reports, and webinars
Learn from customer engagement experts to improve your own communication.
Ahoy
Twilio's developer community hub
Best practices, code samples, and inspiration to build communications and digital engagement experiences.


