Flex Conversations
Time to read: 10 minutes
May 26, 2022
Written by
Reviewed by

Announcing the Flex Conversations Public Beta.
We are thrilled to announce the availability of Flex Conversations – the new and simplified platform architecture for building asynchronous channel flows in Flex.
Flex Conversations makes it easier than ever to create and customize threaded conversations on channels such as SMS/MMS, WhatsApp, and Chat.
What’s New
- Conversations API for SMS/MMS, WhatsApp, and Chat
- Attachment support for all channels that support attachments (US only)
- New Interactions API to programmatically manage inbound and outbound communications
- An open sourced React-based chat application to help you get started with creating and embedding web chat on your website
Getting Started
Whether you have an existing account or you’re starting out, getting started is easy. Simply follow the steps outlined below to get your account ready for Flex Conversations.
For accounts created on or after May 26th, 2022, Flex Conversations comes pre-configured and ready to roll! To get started:
- Create a new account
- Launch Flex by going to flex.twilio.com
- Log in to the agent desktop, and change activity state to "Available"
- From your mobile phone, send an SMS to the preconfigured Flex number
For accounts created before May 26th, 2022 or you’re unsure when your account was created, follow this section as you may need to make some configuration changes on your account to enable Flex Conversations.
- Follow this Flex UI 2.0 migration guide to migrate Flex UI and your plugins
- Set up a new Conversations Address or move an existing legacy address
- Launch Flex by going to flex.twilio.com
- Log in to the agent desktop, and change activity state to "Available"
- From your mobile phone, send an SMS to the address you configured
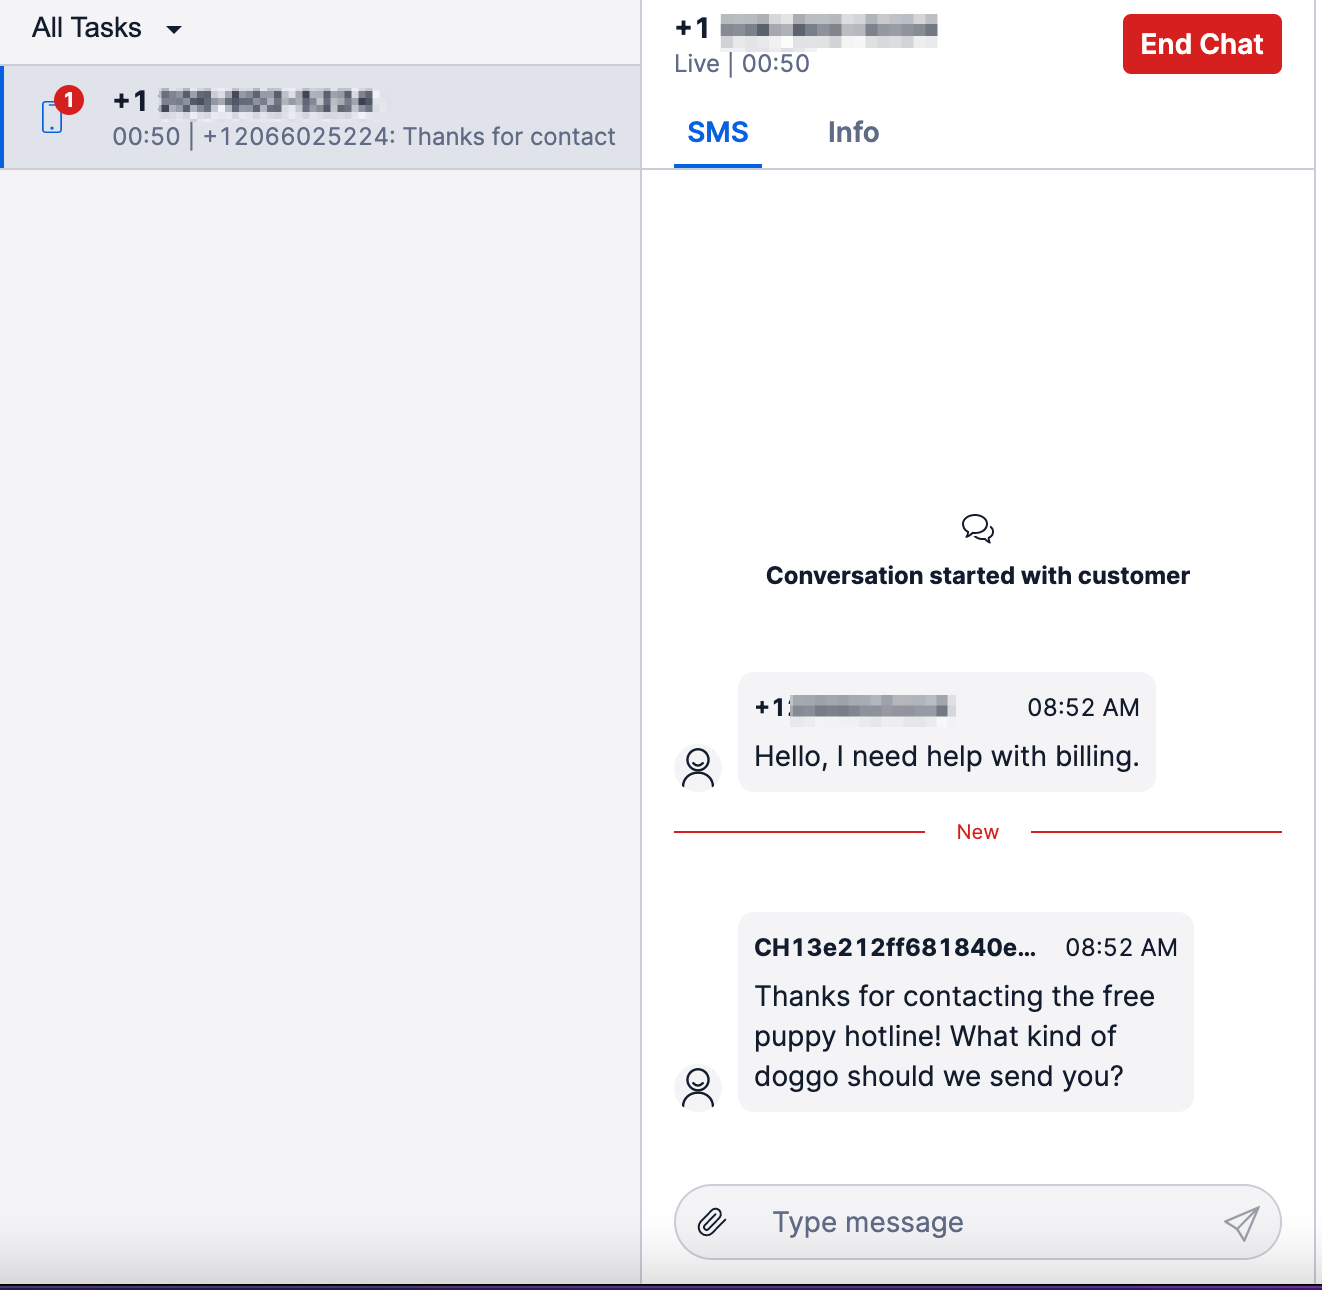
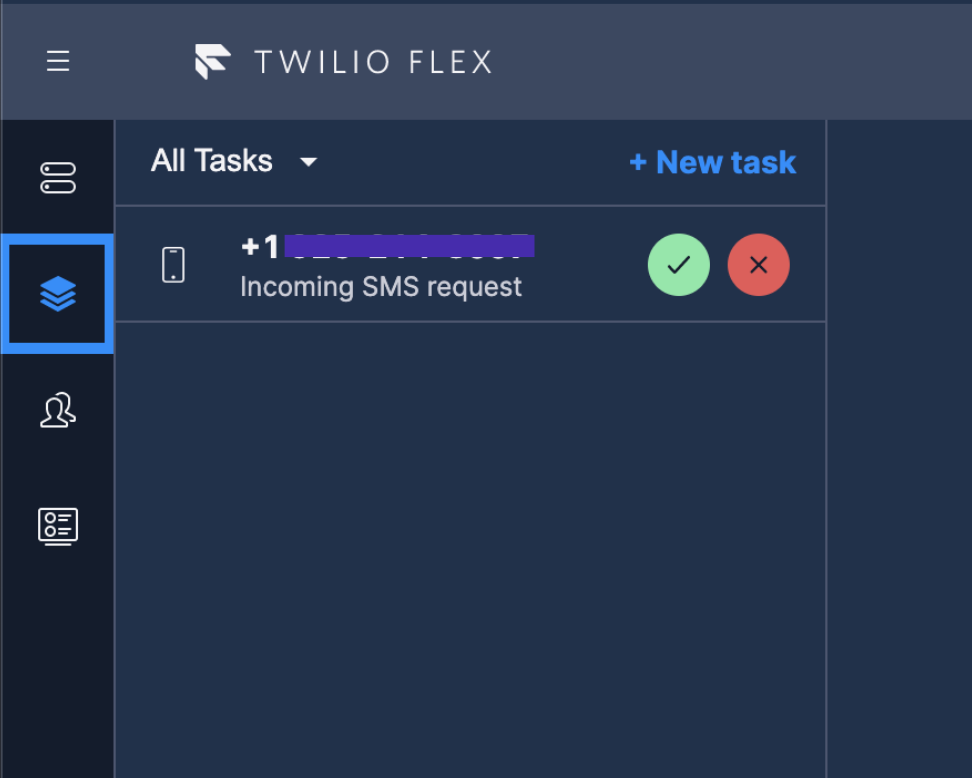
Here’s a screenshot of the Agent Desktop with a few messages and an attachment exchanged.
Exploring Flex Conversations
Now that you’ve seen it in action, let’s dig a little deeper into the programmability of Flex Conversations and explore the WebChat open source application.
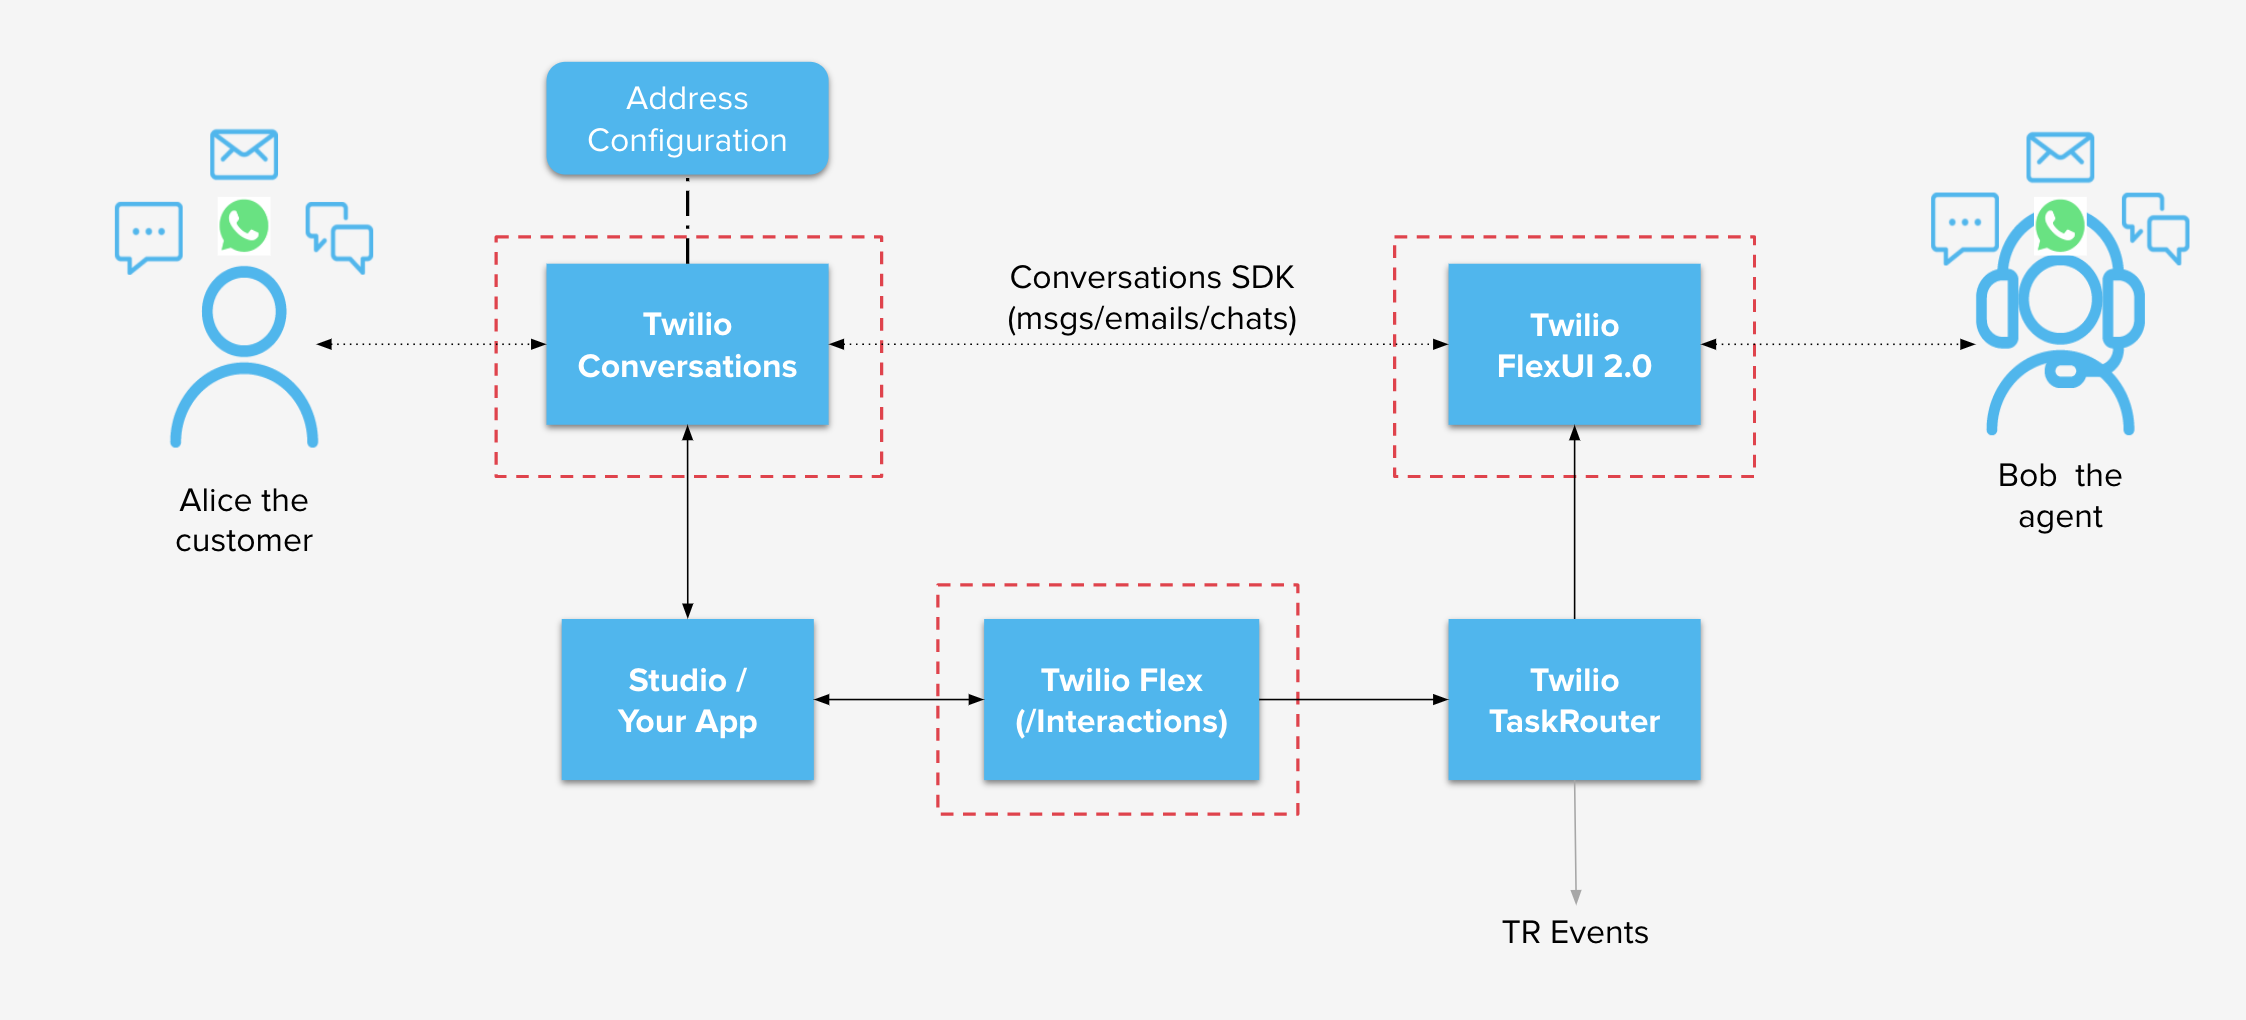
In the next few sections, I will talk about the various building blocks as shown in the high level diagram below.
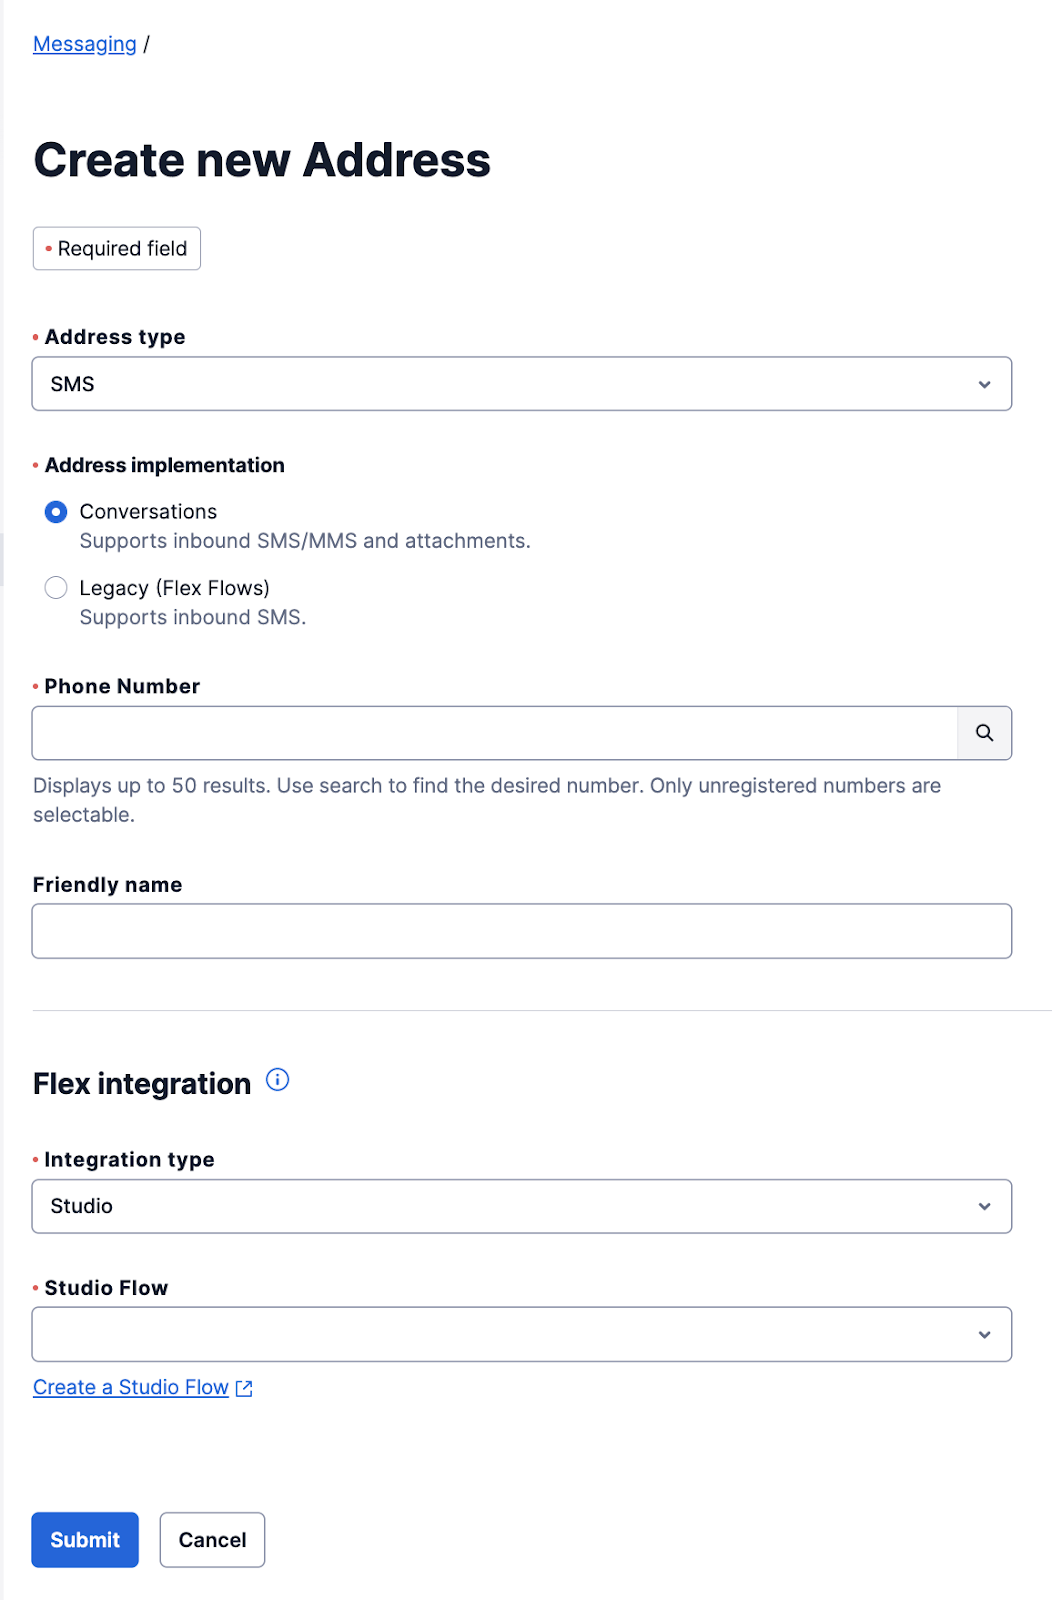
It starts with a Conversations Address
A Conversations Address is a configuration that captures a channel’s address. For example, the SMS or WhatsApp phone number and how you would like to integrate with this address. You can create and configure a Conversations address from the Flex Messaging Console or by using the Conversation Address Configuration resource.
twilio api:conversations:v1:configuration:addresses:create \ --friendly-name "My Flex SMS Address" \
--auto-creation.enabled \
--auto-creation.type webhook \
--auto-creation.conversation-service-sid ISXXXXXXXXXXXXXXXXXXXXXX \ --auto-creation.webhook-url https://example.com \ --auto-creation.webhook-method POST \
--auto-creation.webhook-filters onParticipantAdded onMessageAdded \
--type sms \
--address <Your Twilio number>
Furthermore, Conversations Addresses provide an important function that we call “auto-create”. With this functionality, a new conversation is automatically created for us when a message arrives that does not belong to an ongoing conversation. This takes the burden from you having to provide session management for async channel messages.
Finally, a Conversations Address allows you to set up an integration with a Studio Flow or a webhook to your application. Studio integrations are invoked when a new message arrives while webhook integrations can be configured with a list of events that your application wants to receive.
In the create address example above, the webhook will be invoked when a new participant is added and when a new message is added to the conversation because we supplied the onParticipantAdded and the onMessageAdded events in the webhook-filters option.
Handling Inbound Contact with a Studio Integration
Twilio Studio is a low-code/no-code application builder that you can use to handle your customers' inbound conversations. With Studio, you can build chatbots, auto-responders, or even Slack integrations but for the purposes of this article, we will focus on the SendToFlex widget.
Once you’ve configured a Conversations Address with an auto-creation type of studio, your Studio Flow will be invoked through the Incoming Conversation trigger.
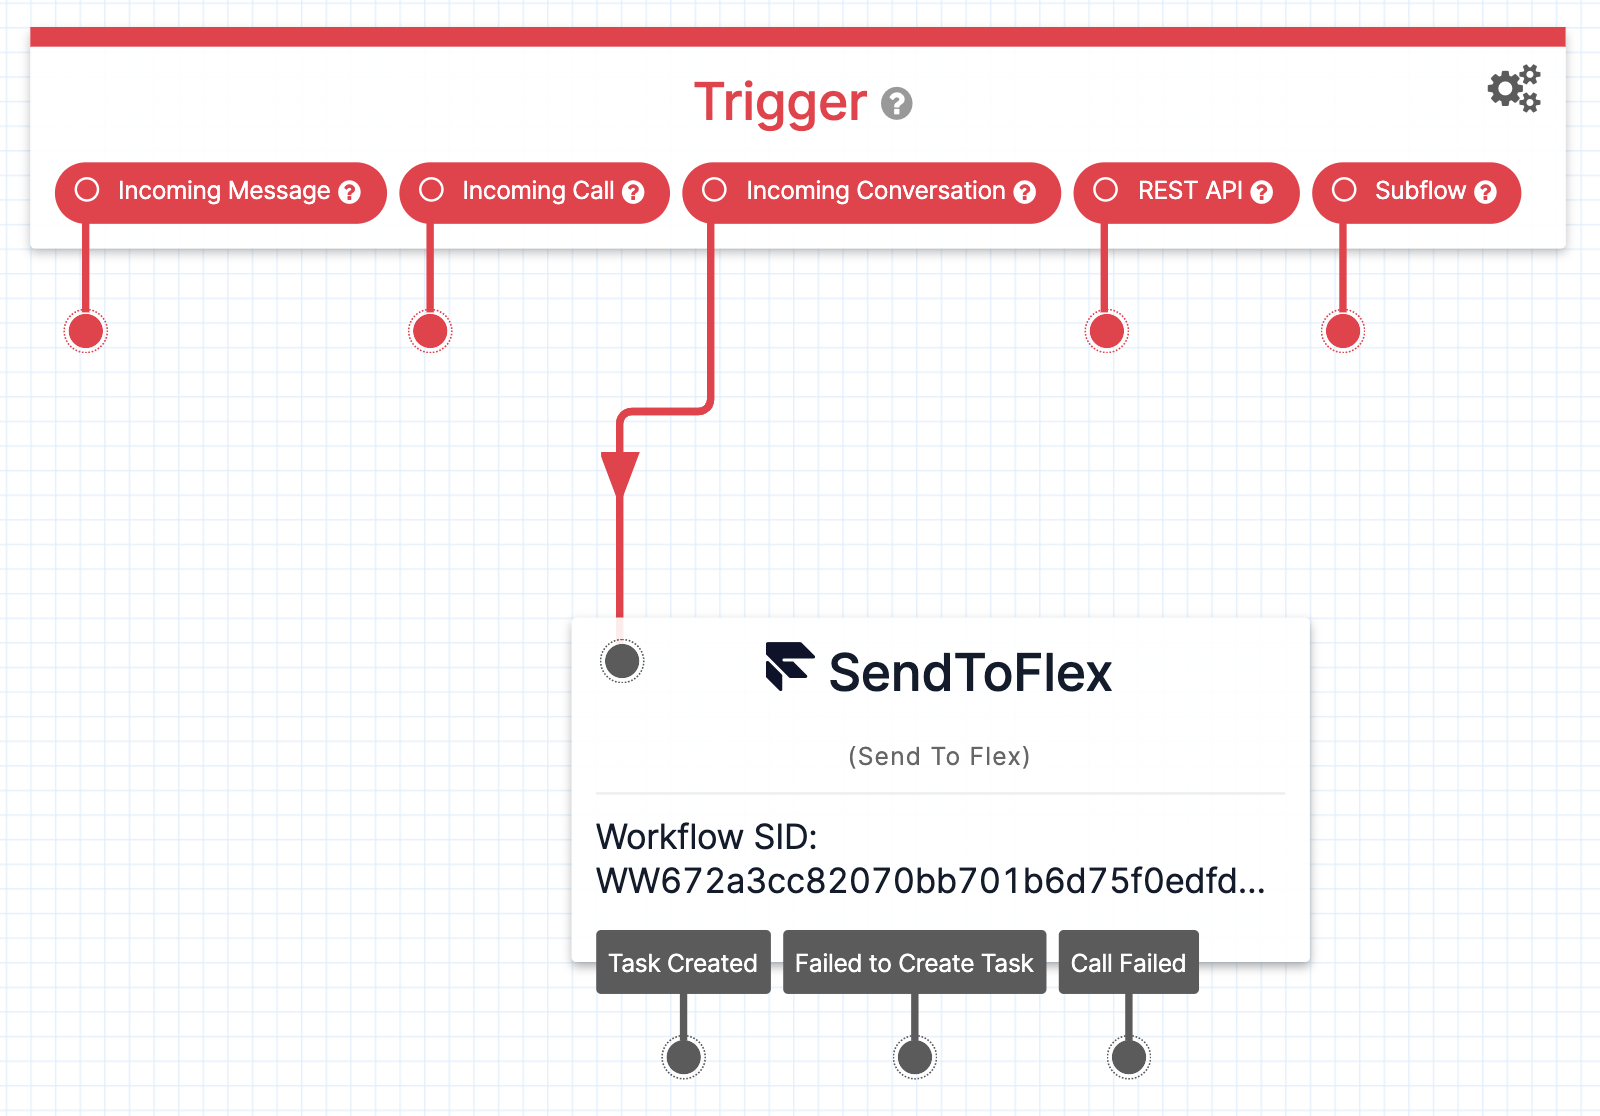
In this flow, you can use the SendToFlex widget to hand over this conversation to Flex. This widget hands over the customer contact to Flex which will then find an agent to connect the customer to.
Note that once this SendToFlex widget finishes executing, Studio will no longer receive messages bound to this specific conversation since it’s been handed over to Flex.

The SendToFlex widget requires the TaskRouter workflow and the Task Channel which will be used by Twilio TaskRouter to find an agent. Select those from the dropdown menu.
You can also specify any custom task attributes that your app relies on which will be automatically added to the created task. This could be, for example, skills required for the agent or an indicator that this is a VIP customer. With these attributes, you can create TaskRouter workflows to match the task with the correct agent. Please refer to the Twilio TaskRouter documentation for more information about routing.
Handling Inbound Contact with a Webhook Integration
For more advanced use cases, you can have your application handle conversation events. When this is the case, you can configure the Conversations Address with an endpoint URL and specify the events that you wish to receive notifications for. You can specify the events via the webhook-filters option on the Address Configuration Resource.
Let’s Connect
We now have the conversation and a customer waiting for an agent to respond. This is where the magic happens and we enter the world of the new Interactions API.
Either through Studio’s SendToFlex widget or your application, an interaction must be created to handle this Flex Conversation. The interaction will take care of creating a task to route the Flex Conversation. Flex Conversations relies heavily on Twilio TaskRouter to route tasks as per the workflows you specify.
Here’s an example of how to create an Interaction for inbound contact. Don't worry, there’s a lot more about Interactions API further down.
CHANNEL=$(cat << EOF
{
  "initiated_by":"customer",
  "properties":{
     "media_channel_sid":"CHXXXXXXXXXXXXXXXXXXXXXXXXXXXXXXXX"
  },
  "type":"sms"
}
EOF )
ROUTING=$(cat << EOF
{
  "properties":{
     "attributes":{
        "from":"<Customer number>"
     },
     "task_channel_unique_name":"sms",
     "workflow_sid":"WWXXXXXXXXXXXXXXXXXXXXXXXXXXXXXXXX",
     "workspace_sid":"WSXXXXXXXXXXXXXXXXXXXXXXXXXXXXXXXX"
  }
}

EOF )

curl -X POST https://flex-api.twilio.com/v1/Interactions \
--data-urlencode "Channel=$CHANNEL" \
--data-urlencode "Routing=$ROUTING" \
-u $TWILIO_ACCOUNT_SID:$TWILIO_AUTH_TOKEN
It ends with "I Accept"
Flex Conversations requires Flex UI 2.0. The new Flex UI 2.0 utilizes Twilio’s PASTE design system that allows you to create consistent and inclusive experiences and adds support for Flex Conversations!
Flex UI 2.0 continues to build on the existing experience with presenting agents with tasks. When a Flex Conversations task arrives, the agent is presented with the familiar Accept/Reject task buttons. Once the agent accepts, they are automatically added to the conversation.
With Flex Conversations and Flex UI 2.0, the agent is able to add and receive attachments on all channels that support attachments, including SMS/MMS, WhatsApp, and Chat. Note that MMS and WhatsApp attachments only work for US phone numbers. They also get delivery and read receipts for channels that support those.
When the agent ends the conversation, by default, Flex UI will give them time to wrap up before completing the task.
Webchat React App
Did I mention that we have an open sourced React-based webchat app to get you started with building your webchat channel? I think I did but we’re very excited about this.
Open source puts the code at your fingertips to get started quickly and to give you endless opportunities to customize and build the experience that you want to give to your customers.
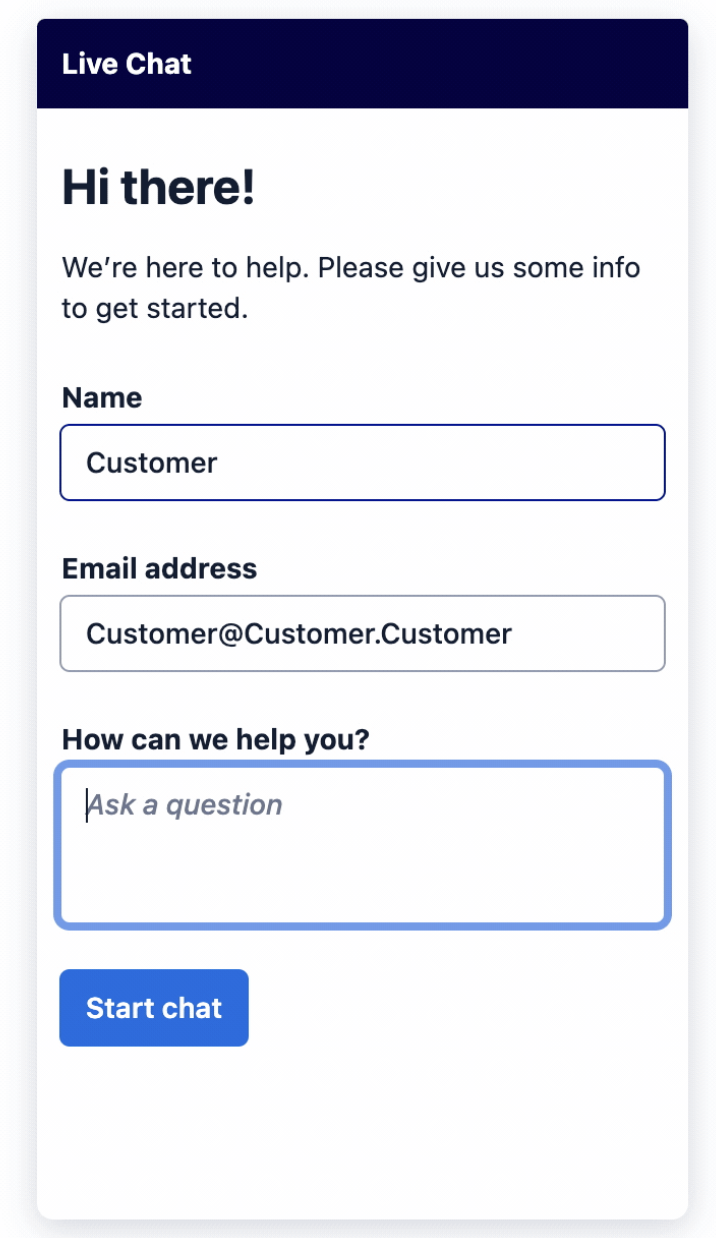
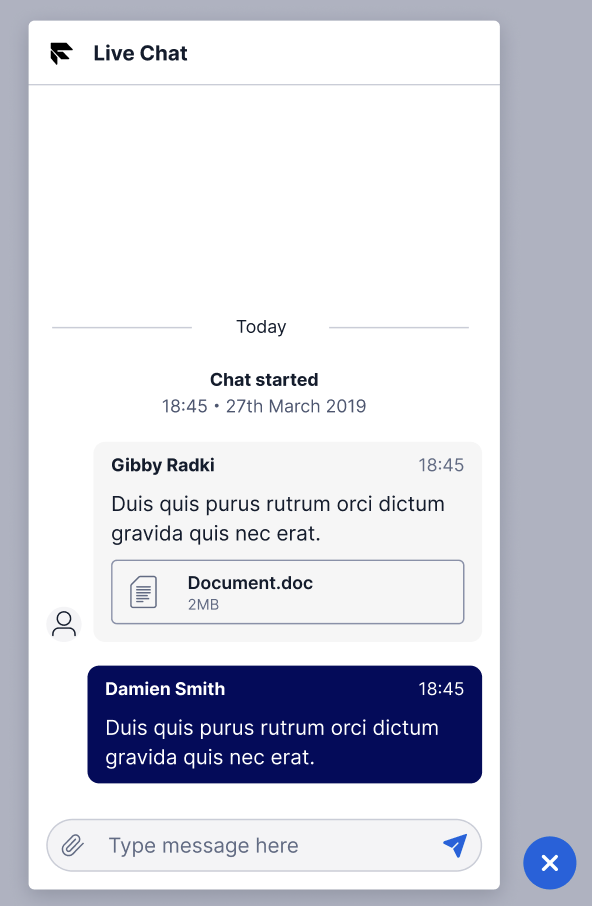
The app provides a very typical webchat engagement flow: gather the inquiry details through a pre-engagement form and then connect the customer to an agent. Once the customer is connected and can see when the agent is typing (with the provided chat widget), they can attach and receive files, and they can even see when the message is read.
Out of the box, the app utilizes the Conversations SDK to provide the chat functionality and makes use of the Webchats endpoint that creates a guest user and adds them to a new Conversation. The app also demonstrates how you can then mint a JWT for the Conversations SDK.
For more details, please check the README and make sure you follow all the security recommendations and guidelines when deploying this to your website.
Interactions API
The Interactions API is an API that facilitates setting up communications between customers and your contact center agents. It provides a model to bridge the world of tasks and task routing with the conversations that take place between customers and agents.
At a high level, an interaction consists of a channel that tracks an associated conversation and allows you to create tasks to bring agents into that conversation. The object diagram below shows the relationships between the various entities.
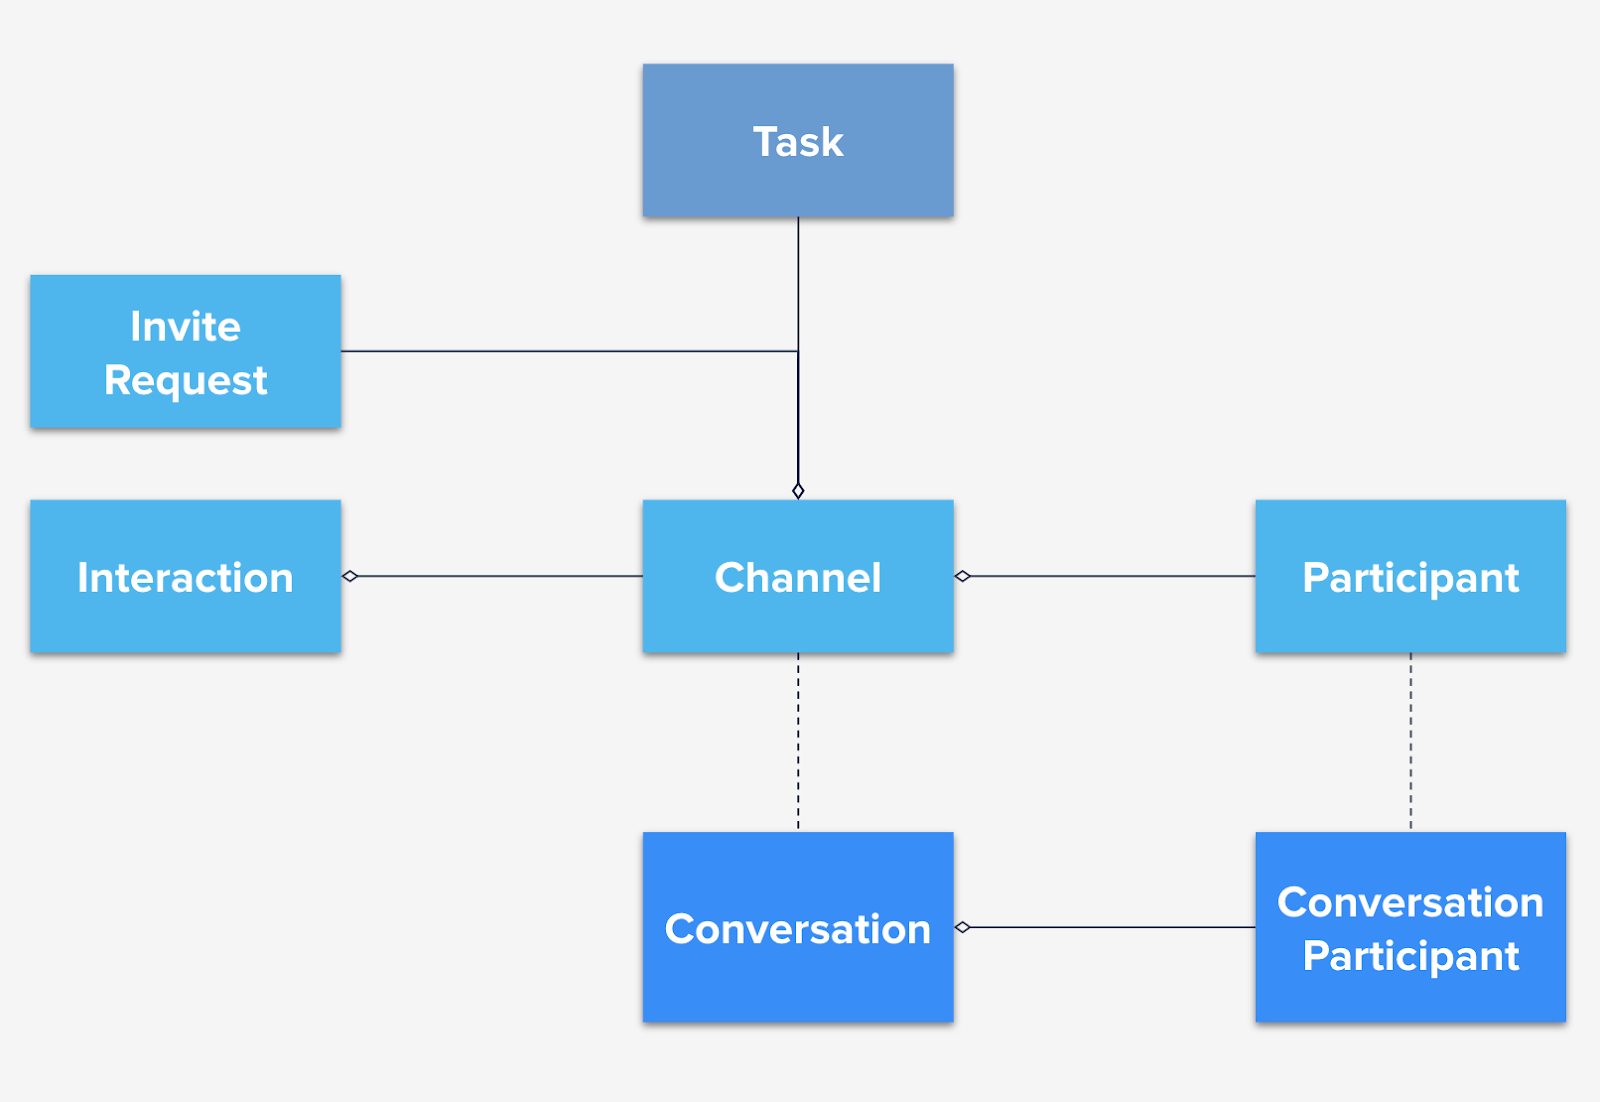
The Interactions API exposes the following endpoints:
- /Interactions - This is a container object that references a channel. In this release, it will only allow one channel.
- /Interactions/KDxxx/Channels - An Interaction Channel binds the world of media to the world of contact center workflows. While it references a single conversation, it can keep multiple tasks for one or more workers interacting with the customer. An Interaction Channel is either
activeorclosed. - /Interactions/KDxxx/Channels/UOxxx/Participants - A Channel Participant represents a customer or an agent and references the media participant object. An agent participant can be removed from an Interaction Channel by setting its status to
closed. - /Interactions/KDxxx/Channels/UOxxx/Invites - This endpoint allows you to invite a worker through an Invite mechanism which uses Tasks and Reservations. The invite mechanism allows a worker to accept or reject an invitation (reservation). Under the hood, the Invite creates a task which is evaluated and routed.
Now, let’s see this API in action by applying to real world use cases.
Interactions API - Handling customer requests via a web form
An example flow for this use case may be something like this:
- Customer fills out a form on your website to request help or an update about a particular product or service. They provide their mobile number and request to be contacted over SMS.
- Your application receives this form and creates an interaction for an agent to handle this request
- The interaction you created will proceed to create the conversation, add the customer as a participant, and create a task for an agent
- Agent accepts and is connected to the customer over the desired channel
For step 2, your request could look something like this:
CHANNEL=$(cat << EOF
{
  "initiated_by":"api",
  "participants":[
     {
        "address":"<Customer number>",
        "proxy_address":"<Your Twilio number>"
     }
  ],
  "type":"sms"
}

EOF )

ROUTING=$(cat << EOF
{
  "properties":{
     "attributes":{
        "from":"<Customer number>",
        "customerName": "Customer Name",
        "customerAddress":"<Customer number>"
     },
     "task_channel_unique_name":"sms",
     "workflow_sid":"WWXXXXXXXXXXXXXXXXXXXXXXXXXXXXXXXX",
     "workspace_sid":"WSXXXXXXXXXXXXXXXXXXXXXXXXXXXXXXXX"
  }
}
EOF )

curl -X POST https://flex-api.twilio.com/v1/Interactions \
--data-urlencode "Channel=$CHANNEL" \
--data-urlencode "Routing=$ROUTING" \
-u $TWILIO_ACCOUNT_SID:$TWILIO_AUTH_TOKEN
Interactions API - Agent Initiates Outbound Reach
To provide excellent customer service, many businesses want to follow up or proactively reach out to their customers to ensure the customer is updated. As an example, an agent may want to initiate contact with a customer from the CRM. With Flex Conversations, this is easy to do. Simply create an outbound interaction:
curl --location --request POST 'https://flex-api.twilio.com/v1/Interactions/' \
-u $TWILIO_ACCOUNT_SID:$TWILIO_AUTH_TOKEN \
--form 'Routing="{
       \"properties\": {
           \"workspace_sid\": \"WSXXXXXXXXXXXXXXXXXXXXXXXXXXXXXXXX\",
           \"workflow_sid\": \"WWXXXXXXXXXXXXXXXXXXXXXXXXXXXXXXXX\",
           \"queue_sid\": \"WQXXXXXXXXXXXXXXXXXXXXXXXXXXXXXXXX\",
           \"worker_sid\":\"WKXXXXXXXXXXXXXXXXXXXXXXXXXXXXXXXX\",
           \"task_channel_unique_name\": \"sms\",
           \"attributes\": {
              \"customerName\":\"Customer name\",
               \"customerAddress\": \"<Customer number>\"
           }
       }
   }"' \
--form 'Channel="{
       \"type\": \"sms\",
       \"initiated_by\": \"agent\",
       \"properties\": {
           \"type\": \"sms\"
       },
       \"participants\": [
           {
               \"address\": \"<Customer number>\",
               \"proxy_address\":\"<Your Twilio number>\"
           }
       ]
}"'
With this API call, the agent’s Flex Desktop UI will receive and auto-accept a task reservation which results in adding the agent to the conversation and they can start chatting with the customer.
The agent uses the same familiar interface to send messages and attachments, and they wrap up and complete the task as they would with any other type of task.
Interactions API - System Initiates Outbound Reach
For many businesses, like Tomonetworks, their application proactively sends out a reminder or a follow-up message to a customer during the application process. In this case, an agent is not involved but the agent needs to obtain context when a customer responds. For this workflow, you will need to do the following:
- Create a conversation, add the customer as a participant, and configure a Studio flow (or a webhook)
curl -X POST https://conversations.twilio.com/v1/Conversations \
--data-urlencode "FriendlyName=My First Custom Chat Conversation" \
-u $TWILIO_ACCOUNT_SID:$TWILIO_AUTH_TOKEN
curl -X POST https://conversations.twilio.com/v1/Conversations/CHXXXXXXXXXXXXXXXXXXXXXXXXXXXXXXXX/Participants \ --data-urlencode "MessagingBinding.Address=<customer number>" \ --data-urlencode "MessagingBinding.ProxyAddress=<Your Twilio Number>" \ -u $TWILIO_ACCOUNT_SID:$TWILIO_AUTH_TOKENcurl -X POST https://conversations.twilio.com/v1/Conversations/CHXXXXXXXXXXXXXXXXXXXXXXXXXXXXXXXX/Webhooks \ --data-urlencode "Configuration.FlowSid=FWXXXXXXXXXXXXXXXXXXXXXXXXXXXXXXXX" \ --data-urlencode "Target=studio" \ -u $TWILIO_ACCOUNT_SID:$TWILIO_AUTH_TOKEN - Add the automated message to the conversation (this sends it to the customer)
curl -X POST https://conversations.twilio.com/v1/Conversations/CHXXXXXXXXXXXXXXXXXXXXXXXXXXXXXXXX/Messages \ --data-urlencode "Author=automator" \ --data-urlencode "Body=Hello there. This is a reminder" \ -u $TWILIO_ACCOUNT_SID:$TWILIO_AUTH_TOKEN - The Studio flow will be invoked when the customer replies with the same Conversation SID. The Studio Flow uses the SendToFlex widget to send to Flex and the agent sees the automated message and the customer replies.
Interactions API - Adding a Second Agent to the Conversation
An agent may want to bring a second “expert” agent to an ongoing conversation to assist with the engagement and provide the best service possible for the customer. With Flex Conversations and the Interactions API, this is also very easy: you simply invite the agent. The Invites endpoint creates a new task that is routed through the supplied workflow. The difference is, there’s an ongoing conversation already and the agent that accepts this task is added to the same conversation.
ROUTING=$(cat << EOF
{
    "properties": {
        "queue_sid": "WQXXXXXXXXXXXXXXXXXXXXXXXXXXXXXXXX",
        "worker_sid": "WKXXXXXXXXXXXXXXXXXXXXXXXXXXXXXXXX",
        "workflow_sid": "WWXXXXXXXXXXXXXXXXXXXXXXXXXXXXXXXX",
        "workspace_sid": "WSXXXXXXXXXXXXXXXXXXXXXXXXXXXXXXXX"
    }
}
EOF
)

curl -X POST https://flex-api.twilio.com/v1/Interactions/KDXXXXXXXXXXXXXXXXXXXXXXXXXXXXXXXX/Channels/UOXXXXXXXXXXXXXXXXXXXXXXXXXXXXXXXX/Invites \
--data-urlencode "Routing=$ROUTING" \
-u $TWILIO_ACCOUNT_SID:$TWILIO_AUTH_TOKEN
Supervisor & Teams View
Flex agent desktop provides a Teams View that allows supervisors to monitor all ongoing interactions including calls and all other tasks. Through this same view, a supervisor can anonymously monitor ongoing Flex Conversations tasks and see, in real time, the messages and attachments exchanged between agents and customers.
For more information, see the Teams View documentation.
Next Steps
Flex Conversations is our next generation platform and architecture to power Flex asynchronous channel capabilities. It makes it easier than ever to deploy these channels into the contact center and build the workflows that are most suited to your business. To continue to learn about this platform, you can -
- Dig deeper into the Interactions API documentation
- Explore setting up WhatsApp
- Learn about Flex Insights
- Check out the Conversations webhooks and the documentation to capture messages for storage or filtering purposes
Finally
We are here to help! If you have any questions or need help with anything Twilio, don’t hesitate to reach us at support@twilio.com.
We can't wait to see what you build!
Related Resources
Twilio Docs
From APIs to SDKs to sample apps
API reference documentation, SDKs, helper libraries, quickstarts, and tutorials for your language and platform.
Resource Center
The latest ebooks, industry reports, and webinars
Learn from customer engagement experts to improve your own communication.
Ahoy
Twilio's developer community hub
Best practices, code samples, and inspiration to build communications and digital engagement experiences.