Get Your Local Weather with TypeScript and Twilio Programmable SMS
Time to read: 13 minutes
December 03, 2020
Written by
Reviewed by

In this article, you'll make use of Twilio Programmable SMS and TwiML, Twilio’s Markup Language, to build an application that provides current weather information for a given location via an SMS message. The user will be able to provide a zip code or city name by sending a message of the format city: <City Name,Country Code> or zip: <Zip Code>, where it’s optional to include a space or neglect it in the former case.
Along the way, with TypeScript, you’ll learn how to interface with external APIs, how to send, receive, and parse messages through Twilio Programmable SMS, how to set up an application configuration via environment variables, how to configure a text message webhook, and finally how to test a deployment of your application via Ngrok.
TypeScript is an extension of pure JavaScript - a “superset”, if you will - and adds static typing to the language. It enforces type safety, makes code easier to reason about, and permits the implementation of classic patterns in a more “traditional” manner. As a language extension, all JavaScript is valid TypeScript, and TypeScript is compiled down to JavaScript.
Requirements
- Node.js v10 - Consider using a tool like nvm to manage Node.js versions.
- A Twilio Account with an SMS-capable phone number. If you are new to Twilio, you can create a free account and register a number.
- An OpenWeatherMap account and App ID. If you are new to OpenWeatherMap, you can create a free account here.
Project Configuration
If you don’t already have one, create a free Twilio account and purchase a trial number with SMS capabilities. New Twilio accounts are provided with a 15 USD free credit, so you can complete this tutorial without having to purchase any services. Ensure the phone number has SMS capabilities for your specific region, and if not, enable permissions here. Additionally, while you’re here, find and make note of your Twilio Account SID and Auth Token, which are located on your Console dashboard.
With that done, create a free OpenWeatherMap account and find your App ID/API Key. On the OpenWeatherMap dashboard page, you should see your API key or be able to generate one if it’s not already provided. It’s a slight misnomer that OpenWeatherMap refers to this key as an “API Key” on their dashboard but expect it to be provided via the appId query parameter in GET Requests to their API. Due to that, you should keep in mind that any reference to “App ID” or “API Key” refers to the same thing.
To begin, you’ll need to set up your development environment. Open a terminal and run the following commands:
With these commands, you created a folder entitled weather-sms, with two inner folders: src and env. You also initialized a new npm project and installed the TypeScript compiler.
Begin your TypeScript configuration by replacing the contents of your tsconfig.json file with the following (this file was automatically generated for you when you ran tsc --init above):
This specifies to the TypeScript Compiler that it should ingest all source code from the src directory and emit compiled JavaScript to the build directory, both relative to the application root. Later, when creating the start and build scripts for package.json, this will come into play.
All of your source code will live within src and you’ll set up your environment variables within env. You’ll work on the latter part now. Create a file within env called env.env:
Using a naming convention like this allows you to specify different files for different environments, such as dev.env, or prod.env, or staging.env, etc. In this case, you can use env.env to keep the name agnostic.
Open your new env.env file and populate it with the following environment variables:
Before you deploy your application, you'll use a tool called env-cmd to make these variables available to the runtime.
Now you can navigate into the src folder and create a new folder called config. Inside this file, you’ll create a new file called appConfig.ts, which will provide a thin wrapper around your environment variables for use by your application:
Inside of appConfig.ts, you can add the following code:
In ES6 JavaScript, objects marked as const are not truly constant - only the reference to the object is constant, which means you can’t reassign a const object to another object, but you can manipulate the properties.
To remedy that, at compile-time, you use a TypeScript 3.4 feature known as a “const assertion” - that’s the meaning of the as const at the end.
It forces that no literal types will be widened, the properties of object literals will become readonly, and array literals will become readonly tuples.
To understand widening, consider creating a constant (const) variable and assigning it to a literal value like 3.14. The type of that variable will be the literal 3.14 since it can’t be changed. If you assigned the literal 3.14 to a variable declared via let (i.e, a non-constant variable), the variable type will be widened from the literal type 3.14 to the number type, since other numbers can be assigned and you’re not reduced to that literal.
To learn more about Const Assertions, see the relevant section of the TypeScript Documentation. This section of the documentation also shows an example of widening.
With your project configuration complete, you are now ready to start building the application.
Build the Application
There are two distinct parts to the build - the first part is working with the Weather API to query it and then parse the response. The second part is building the webhook endpoint for Twilio which will respond to user messages. You’ll start with the Weather API.
Create Utility Functions for Value Conversions & Helper Types
When you call the Weather API to query data for a specific location, it will return a JSON response containing various values in units that probably aren’t applicable to every user across all regions. For example, temperature will be returned in Kelvin and wind speed in meters per second. You can visit the OpenWeatherMap documentation to see exactly what fields are returned in the JSON response.
You’ll start by building a few unit conversion functions. You want to display temperature in both Celsius and Fahrenheit and if you want, wind speed in miles per hour. Create a new folder in the src directory named utils, short for utilities, and create a file within it called conversions.ts:
Add the following code to your new conversions.ts file to add the three unit conversion functions you'll need:
You’ll also add a type called Immutable<T>, which will allow you to force any arguments passed to methods to be readonly (recursively). That is, the object specified as the generic T will be effectively deeply frozen at design time.
Create a new file called types.ts in utils with the following type:
It forces that each property in a given object, recursively, is marked as readonly, by iterating through its properties until it reaches the end of the tree. It will look at each key of the object of type T and make it readonly, while also making the value of that key (the T[K] part) readonly too. To learn more about Recursive Types, visit the TypeScript Documentation.
You’re now ready to integrate the Weather API.
Write the Data Access Code
Run the following commands to create a few files and directories:
These commands created a new folder inside your src folder called weather, and within weather, created another folder called api. This api folder will house your files for interacting with the Weather API.
These commands also created two files inside the api folder: getWeather.ts and parseWeatherDto.ts.
The getWeather.ts file will handle the request to the Weather API while the parseWeatherDto.ts file will parse the API response and turn it into a readable string that can be sent to the user via an SMS message.
Inside getWeather.ts, the first thing you'll want to do is define the shape of the expected API data response.
In software architecture, you commonly use the concept of Data Transfer Objects to do this. A Data Transfer Object can be thought of as a bunch of getters and setters, or public properties, that are used to transmit data between two external systems or two layers of an application. A Data Transfer Object formalizes a data shape so that both systems know how to communicate with each other.
You’ll use an interface rather than a class to do this. You don’t need to use a class because inherent within the notion of a class is a mixing of state and behavior. Here, you have only state - no behavior and no requirement for data to be protected from other parts of the code (this is called encapsulation).
Inside getWeather.ts, define the interface:
This interface defines an object with four properties:
weathermainvisibilitywind
weather is an array containing the various weather conditions and a description for each. For example, rain, thunderstorms, fog, etc. These properties come straight from the OpenWeatherMap API documentation.
Your interface is defining the same data shape as defined on the OpenWeatherMap API documentation, but you’re handpicking the properties that you are interested in for the purposes of your application. And now, when you make a request to the API, the data you get back will abide by this interface.
Due to the fact that you allow the user to specify either a zip code or city name for their target location, you'll also define an enumeration in this file to differentiate the two. Below the code you just added, add the highlighted lines:
The OpenWeatherMap API documentation tells you that the URL you have to make a request to changes based on whether you are providing a city name or zip code. In both cases, you have to pass your App ID/API Key via the appId query parameter, but for zip codes, you'll have to use the zip query parameter. For other location types, including city names, you can use the q query parameter.
This means you have to construct the URL dynamically based on what data the user is looking for. To accomplish this, at the top of the getWeather.ts file, import the config object you exported earlier.
Then, below all the existing code in getWeather.ts, add a new function called makeUrl:
The makeUrl function accepts the location as a string, be it a zip code or city name, as well as a LocationType enumeration, which is used to differentiate between the two (because just location would be too ambiguous).
It places the base URL of the Weather API, which is the part that doesn’t change, as well as your App ID into const variables. This helps to keep things clear. It then creates a partial URI dynamically based on the value of locationType, and then appends the APP_ID variable to the end of the string. This whole value then gets returned.
You’re almost finished with this file. You need to add two more functions. The first function you'll add is called queryApi, and it will use the Axios HTTP Client to query the API. Add the following code beneath the rest of the code in the file:
This queryApi function makes the GET request to the weather API and returns the response. The reason this is separated into another function is just to abstract away the code that interfaces with Axios so that you can migrate away from Axios in the future without having to touch the rest of your code.
You’ll notice that the makeUrl() and queryApi() functions are not exported. That’s what you want - they are functions private to this file because they are directly coupled to the Weather API as well as Axios.
The whole point of abstracting away these functions and defining the DTO and LocationType enumeration is to be able to move away from the Weather API or Axios without having to refactor your business logic.
The last function you'll add is a public function, which will be used by the API caller. This function should never have to see a change to its signature or internal workings:
This getWeather() function is what will be used throughout the rest of your application to call the weather API. It also parses the DTO that comes back via the parseWeatherDto function, which you will create next.
To create the parseWeatherDto function, you want to take that entire DTO interface, make all the unit conversions, and then collapse it into one readable string to return to the user.
Open the parseWeatherDto.ts file and add the following:
There is a lot going on here, so let’s step through it line-by-line.
You retrieve the Weather API DTO into the function, specified as the IWeatherResponseDTO type, wrapped in the generic Immutable<T> type, which, as described earlier, makes all fields readonly to ensure you don’t accidentally change the data in the DTO (thus sending bad information to the user!).
Keep in mind that we’ve only marked the type to be immutable. The actual object isn’t. We can change the object at any point by bypassing TypeScript’s typing information with something like as any - which is the reason why you should seldom mark types as any since it defeats the purpose of TypeScript. Additionally, the static typing of TypeScript is available at design time and design time only, and falls away in the compiled JavaScript.
Next, you pull the current temperature and the current “feels like” temperature, and retrieve a Celsius and Fahrenheit result from the Kelvin values provided by the API.
Then, you take that array of weather conditions and collapse it into one comma-separated list. The addListSuffix local function checks if it is correct to append a comma and a space based on where you are in the string. The conditions variable gets filled with the resulting string.
You also get the wind speed in miles per hour, and you place all these new values into an array called lines, which represents every line you want to send to the user. You finally join that array, appending a newline character in between each line, and return that readable string.
With that, you are completely done with all of the code relating to the Weather API!
Build the Webhook Endpoint
You will create a function that acts as a webhook to which Twilio will make a POST request when a user sends a text message to your Twilio phone number, requesting weather information for a given location.
Run the following commands to install express and its corresponding types, and create a new file inside the weather folder called weather.ts:
Within weather.ts, create a function called getWeatherForSMS() that accepts the Express request and response objects:
This function will eventually be called by Twilio when you set it up as a webhook. In Express, you receive data on req.body. Twilio will place the content of the text message on a property called Body. So, that means that a given user-specified location will exist on req.body.Body.
You’ll need to parse that string, validate it, determine if it’s a zip code or city name, and then pass it to the getWeather function from earlier.
In order to respond to the user with Twilio and TwiML, you'll have to create a new instance of the class MessagingResponse provided by the Twilio package you installed above. Using that, you'll build the message, and then you'll respond back to Twilio with it, which will go ahead and execute the instructions you specified.
For example, to echo the user’s message back to them, you could do this:
You can simplify this code by creating a function that abstracts this process away. It’ll be a higher-order function - in this case, a function returning a function. The outer function will have the Express Response object injected in, and then a closure will be created with the function it returns.
To build this, create a new file called makeResponder.ts inside the src/utils folder with the following command:
Inside your new makeResponder.ts file, add the following code:
The reason for building it this way is to simplify the signature. Rather than have to pass in the res object everywhere, you only need it once - in the factory that creates the function. Now, for example, in any given Webhook function, you can access the returned function as follows:
Now that you have a way to respond to the user, you’re ready to validate the inquiry sent up by the user and ensure it’s valid. Create a new file inside utils called validation.ts:
And add the following validation code:
The first isValid() function checks that the message from the user contains a substring of city: or zip:. If it does not, the input is invalid, so it returns false. Otherwise, it returns true.
The parseLocationAndGetType() function attempts to pull the location and location type out of an input that it knows is valid. It returns the user’s location followed by the LocationType enum as a tuple, which is quite similar to React Hooks.
Back inside the weather/weather.ts file, update the getWeatherForSMS() function as follows:
You first make a responder function, then validate the body - relying on JavaScript’s short-circuit evaluation, then parse the input, and then pull the weather information from the API and respond with it. With that, most of the application is built and you are almost ready to test it.
The final step is to build the server and handle your environment variables. Before you do that, however, there is one final change you can make. There’s a potential that something goes wrong when contacting the Weather API or returning the TwiML, so you should wrap your code in a try/catch block to handle errors. I’m generally not a fan of try/catch repetition, however, so I like to abstract away error handling logic to an external function. Create one more file in the utils folder called withErrorHandling.ts:
And inside, place the following code:
This function accepts some responder function as well as a function f that encapsulates the likely to fail operation. It attempts to run the operation and returns the result, but if it fails, it catches the error and responds with a message to the user.
You can now update your getWeatherForSMS() function to reflect the highlighted lines:
All you’ve done is put the code subject to transient failures inside the error handling function so those errors can be caught and dealt with. This also ensures your request doesn’t hang.
To test your function, you'll have to create a server with Express and register the function as a POST endpoint.
Create a new file inside src called server.ts.
Inside, configure Express:
Now for the environment variables!
Handle Environment Variables
We’ll use a tool called env-cmd to notify the runtime of your environment variables and make them accessible to the application. To do that, first install the package:
Now, edit your package.json file at the root of your project to reflect the highlighted lines:
You use the -f flag to notify env-cmd of your environment variable location file, which will become available to the application when built.
Running and Testing the Application
Now give it a try! Run the application via npm start, which is the start script created above. It handles building the app through the TypeScript Compiler and notifying the runtime of the environment variables.
After starting the app, use ngrok to make it accessible to the outside world. Note the port number the app is running on - in my case, it’s 3000 - and then in a new terminal window or tab, run npx ngrok http 3000 (or whatever port number).
With the ngrok URL, you can configure Twilio to make a POST request to [ngrok URL]/sms in order to hit your web hook. Navigate to the Manage Phone Number page of the Twilio Console, click your phone number, and under Twilio Messaging, paste your URL as a Webhook for HTTP POST.
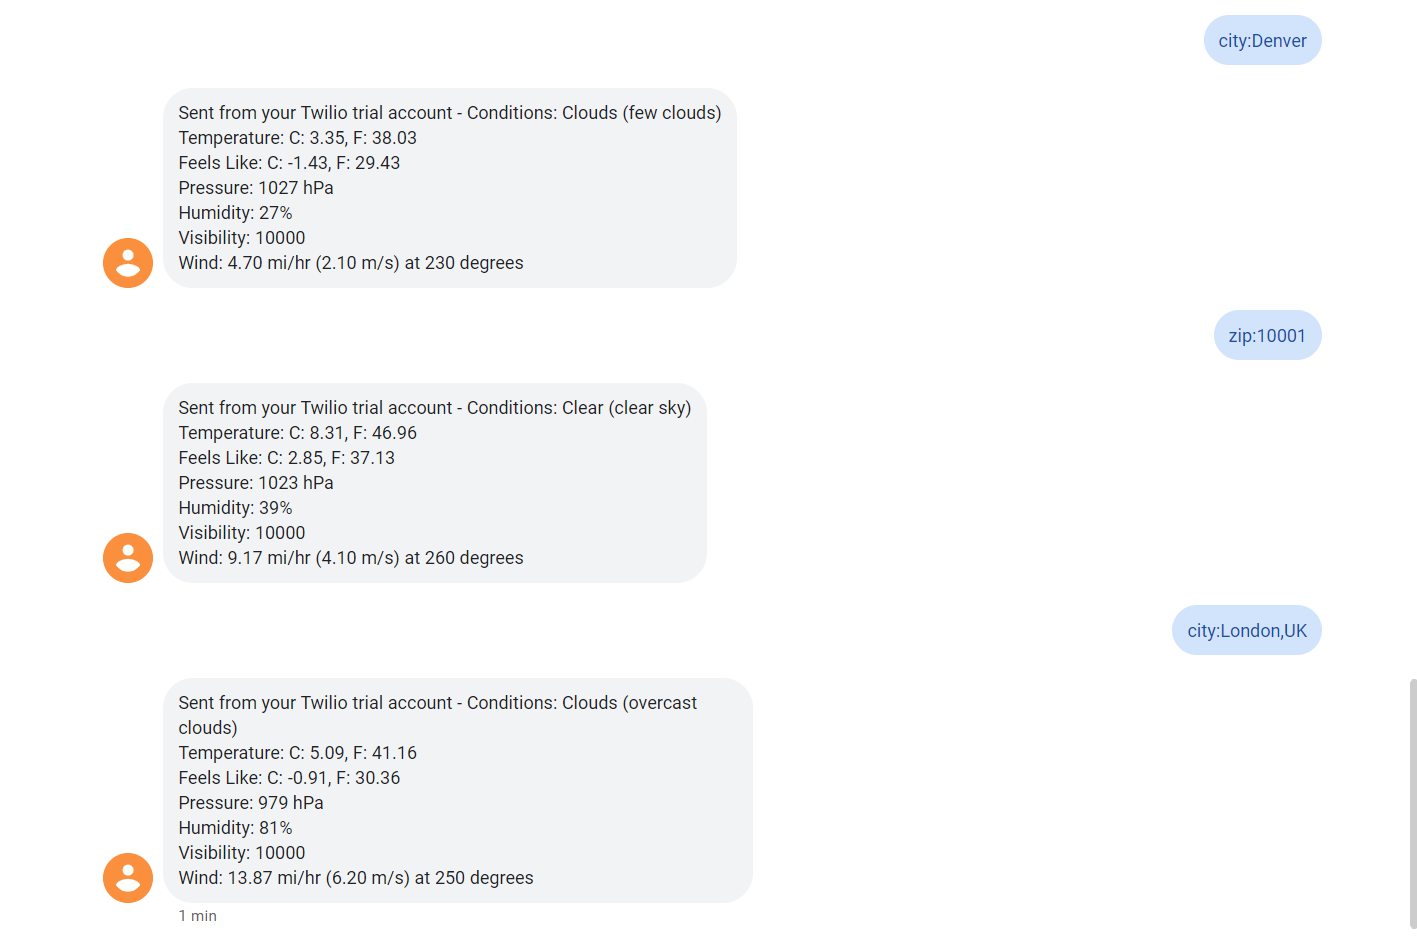
Time to test! Try sending an SMS message with your zip code or city name to your Twilio number and you’ll see weather information come back.
Conclusion
In this article, you’ve learned how to utilize an external API along with Twilio Programmable SMS in order to receive, send, and parse text messages. If you got stuck along the way, the full source code can be found here: https://github.com/JamieCorkhill/Weather-Twilio-SMS-Demo
Jamie is an 18-year-old software developer located in Texas. He has particular interests in enterprise architecture (DDD/CQRS/ES), writing elegant and testable code, and Physics and Mathematics. He is currently working on a startup in the business automation and tech education space, and when not behind a computer, he enjoys reading and learning.
- Twitter: https://twitter.com/eithermonad
- GitHub: https://github.com/JamieCorkhill
- Personal Site: https://jamiecorkhill.com/
- LinkedIn: https://www.linkedin.com/in/jamie-corkhill-aaab76153/


Related Resources
Twilio Docs
From APIs to SDKs to sample apps
API reference documentation, SDKs, helper libraries, quickstarts, and tutorials for your language and platform.
Resource Center
The latest ebooks, industry reports, and webinars
Learn from customer engagement experts to improve your own communication.
Ahoy
Twilio's developer community hub
Best practices, code samples, and inspiration to build communications and digital engagement experiences.