Getting started with Socket.io: Adding Real Time Events to your Node.js Express App
Time to read: 4 minutes
October 12, 2015
Written by

In a previous post, I explained how to monitor phone calls sent with the Twilio API in real time using call progress events. These allow you to set up a webhook url to receive a request whenever the status of your phone calls change.
The real time updates of call progress events provide us with a great opportunity to play around with websockets. In this post I am going to show you how to extend an already existing Express app to add real time communication between the client and server. We will be turning the Express server from my previous post into the backend of a dashboard for monitoring calls in real time using socket.io.
Setting everything up
You are going to need to have have Node.js and npm installed. At the time of writing this blog post, I have Node v4.0 and npm v2.10.1 installed.
You will also need to create a Twilio account and purchase a phone number with Voice capabilities. You can get through this post using a trial account, but you will have to verify each phone number that you make calls to with the API. Upgrading your account will allow you to make calls without verifying the phone number first.
If you did not follow through the previous blog post, you can get the code for the back end that we are adding websocket functionality to from this GitHub repository.
Set it up locally by entering the following commands into your terminal. You may have to enter your GitHub credentials:
Now install Socket.io:
Getting started with Socket.io
Socket.io is a websocket library for adding bi-directional, event-based communication between your server and client. This allows us to receive and emit events in real time whenever our data changes. This is awesome because we can always have everything up to date by emitting an event to the client whenever our server receives an update to its /events webhook url.
Let’s get started by making a new directory called views for our HTML and a directory called static for our client side JavaScript.
Open the index.js file and make the following changes to allow our app to serve static content and to log whenever a socket connection is made:
We can hop over to the client side now to write code to connect to Socket.io.
Create a new file called client.js to the static directory with the following line of code:
To finish things off, we need to include this JavaScript code in some HTML. We will add the client.js file as well as a link to the cdn hosting the socket.io code. Create a file called index.html and add the following:
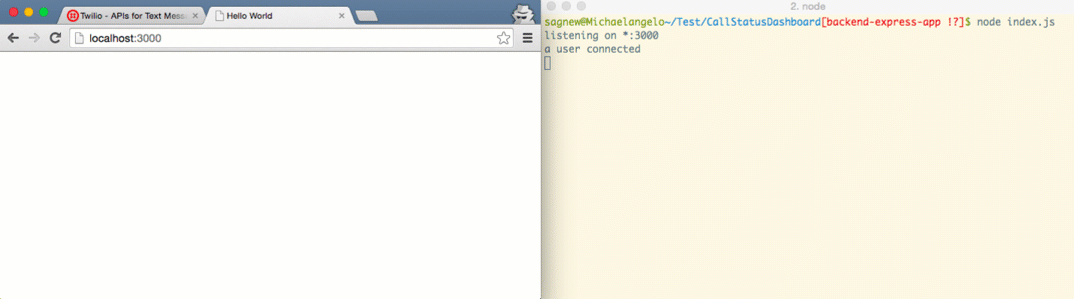
Now we can check to see if everything is working by running our server and visiting our dashboard page at http://localhost:3000 to see if anything is logged to the console:
Adding real time server-client communication to our app
Let’s modify our call status events route to emit an event with Socket.io whenever we receive an update from Twilio. We will want to emit an object with all of the relevant data from the request for the call progress event.
For now let’s just use the phone numbers that the call was made to and from, the status of the call and a call SID to use as a unique identifier for each phone call.
Go back to editing your index.js file and add the following code to your /events route:
We have to make one last change before everything works. Hop back over to our client.js script in the static directory and log events that we receive from the server:
Now whenever a call update is received, we will log it to the console both on the server and on the client. Pull out your phone and give your Twilio number a call while viewing the dashboard page in order to see how this code works.
Ready for more?
You were able to add basic Socket.io events to your app and should be set up to use this for more complex tasks. Try checking out Socket.io’s docs and their cool demos to see other stuff you can do with web sockets.
If you’re interested in finishing this up and building a front end for our dashboard app with ReactJS, stay tuned for future blog posts.
I’d love to see what cool things you build. Feel free to reach out if you have any questions.
- Email: Sagnew@twilio.com
- Twitter: @Sagnewshreds
- Github: Sagnew
- Twitch (streaming live code): Sagnewshreds


Related Resources
Twilio Docs
From APIs to SDKs to sample apps
API reference documentation, SDKs, helper libraries, quickstarts, and tutorials for your language and platform.
Resource Center
The latest ebooks, industry reports, and webinars
Learn from customer engagement experts to improve your own communication.
Ahoy
Twilio's developer community hub
Best practices, code samples, and inspiration to build communications and digital engagement experiences.