Handling High Volume Inbound SMS and Webhooks with Twilio Functions and Amazon SQS
Time to read: 10 minutes
July 31, 2017
Written by

Do you or a developer you know code for a nonprofit or social enterprise? Twilio.org can help with API credit and discount pricing to increase your impact.
When you use Twilio at scale, like our Twilio.org buddies DoSomething and Mobile Commons, webhooks can generate a significant amount of traffic to your web application. Each inbound message and status callback generate an HTTP request to your app. These requests add up quickly if you’re sending thousands or millions of messages, and can lead to traffic your application can’t easily support.

Many advanced Twilio users quickly offload incoming webhook requests to a queue like SQS, so that they can process these incoming requests more efficiently with background workers. With the new Functions feature, you can offload this queueing task to Twilio and only worry about the workers that clear out the queue. This can also be handy if you don’t have a public webhook URL you can configure with Twilio, and would rather process these messages by polling SQS from the comfort of your own internal servers.
Let’s see how it’s done!
Prerequisites
In this tutorial, we’ll assume you have basic knowledge of both the Twilio API and console, as well as the AWS API and console. If you need a primer on Twilio, I would first check out the Twilio Node.js quickstart for SMS. If you’re new to AWS and SQS, a good place to start would be their developer guide.
Configuring Amazon SQS queues
To illustrate how we handle incoming Twilio requests with queues, we’ll set up two Amazon SQS queues – one for incoming messages, and another for status callbacks. Why two queues? We don’t necessarily need them, but your application might decide it’s more important to handle incoming messages quickly versus status callbacks from messages you send. That way, you can devote more workers/resources to working off your incoming messages, and possibly fewer resources toward the callback events, which may be less time sensitive. You can tweak this as necessary in your particular use case.
Create an IAM user with SQS permissions
In your AWS account, let’s ensure we have an IAM user that is capable of managing SQS queues.
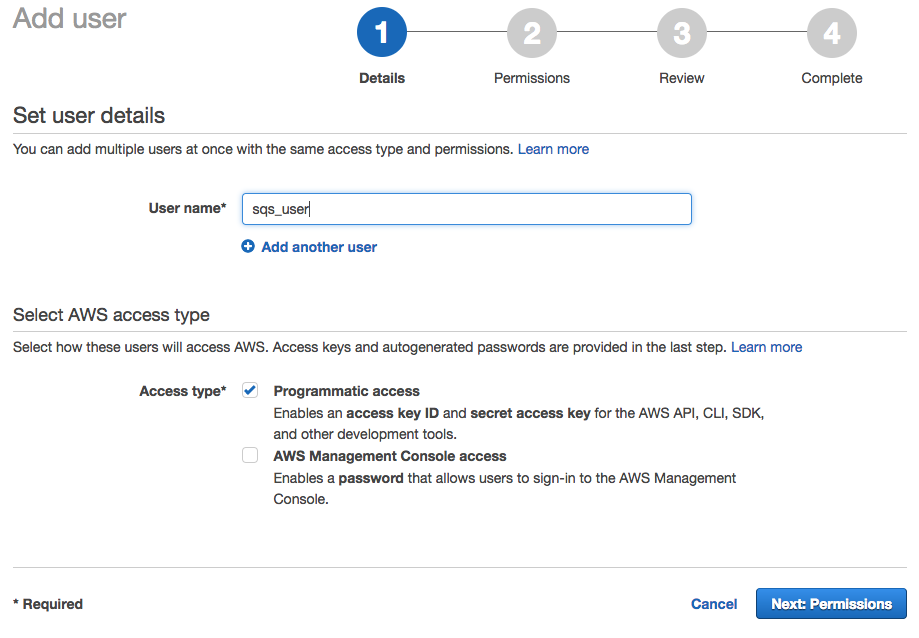
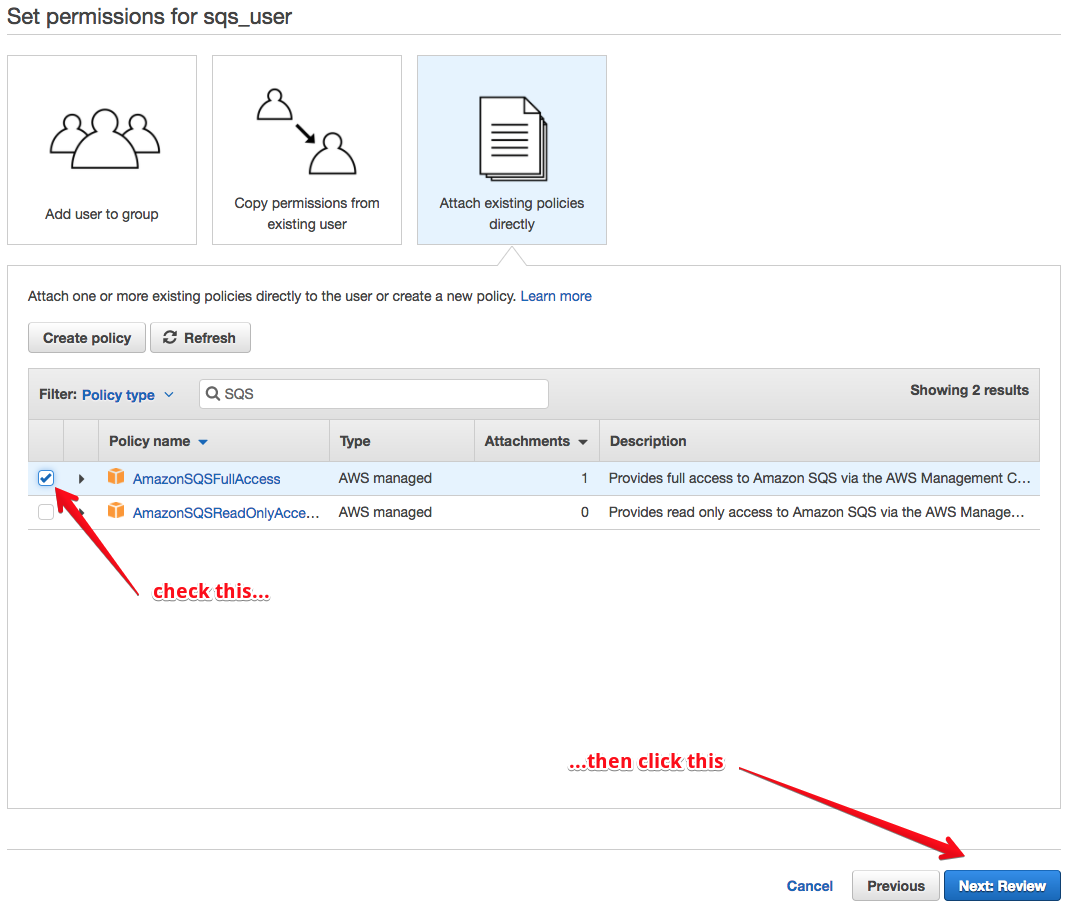
This user will require API access to SQS with the proper security policy for our user. You can use whatever makes sense in your AWS world, but a useful default choice is the “AmazonSQSFullAccess” policy, which you can choose during the setup process.
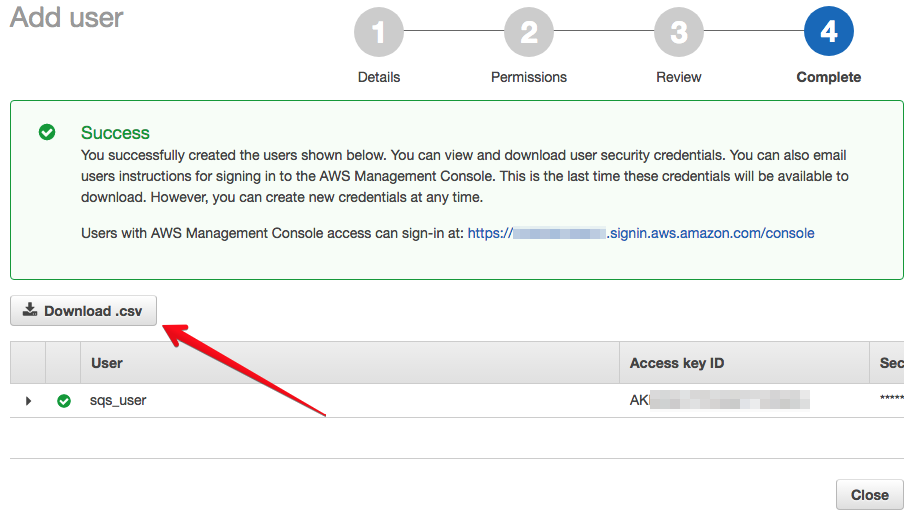
Once your user is created, make sure you save the user’s credentials in a secure location! We’ll need those later.
Create queues in the AWS console
Now that we have an API user all set, let’s create the queues we are going to use. You can create queues via the SQS REST API, but since we’re already in the console, let’s create them there. Navigate to the SQS section of the console and create a new queue – the first one we’ll create will be for incoming SMS.

You’ll notice there are two queue behavior options you can choose from – standard and FIFO (first in, first out). You can read more about the differences in the docs, but if you plan to create a conversational flow with your messages, you might prefer the guaranteed delivery order and exactly once delivery of a FIFO queue.
A quick aside – beware of the 300 transactions per second limitation on FIFO queues, as that may limit how fast you’re able to respond to messages. If you want to use a FIFO queue but get a higher transaction per second limit, you may need to use multiple queues. If you have this problem, congratulations! People must love your app.
But let’s get back down to business. Click the “quick create” button in the “Create New Queue” flow to create the incoming SMS queue.
Next, we’ll create a queue for status callbacks. Since these types of events aren’t usually user facing, we might be slightly more tolerant of receiving messages out of order. Create a standard queue this time.
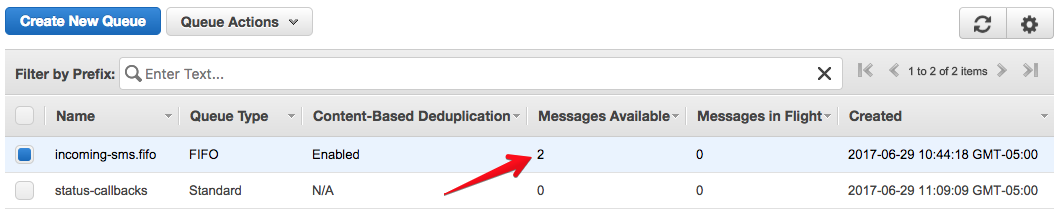
If all went well, we should now have two SQS queues to deal with.
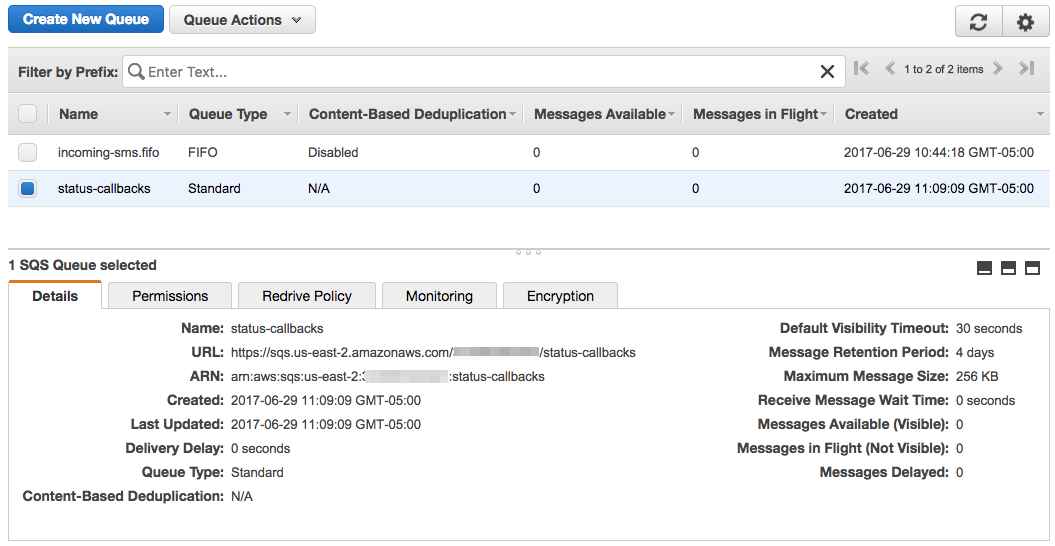
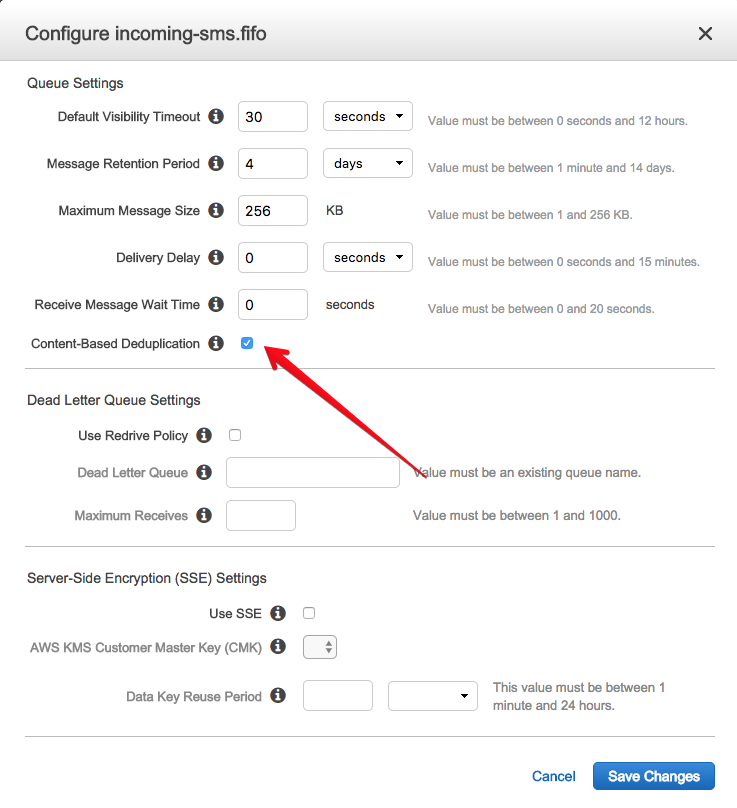
If you did a “quick create” for both queues you will have one more minor configuration step for our first FIFO queue. Right click on it and choose “Configure queue”. In the resulting dialogue, select “Content-Based Deduplication” – this will allow SQS to ensure once and only once delivery of messages based on content, which will be desirable for our JSON-encoded incoming message data (which we’ll get to in a minute).
We should now be all set to switch over to Twilio land to handle incoming SMS with a Function!
Writing and Configuring your Twilio Function
Twilio Functions are built (today) on top of AWS Lambda, which allows us to execute Node.js functions in response to Twilio events (like an incoming SMS message). In our case, we’ll want to use Functions to push incoming messages and status callback events onto our SQS queues, so we can process them at a rate we control.
Configure your AWS credentials in the Twilio console
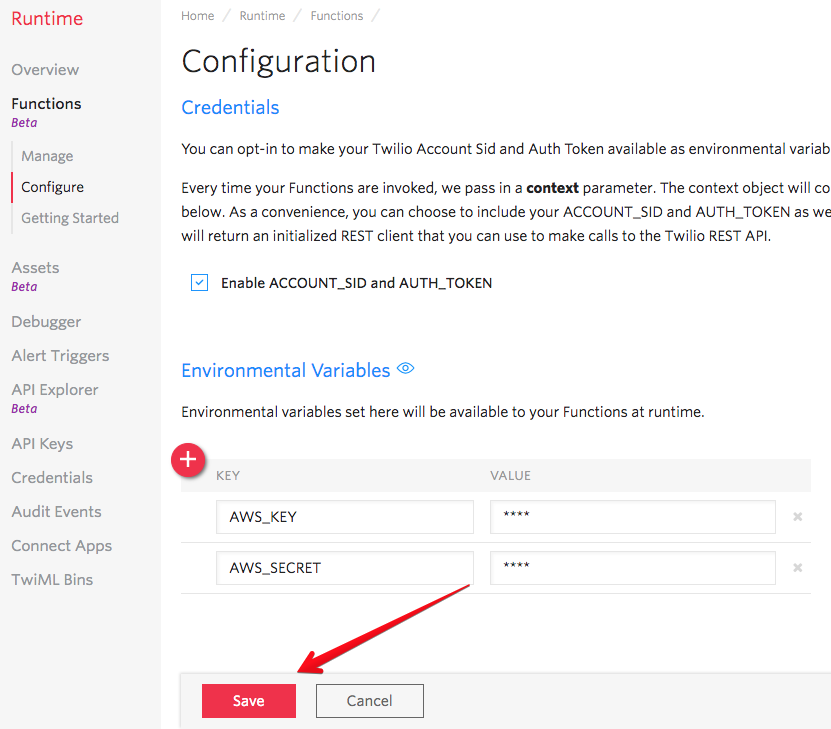
In order for your Node.js code to have access to your SQS queues, you’ll need to configure your AWS IAM user credentials as system environment variables in the Twilio console for Functions. Use your API key and API secret values from the CSV file you downloaded when you created your AWS IAM user. Don’t forget to hit save!
Now that your AWS credentials are locked in, we can write the actual function that will push the incoming messages and status callbacks onto the right queues.
Write a Twilio Function to push messages and callback events onto SQS queues
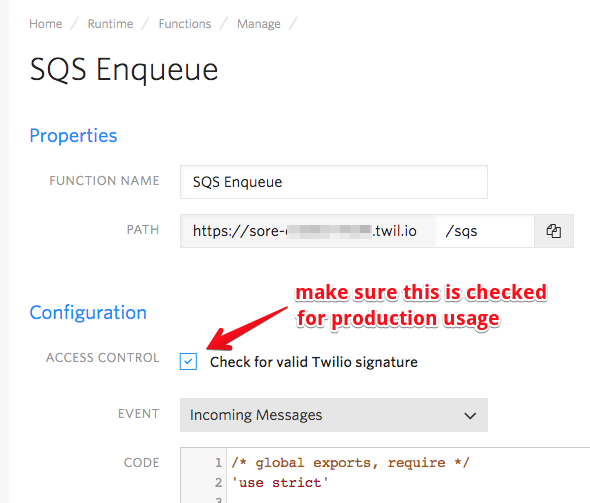
Let’s begin by creating a new Function called “SQS Enqueue”. When you create a Function, you can choose from a variety of pre-built templates, but let’s start with a Blank one this time. You are able to assign a URL route for your function – do this! You’ll want it later as we write the function. If you configured your route at “/sqs” your configuration would look something like this.
Paste the following code into the code text box – replace the queue URL variables with the URLs to your specific queues. The queue URLs for the queues you created are found by clicking on them in the SQS console in AWS. Read along in the comments to see what’s happening at each step.
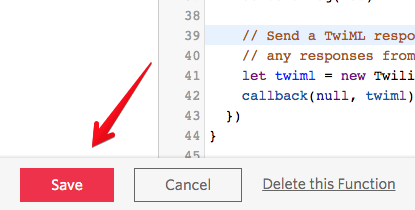
Click save once you’re done editing the code. This will deploy your function and make it available for use.
We should now have a function ready to handle incoming messages and status callbacks, and put them on the right queues. Next, we’ll need to assign that function to handle incoming SMS for one of our Twilio phone numbers.
Configure a Twilio number to use a Function to handle incoming messages
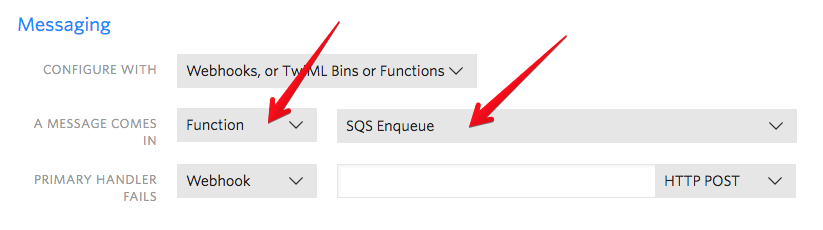
In the Console, go to your phone number configuration page and choose a phone number you’d like to assign your newly created Function to handle. In the detail view, choose your function in the dropdowns detailing how you’d like to handle incoming messages.
Send a few messages to your Twilio number. If you don’t get a reply back, that’s probably okay – we didn’t set up our Function to return any TwiML. You can check to see if the messages are coming through in your SQS console, where you can see a few new messages appearing on your queue.
Now let’s see some code for responding to messages from the queue.
Clearing out the SQS queue
Once we start queueing up incoming messages, we’ll need to dequeue them and reply using the Twilio REST API. When we reply, we’ll also want to specify a status callback URL that executes the same function code we just created in the console – luckily, each function we create has a unique URL which we can use for this purpose. In a production scenario, we’d want to run jobs constantly (or on a short interval) to look for incoming messages in our queue, and quickly reply to them. Depending on our needs, we could have a job running slightly less often to process our queue of status callback events.
Let’s take a look at a Node.js script that will access our incoming message queue and send responses to everyone that texted in, as well as another script that will process messages in the status callback queue. You can use these as a starting point to implement your own queue-clearing logic.
Create the scripts in a terminal window with:
touch incoming_queue.js status_callbacks.js
Configure your environment
Before you can execute the scripts to work on the queue, you’ll need to make sure the right npm modules are installed, and to export the environment variables you will need to execute the script.
Install the necessary npm modules with:
npm install —save twilio aws-sdk
Next, export the environment variables you will need.
- TWILIO_ACCOUNT_SID – your account credential, found in the console dashboard
- TWILIO_AUTH_TOKEN – your account credential, found in the console dashboard
- AWS_KEY – the AWS key you created for your IAM user earlier
- AWS_SECRET – the AWS secret you created for your IAM user earlier
On *nix systems, you can export an environment variable with export =.
Process incoming messages from the queue
Next, we’ll write a script that you would execute from a worker server of some kind, probably as a recurring or continuous job. You might use scheduled events with Lambda, or maybe Heroku workers. How you execute the logic that clears the queue will depend greatly on your tech stack, but the basic principle will be the same – you’ll work through a backlog of incoming messages and events with a set (or elastic) amount of compute resources that will dictate how quickly you can process the messages.
To illustrate how the code works, we’ll run the script to clear out the incoming message queue manually. Here’s what the code for “incoming_queue.js” looks like – if you followed the steps above, you can execute it after changing the SQS URL to the proper URL for your queue, and the URL for your Twilio Function:
That code should handle taking all the incoming messages off the queue and sending replies via REST API. We should also have sent a number of messages to our status callback queue on SQS. Let’s see how we might work with those status callback events next.
Process status callback events
As messages are sent out from your Twilio account, you get status callbacks to indicate changes in the delivery status of those messages. You might use these status callbacks to update a real-time UI when messages are received, or update your database to indicate which messages have been sent out. Let’s write some code that processes status callback event queue as well in “status_callbacks.js”.
Unlike the incoming message queue, you’re unlikely to get a full, up to 10 message list of status callback events if there are a small number of messages in your queue. You may need to run this script several times to completely empty the status callback events in your queue. There are a number of reasons behind this – before running this kind of solution in production, I would strongly recommend reading through the SQS developer guide to understand how both the FIFO and standard queues are intended to behave.
However, within a few moments, executing these scripts should result in several reply messages being sent out, and callback events being processed by your “background workers”. Good for you!
Smarter queue processing
This is a relatively simple use case demonstrating short polling of your SQS queues. You can likely make your queue processing more efficient by using long polling to reduce the number of empty API requests your workers make to AWS.
You can probably also make your message reply logic smarter. In the rare instance where you are processing multiple messages from a single number, you might consider only replying to the most recent message, rather than responding to every previous message the user sent. How you clear out the queues will depend greatly on the type of experience you’re trying to create in your application.
Wrapping Up
By processing incoming messages and status callbacks in background workers, you can control the cost of compute resources and speed at which you handle incoming requests. You also free up your web application to handle normal web traffic rather than webhook requests (assuming the same app handles both webhooks and any other public traffic). Twilio Functions fit into this solution nicely as a lightweight way to get these incoming requests onto a queue. It can also be a handy way to prevent the need for a public webhook URL on your end; you can access your Amazon SQS queue via API on any server that can connect to Amazon’s API.
While this solution is useful for any organization using Twilio at scale, your friends at Twilio.org specialize in helping nonprofits and social enterprises increase their impact with communication technology. If that sounds like you, you should apply for our Billion Messages for Good program, which will give you $500 USD in free Twilio credit and a 25% discount on Twilio usage pricing. You can also get help and support from Twilio experts and community members to make sure your development effort succeeds and makes a difference in your mission.
We can’t wait to see what you build!


Related Resources
Twilio Docs
From APIs to SDKs to sample apps
API reference documentation, SDKs, helper libraries, quickstarts, and tutorials for your language and platform.
Resource Center
The latest ebooks, industry reports, and webinars
Learn from customer engagement experts to improve your own communication.
Ahoy
Twilio's developer community hub
Best practices, code samples, and inspiration to build communications and digital engagement experiences.