Integrate Twilio and SendGrid Accounts through Single Sign-On with Okta
Time to read: 12 minutes
April 05, 2022
Written by
Reviewed by

Oftentimes organizations use a large number of SaaS applications. And with a large number of user accounts for their employees and customers, it can get difficult for both the end user and the organization—end users have to memorize different credentials for multiple applications and organizations have to support multiple applications, and securley manage thousands of user accounts on each application.
As a result of this, organizations have been using single sign-on (SSO),which allows users to securely sign-on to multiple applications through one credential, and allows organizations to manage all accounts through a single user directory.
Both Twilio and SendGrid (now in GA) allow SSO using Security Assertion Markup Language (SAML 2.0) to integrate your Twilio and SendGrid user authentications with any identity and access management (IAM) platforms that support SAML 2.0.
For this tutorial, you are going to learn how to integrate Twilio and SendGrid accounts, account management, and user authentication all through single sign-on. The identity provider (IdP) you’ll be using to configure SSO for this tutorial is Okta.
And if you want more details, check out our documentation on SSO integration: Twilio Single Sign-On documentation, SendGrid Single Sign-On documentation.
Single sign-on overview
Before we proceed with the tutorial, let's talk about SSO in more detail.
SSO is a method of authentication that relies on an Identity Provider (IdP)—such as Okta—to securely authenticate users to multiple applications or services with one set of login credentials. SSO also centralizes all users to a single platform where organizations can authorize roles and permissions to all users for each application.
How does SSO work?
SSO is based on a sharing of identity attributes given by the IdP to a Service Provider (SP) – such as Twilio and SendGrid. When a user is authenticated by an IdP, they are automatically granted access to all other SP’s that are trusted with it and authorized by their organization. This trusted relationship requires a back and forth communication between the IdP and the SP through a protocol.
Twilio and SendGrid both use the Security Assertion Markup Language (SAML) protocol to securely authenticate users as it is the industry standard. Not only is SAML able to authenticate users, it’s also able to authorize user roles and permissions.
Let’s take a look at an example where a user is already authorized to use Twilio or SendGrid by their organization – where their IdP is Okta – and is attempting to sign-in. This is how the SSO authentication flow would look like:
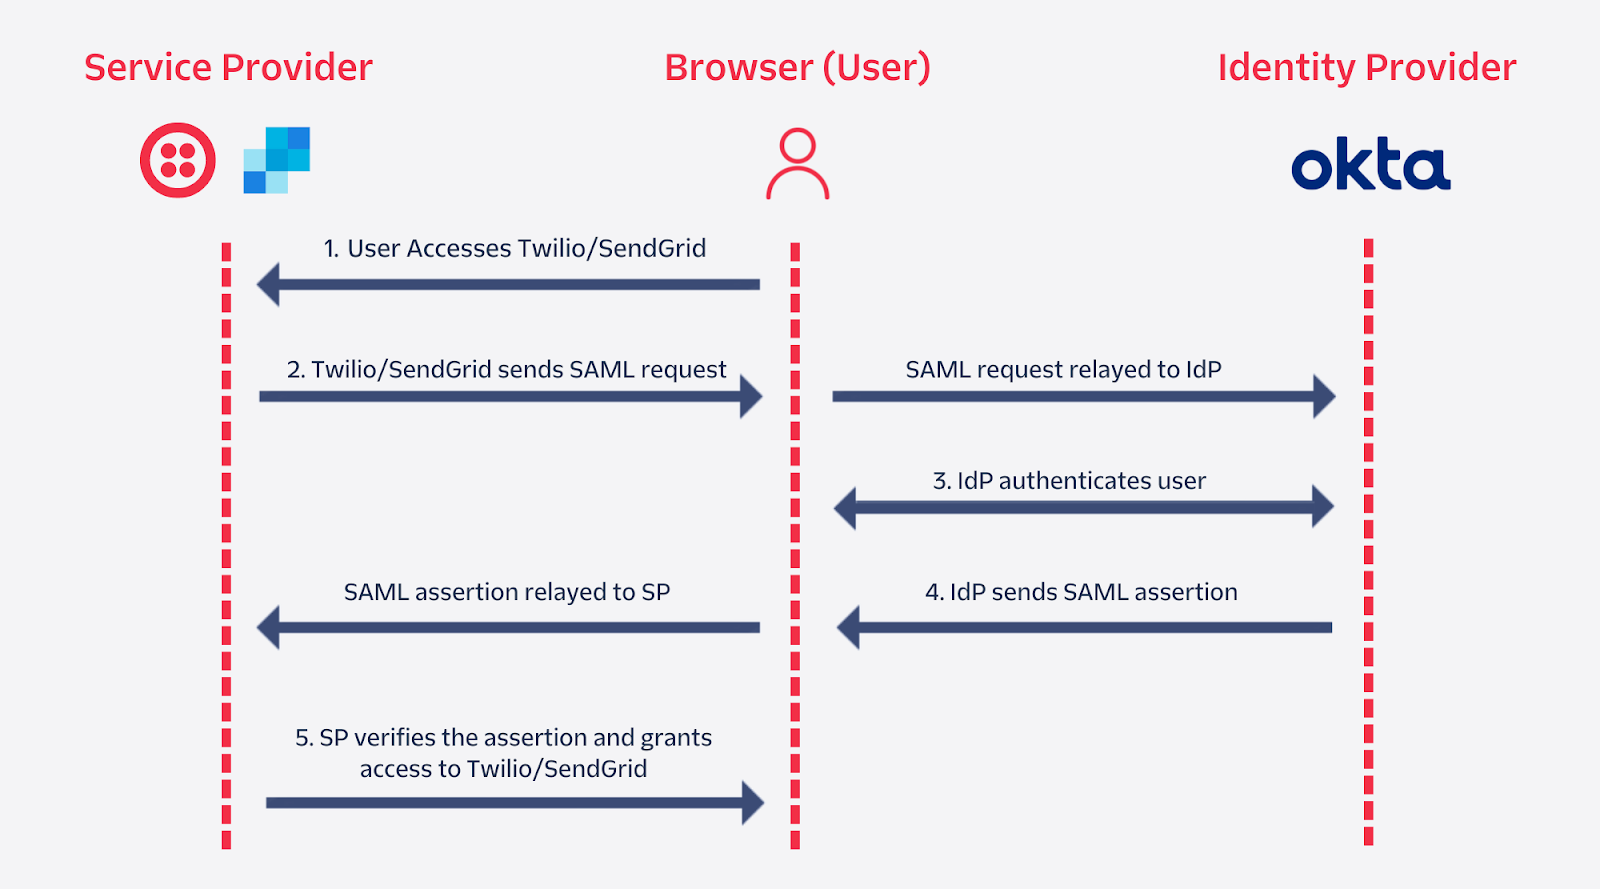
- The user will first attempt to sign-in to SendGrid or Twilio. Based on the user's email, the SP will figure out what organization they are a part of and that Okta is their IdP.
- The SP will send out a SAML request in a redirect to Okta.
- Okta will verify the request and will have the user sign-in. Once the user signs-in, Okta will set an SSO cookie within the user's browser so they won't have to sign-in again. In some cases, the IdP will already notice the SSO cookie in the user's browser and will skip to step 4 without asking the user for any information.
- Okta generates a SAML assertion and is returned to the user's browser, which is then relayed back to the SP through another redirect.
- Using a stored certificate, the SP verifies the SAML assertion and grants the user access to the service.
As referred in step 3, any subsequent sign-ins to Twilio, SendGrid or any other SPs the user is authorized to use will automatically be authenticated by the IdP without having them sign-in again.
SP-initiated and IdP-initiated sign-in
The authentication flow above is just one way an SSO authentication can start. The example and the flow above is considered a Service Provider Initiated (SP-initiated) sign-in. This is usually triggered when the user attempts to directly sign-in to the SP.
Another way where an SSO authentication can start is through the IdP—this is called an Identity Provider Initiated (IdP-initiated) sign-in. This is usually triggered when the user first signs-in to their IdP and selects their SP through the platform. This shortens the flow by removing the SAML request from the SP and will have the authentication flow start at step 3 in the diagram above.
Some SPs don’t support SP-initiated sign-ins. Both Twilio and SendGrid support SP-initiated and IdP-initiated sign-ins.
SAML configuration
Now let’s take a look at how SAML is configured between the SP and the IdP and what is needed to implement it.
The assertion that is generated by the IdP is based on a configuration that's mutually agreed by both the SP and the IdP. When the SP receives the assertion, it needs to validate that it came from a valid IdP.
To validate the assertion, the SP needs an X.509 Certificate, which is given by the IdP and is stored to verify the SAML assertions. The SP also needs the IdP’s SSO URL to send SAML POST requests to receive information. The IdP will need the SP’s SSO URL, which is where the SAML responses are posted to.
Depending on the IdP and SP you choose, the SAML parameters for the configuration will be different and you may need to provide more metadata than other IdPs or SPs.
Just-In-Time Provisioning
Certain SPs, such as SendGrid, support Just-In-Time (JIT) provisioning to automatically create a user account upon sign-in from their IdP. With JIT provisioning enabled, you will only need to assign users an application from their IdP and users will be created by the SP with default permissions upon signing in for the first time. This further streamlines the SSO process for organizations by not having to manually create an account for each user in each application.
Prerequisites
- A Twilio account with the Enterprise or Administration Edition (sign up here!), and/or a SendGrid account with the Pro, Premier, or Advanced Marketing Campaigns plan
- Okta Developer account
- Your own domain, added and verified on your Twilio account and SendGrid account
- An email account under your verified domain—for testing purposes. Adding users to your Twilio Organization (needed for SSO) requires their email domains be verified
Twilio Integration
Let’s get started with integrating your Twilio account with Okta. In this section, you’ll first create an organization within Twilio to configure your SSO profile. Once that’s configured, you’ll head over to your Okta admin console to create a SAML integration with Twilio. You’ll be given metadata by both Twilio and Okta to configure on each end which will then complete your SSO setup for Twilio.
Configure SSO profile in the Twilio Admin Center
To configure an SSO profile, you’ll need access to the Twilio Admin Center, which requires you to be an administrator or owner of an Organization. If you have yet to set up an Organization with your Twilio account, follow these steps and come back once you’ve created your Organization.
Head to the Twilio Admin Center, and navigate to the Single sign-on section on the left panel. Then, click on Create new SSO profile, which will be display Twilio’s metadata for the SSO configuration:
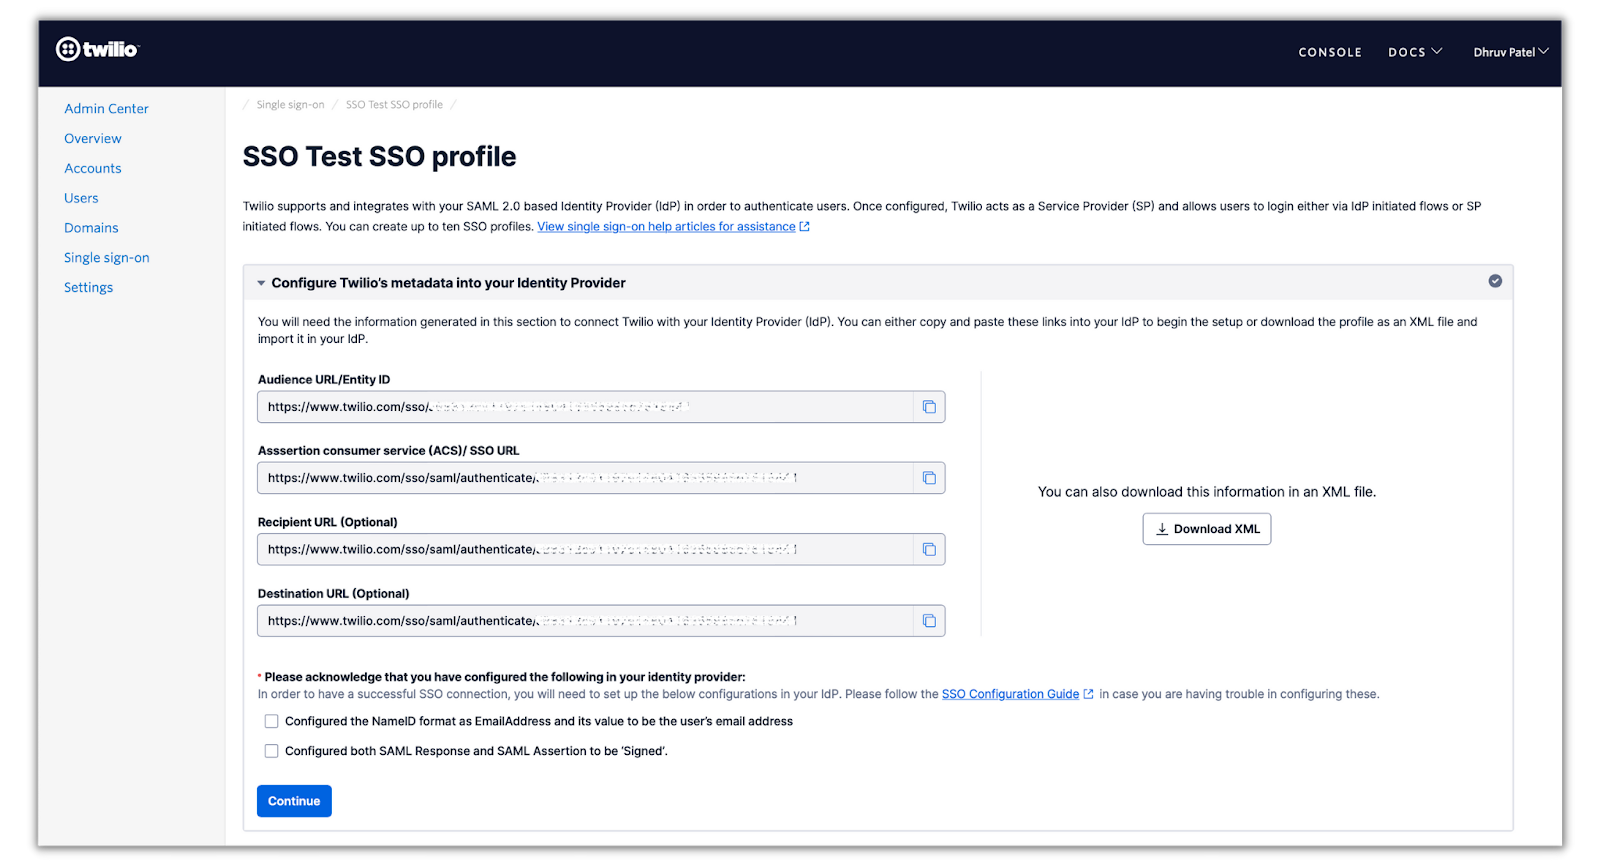
The metadata values displayed are what will be provided to Okta to configure the SAML integration. Save this tab for the next section and open a new tab to set up the SSO configuration on your Okta account.
Create SAML Integration in Okta
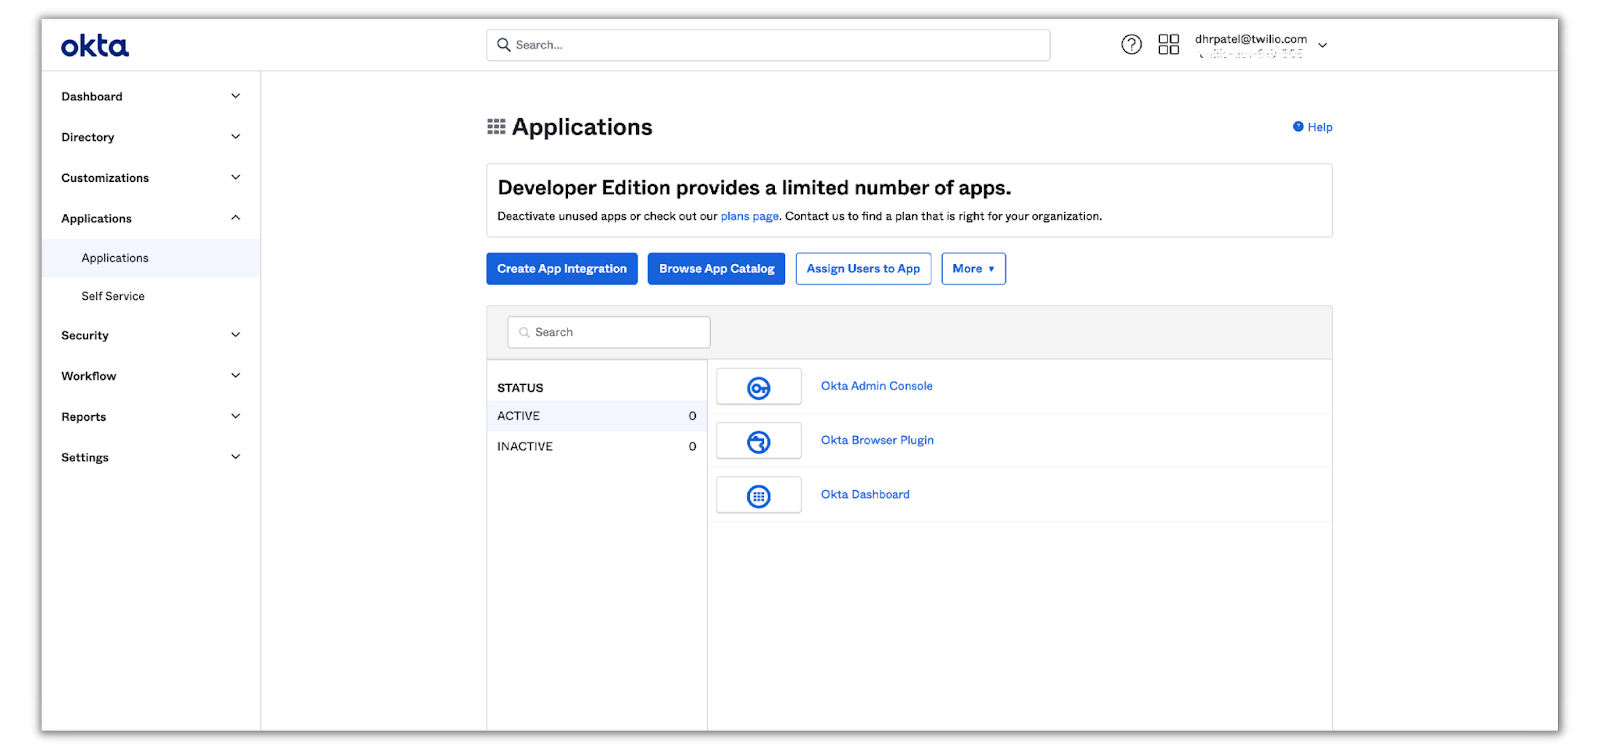
In the new tab, sign-into your developer account on Okta and head to the admin console. Select Applications > Applications on the left panel and you will be presented with this menu:
a
Click on Create App Integration to select the sign-in method for the Twilio integration:
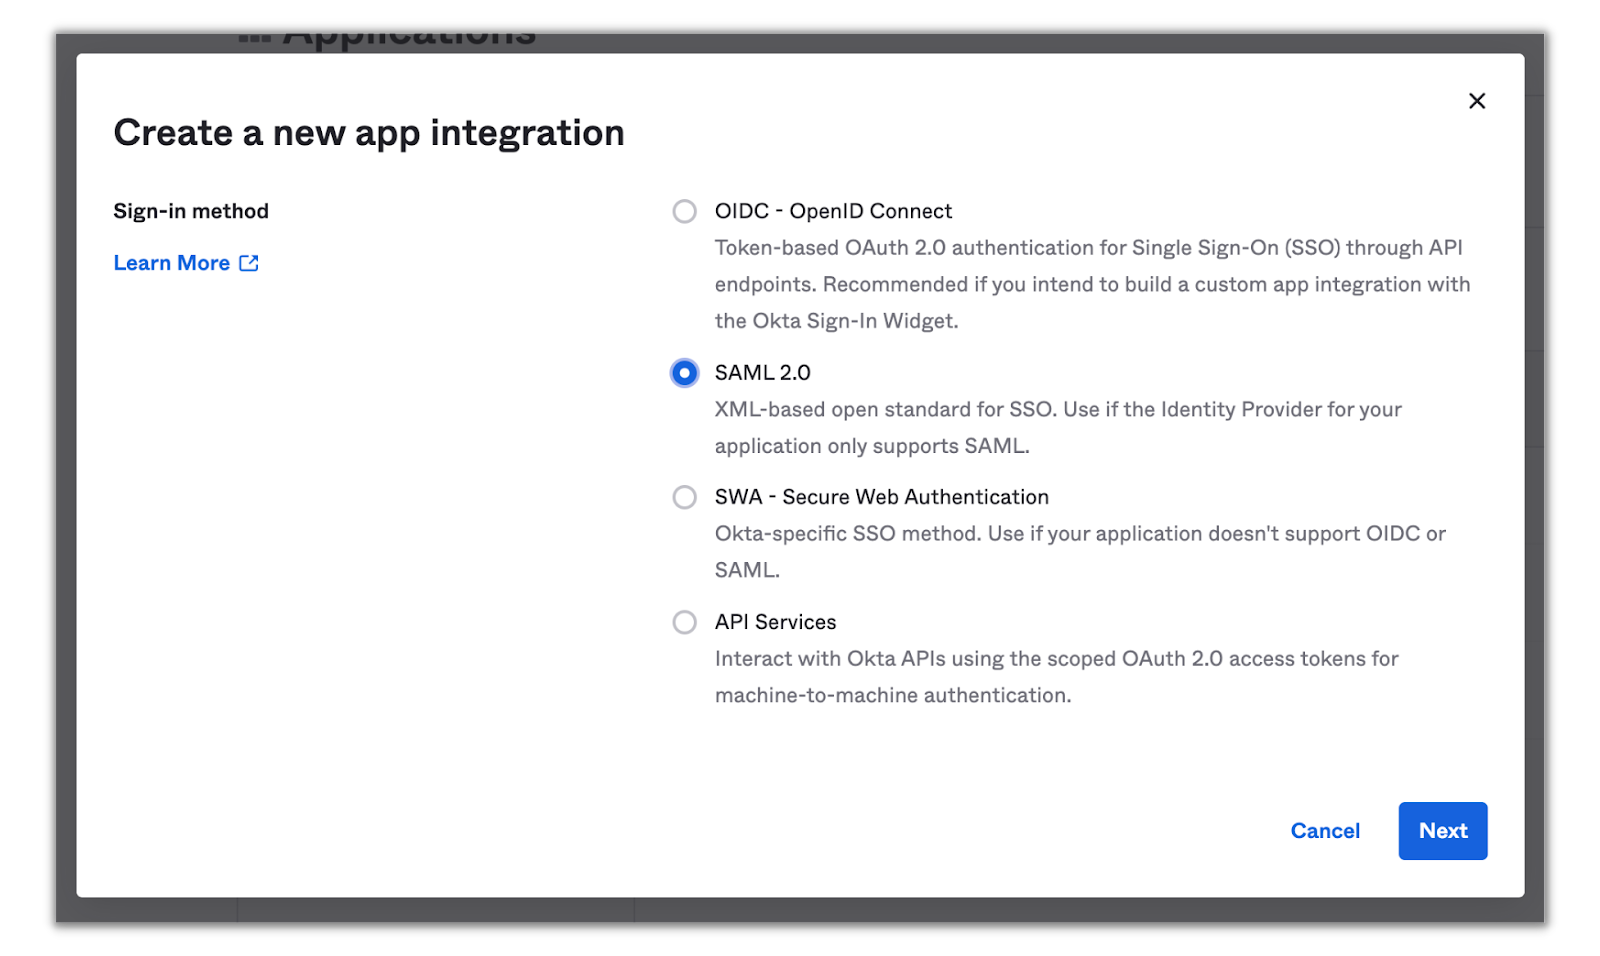
Select SAML 2.0 and click Next.
Enter in Twilio Console for the App name and feel free to upload the Twilio logo as the App logo. You can download the Twilio logo here from our brand platform page.
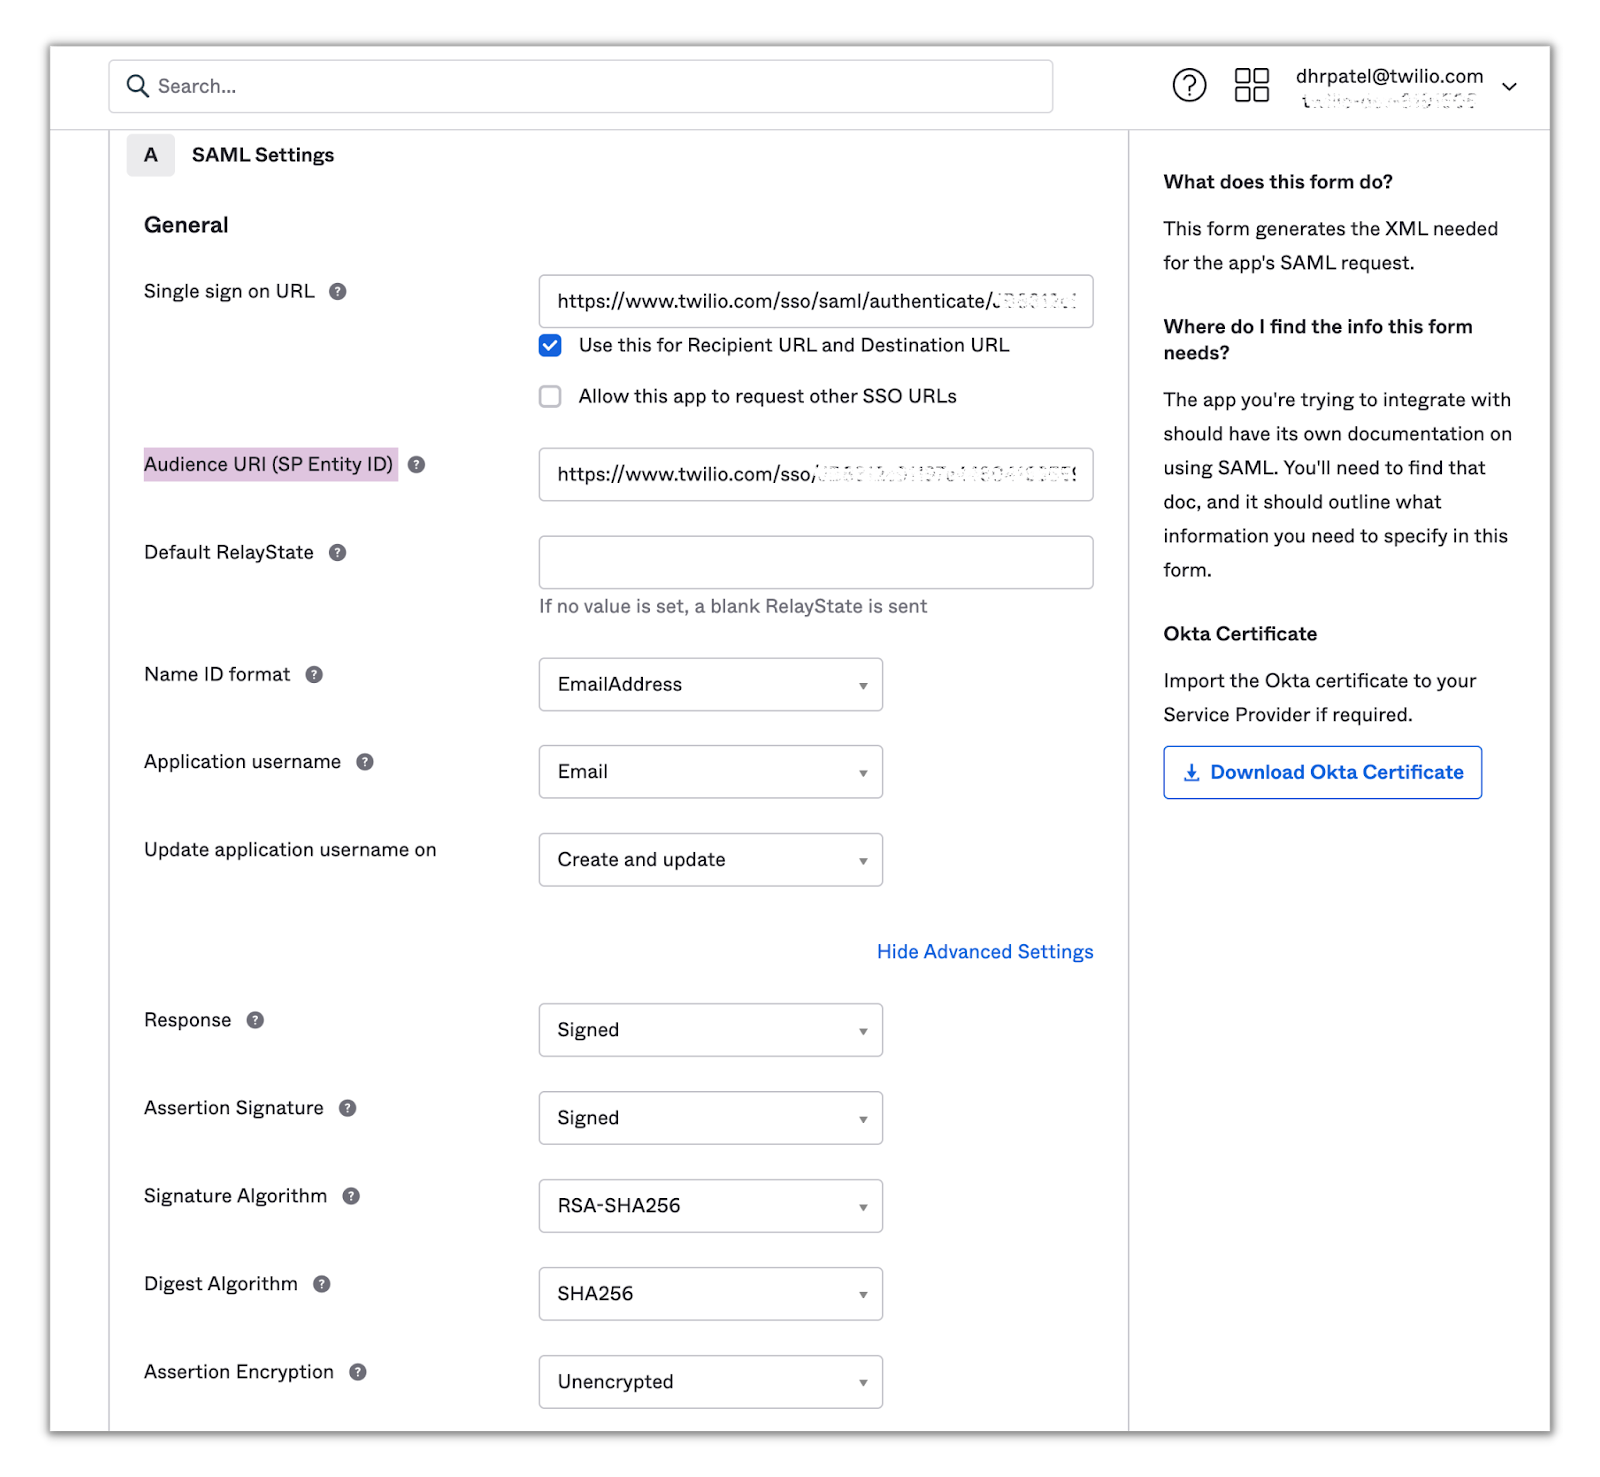
Click Next and you’ll be presented with the SAML settings which is where you’ll enter in the metadata given by Twilio. Here, you’ll need to do a few things:
- Place the ACS/SSO URL from the Twilio metadata in the Single sign on URL field and select the Use this for Recipient and Destination URL checkbox.
- Place the Audience URL/Entity ID from Twilio metadata in the Audience URI (SP Entity ID) field.
- From the Name ID format dropdown, select EmailAddress.
- From the Application username dropdown, select Email.
- Click Show Advanced Settings and ensure that the Response and Assertion Signature dropdowns have Signed selected and that the Assertion Encryption dropdown has Unencrypted selected.
After completing the above steps, your SAML settings will look like the following:
Click Next and you’ll be directed to the feedback section. Fill out the feedback questions and click Finish. You’ll then be redirected to your newly integrated app page:
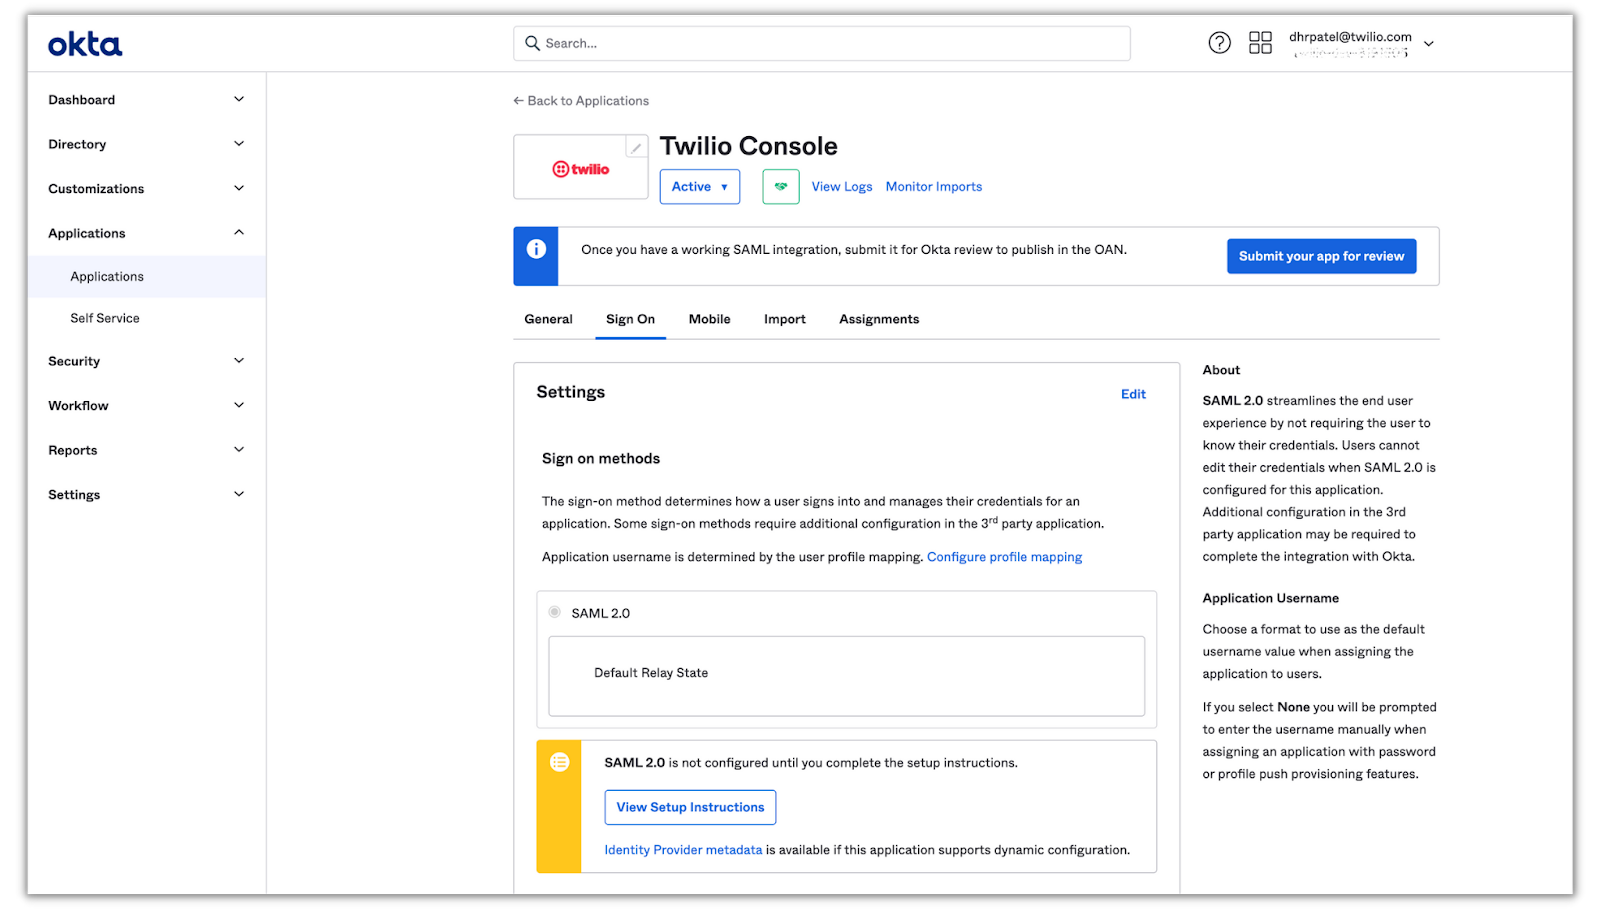
The next step is to provide Twilio with the metadata from Okta. Click View Setup Instructions to navigate to a page that displays Okta’s IdP metadata:
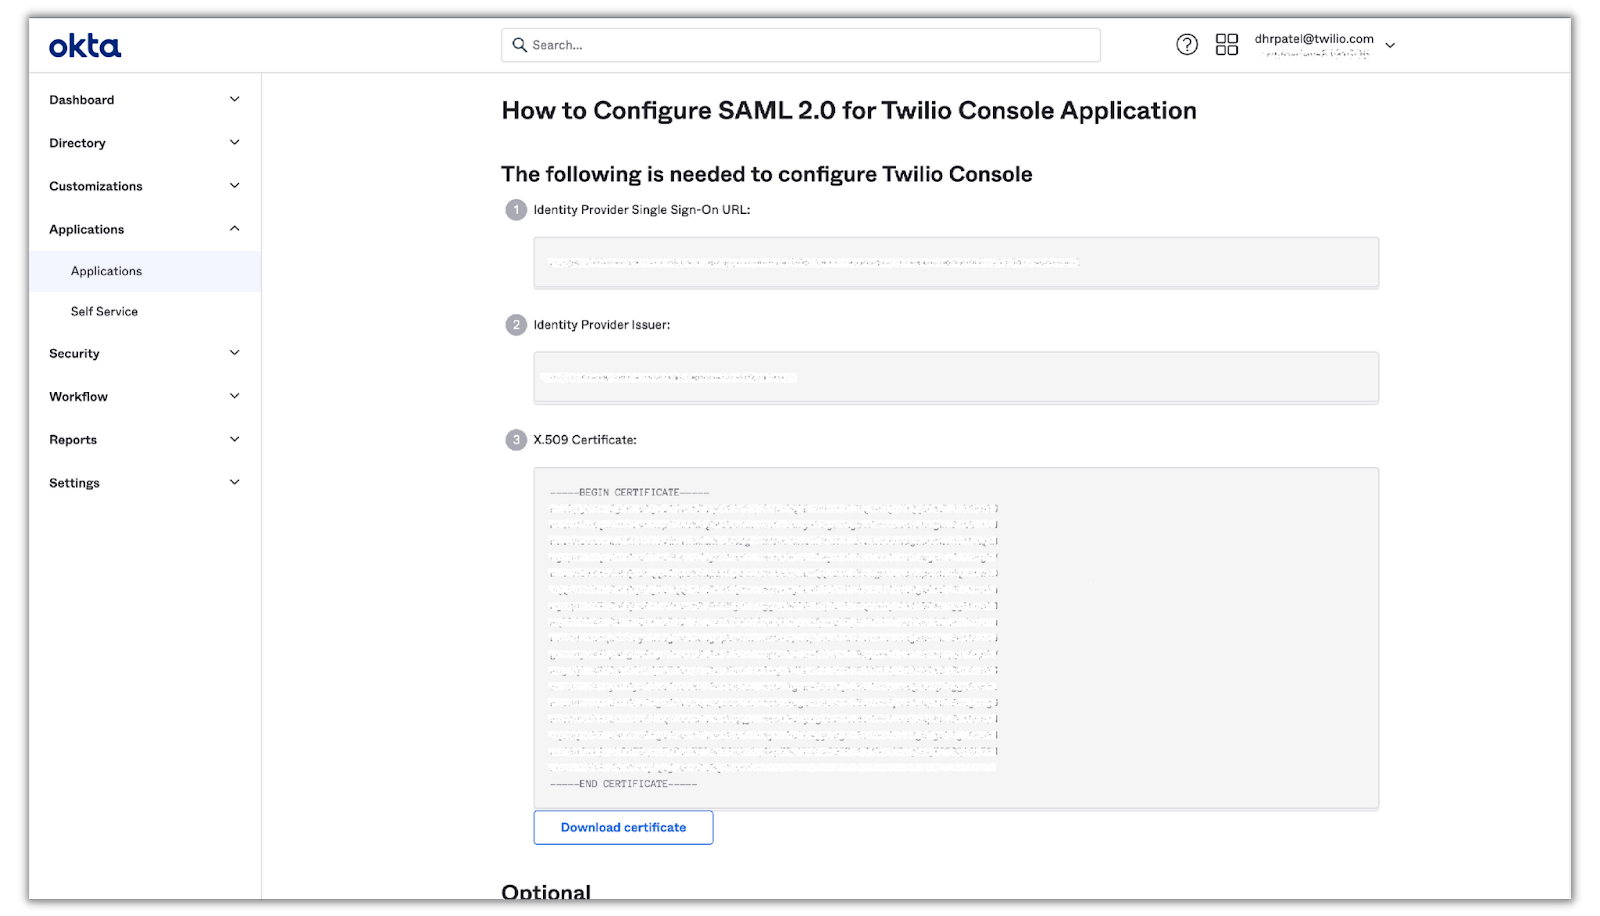
Save this tab and head back over to your SSO profile on Twilio.
Configure Okta metadata to Twilio SSO profile
In this section, you’ll finish up the SAML configuration in Twilio by configuring Okta’s IdP metadata. Back in your SSO profile on Twilio click on the two check boxes at the bottom:
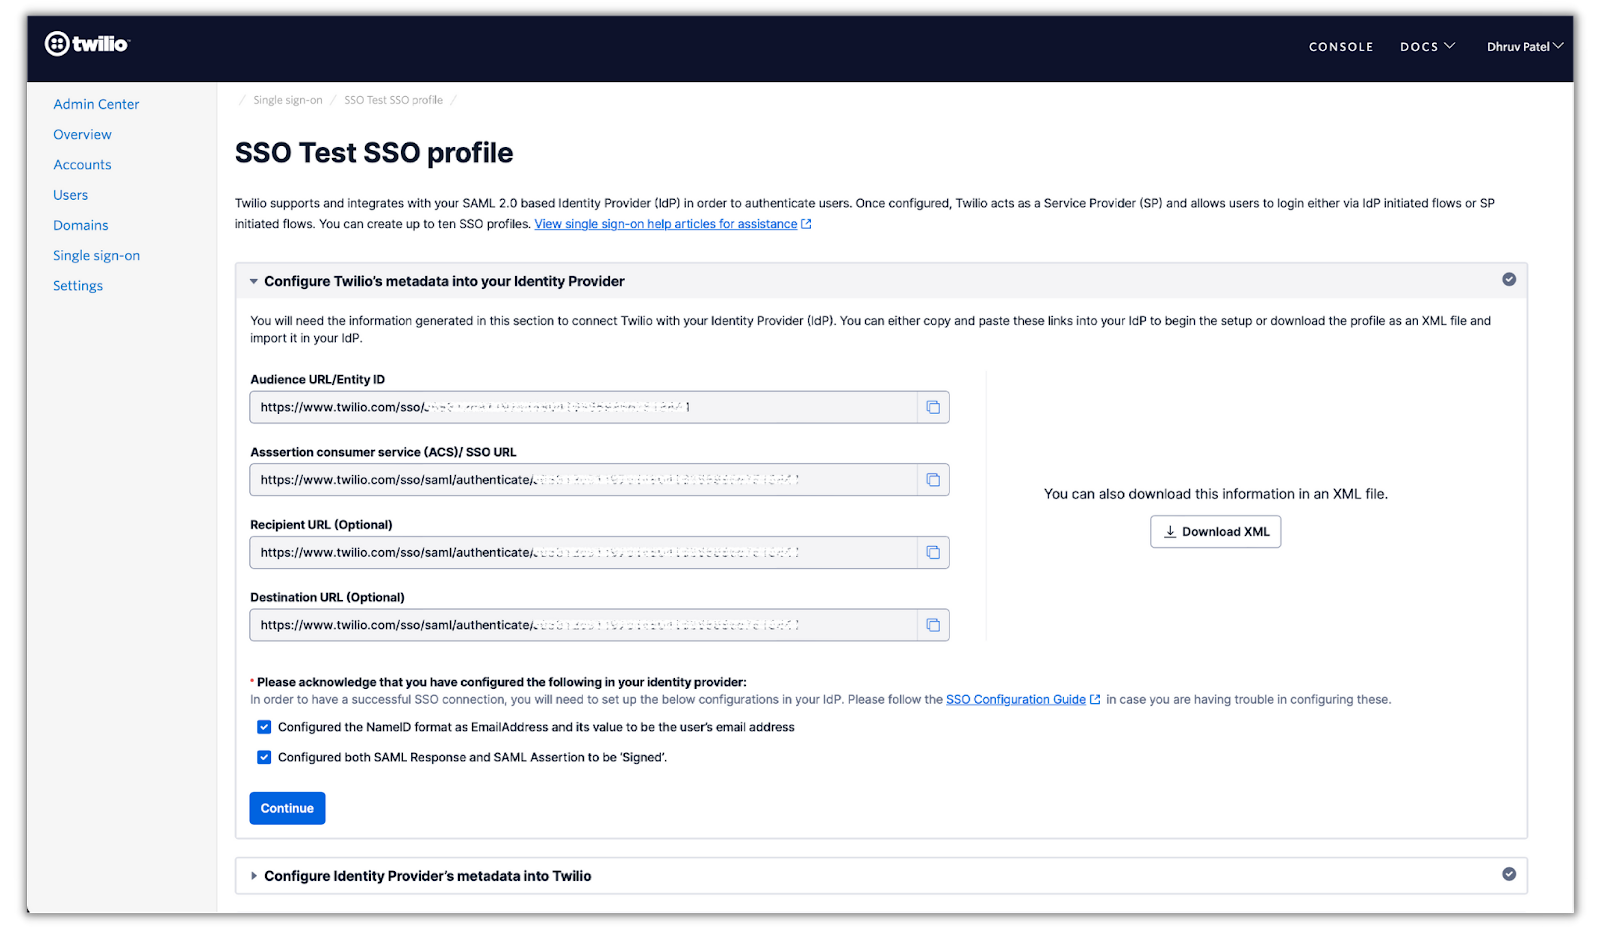
The check boxes are to ensure you’ve done steps 3–5 from the previous section. Click Continue and the next section will have you provide the IdP metadata given by Okta:
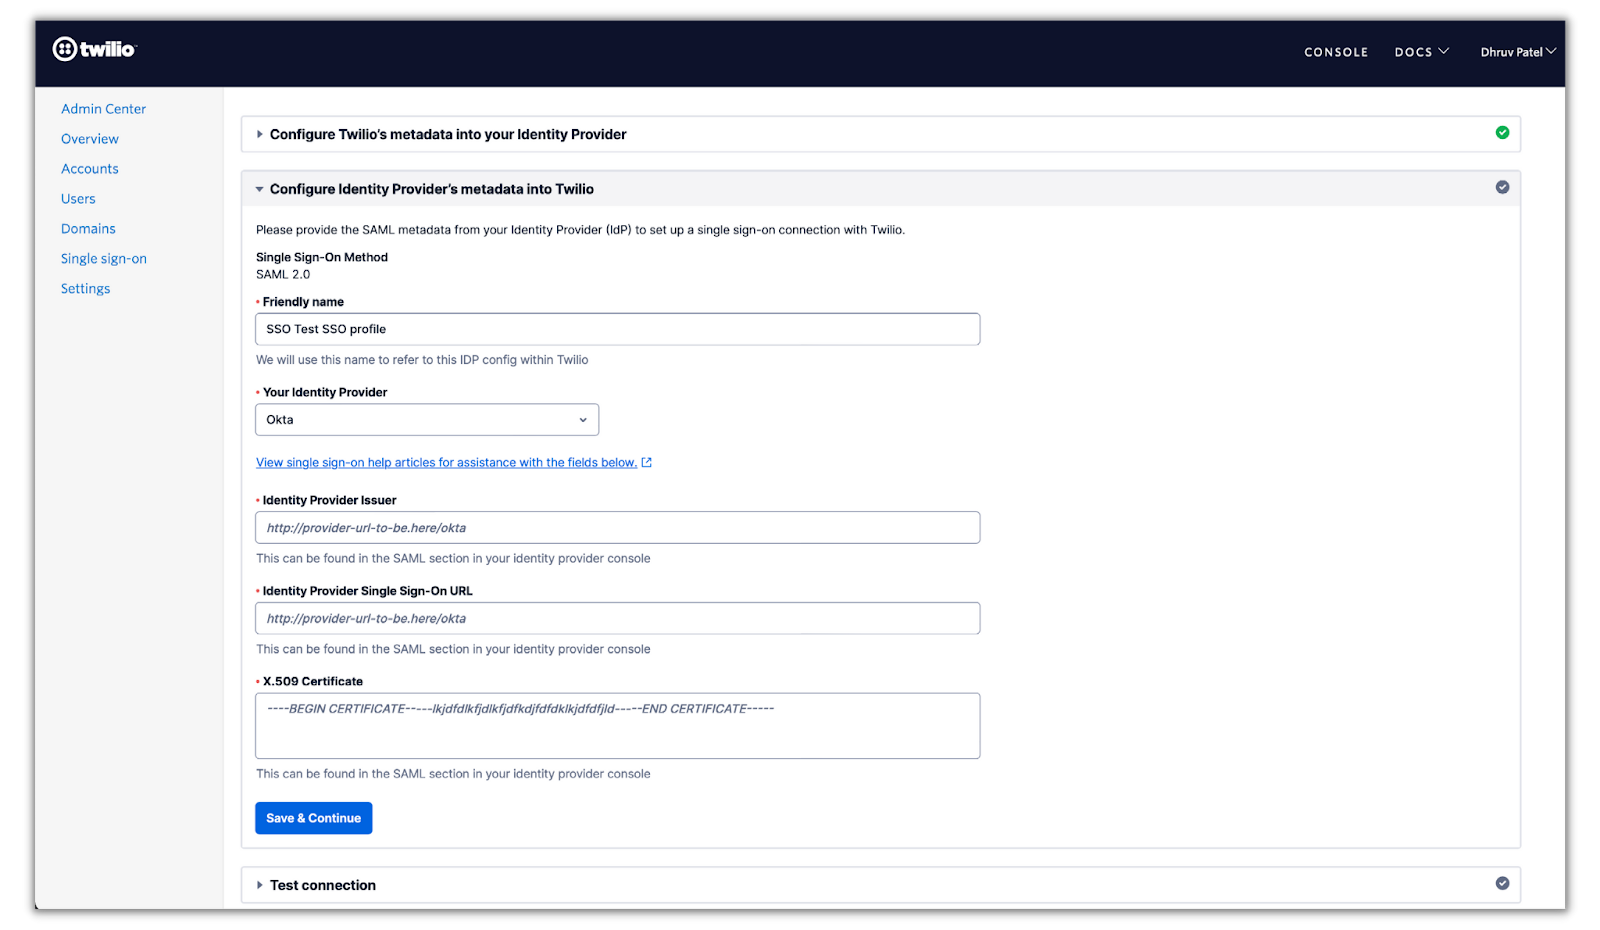
Select Okta in the Your Identity Provider drop-down box and enter the Identity Provider Issuer, Identity Provider Single Sign-On URL, and X.509 Certificate from the Okta metadata obtained in the previous section in their respective fields.
Click Save & Continue and the next section will be to test out the SSO connection. But before you test it out, let’s configure SSO with your SendGrid account.
SendGrid Integration
This section will be slightly different from Twilio’s SSO integration since Okta has the official SendGrid SAML integration within their Integration Network. You’ll create the integration with your SendGrid account and then you'll add the official integration app from the app catalog. The last step will be to configure the metadata given by both SendGrid and Okta on each other’s end.
Configure SSO Integration in your SendGrid account
Sign-into your SendGrid dashboard and click on the Settings drop-down in the left panel:

You should see SSO Settings within the drop-down. However, if it's not present, ensure your account has either been upgraded to the Pro, Premier, or Advanced Marketing Campaigns plan. Check out the SendGrid docs on Upgrading your Plan for more info.
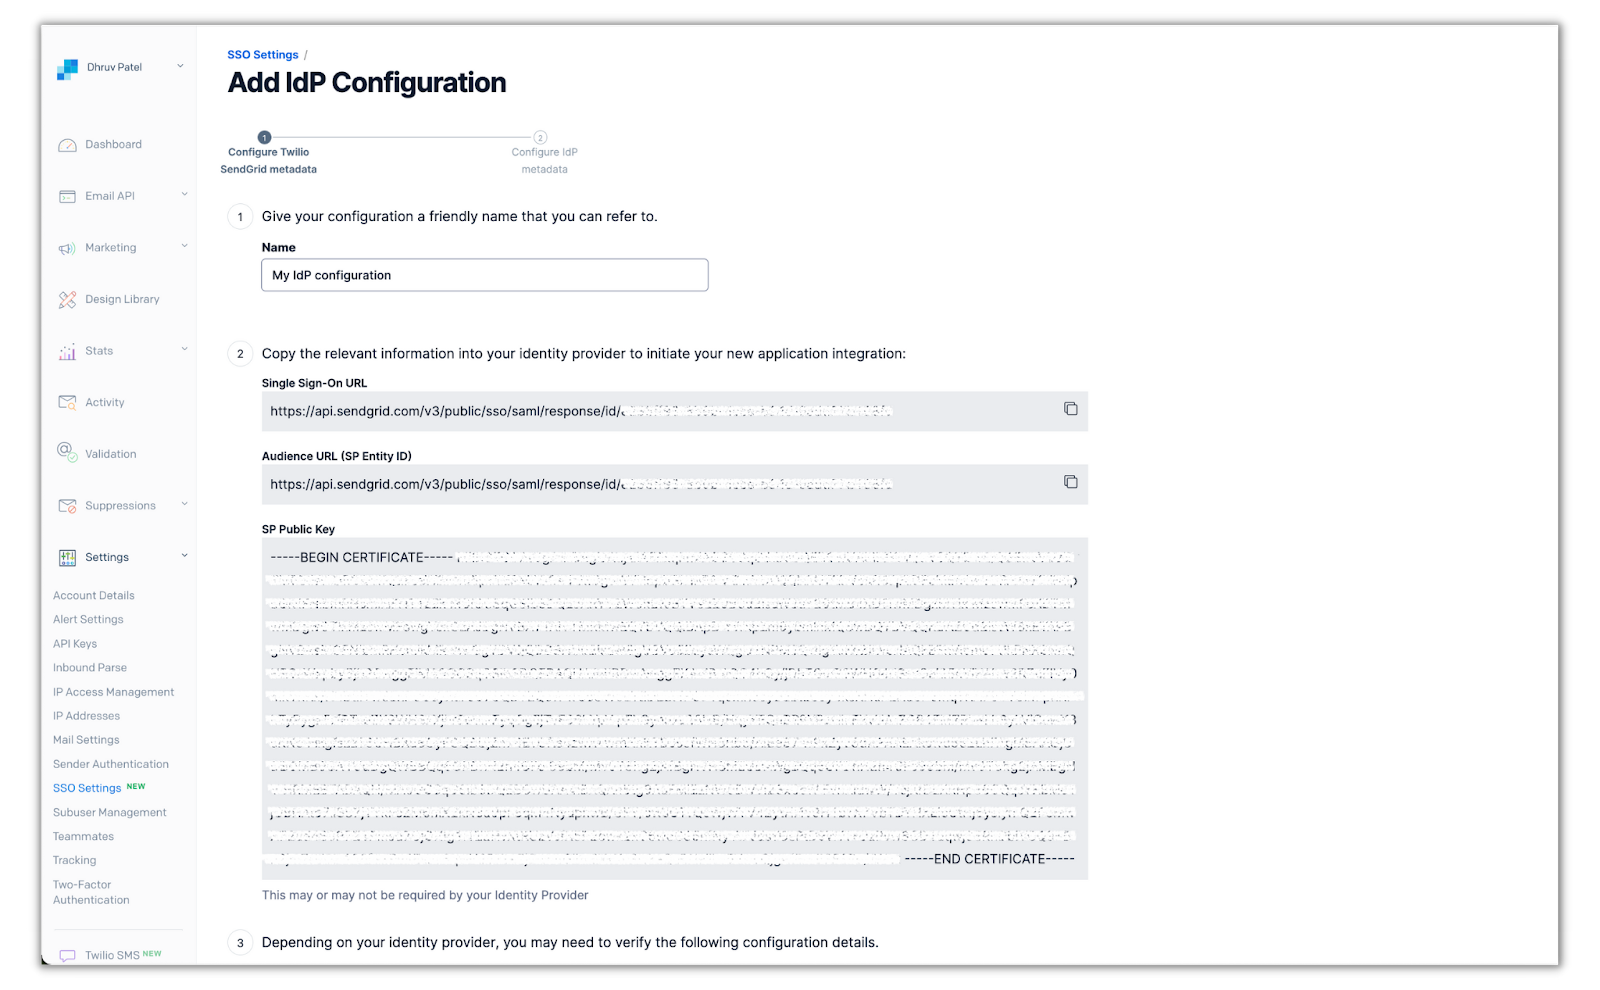
Click on SSO Settings and click Add Configuration. You’ll then be presented with your SendGrid SAML metadata:
Save this tab and open your Okta admin console on another browser tab.
Add SendGrid application from Okta Integration Network
Instead of manually creating the SendGrid application and integration on Okta, you’ll be able to add SendGrid’s official integration app through their app catalog.
In the Okta admin console, head to Applications > Applications on the left panel, and click on Browse App Catalog:
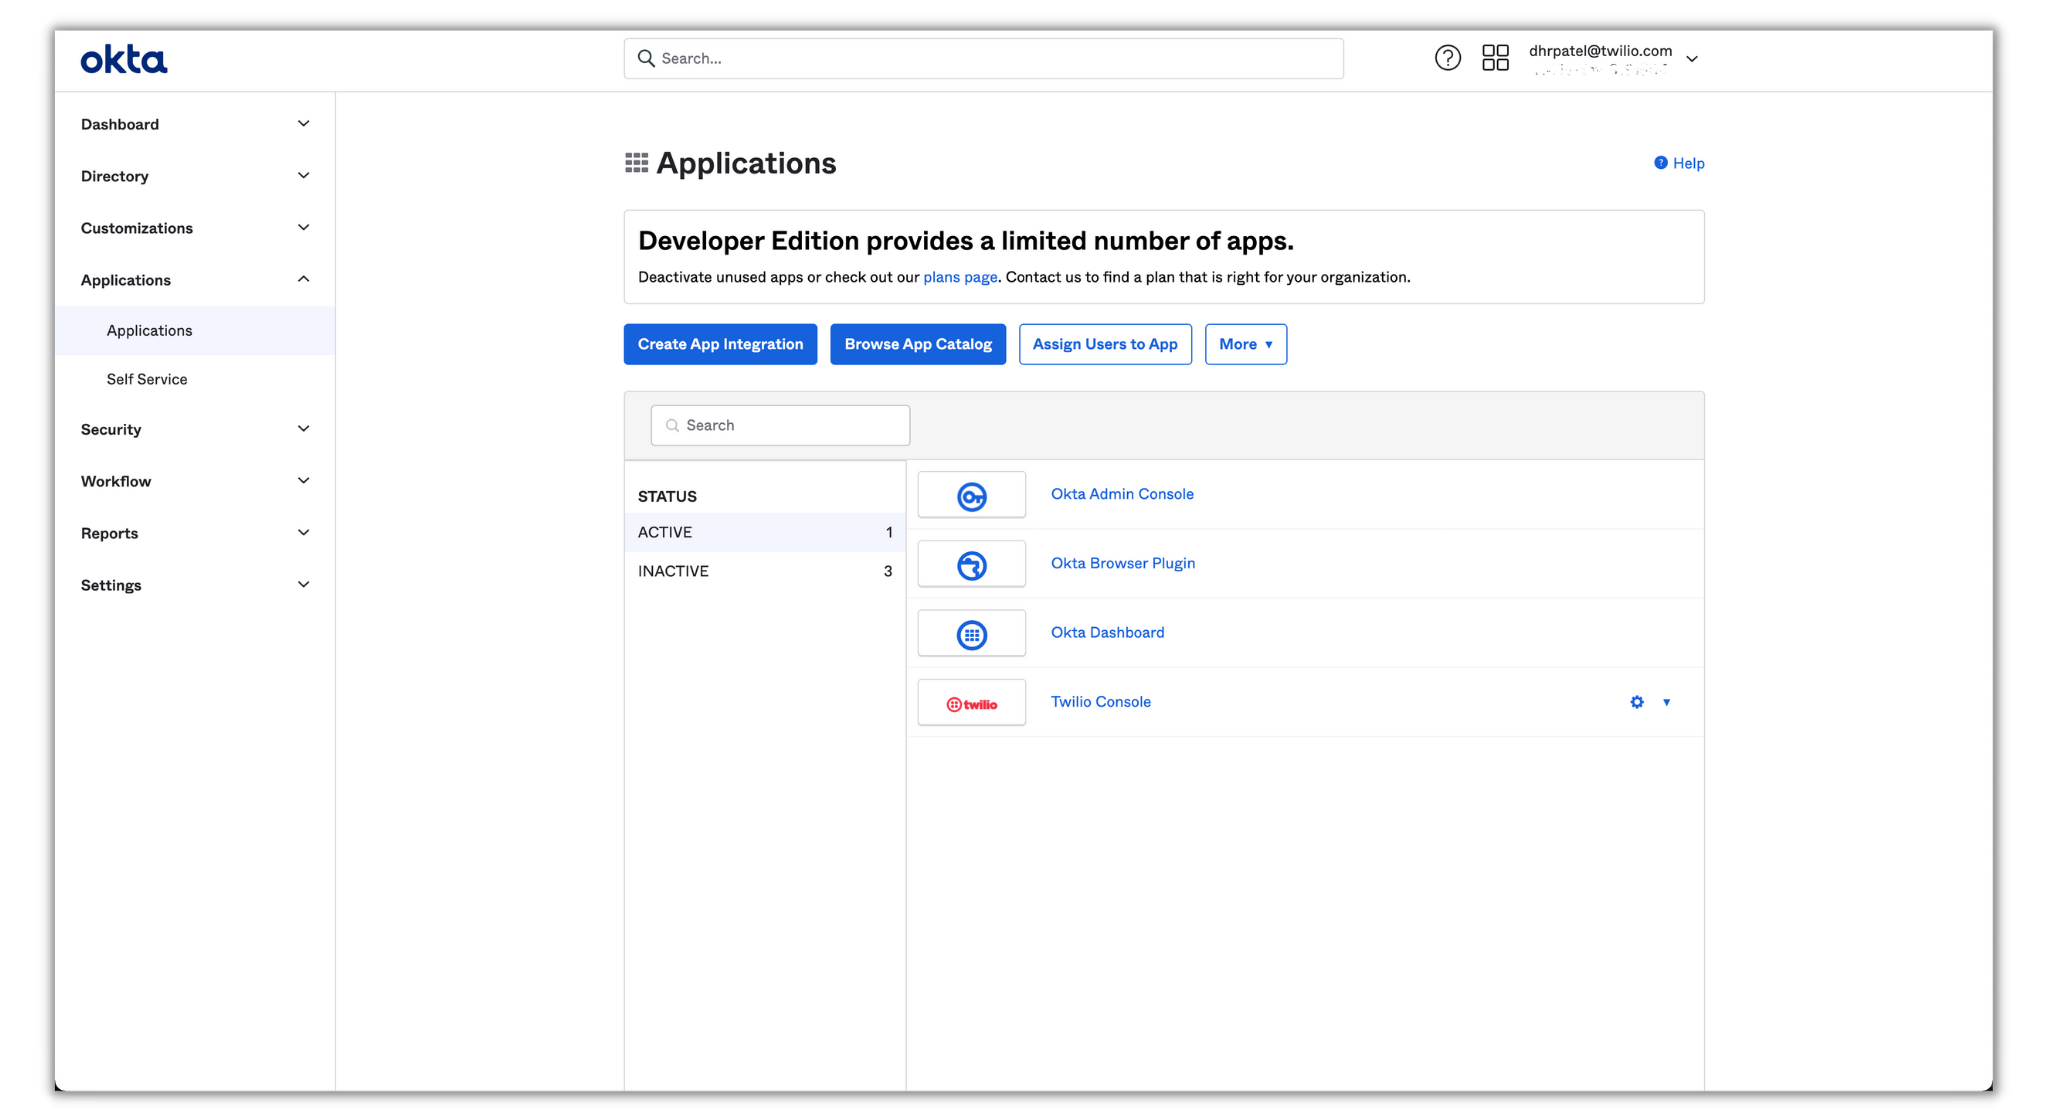
In the search bar, type SendGrid and click on SendGrid from the dropdown and you’ll be directed to the official SendGrid app page:
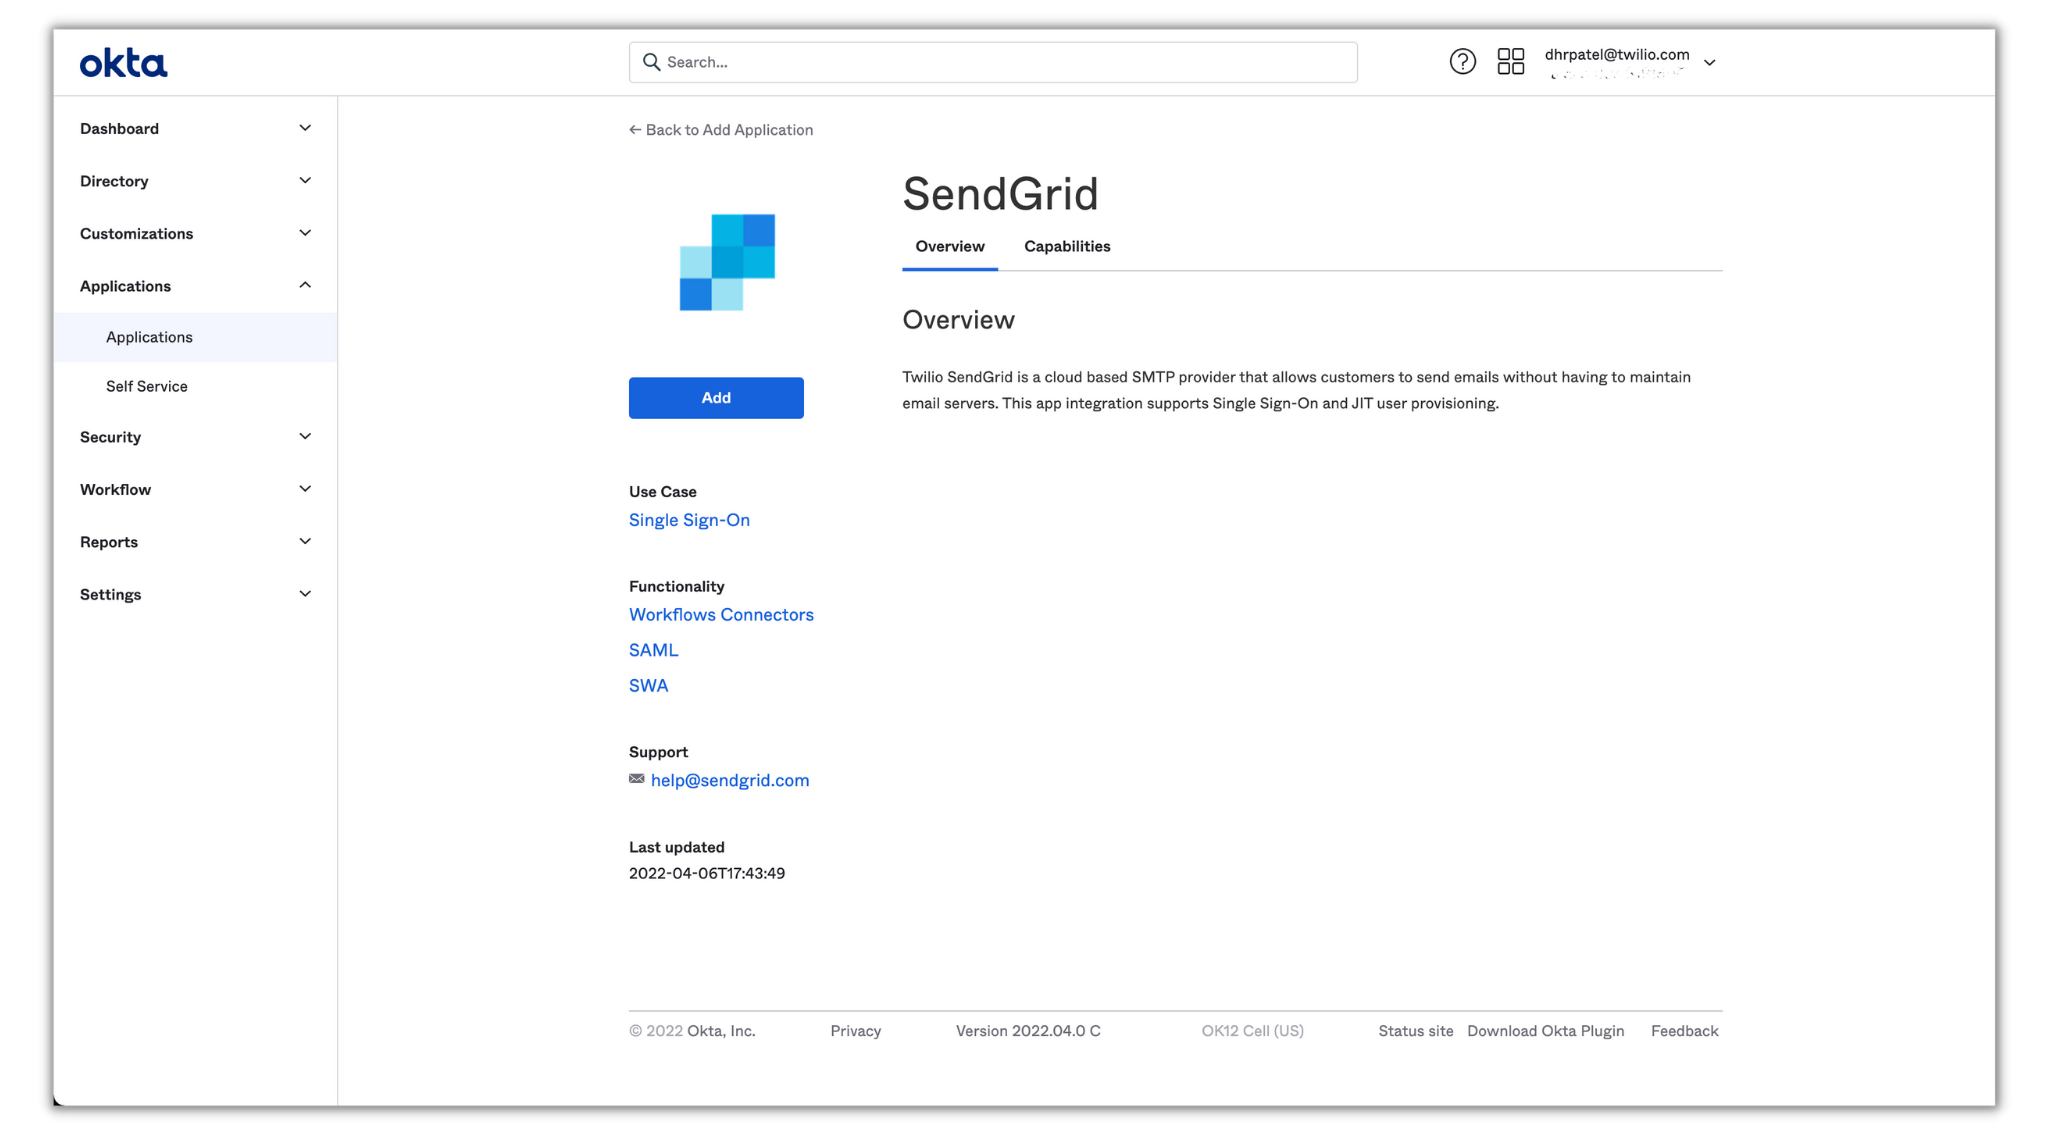
Click Add and you’ll be directed to finish the setup. The first screen will show general settings which you don’t need to change. Click Next to proceed to the Sign-On Options section:
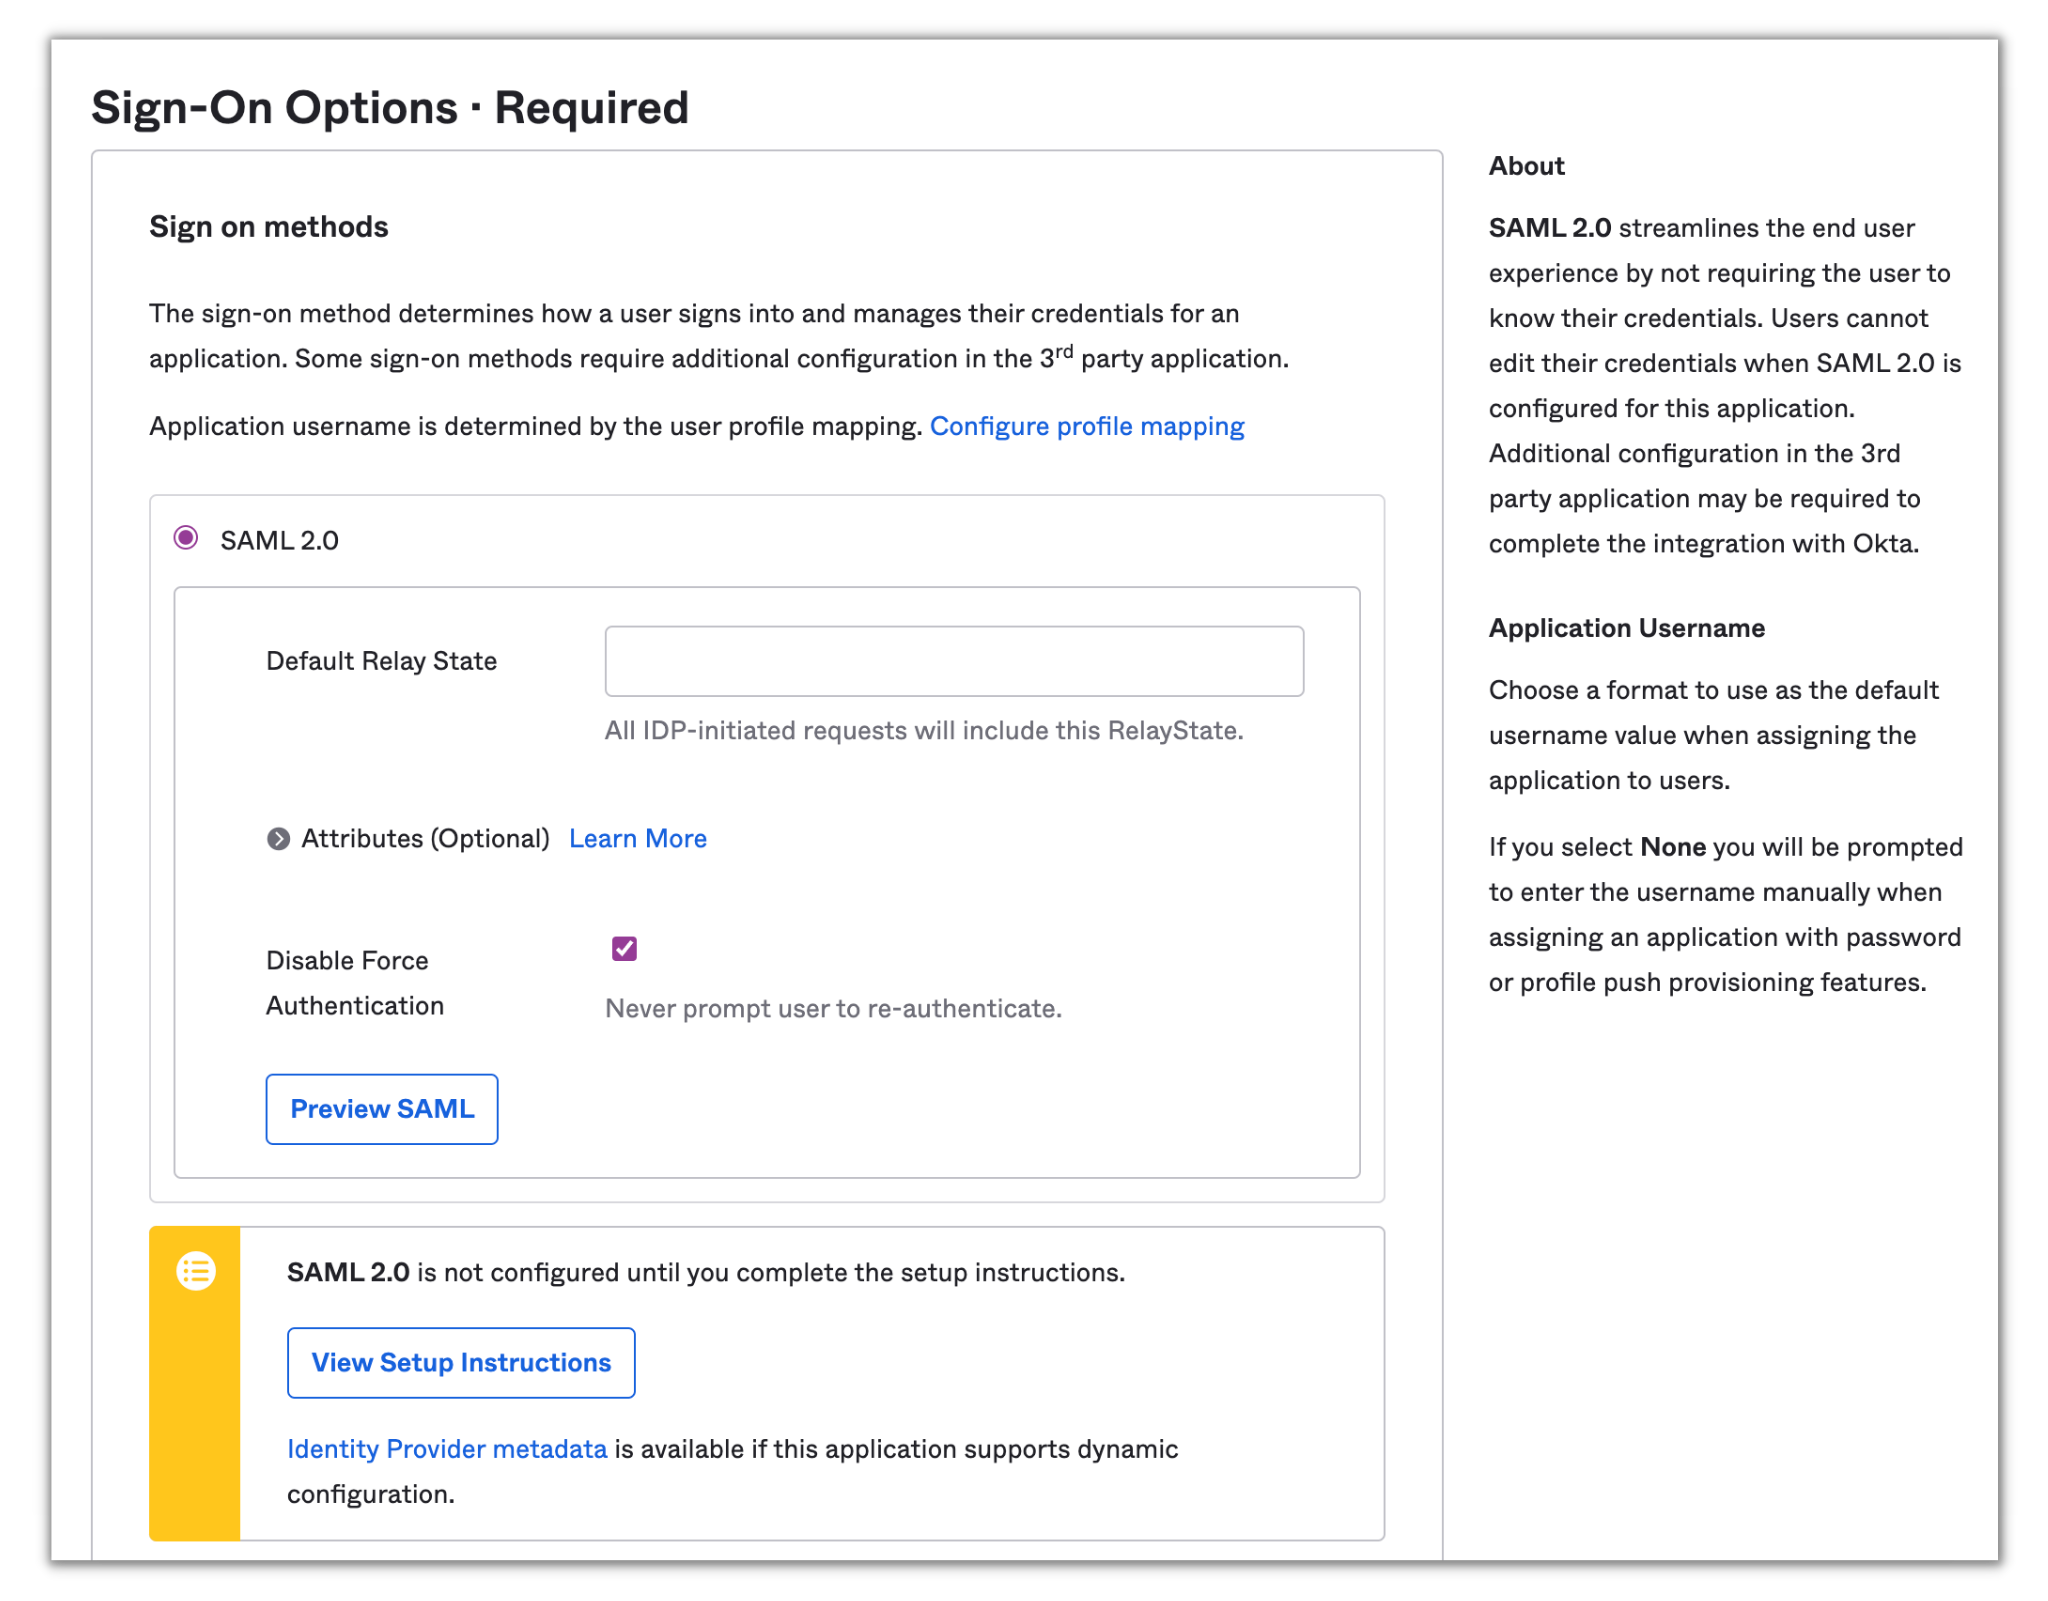
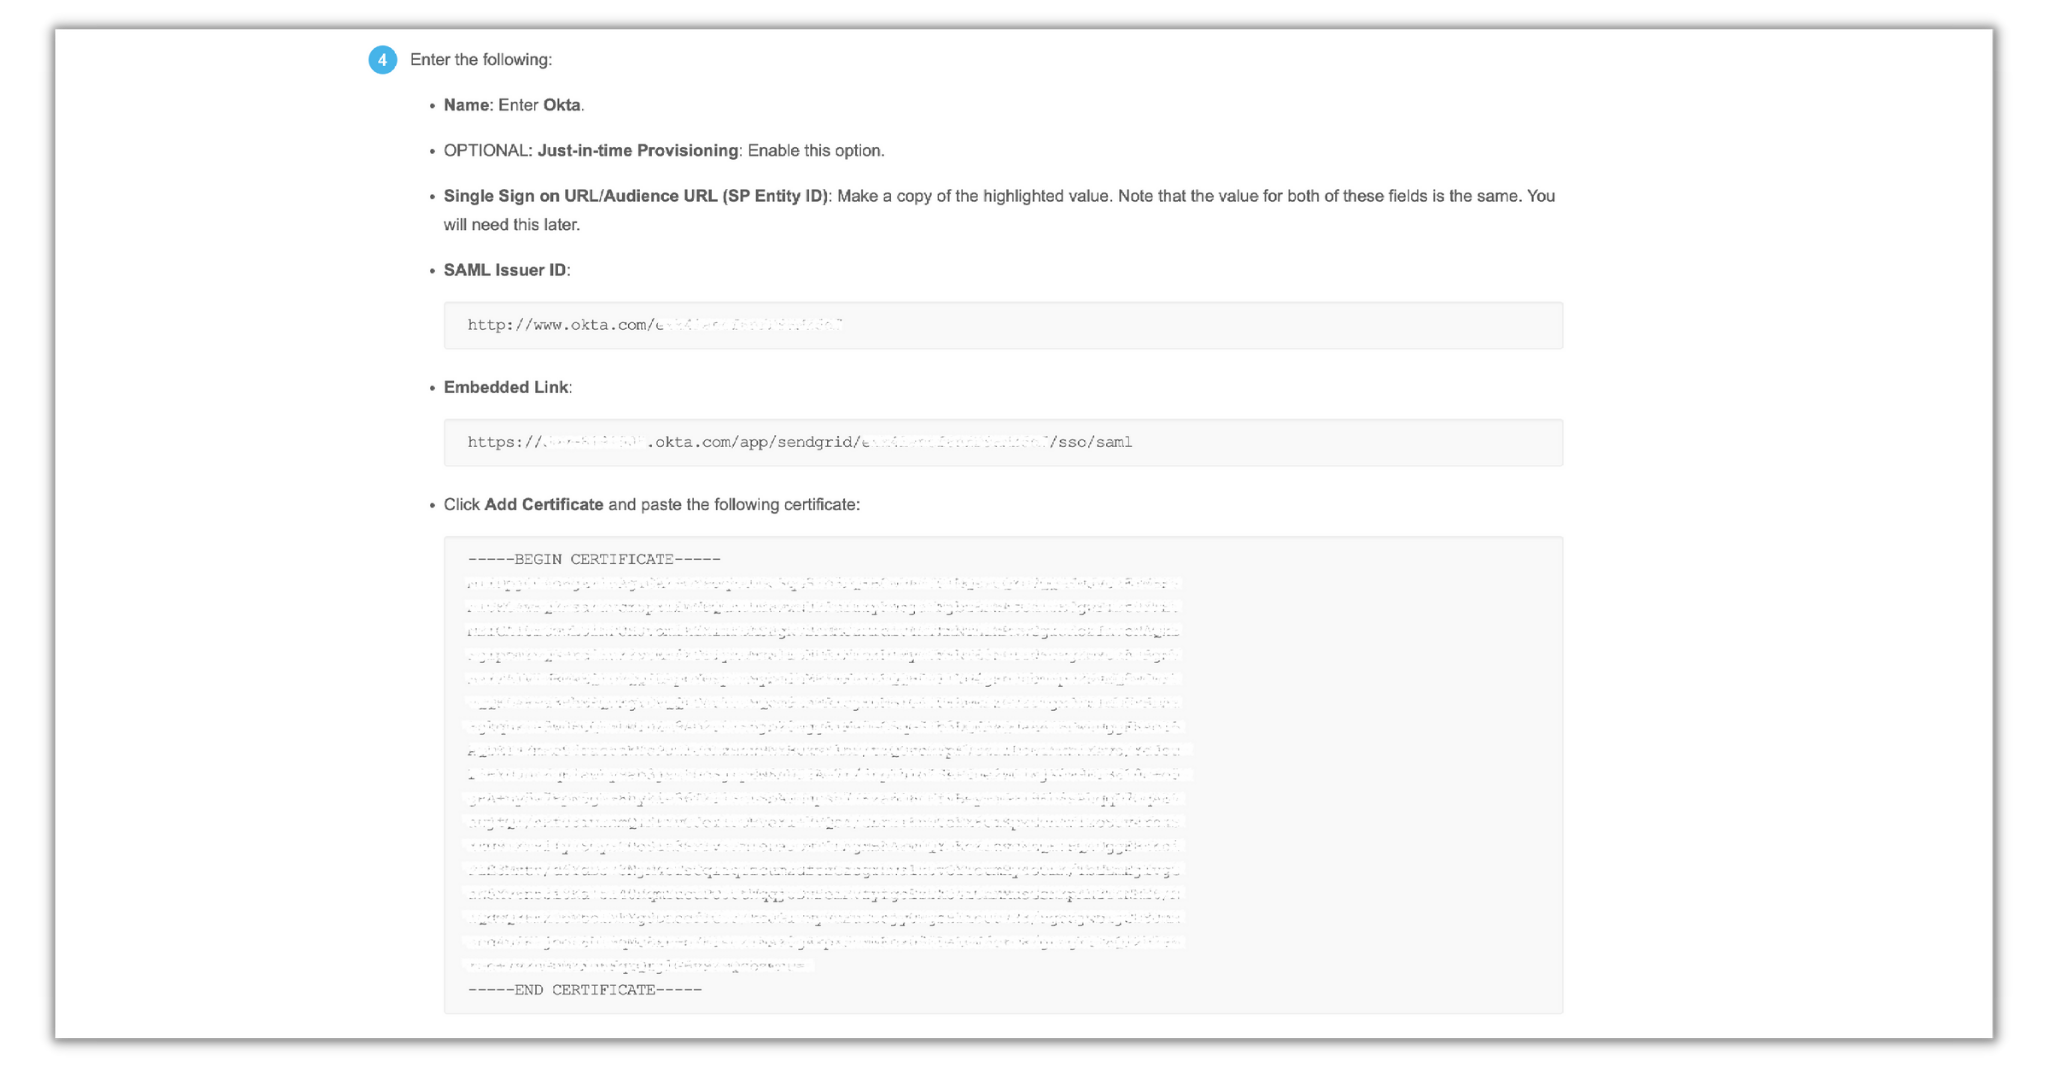
Click on View Setup Instructions, scroll down to the Configuration Steps section you’ll be provided with the Embedded Link (SSO URL), SAML Issuer ID, and X.509 Certificate which you will add to SendGrid:
Save this tab and head back to the IdP configuration setup in SendGrid.
Configure Okta metadata to SendGrid SSO configuration
Within the IdP configuration setup in SendGrid, click Next and you’ll see where to input the given metadata values from Okta into SendGrid:
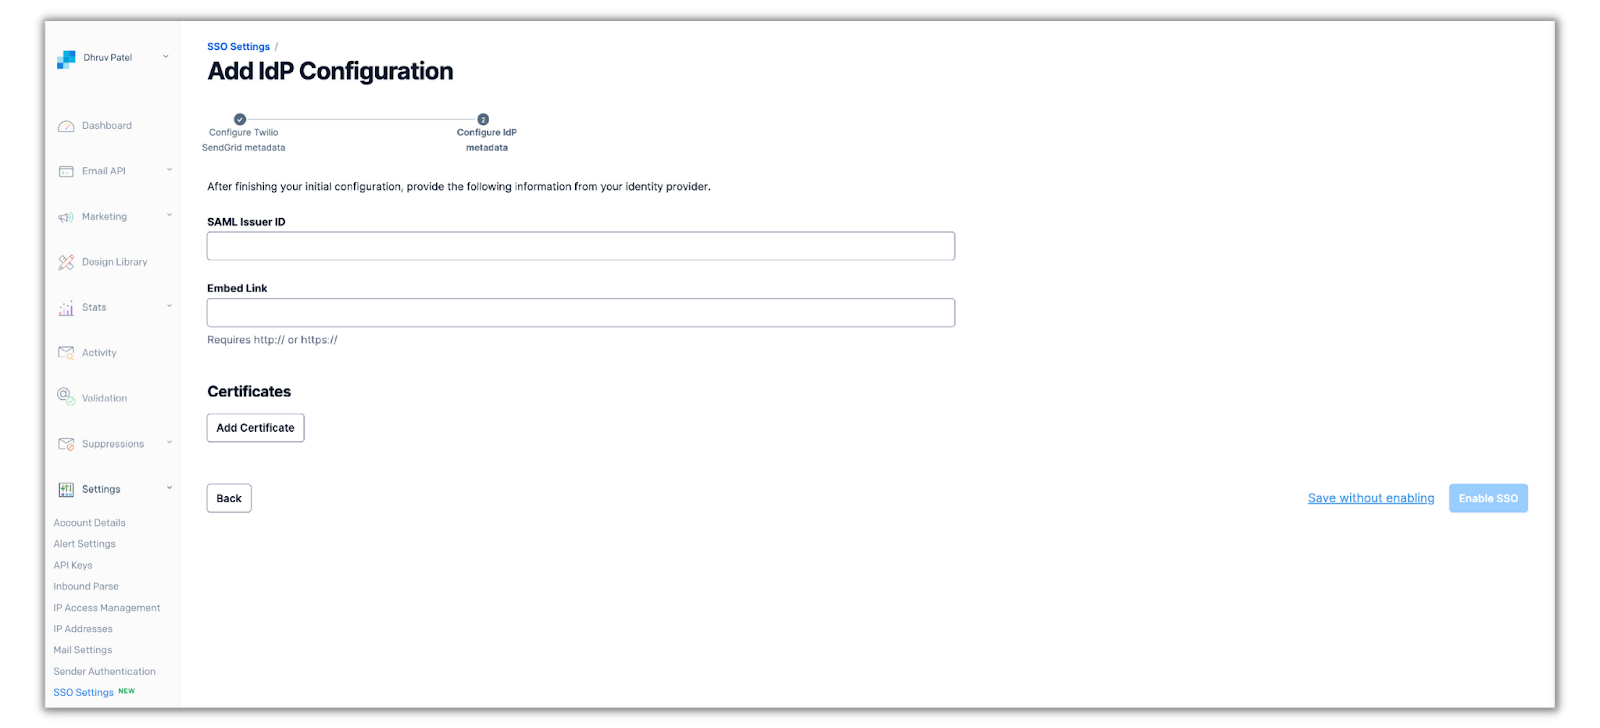
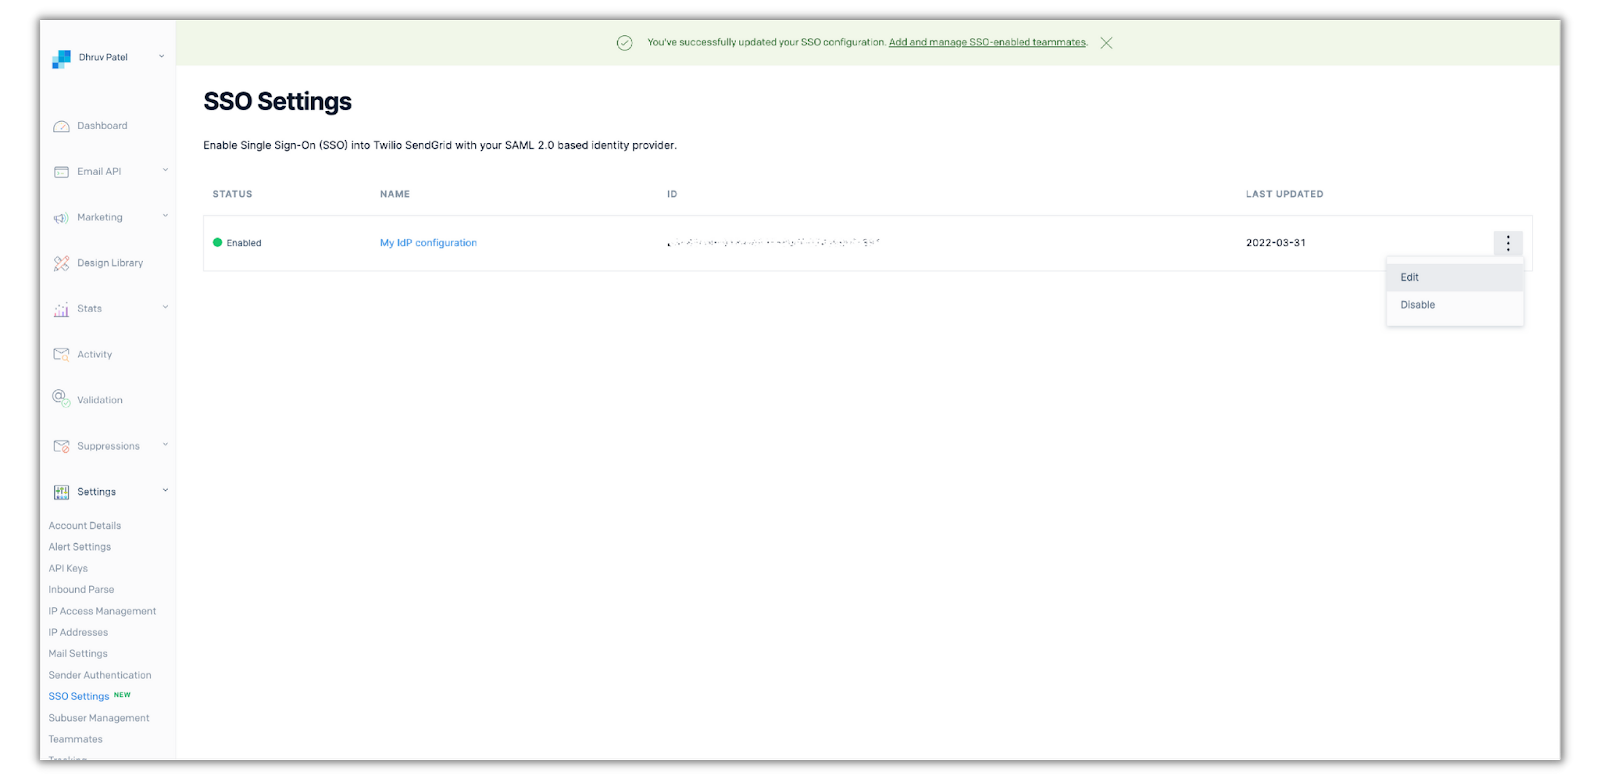
Place the Embedded Link, and SAML Issuer ID from Okta in their respective fields and click Add Certificate. Paste in the X.509 Certificate given by Okta within the text box and click Add Certificate. Once you’re finished adding all of the metadata values, click Enable SSO and you’ll be directed to the SSO settings menu with the completed IdP configuration you just setup.
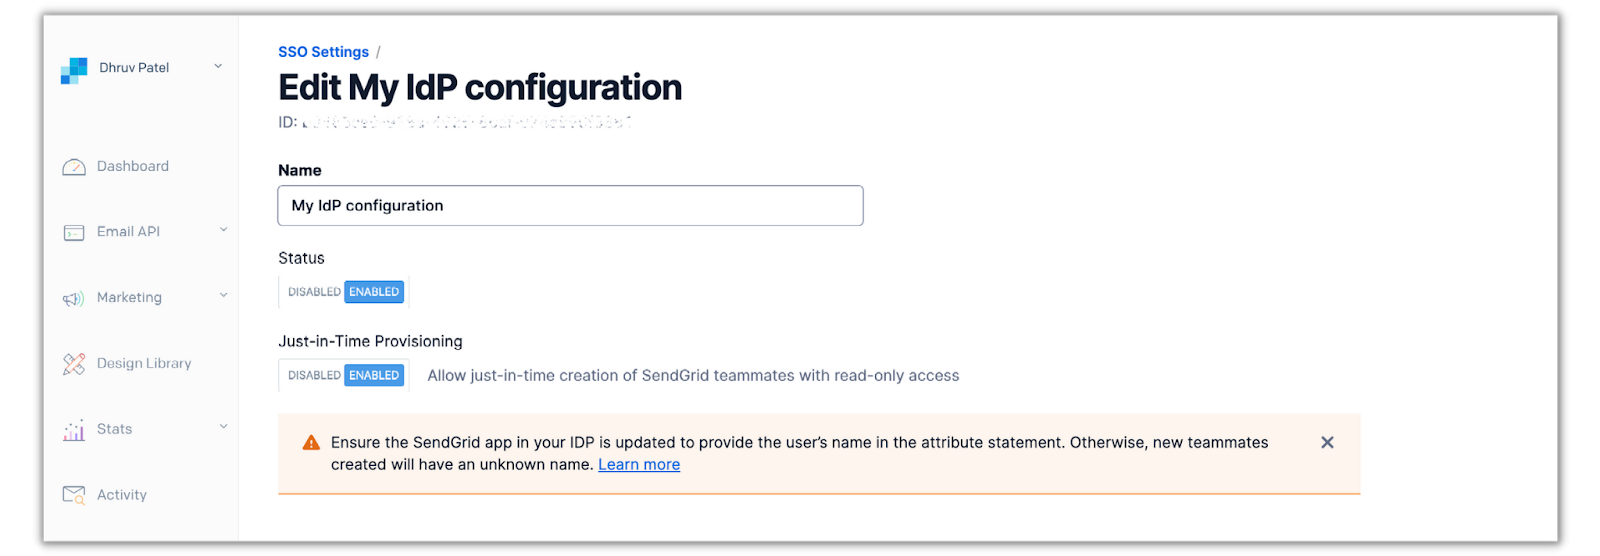
Now in order to enable JIT provisioning, you’ll need to click on the three dots (...) next your new IdP configuration and click Edit:
Once you’re in the editing menu, click the Enabled switch under the Just-in-Time Provisioning label:
Scroll down and click Save. The next and last step for this tutorial is testing out the SSO connection for both Twilio and SendGrid applications.
Test SSO Connections
Now that the setup is completed with Twilio and SendGrid on Okta, let’s assign both applications to a user within your organization and see how the SSO process looks like.
Before you test it out and proceed, ensure you have access to an email under your verified domain and follow these steps to add that email as a user to your Twilio Organization. Once added, login to your email inbox and follow the steps given by Twilio to complete your account. Since JIT provisioning is enabled for SendGrid, you won’t need to add this user as a Teammate to your SendGrid account.
Within these next sections, you’ll be adding the test user to Okta and then authorizing them in the Twilio and SendGrid applications. Lastly, you’ll test out the connection by signing into both applications as the test user.
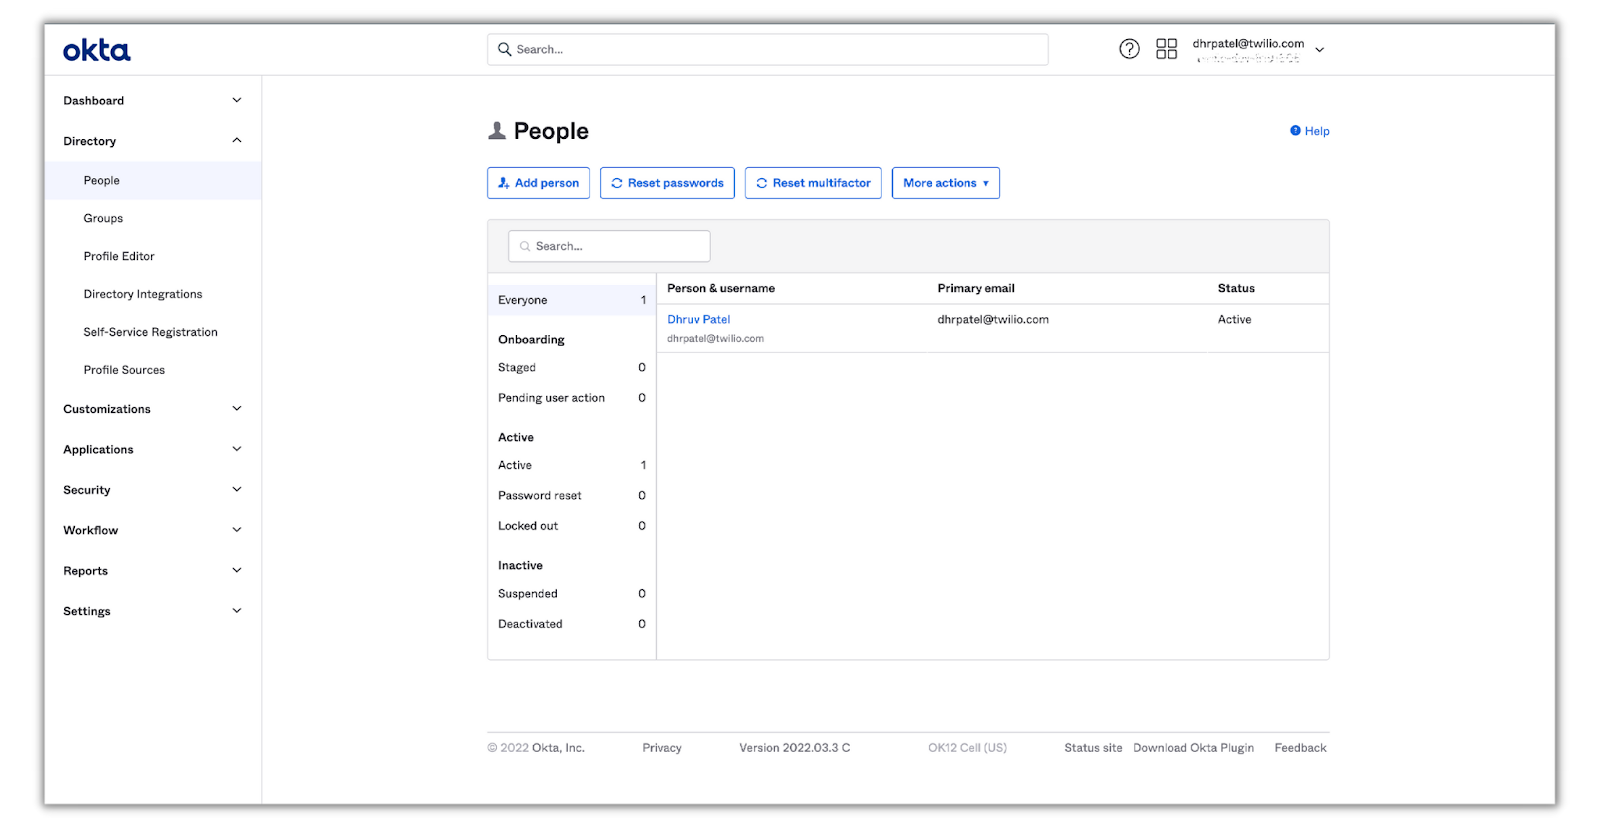
Add a user to Okta
Head back to your Okta admin console and access the People page by clicking Directory > People on the left tab:
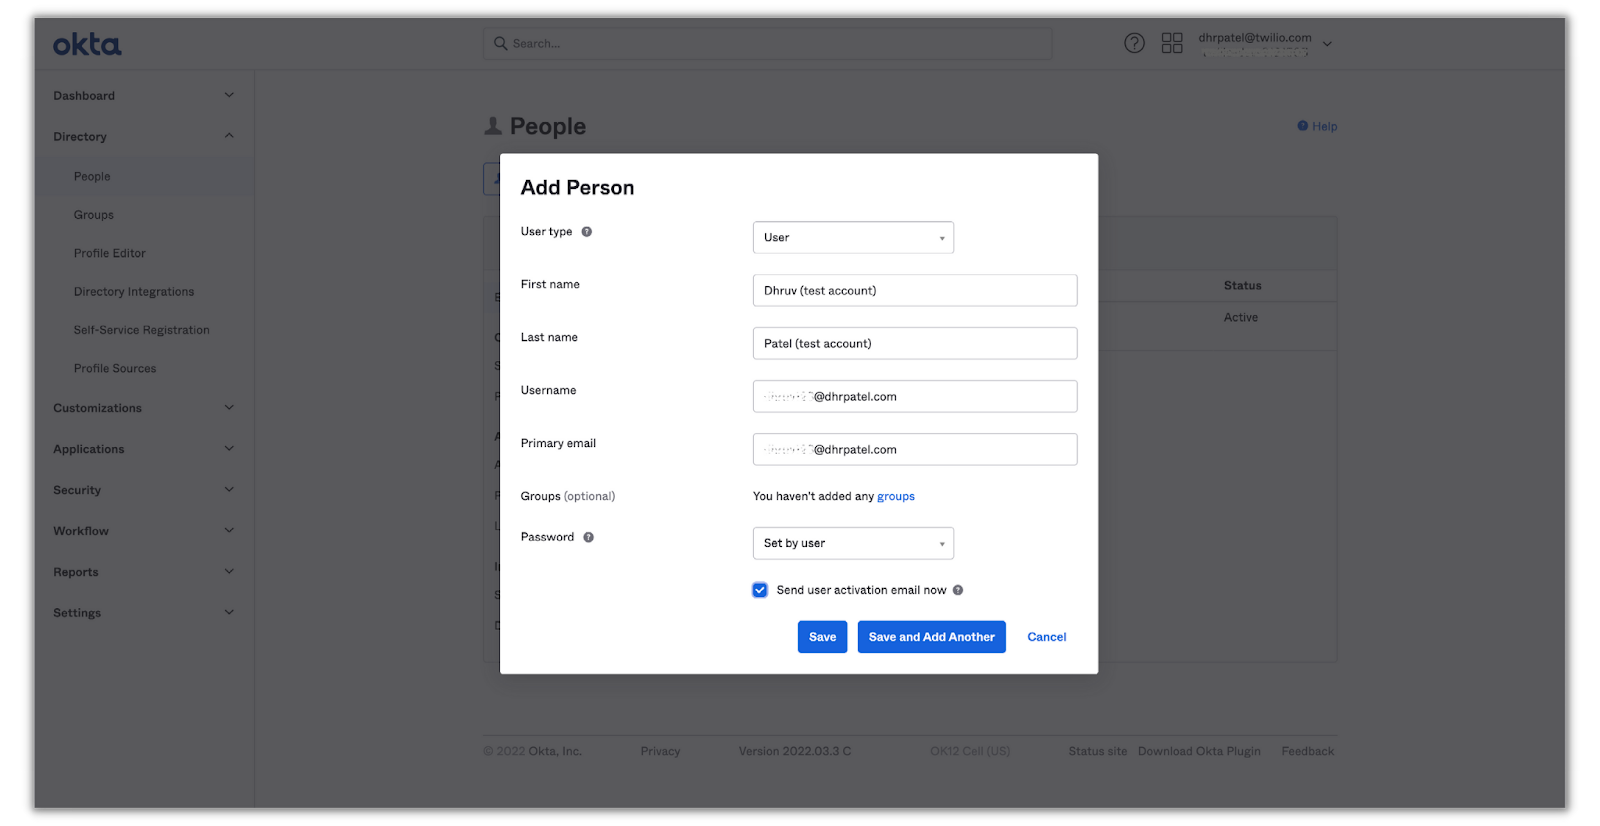
Then click on Add Person and fill out the form for your test user. Select the Send user activation email now checkbox—this will automatically activate the user and send them an email to complete their Okta account setup—and click Save.
Assign the Okta user to Twilio Console and SendGrid applications
Now that you have a user within your Okta directory, let's assign them to the SSO applications you just integrated.
Click on the user’s name you just added and you’ll be directed to the applications tab of their profile. Click on Assign Applications and you’ll see a list of the SSO applications you’ve set up:
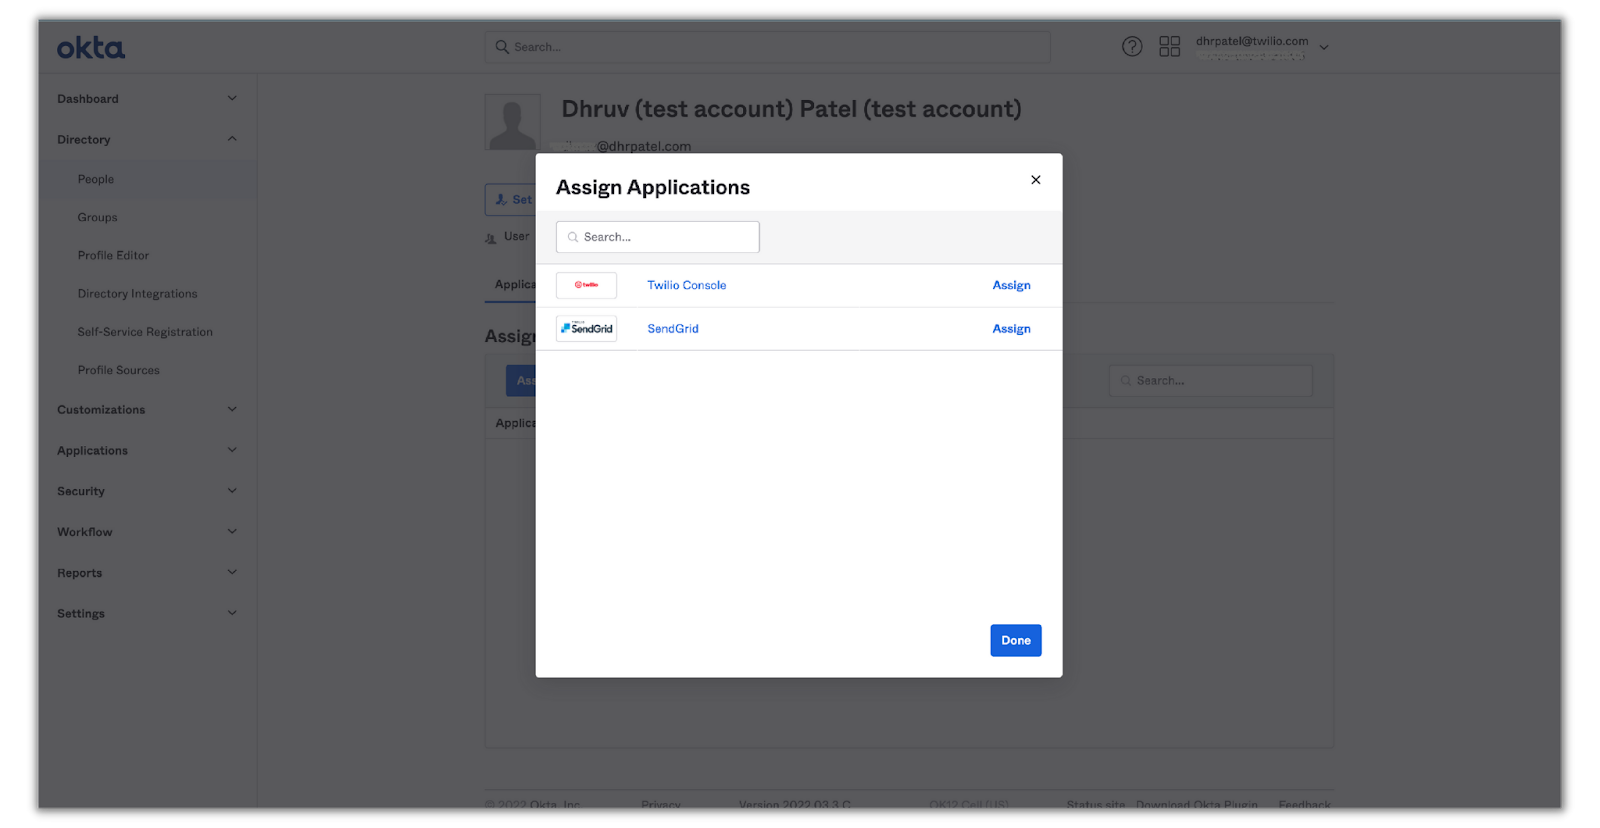
Click Assign on one of the applications and you’ll be prompted to enter a user name for them for that application. This field should already have their email as their username (since that's how it was set up in the SAML integration for both applications). Click on Save and Go Back and repeat the steps for the other application.
Since the test user is now assigned both applications, let’s finish the account setup for this user. Sign into your test user’s email inbox and find the email from Okta that was sent earlier to complete the account setup. Click on Activate Okta Account, enter in a password and click on Reset Password to complete the setup. You’ll then be redirected to the Okta portal as a nonadministrative user.
Now that the Twilio Console and SendGrid applications have been assigned to your test user, let's test out the SSO process!
Test out SSO
In the Twilio integration section, we were left off at testing the connection from the SSO profile that was being set up. Sign back in as the organization owner/administrator in Twilio, head back to the SSO section in the admin center and click on your SSO profile:
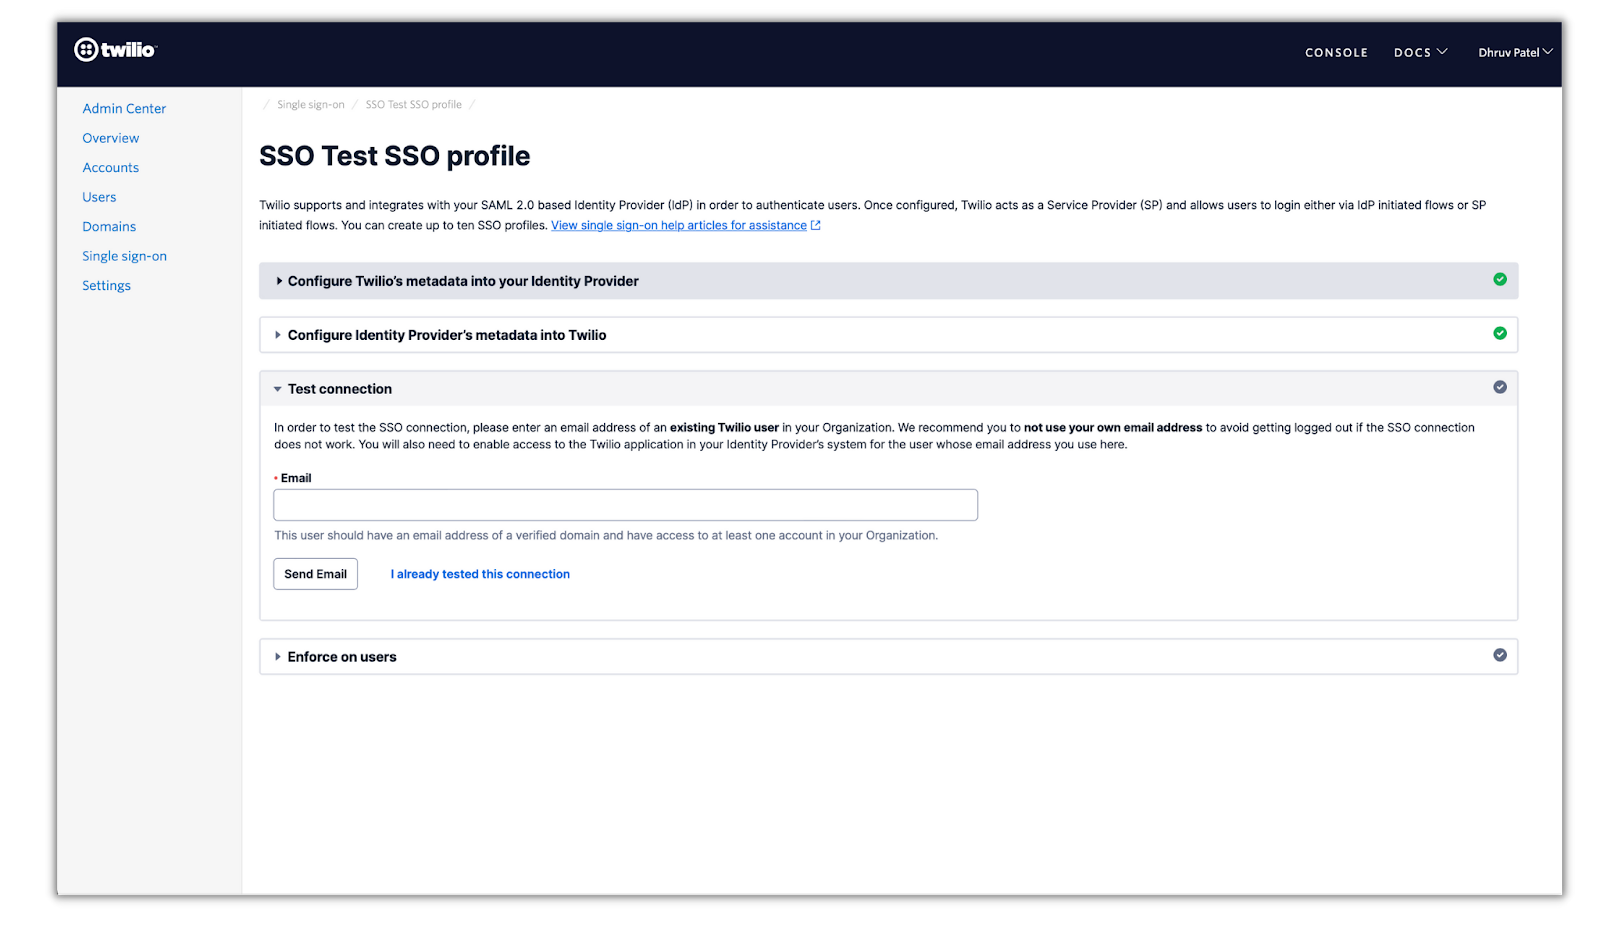
Enter in the test user’s email address (which should already be set up and a part of your Twilio organization) and click Send Email. Head back to your test users email inbox and you’ll see this email from Twilio:
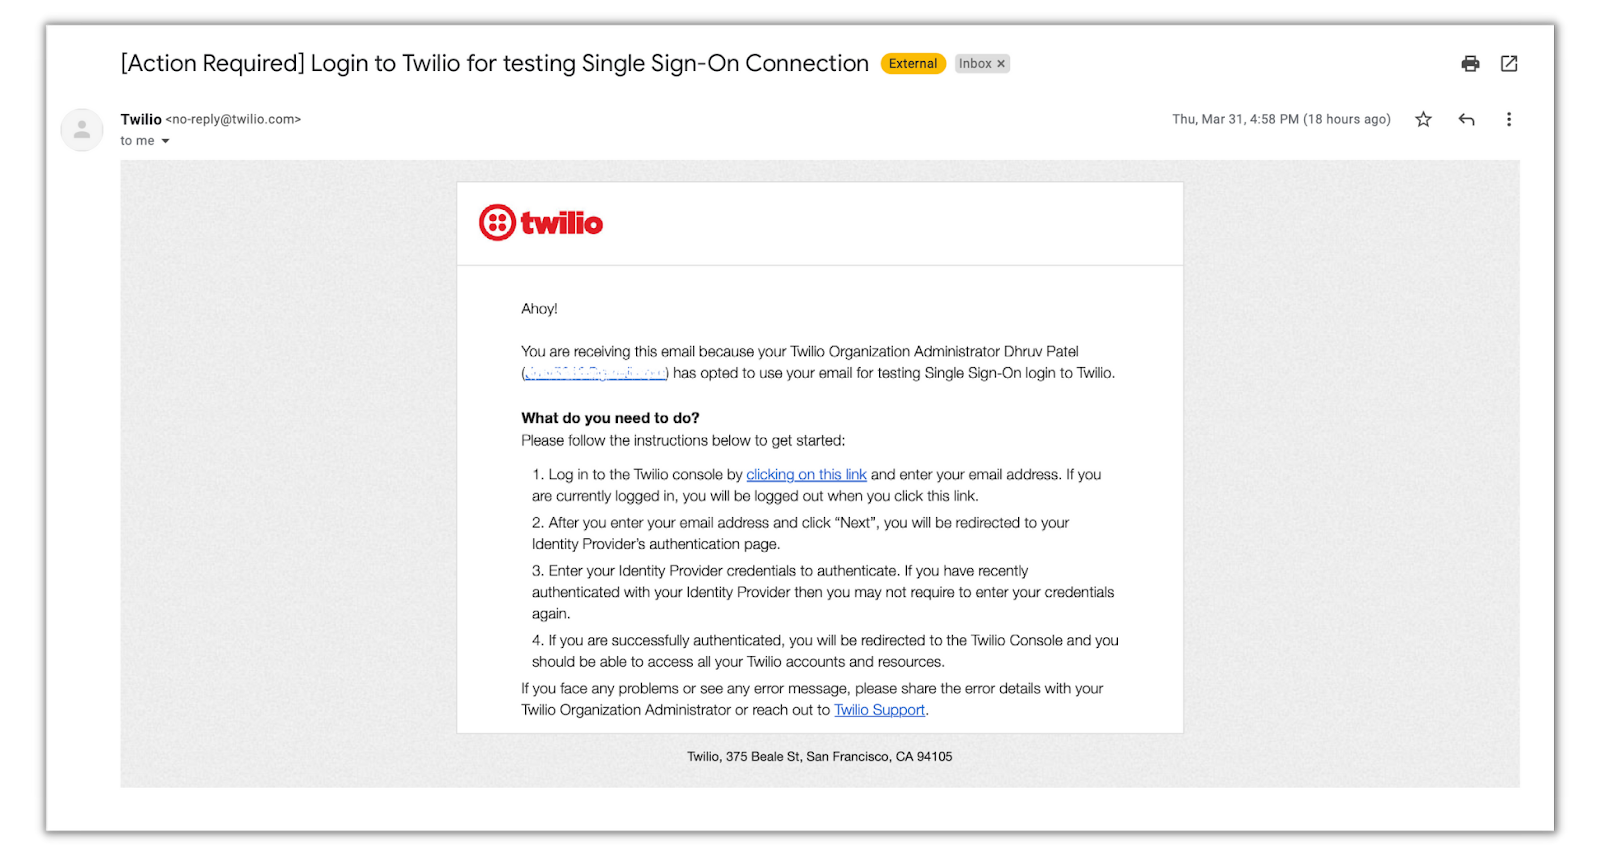
The email will ask you to test out the SSO process by signing into Twilio which will then redirect you to your IdP (Okta) to sign-in and will lastly redirect you to your Twilio Console—this process is called an SP-initiated sign-in. Let’s see how it works!
SP-initiated SSO
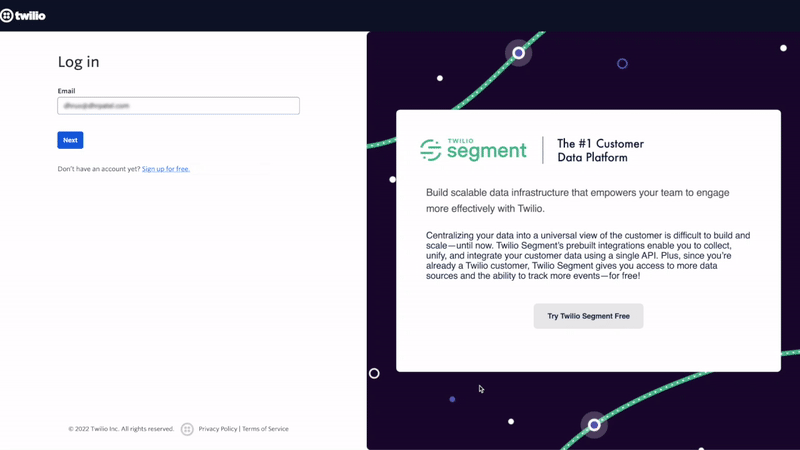
Click on clicking on this link in the email, type in your test users email into Twilio, and sign into Okta with the test users account. You will then be successfully signed into your Twilio console! The SP-initiated SSO process should have gone like this:
Now sign out and sign back to Twilio as the organization owner and head back to the SSO profile to complete the setup:

Click I already tested this connection, and you’ll proceed to enforce SSO on users that belong to your verified domain. Enter your domain in the field and click Enforce SSO. You’ll be asked one more time to enforce SSO and to verify it. Click on the verification check box and click Enforce SSO, which will complete the SSO setup for Twilio.
Now let's test out SSO and JIT provisioning with SendGrid! JIT provisioning is only possible from an IdP-initiated sign-on flow so you’ll sign back on to Okta as the test user to test it out.
IdP-initiated SSO with JIT provisioning
Once you’re signed into Okta, click on the SendGrid tile and you’ll be signed in with your account, which will automatically be set up on SendGrid:

After your very first sign-in to SendGrid (with JIT provisioning enabled), you’ll also be able to sign-in directly through SendGrid.
Next steps
Ta-da! You have officially set up and integrated your Twilio and SendGrid accounts all through single sign-on. Not only does this streamline the sign-on process for users within your organization, but it also allows you to provision and manage your users all through one platform.
I hope you enjoyed this tutorial and learned a few things about SSO along the way! So now what’s next? For Twilio, you can learn more about Organizations, managed users, and roles, and for SendGrid, you can learn more about Teammates and Subusers and how they can help you manage your users. Happy building!
Dhruv Patel is a Developer on Twilio’s Developer Voices team. You can find Dhruv working in a coffee shop with a glass of cold brew or he can either be reached at dhrpatel [at] twilio.com or LinkedIn.


Related Resources
Twilio Docs
From APIs to SDKs to sample apps
API reference documentation, SDKs, helper libraries, quickstarts, and tutorials for your language and platform.
Resource Center
The latest ebooks, industry reports, and webinars
Learn from customer engagement experts to improve your own communication.
Ahoy
Twilio's developer community hub
Best practices, code samples, and inspiration to build communications and digital engagement experiences.