Learn the Maasai Language the Fun Way
Time to read: 6 minutes
October 20, 2022
Written by
Reviewed by

Learning a new language can be hard!
You get passionate about learning a new language for work reasons or because you plan to go on a vacation and want to immerse yourself into the culture and interact with the locals. You sign up for a course, hire an online tutor, or start watching youtube videos. You are psyched and keep this up for a minute, but it quickly starts feeling boring and like a chore.
Sound familiar? Yes, I know; we have all been there. Don't worry. The Maasai language app is up to the rescue!
The app enables you to learn the Maasai language in an easy and fun way. No hassles! Just open WhatsApp and start learning.
Why the Maasai language? The Maasai culture has a wealth of life lessons, moral principles, and practices that everyone should yearn to learn. Plus, if you ever want to see the world's eighth wonder, the wildebeest migration, you have to learn at least some basic Maasai language. But, in return, you will brush shoulders with Maasai people during your vacation.
How does the language app work?
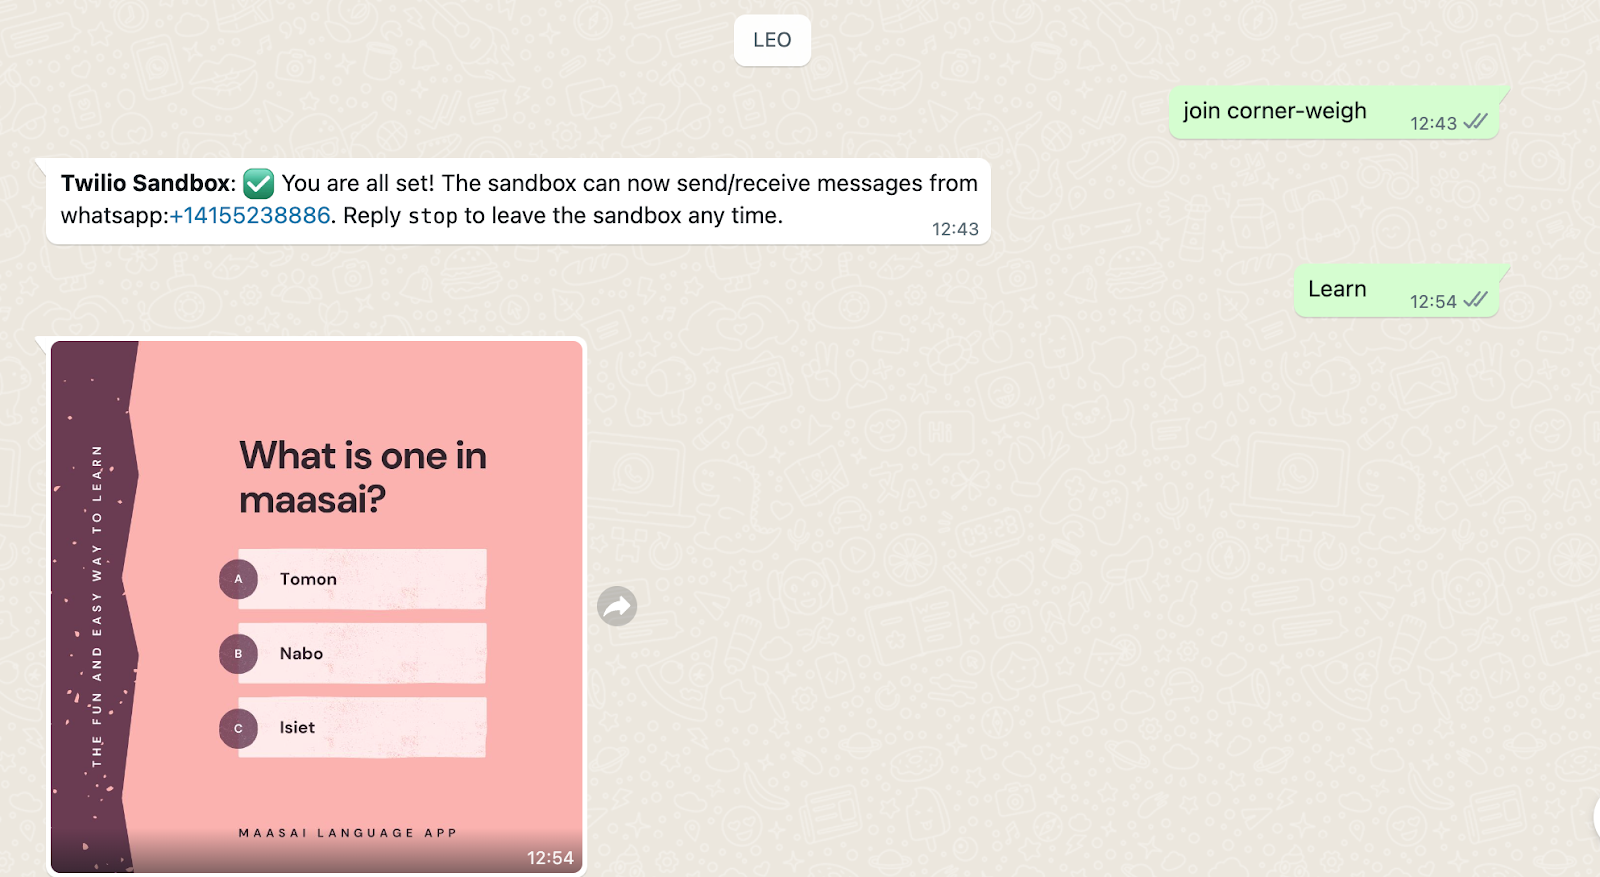
- You text the word "Learn" to a Twilio WhatsApp number.
- You immediately get a picture response, which contains a multiple-choice question.
- You respond with your answer. The language app then informs you if you are wrong or right. If you are wrong, you try again. If you are correct, then congratulations! You are shown an example Maasai sentence with the word and an English translation of the example; an example is vital for the learner to understand the word usage context.
- Text the word "next" to see a picture with the next question, and the process repeats itself.
Prerequisites
To follow this tutorial, you need the following:
- A free Twilio account
- PHP 8.0 or higher
- A basic understanding of Laravel
- Composer globally installed
- Ngrok globally installed
- Access to a MySQL database
Create a New Laravel Project
To start off, create a new Laravel project using the Composer create-project command, and change into the newly created Laravel project directory, by running the commands below.
Install Twilio SDK
Next, install the Twilio PHP Helper Library to enable easier interaction with the Twilio API from the application by running the command below:
Initialize the database
To create the learn_maasai database, login into your MySQL instance and run the following command:
Set the required environment variables
To set the required environment variables, add the following entries to the end of .env in the top-level directory of the project:
Then, retrieve your Twilio Account SID and Auth Token from the Account Info section of the Twilio Console, and your WhatsApp sandbox number from the WhatsApp Sandbox and insert them in place of the respective placeholders in .env.
Then, update the following three, existing, settings in .env with the respective details from your MySQL instance.
Then, set the Twilio-specific environment variables by adding the following array configuration to the end of the array returned from config/services.php.
Build the Maasai Language App
Now, it's time to add the business logic. As outlined earlier, the application will be able to:
- Send a picture with a question
- Check the learner's choice against the correct answer and respond accordingly
- Store the user details and learner responses
Let's build this functionality step-by-step.
Add a Model, Controller, Migration, and Seeder
The app needs to listen to API requests and respond with a follow-up question or an answer. To achieve this, you need to create a questions table using a migration, seed the questions data into the table, and create a model and a controller to handle the logic.
To complete these four steps, run the following Artisan command:
The command creates four files:
- The Model: app/Models/Question.php
- The Controller: app/Http/Controllers/QuestionController.php
- The Seeder: database/seeders/QuestionSeeder.php
- The database migration: database/migrations/{current timestamp}__create_questions_table.php
Now, open the migration file and update the up() method to match the following code:
Then, open database/seeders/QuestionSeeder.php and update the run() method to match the following code
Then, add the following use statement to the top of the class.
After that, open database/seeders/DatabaseSeeder.php and update the run() method to match the code below.
The call() method executes database/seeders/QuestionSeeder.php when seeding the database.
Fourthly, open app/Models/Question.php and add the following functions to the end of the class.
Then, add the following use statement to the top of the class.
The send() function accepts two parameters: the WhatsApp receiver number, and the image path. It then creates a new instance of the Twilio\Rest\Client class passing it the Twilio configurations. The create() method is called passing from and mediaUrl parameters. Finally, the WhatsApp message is sent.
The fetchQuestion() method accepts two parameters: the response from the user and the user id. It then picks a random question and returns the image path. If the response from the user is "next", it checks all the questions they have been asked and excludes those from the query.
Next, add the logic to receive and send WhatsApp messages, in the code example below, to app/Http/Controllers/QuestionController.php:
Then, add the following use statements to the top of the class.
The reply() function logs the user's WhatsApp number, checks if the incoming message is from a new user or a user responding to the previously asked questions, and then sends replies accordingly.
Add a session Model and migration file
The app also needs to track the learner's progress, hence the need for a session table.
To create the supporting Model file, run the following Artisan command:
The command creates two files:
- The model: app/Models/Session.php
- The database migration: database/migrations/{current timestamp}__create_sessions_table.php
Open the sessions migration file and update the up() method to match the following code
Then, update app/Models/Session.php, add update the logSession() method as shown below:
The logSession() method accepts three parameters; user id, the question id, and the status update check, which is false by default. The function logs the learner's responses. If the learner picks the right choice, it updates the status to one.
Update the user migration
Laravel ships with a users' migration file and model. However, for this app, you won't handle authentication; therefore, most of the columns are not needed.
So, open the user's migration file (database/migrations/2014_10_12_000000_create_users_table.php) and update the up() method as shown below:
Now that you have all the migration files ready, it is time to create the respective tables in the database, by executing the migrate Artisan command below.
You also need to seed the questions table. To do this, execute the db:seed Artisan command below
To confirm if the database has been populated with data, log in to your MySQL instance and run the following commands.
Define the API Route
Finally, add the API route. You will add this endpoint in the Twilio console as a Webhook.
At the end of routes/api.php, add the following route definition:
Then, add the following use statement to the top of the file.
Install the images
To finish up the application, you now need to download the images for the answer, question, and wrong responses. Create a new directory, named images, inside the public directory, then download the three images from the GitHub repository accompanying this tutorial to public/images.
Create a temporary public URL using Ngrok
To test the app locally, first start the app by running the following command.
Then, you need to use Ngrok. It assigns a local port a publicly accessible URL over the Internet. Run the command below, in a new terminal session, to expose the Laravel app running on port 8000 to the Internet:
Test the App
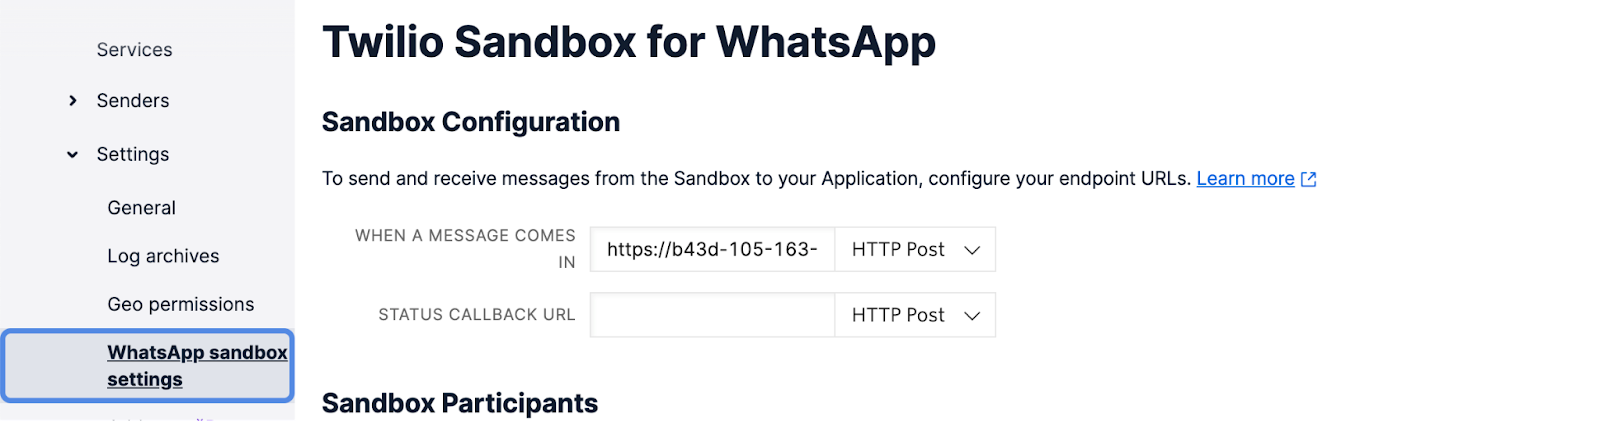
Now, head over to the Twilio console, WhatsApp Sandbox settings, and set "WHEN A MESSAGE COMES IN" to be the ngrok Forwarding URL. and click Save.
Then, text the word "Learn" to the Twilio WhatsApp Number. You should get a WhatsApp picture message with a question:
Pick A as the answer and see what happens.
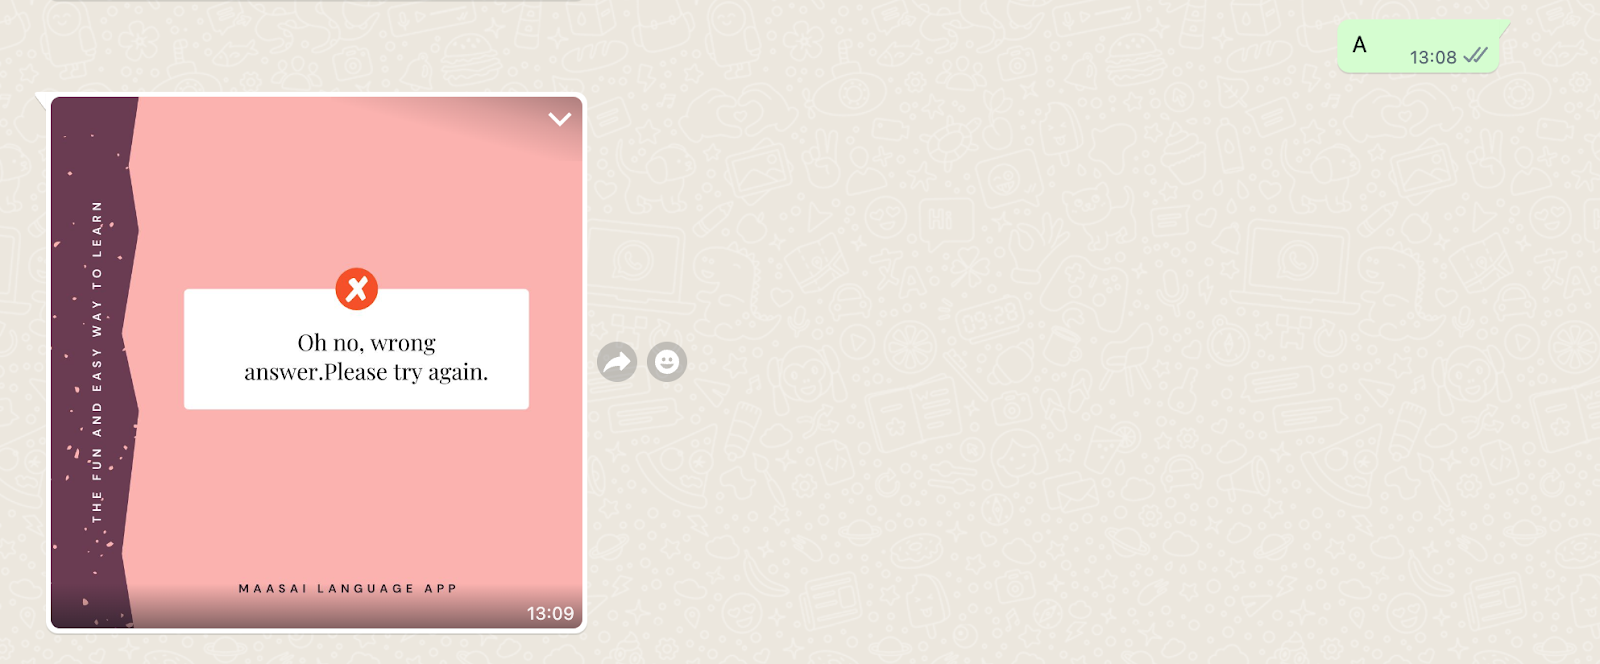
Sadly, the correct answer is B. Now pick B and see what happens.
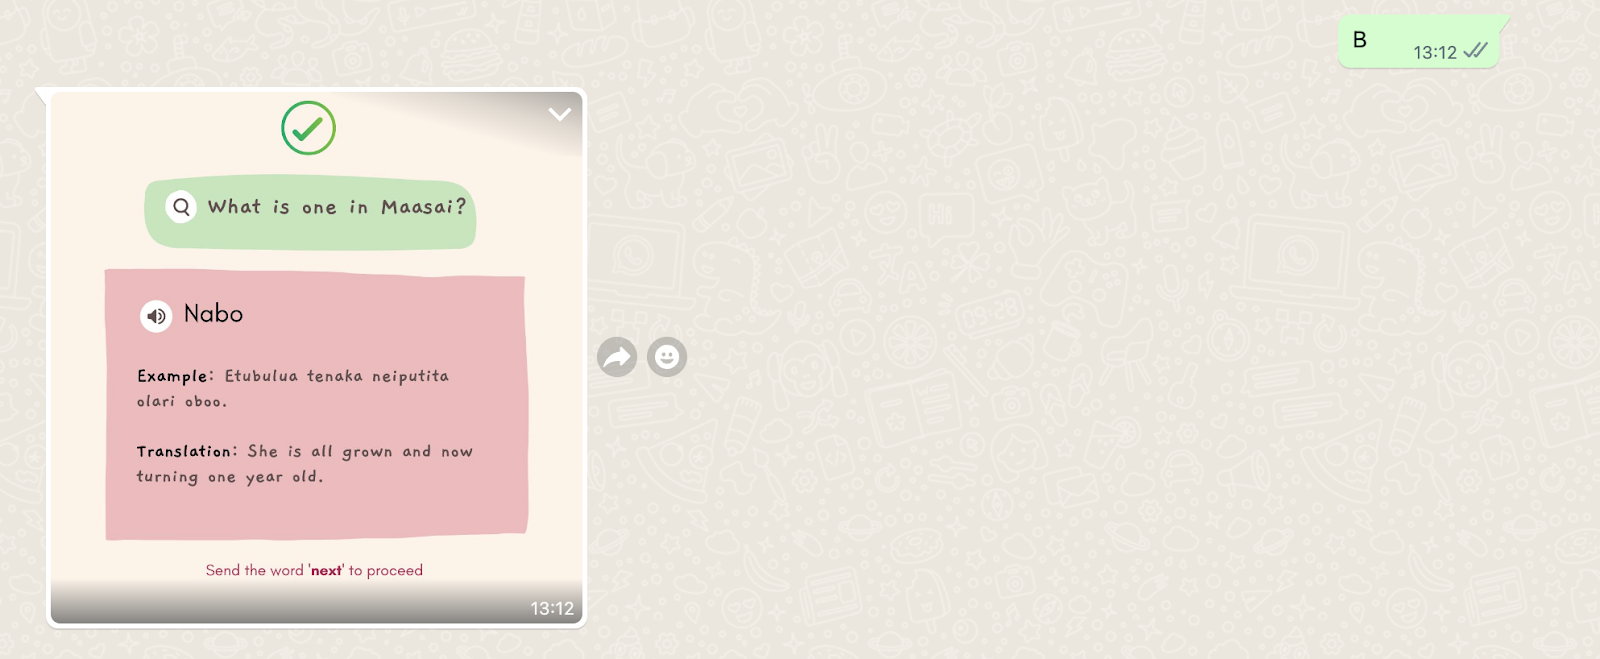
Nice! It worked.
That's how to learn the Maasai language the fun way
There you go. You've now built an app to learn the Maasai language. There are a few things you could do to make the app more robust, however:
- You have just touched on numbers. Cover more topics. You could add topics like greetings, months of the year, directions, etc.
- Add voice. Instead of images, you could use video. Help learners know exactly how to pronounce the Maasai words.
- Add tests. I'd recommend you look into Pest PHP to learn more about adding tests to a Laravel application.
- Add the competition element to the app. Family members could compete on who got the most questions right.
I would love to see what you build! The code is available on GitHub. Feel free to make PR requests, report issues and play with it.
Want to learn a new language? Then, what are you waiting for? There is never a perfect time to start. The time to act is now.
Michael Jaroya is the Co-founder of Lughayangu. He is an entrepreneur, a wannabee copywriter and a history enthusiast. You can find him on Twitter and GitHub.
"Maasai" (in the tutorial's main image) by Anita Ritenour is licensed under CC BY 2.0.


Related Resources
Twilio Docs
From APIs to SDKs to sample apps
API reference documentation, SDKs, helper libraries, quickstarts, and tutorials for your language and platform.
Resource Center
The latest ebooks, industry reports, and webinars
Learn from customer engagement experts to improve your own communication.
Ahoy
Twilio's developer community hub
Best practices, code samples, and inspiration to build communications and digital engagement experiences.