Light Up Your Hackpack With the Adafruit NeoMatrix Library
Time to read: 8 minutes
May 14, 2015
Written by

Signal is almost upon us. That means that in just a few days we’ll be handing out hackpacks to every attendee of the conference. The hackpack contains a littleBits-powered Adafruit NeoPixel 8×8 LED Panel that can be programmed to display whatever you can fit onto its display. If you haven’t already read it, check out our recent post detailing what hardware is in the hackpack and instructions on how to build your own hacks.
Adafruit provides a set of libraries that make it easier to hack on its LED products and developers have used them to create a variety of creative hacks including Christmas tree ornaments and animated sprites. While these libraries streamline the development process a bit they don’t come with a lot of documentation, so they can be challenging to figure out at first. Even though the core concepts of using the Adafruit aren’t too difficult to grok we want to make this learning process less stressful for you so that you can get to building your own hacks once you have the hackpack.
What You’ll Need
- Hackpack: If you want to build your own hackpack, follow this wonderful guide. While you can get everything yourself, it’s easier (and a lot more fun) to come join us at Signal. Use the promo code Swag75 for $75 off of your ticket price.
- Arduino IDE: allows us to write code and upload it to our Arduino
- Adafruit_GFX Library: Base library for programming Adafruit LED pixels
- Adafruit_NeoPixel Library: This library builds on the Adafruit_GFX library to add abstractions that make it easier to change the color and brightness of multiple LEDs arranged in a strip at the same time.
- Adafruit_NeoMatrix Library: This library builds upon Adafruit_NeoPixel to create two-dimensional displays using NeoPixels and allows us to access the pixel positions in a grid arrangement.
What We’re Building
We’re going to create a looping name tag animation that includes a Twilio logo and some scrolling text to let everyone at the conference know your Twitter handle. In the process we’ll learn how the Adafruit_GFX, Adafruit_NeoPixel and Adafruit_NeoMatrix libraries can be used to power your own creations. The animation loop will repeat the following pattern:
- Fade entire screen in from off to white
- Color wipe (which means to set each pixel sequentially) to red
- Create a Twilio logo by crossfading individual pixels from red to white
- Fill the screen to red
- Scroll our Twitter handle in white text on the red background
- Color wipe the screen back to off
When done it’ll look like this:
Setting Up the Environment
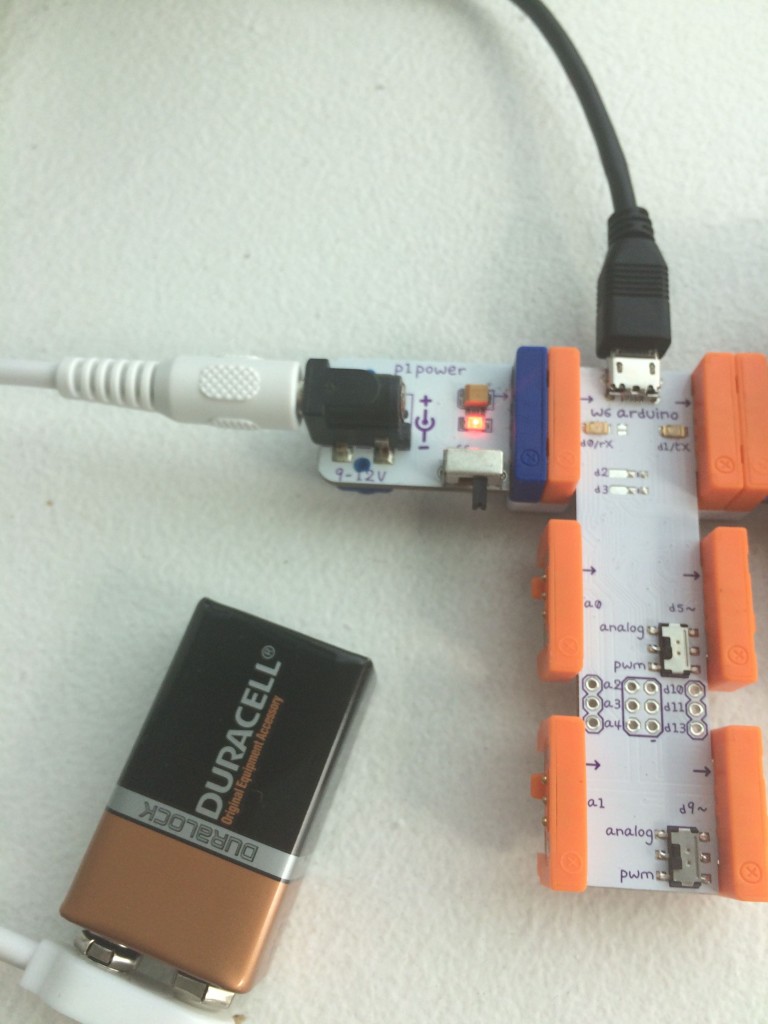
To get started on our name tag hack we’ll need to connect the littleBits Arduino module to our computer. If you are assembling the hardware yourself check out our intro post for instructions. Plug the Arduino module into your computer via USB and connect the battery power module to the Arduino. Flip the power switch to “on” and a red light will appear indicating the power is flowing to the Arduino:
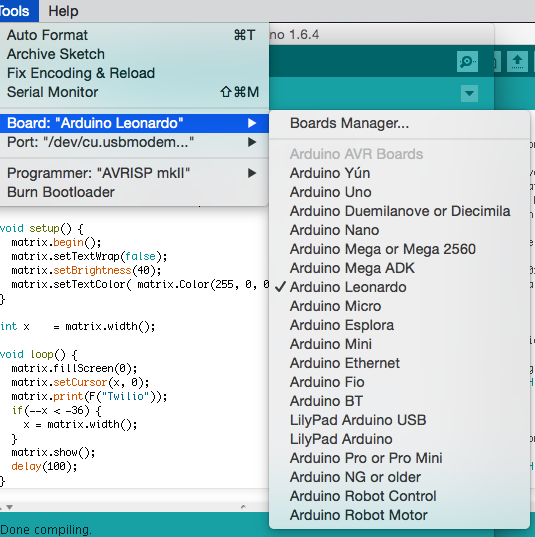
Next, open up the Arduino IDE. Before we can do anything we need to specify which board we are using and which port it is connected to. Our littleBits Arduino module is based on the Arduino Leonardo so select Tools -> Board and pick Arduino Leonardo:
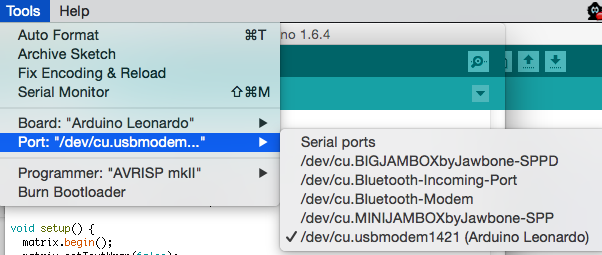
Now go to Tools -> Serial Port and select the port that is identified as an Arduino Leonardo board:
The next step is to install the Adafruit libraries that will help us program the LEDs. Click the following links to download each library:
Unzip each library, remove the “-master” from the name of the folder and move them to the Arduino libraries folder. Restart the Arduino IDE to load the libraries.
Jacking Into The Matrix
Now that we have the Adafruit libraries installed we can create a new sketch using File->New and import the libraries at the top of the file:
Next we define the pin that our NeoPixel panel is plugged into:
Next we’ll initialize our 8×8 matrix using the NeoMatrix library according to the documentation:
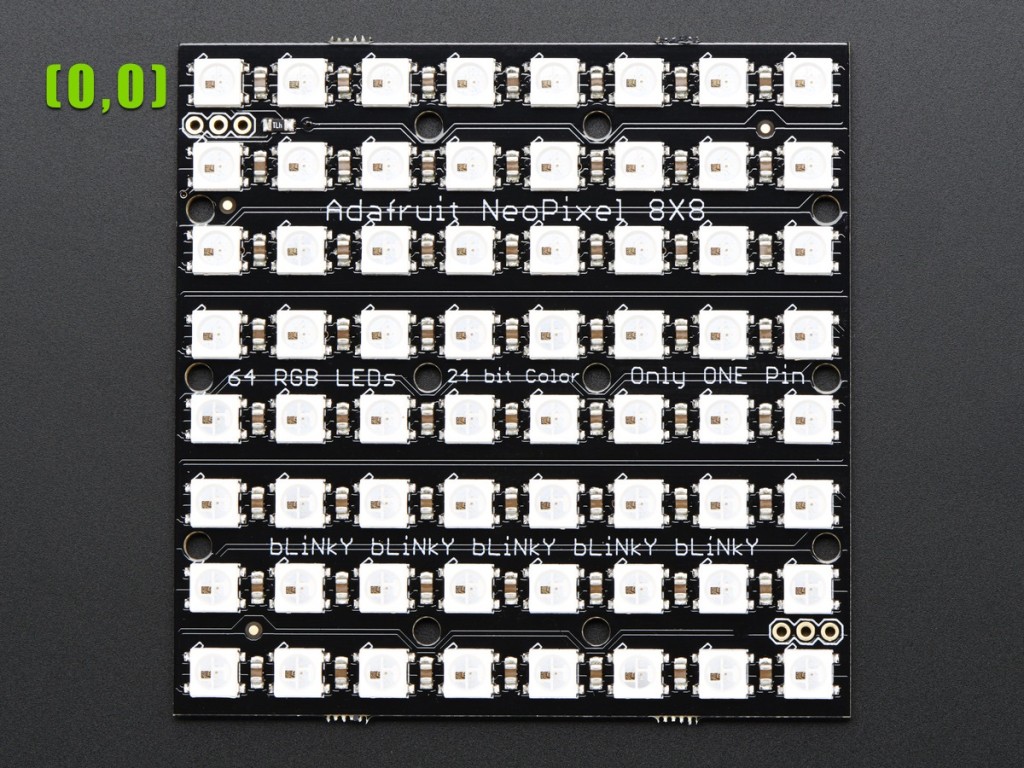
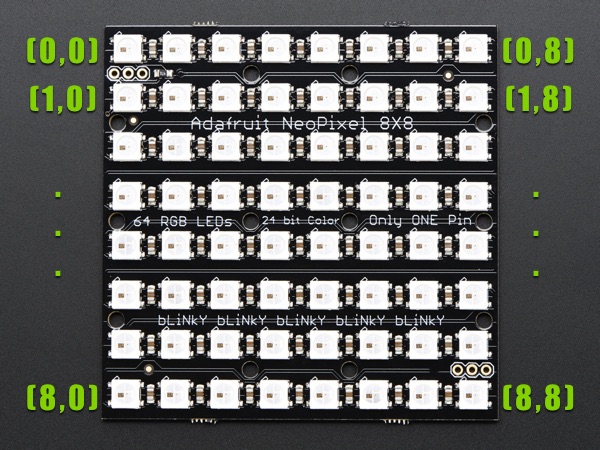
The first two arguments represent the width and height of the matrix and the third is the pin we defined above. The fourth argument is very important. It defines where the first pixel in the matrix is located and whether the matrix is arranged in rows or columns. As wired, the first physical pixel in the matrix (0,0) is the pixel at the top left of the panel when the panel is viewed such that the words on the front can be read.
But because you can physically orient the Adafruit display any way you want, when we initialize it we need to tell it which pixel we want to set as the logical first pixel. We do that by adding NEO_MATRIX_TOP to NEO_MATRIX_LEFT.
The next method parameter indicates that we want the matrix to be arranged in horizontal lines (or rows) and that each row proceeds in the same direction which is called progressive.
The final method parameter specifies the type of LEDs that are used in the matrix. Our Adafruit NeoMatrix uses LEDs wired for GRB data order with an 800 KHz datastream.
The following image shows how our matrix is set up after initializing it:
When our application starts up on the Arduino we will initialize the matrix and configure its pixel brightness, text color and text wrapping options:
The matrix is now set up and ready for us to build our name tag. Before we can do that we need to go over the basic building blocks we’ll use for the hack.
Building Blocks for NeoMatrix Programming
In order to build our name tag application we first look at which Adafruit_NeoMatrix library API’s we’ll use to control the pixels in our matrix and how adding a few abstractions over those API’s can simplify the code in our app.
The most basic operation we can perform on the matrix using the Adafruit_NeoMatrix library is setting the color of an individual pixel. To do this we call matrix.drawPixel(x, y, Adafruit_NeoMatrix::Color) passing in the x and y coordinates of the pixel as well as an Adafruit_NeoMatrix::Color value. Adafruit_NeoMatrix::Color is a wrapper around a uint16_t value that is created as follows:
Unfortunately, once created, it’s not very easy to get the RGB values back out of an Adafruit_NeoMatrix::Color, which, as you’ll see later in the post, we’ll want to do that in order to perform actions like color fades. To solve that problem we’ll make a struct for RGB values. This will make code we write later more manageable since we will have a way to pass RGB values as a single unit and be able to both set and get the individual RGB values on it.
To add the struct click on the triangle at the end of the tab row in the Arduino IDE and select New Tab. When prompted, name the file RGB.h and add this code to it:
At the top of your sketch we’ll include the RGB.h file:
Now to test our struct we can set the top-left LED to red using this code:
The call to matrix.show() is very important. Any changes you make by calling drawPixel(x, y, c) or other functions that manipulate pixels are only made in RAM. We need to flush these changes out to the LEDs by calling matrix.show().
Now that it’s a bit easier to manage a color we can loop through each pixel sequentially and set it to a color creating what is known as a color wipe. Let’s define a reusable function that performs a color wipe in our sketch:
To test it out, add the following code to loop():
Changing the color of pixels one at a time is fun, but what if we want to change them all at the same time? The Adafruit_NeoMatrix library allows us to fill the entire matrix with a particular color or to turn all of the pixels off using the fillScreen(c) method:
For a little more flair what if we want to crossfade between two colors? This is not something that is built into the Adafruit libraries but it is possible with a little bit of math. What we need to do is, given values for a starting RGB color and ending RGB color, break up the transition between each into equal steps. The more steps we take to get from the starting RGB value to the ending RGB value the smoother the fade will be.
For example if we we wanted to fade the red value of an RGB color, the basic math is as follows:
new red value = starting red value + ((difference between ending red value and starting red value) * current step) / total steps
Changing all three color values within a loop and then calling the drawPixel method lets us create a reusable function that crossfades the color of an individual LED:
If we replace the drawPixel call with a fillScreen we can crossfade the entire screen between two colors:
Using the fadePixel function we created above you can use the following code to draw a Twilio logo that fades in pixel by pixel:
One final thing the Adafruit_NeoMatrix library helps us with is scrolling text. A call to matrix.print will generate a pixel representation of the string passed to it. Manipulating what part of the string is being displayed on the matrix is accomplished by calling matrix.setCursor. By moving the cursor and redrawing the string over the course of a loop we can scroll text on the matrix.
Using those two methods it’s easy to create a function that scrolls text, for example my Twitter handle, from left to right across the panel:
These building blocks are all we need to create our name tag so let’s put the hack together.
Piecing It Together
We’ll start our name tag app by adding inside of the Arduino loop() function so make sure to remove any test code you may have added earlier. First we’ll fade in from off to a full white screen followed by a one second delay:
Next we’ll perform a color wipe to set all of the LEDs to red sequentially followed by another one second delay:
With our matrix set to red we’ll now draw the Twilio logo and wait two seconds this time for dramatic effect:
Now we’ll fill the screen back to red and scroll our Twitter handle a few times:
Finally, for a flashy finish we’ll crossfade from white to red and then immediately from white to off:
Here’s what the final product looks like:
Show Me Your Hackpack
Amazing! We just built a looping name tag for our hackpack. If you followed along and built your own hackpack name tag, I want to see it! Send me an email or a tweet with pictures or videos of your scrolling Twitter handle or other hackpack hacks and I’ll share them with the Twilio community. Or better yet, come hang out with me at Signal and I’ll help you build your own Hackpack hack whether its this simple name tag, a more complex sprite animation or even responding to incoming text messages to your Twilio phone number.


Related Resources
Twilio Docs
From APIs to SDKs to sample apps
API reference documentation, SDKs, helper libraries, quickstarts, and tutorials for your language and platform.
Resource Center
The latest ebooks, industry reports, and webinars
Learn from customer engagement experts to improve your own communication.
Ahoy
Twilio's developer community hub
Best practices, code samples, and inspiration to build communications and digital engagement experiences.