Live Stream your Screen with Twilio Live
Time to read: 20 minutes
October 20, 2021
Written by
Reviewed by

The new Twilio Live is finally here, so there is no better way to celebrate than building a nice little project with it. In this tutorial I’m going to show you how to create a serverless livestreaming solution that allows you to share your computer screen and microphone audio with an audience.
This project will allow you to broadcast your live coding or gaming sessions, without installing any software locally, unlike most other streaming platforms. Twilio Live is so lightweight that it can even run on low end computers such as Chromebooks!
Requirements
To work on this tutorial you will need the following items:
- A Twilio account. If you are new to Twilio click here to create a free account now and receive $10 credit when you upgrade to a paid account. You can review the features and limitations of a free Twilio account.
- A Node.js version that is compatible with Twilio Functions. Currently (October 2021), version 12.x is used. You can download a Node.js installer from the Node.js website.
- The Twilio CLI. You can find installation instructions on the Twilio CLI Quickstart page of the documentation.
- The Twilio Serverless Toolkit. This installs as a plugin to the Twilio CLI. Find installation instructions in the documentation.
Project overview
Live is the newest addition to the Twilio family of communication services. Combined with the Video product, it offers a powerful way to create livestreaming experiences.
Below you can see a high-level diagram of the project you are going to build in this tutorial:
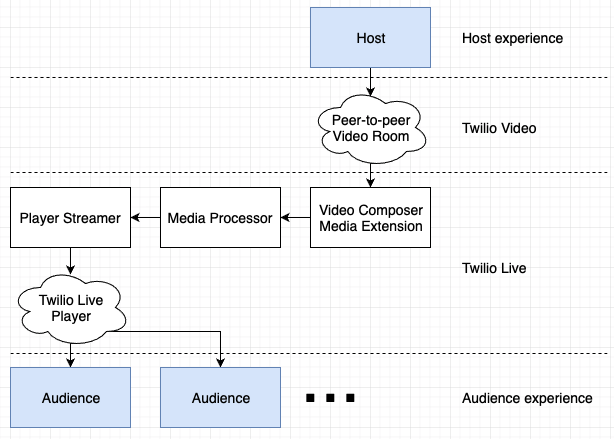
Starting from the top, the host application is used by the person running the livestreaming session. Using the Twilio Video APIs, this application pushes the screen and audio tracks to a video room.
In this project, the Node.js version of the Twilio helper library will be used to publish video to a WebRTC Go video room. The advantage of WebRTC Go video rooms is that Twilio offers these rooms for free, while the disadvantage is that only two participants can join with this room type, though this is sufficient for this project. Depending on the project requirements other room types might work better.
At this point, the host is broadcasting to a video room with no other participants, and here is where Twilio Live enters the picture.
The “Media Extension”, controlled by a “MediaProcessor” resource, joins the video room as the second participant. These two components work together to capture the media tracks published to the video room and generate a livestream from them.
The “Video Composer” media extension used in this project is designed to connect to a Twilio Video room and render a live stream with all the participants in a grid. Since in this project the host is the only participant in the room, their video will effectively be rendered full screen in the output livestream.
You may wonder why there are media processors and media extensions. The idea is that the MediaProcessor contains the common logic that deals with the livestream generation, while the media extension handles the rendering portion, which can be changed according to the needs of the application. Twilio Live includes a second media extension, the “Audio Mixer”, designed for podcasts or other types of audio-only live streams. In the near future, applications with very specific needs will be able to create their own custom media extensions.
The “PlayerStreamer” receives the livestream from the MediaProcessor and distributes it to the “Twilio Live Player SDK” instances, which run on each device that is connected to receive the stream. In this project you will use the JavaScript version of the Player, which will allow your audience to watch the live stream in a web browser. Player versions for iOS and Android are also available.
Going back to the diagram, you can see that there are only two components that need to be built, highlighted in blue: the host and audience applications. Everything else is provided by Twilio Live and Twilio Video!
Create the Live Streaming Service
The host and audience applications are going to be standard front end applications built with HTML and JavaScript that run in the web browser. Both applications need back end support functions, which in this tutorial will be implemented in Node.js. The back end functions are going to be extremely simple, so you will be able to translate them to your favorite back end language and web framework.
The main reason I have settled on Node.js is because this is the supported runtime for Twilio Functions, Twilio’s own serverless platform. By the end of this tutorial you will have the complete solution, including a Node.js back end and the host and audience HTML + JavaScript front ends deployed as a Functions “Service” that is accessible anywhere in the world.
Ready to begin? The very first step is to create the service, which is the top-level container inside which the front end and back ends for this project will be defined.
Open a terminal or command prompt window and set two environment variables with your Twilio Account SID and Auth Token values:
You can find the values of these two variables for your account in the Twilio Console.
The above export commands are for UNIX operating systems, so If you are following this tutorial on a Windows computer, they will not work. You can learn how to set environment variables in Windows using the Control Panel or directly within PowerShell or Command Prompt.
Make sure the Twilio CLI and the Serverless Toolkit are both installed (see the Requirements section above for installation instructions) and find a suitable parent directory for your project.
If you want to download the code for this project instead of typing it along, you can clone the live-screen-sharing GitHub repository. However, to gain a better understanding of Twilio Live I recommend that you work through the code step-by-step, in which case you can start by creating a new Service with the following command:
Inside the live-screen-sharing directory you will find two subdirectories called functions and assets. The HTML and JavaScript files that implement the host and audience front ends will be stored in *assets*, while the corresponding back ends will go in *functions*.
The package.json file is where the dependencies for the project are listed. Open this file in your editor and check the dependencies section, in particular the version number used by the twilio package:
If you see any version number lower than 3.70 for the twilio package, edit the version so that it reads "^3.70", save the file and then run npm install in your terminal to install this version.
Configure Twilio credentials
Some of the operations that are going to be needed in this project require the use of an API Key, while others require the same Account SID and Auth Token credentials used above. The application will also define a password to authenticate the host. In this section all these values will be configured into the service.
In the same terminal session you used above, enter the following command to add a new API key to your Twilio account:
The output of this command is going to look like the following:
The two important values are the sid and secret properties of the API Key, which you are going to save in the configuration of the project, which is a file called .env in your live-screen-sharing directory.
Open .env in your favorite text editor or IDE edit it so that it has the following contents:
Make sure you replace the XXXXX placeholders with all the correct values for the four variables and then save and close the file. The value that you set in the HOST_PASSWORD variable is up to you. The host will have to enter this password when starting a livestream.
Run the development web server
The project at this point is empty, but regardless, you can start a development web server on your computer and have it running while you continue with the tutorial. You will use this server as a convenience to quickly test each step, without having to deploy the code to Twilio servers. I recommend that you start the server now and leave it running in the background while you continue working on the rest of this tutorial. Use the following command to start the server:
When the server is up and running you should see the following output in your terminal:
The list of available functions and assets will automatically update as you start adding components in the following sections.
The Host experience
In this section you are going to create the application that the host will use to manage the live stream.
User interface
To begin, create a file named host.html in the assets subdirectory, and enter the following contents in it:
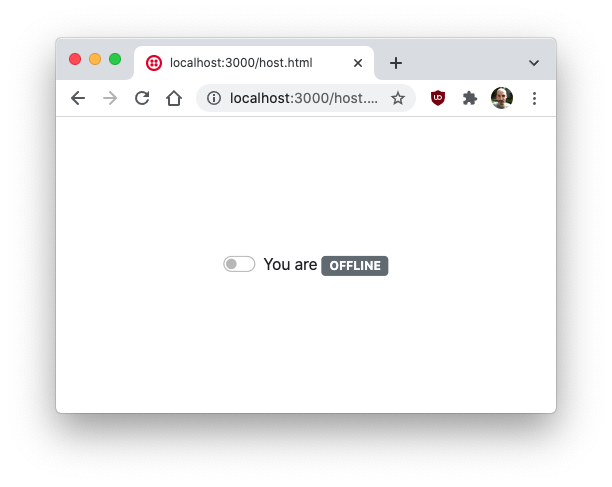
As soon as you save the file you should notice that the development web server updates to show that this asset is now available::
The HTML document you just created defines a simple user interface with an on/off switch in the middle of the page. To make it look nice I have used some components from the Bootstrap framework, which is included in the <head> section of the page. Note that the “off” position of the switch is visible, while the “on” position is hidden by a CSS directive. The JavaScript logic that you are about to add will toggle these two versions of the switch.
You can see how the page looks by opening the development URL assigned to the asset in your web browser. The URL should be http://localhost:3000/host.html.
At the bottom of the <body> element in this page, two JavaScript files are loaded. The first is the client for Twilio Video, which will be used to connect to the video room and push the screen and microphone media tracks to it. The second file is called host.js and has no path, which means that it comes from the same directory as the HTML file. This is where the logic for the host front end will be implemented.
Front end logic
Below you can see a first implementation of the host.js file that just adds the logic for the on/off switch. I included TODO comments showing parts of this application that will be added later. Enter the following code in a host.js file also located in the assets subdirectory:
This file creates three constants that reference the checkbox that represents the on/off switch and the “live” and “offline” messages that appear to its right. These constants are added at the top for convenience, so that these elements are easily accessible when needed anywhere in the file. The tracks and room global variables will be used later to hold state that is related to the video room. The password global variable will be used to remember a password entered by the host when starting the livestream.
The core of the application is going to be placed in the start() and stop() functions, which will manage the starting and stopping of the livestream. In this first version I have included just the logic that updates the on/off switch. The TODO comments should give you an idea of what is still to be added in each of the functions.
At the bottom of the file, a listener for the click event of the switch element is registered. This listener will be invoked every time the switch is toggled. The function calls whichever of the start() and stop() functions is appropriate according to the switch on/off state.
Refresh the page in your browser, and test that the switch is now operating correctly by clicking it a few times.
Pretty cool, right?
Now that you have an idea of how this front end application will work, let’s get to the details. Below you can see the complete implementation of the start() function. Take this code and copy it in place of the previous version of this function in the host.js file.
There is a lot going on in this function, so I’ll try to go over all these changes section by section. The comments in each part should also serve as reference.
At the start of the function a prompt() call is used to ask the user to enter a password. The reason for this is that once deployed, this application is going to be openly available on the Internet, so it is necessary to add some security measures to prevent unintended users from installing themselves as livestreaming hosts and consuming resources associated with your Twilio account.
In the next section a request is sent to the /host_token endpoint to get an access token. The request includes the password entered by the host in the prompt above. The endpoint will validate the password and generate an Access Token for the host to be able to connect to the video room and start sending media to it. Access tokens are an important security feature of the Twilio Video service. If you are interested in learning more about their use in video rooms, consult the documentation.
The next two sections create the video and audio tracks. The video track is created in two steps: first a screen capture stream is obtained using the browser’s getDisplayMedia() function, then this stream is wrapped in a LocalVideoTrack object using the Twilio Video JavaScript library that was included in the host.html page. Creating the audio track is easier, as the library provides a createLocalAudioTrack() helper function.
Later when you test this code you will see that when these tracks are created, the web browser will ask the user to select a screen, a window, or browser tab to share, and will also request permission to access the microphone to record audio.
As a side note, a variation that you may be interested in exploring is to replace the screen sharing video track with video from your webcam. To do this, you can replace the section of the function above under the “get the video track” comment with the following:
The following step is to connect to the video room. For this to work, the Access Token returned earlier must be provided. The return value of the connect() call is a Room object that represents the video room. Both the room and the tracks are saved in global variables of the same names so that they are available later when it is time to disconnect and end the livestream.
The host is now sending the screen and audio tracks to the video room, so in the last step another endpoint on the /stream_start URL is invoked to tell Twilio Live that the room is ready to go and the livestream can start, sending again the password to make sure none other than the host has access. As a result of this endpoint, Live will connect to the video room as the second participant to have access to the video and audio tracks from the host.
The stop() function is not as complex, luckily. Replace the first version of this function with the following code:
The purpose of this function is to undo all the work that was done by start(). First a /stream_stop endpoint is called to stop the livestream. This is the third and last back end endpoint needed by the host application, and is also protected by the password. After the stream is stopped the video room is disconnected and the video and audio tracks are stopped.
Access token generation
The front end for the host is now complete, but you’ve seen that it relies on three back end endpoints to do its work. The code below implements the first of them, which is accessible through the /host_token URL. In Twilio Functions, an endpoint is implemented as a JavaScript file, with the name that you want to be used in the URL. So for this endpoint, add the following code in a file named host_token.js in the functions subdirectory:
Twilio serverless functions are regular JavaScript functions that receive three arguments:
contextprovides access to a Twilio client object that can be used to make API calls, and also exposes the environment variables that were defined in the .env file.eventincludes the data that the client sent when it invoked the function.callbackis used by the function to provide a response back to the caller. All three arguments are used in this endpoint, as you will see below.
The first line in this function creates a unique video room name. The name is built with the livestream- prefix followed by a random string of characters.
In the next section, the event.password variable (which contains the password argument sent by the client in the body of the request) is checked. The password check logic for this application is not sophisticated at all, it just compares the password provided by the client against the HOST_PASSWORD variable set in the configuration.
If the password provided by the client is incorrect, then a response with a status code of 401 is returned, by invoking the callback function with the corresponding response object as a second argument. If you are wondering what the first argument in the callback function is used for, it is to report an error. When the error argument is not null, the client receives a 500 response.
After the password has been verified the function can proceed. The following section of code uses the Twilio client library instance (accessed as context.getTwilioClient()) to create a new video room with the name generated at the start of the function. The getTwilioClient() function only works when the credentials for your Twilio account are configured in the .env file, so review the “Configure Twilio credentials” section above if you haven’t created this file yet.
The video room is now ready to be used, so the final step is to create an Access Token and return it to the host to be able to connect to the room and start streaming video and audio content. Access tokens are created with the AccessToken class provided by the Twilio JavaScript library. The token contains the name of the recipient in the identity argument (you should replace my name with yours) and a video grant, which is the permission to access the designated video room.
The response from this function contains the generated Access Token, and the name of the video room. To understand how this response is used, you can go back to the host.js file in the assets directory to see how data.token is used to initiate the connection to the video room, and right after, data.room is sent as an argument to the /stream_start endpoint, which you’ll be writing in the next section.
Start the live stream
When the host front end is connected to the video room and sharing the screen and audio tracks, it invokes the /stream_start endpoint, passing the room name (which was returned by the /host_token endpoint). Using the diagram in the “Project overview” section as reference, this endpoint is going to create the Media Extension, MediaProcessor and PlayerStreamer components of Twilio Live.
The implementation of this endpoint is shown below. Copy this code to a file named stream_start.js in the functions subdirectory.
The function first creates a PlayerStreamer resource. You can review the options that can be passed when creating PlayerStreamers in the documentation, but for this tutorial the defaults are sufficient. The new resource is initialized with a CREATED status, which will automatically change to STARTED as soon as it is connected to a MediaProcessor.
The MediaProcessor resource is created next. The Extension parameter specifies which media extension to instantiate. Consult the documentation to learn about the available media extensions and their versions. The ExtensionContext parameter includes configuration options for the chosen media extension.
The Video Composer extension is given the video room name, which was passed by the client in the body of the request and is available to the function as event.room, an identity name to use when joining the video room (I used twilio-live), one or more connected PlayerStreamer resources given by their sid attribute, and the stream resolution in pixels.
Once the MediaProcessor resource is created, the Media Extension will join the video room as the second participant, and start livestreaming the video and audio tracks from the host to the PlayerStreamer.
Stop the live stream
Before you move to the audience application, let’s complete the host side by implementing the third endpoint, intended to stop the livestream.
Copy the code below to a file named stream_stop.js in the functions subdirectory of the project.
This function first sends a request to the MediaProcessor endpoint of the Twilio Live API, requesting a list of resources that are in the STARTED state, but limiting the response to one element. This project assumes that at most there is one active live steam, so for that reason it takes the first result. For an application that manages multiple streams concurrently, more sophisticated logic to locate the proper stream to stop should be used, such as having the client send the MediaProcessor sid as an argument.
As described earlier, the MediaProcessor resource has a link to the PlayerStreamer resource, so now the function has access to the two resources and can terminate them both by setting their status properties to ENDED.
At this point the live stream is fully working, but you do not have the audience portion built yet, so there is no way to connect to it yet to watch. Regardless, you can test the complete host application to ensure that everything is working properly. Start by navigating to http://localhost:3000/host.html and clicking the switch to go live. You will have to enter the password, which is twilio if you did not change it in the code above.
Next you will have to configure the screen sharing, which can be for a complete screen, a single window, or a browser tab. When the video room and the live stream are running, the switch will change to show that you are live. Clicking the switch again should turn the live stream off.
Make sure to stop your livestream when you are done testing. MediaProcessor and PlayerStreamer resources generate charges while they are running, so you should always make sure they are stopped when not in use. At the end of the tutorial I will show you how to do an account wide check to detect any rogue resources that may not have been properly stopped.
The Audience experience
You are now ready to move to the second application, which will be used by audience members to connect and watch the livestream. This is a much shorter application, rest assured that the end is in sight!
Add the Twilio Player files
The live stream playback relies on the JavaScript Player SDK, which needs to be installed as static files that the front end can download. The library is composed of a twilio-live-player.js file and two auxiliary files with Web Assembly (wasm) code. Download the three files from the links below, and copy them to the assets subdirectory of the project:
- twilio-live-player.min.js
- twilio-live-player-wasmworker-1-5-0-beta.min.js
- twilio-live-player-wasmworker-1-5-0-beta.min.wasm
User interface
The web page for the audience only contains a <div> element under which the steam video object will be inserted. Copy the following HTML page as index.html to the assets subdirectory.
The only dependencies imported in this page are the Twilio Live Player SDK, and the index.js file, which is where the front end logic will be implemented.
Front end logic
Below is the complete code for the index.js file, which is imported by the HTML page of the audience application. Add it to the assets directory.
The playerDiv constant is saved at the start for convenience, because it will be needed later to insert the live stream in the page.
The logic to connect to and display the live stream is included in the playStream() function, which is automatically invoked at the bottom of the file.
The function sends a request to a /stream_play endpoint in the back end, which is expected to return an Access Token for the client to join the livestream. If a token is not returned in the response, then it is assumed that the host is not currently streaming, so a message to that effect is displayed in the <div> element.
If a token was returned, then the Player library’s connect() function is invoked to join the stream. The playerWasmAssetsPath option provides the location of the wasm auxiliary files. In this application they are in the same directory as the player JavaScript file, so an empty string is used.
The connect() function returns a Player object that the client can use to control the live stream. The play() method starts the livestream, and the videoElement attribute contains a <video> element that needs to be attached to the page. This element is added as a child of the playerDiv element.
There is a browser policy that makes autoplay videos start muted, and I’m sure as a web browser user you appreciate this policy. Unfortunately, that means that the user will have to explicitly enable the audio. The click handler on the playerDiv element does that, so the user just needs to click anywhere on the video and the audio will begin playing. The click handler is implemented as a toggle, so a second click will mute the audio again.
The Player object notifies the application when there is a state change. I have added a check for when the player changes to the ended state, which means that the live stream has been stopped from the host’s side. This is the opportunity to cleanup the page by removing the video element and informing the user that the livestream concluded.
Access token generation
Similar to the host side, audience members need an Access Token to connect to the livestream. This is the only support endpoint needed in the audience application.
Copy the following code to a new file named audience_token.js in the functions subdirectory.
The function begins by querying the Twilio Live API for PlayerStreamer resources that are in the STARTED state. As before, the assumption is going to be that there is one at the most, so the first result is taken directly.
If no running PlayerStreamer is found, then a response with an empty token is returned. This will cause the front end to display a message to the user indicating that there is no active live stream to connect to.
Back when you added the Access Token endpoint for the host, a VideoGrant was created. The grant that is needed for audience members is a PlaybackGrant, but these grants are trickier to generate, as they are obtained by sending a request to the Twilio Live API.
The PlayerStreamer resource has a playbackGrant sub-resource that is used to request this type of grant. The ttl argument specifies the validity time for the grant, with a maximum of 60 seconds. For streams with a large number of viewers it makes sense to request a grant that lasts longer, and reuse it for multiple clients during its validity period. This eliminates the risk of reaching the rate limit imposed by the Twilio API. The documentation describes how to generate playback grants at scale.
After the grant is obtained, an AccessToken object is created. Since in this project audience members do not need to log in, a randomly generated string is configured as each user’s identity. The playback grant is added to the token, and finally a response with the generated token is returned to the client to use in connecting to the stream.
End-to-end testing
The project is now complete, and can be tested while still running on your computer!
Make sure the development server is running, and from a web browser connect to the host application at http://localhost:3000/host.html. Click the switch to start the livestream, enter the host password, and select something from your desktop to share. Wait until the switch indicates that you are livestreaming.
Open a second browser window or tab, and connect to the audience application at http://localhost:3000/index.html. Wait a few seconds and you should see the contents of the screen or window that you shared. As explained earlier, due to the autoplay limitations the stream will likely start muted. Click anywhere in the video to unmute. To test audio it is best if you have headphones plugged into your computer, to avoid audio feedback.
Deployment
Ready to deploy the project to the cloud and start livestreaming for real? Stop the development web server and run the following command to deploy the project to Twilio Functions:
After a few seconds, the output of this command will tell you what the public URLs are for all your assets and functions. Use the URL assigned to the host.html asset to start a livestream as a host. Then give the index.html URL to your friends so that they can attend your live stream!
Use shorter URLs
Unfortunately the Twilio Functions service does not support using shorter URLs, or URLs based on a custom domain of your own. But you can use any URL shortener service, or if you prefer something more polished a Cloudflare Worker to wrap the long URLs with ones that are easier to share or remember.
Avoid unexpected charges
Twilio Live resources generate charges to your account for as long as they are in the STARTED state. It is very important, especially when you are learning how to work with Twilio Live, that you remember to stop all the livestreams that you start.
To make sure that you don’t leave any lingering resources running, you can run a few curl requests to list and terminate Twilio resources.
The first one lists any MediaProcessor resources that are still running in your account:
The above command relies on the Twilio credentials you set at the start of the tutorial. If you are doing this on Microsoft Windows, then the syntax is a bit different:
The response is going to be a JSON payload. If you don’t have any running resources, you should see the following output:
If you have the jq utility installed, you can get a much nicer formatting if you pipe the output of curl to jq. Then the response will look like this:
The important part here is the media_processors item, which is an empty list. If you see anything listed under this attribute, then you have resources that are running. Find the sid value of each running MediaProcessor (a string that starts with the letters ZX), and then for each, send a request to set the status to ENDED as follows:
In this command you have to replace $SID with the sid attribute of the MediaProcessor you want to end. Also remember to change the environment variable substitution style if you are doing this on Windows.
Once you ended all your MediaProcessor resources, you can check your PlayerStreamers:
If the player_streamers attribute in the response is not an empty list, then you have some more running resources. PlayerStreamer SIDs start with the letters VJ. Find all the running resources and end each of them as follows:
Next steps
I hope you had as much fun as I did working on this project. Twilio Live is fairly new at the time I’m writing this, so be sure to check the documentation to learn how to make the most out of this cool service. Also check out these other Twilio Live resources:
- Video livestreaming example on GitHub
- Audio livestreaming example on GitHub
- Another Twilio Live Tutorial using Express.js instead of Twilio Functions
I can’t wait to see what you stream with Twilio Live!
Miguel Grinberg is a Principal Software Engineer for Technical Content at Twilio. Reach out to him at mgrinberg [at] twilio [dot] com if you have a cool project you’d like to share on this blog!


Related Resources
Twilio Docs
From APIs to SDKs to sample apps
API reference documentation, SDKs, helper libraries, quickstarts, and tutorials for your language and platform.
Resource Center
The latest ebooks, industry reports, and webinars
Learn from customer engagement experts to improve your own communication.
Ahoy
Twilio's developer community hub
Best practices, code samples, and inspiration to build communications and digital engagement experiences.