Manage the Recordings of Your Video Calls with the Twilio Compositions API Using Node.js, Express, and TypeScript
Time to read: 10 minutes
May 28, 2021
Written by
Reviewed by

Have you ever been in a video meeting that was being recorded? It's great to be able to catch up on a meeting you may have missed or to refer back to a great conversation you had via video chat. Recording a video call can also be a great way to make your content and conversations more accessible in general by providing participants with a way to play back the conversation at their own pace.
With Twilio Programmable Video, you can enable recording for your video rooms. When recording is enabled, each participant's audio and video are recorded in separate tracks. You can use the Compositions API to combine these tracks into a single playable video that will be compatible with most common media players.
In this tutorial, you will learn how to build a quick application for creating, viewing, and downloading your video compositions using the Compositions API, Node.js, Express, and TypeScript. Let's get started!
Prerequisites
- A free Twilio account. (If you register here, you'll receive $10 in Twilio credit when you upgrade to a paid account!)
- Node.js (version 14.16.1 or higher) and npm installed on your machine.
- ngrok
Set up your environment
To get started, open up a terminal window and navigate to the place where you would like to set up your project. Then, create a new directory called try-compositions where your project will live, and change into that directory using the following commands:
Next, set up a new Node.js project with a default package.json file by running the following command:
Once you have your package.json file, you're ready to install the needed dependencies. Run the following commands in your terminal to install the needed packages from npm:
If you check your package.json file now, you'll notice that all of the packages above have been installed as either dependencies or devDependencies.
Next, create a new file named .env at the root of your project and open it in your code editor. The .env file is where you will keep your Twilio account credentials. Open the .env file in your text editor and add the following variables:
You’ll need to replace the placeholder text above with your actual Twilio credentials, which can be found in the Twilio Console. Log in to the Twilio Console and find your Account SID.
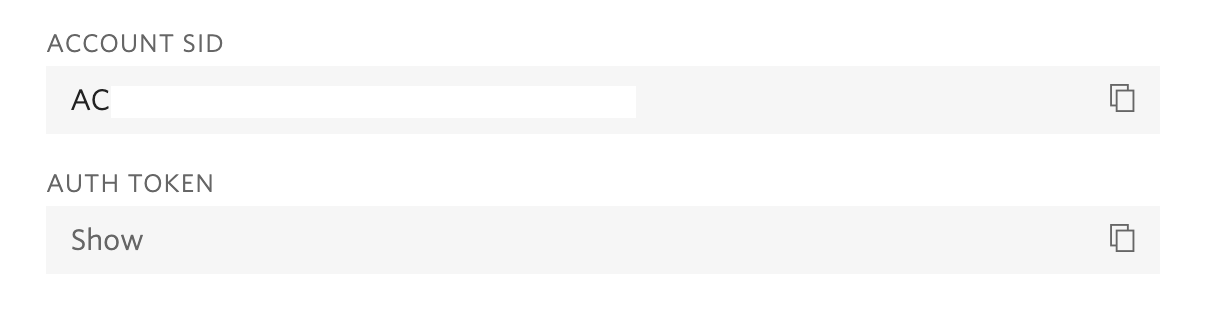
Copy and paste the value for Account SID to replace the placeholder text for TWILIO_ACCOUNT_SID.
Then, navigate to the API Keys section of the console and generate a new API Key. Copy the API Key's values for SID and Secret to replace the placeholder text for TWILIO_API_KEY_SID and TWILIO_API_KEY_SECRET.
It’s important to keep these credentials safe, so create a .gitignore file at the root of your project. Then open .gitignore in your code editor and add the .env file. While you're in here, add the node_modules directory as well:
Next, since you'll be using TypeScript for this project, create a tsconfig.json file by running the following command:
Then, replace the code in your new tsconfig.json file with the following code, since you'll only need a few of the settings for this project:
Now that you are set up, it's time to create your Express server.
Create an Express server
Create a new file called index.ts at the root of your project. This is the place where you will start to write your server-side code. Open up index.ts in your code editor and add the following imports to your code:
Then, set up some configuration for your Express server by adding the following code just below the list of imports:
This code will set your Express server to run on port 5000, as well as set up the middleware you will need for this project. You are also setting the view engine to pug, which will allow you to display your video composition data using Pug templates. (To learn more about Pug, check out its documentation here.)
Next, initialize the Twilio client and create an interface for the structure of your data by adding the following code just below where you've set up your middleware:
Each VideoRoom you display in your application will have a unique identifier (sid) and unique name (name), a duration in seconds, and a list of compositions that have been created from that specific video room.
Just under the interface you added in the previous step, add the following lines of code to run your server and start up a Socket.IO connection:
Since creating a composition is not usually an instant process, you'll be using Socket.IO to send real-time status updates about your video composition to display in your Pug template.
Now, open the package.json file in your text editor and replace the code in scripts with the following start script:
Once you have done this, return to your terminal window and run the following command there to start the Express server:
Now that your Express server is running, you're ready to move on to the next step.
Set up an ngrok tunnel
In this project, you'll be using ngrok to connect the Express application running locally on your computer to a temporary public URL. To start a new ngrok tunnel, run the following command in a new terminal window:
Once ngrok is running, you will see text like the below in your terminal window:
Take note of the URLs next to Forwarding. Now, any requests that are made to these ngrok URLs will be forwarded to your Express server. This will be especially important later in the tutorial for when you want to receive status updates from Twilio about how your video composition is coming along.
Awesome! Now it's time to create a Pug template to display your video rooms and any compositions they might have.
Create a Pug template
Open a second terminal window and navigate to the root of your project. Create a directory called views by running the following command:
Then, change into the views directory and create two new files called index.pug and style.css.
Open views/index.pug in your code editor and add the following code to the file:
Here, you're setting up the HTML and adding Socket.IO to your client side from a CDN.
Next, add a body to your template. The body of your HTML will include two tables—one for displaying rooms that already have compositions, and one for displaying rooms with recordings available for you to compose. Add the following body code to index.pug, just below where you added the code for head:
Now that you have the beginnings of your template ready, it's time to add some more code to your server so that you can start viewing the data in your template.
Fetch video room data and update CSS styles
Return to index.ts in your code editor. Just below where you created the interface for VideoRoom, add the following function that will allow you to get a list of recent video rooms and filter them by whether they have associated recordings and/or compositions:
Now that you have a way to get the video room data you need from the Twilio APIs, add the following new route just below where you added the getRoomsAndCompositions function:
This route will allow you to display data about video rooms and their compositions in your index.pug template.
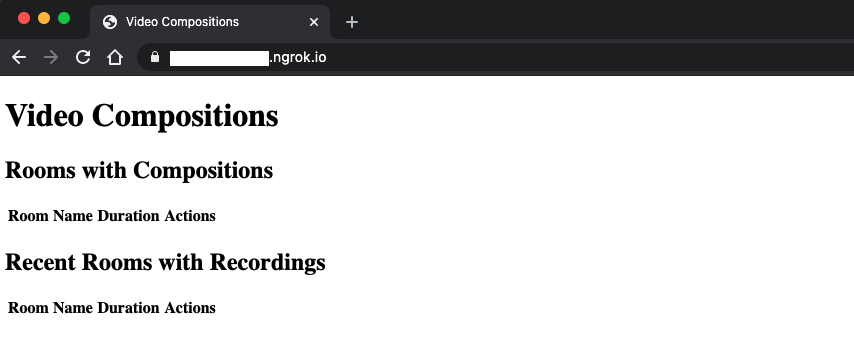
Do you remember the ngrok forwarding URLs from earlier? If you would like to see what your user interface looks like so far, try navigating to one of these forwarding URLs (https://<YOUR_VALUE_HERE>.ngrok.io/) in your browser. Depending on whether you have recently recorded any Twilio Video conversations lately, you may or may not already have data in your UI. If you have not created any recordings, you will see something like the image below in your browser window:
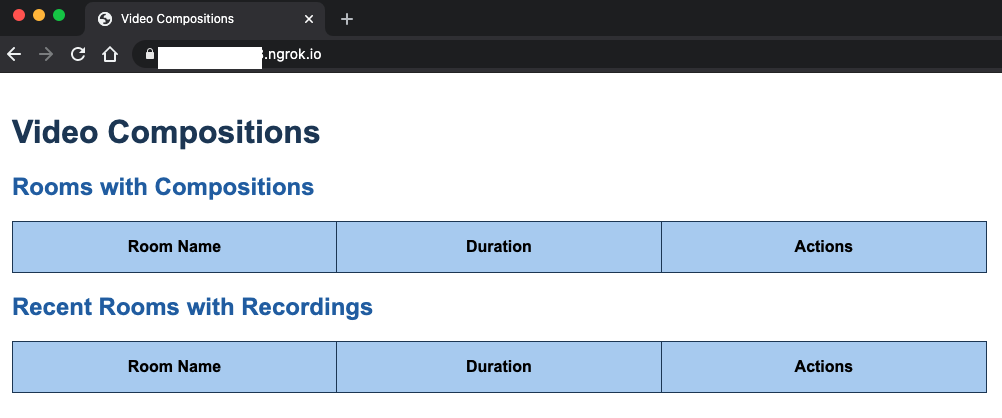
This looks pretty basic so far, so add a few CSS styles to make your template look more interesting. Open views/style.css in your text editor and paste in the following CSS code:
Now, if you refresh the page in your browser, it should look more like this:
Record a video
Now that you have a template ready and some logic in your server to handle it, try recording a video of yourself using the open-source Twilio Video application. (Alternatively, if you already have a different Twilio Video application built that has recording capabilities enabled, you can use that as well.)
To set up the video application, head to the twilio-video-app-react GitHub repository. Navigate to where you would like this code to live on your machine, then clone the repository by running the following command in your terminal:
Once you have the repository cloned, change into this application's root directory and run npm install to install dependencies:
Open up the code for the React app in a different code editor window. Inside this project, open the .env file and copy your environment variables for TWILIO_ACCOUNT_SID, TWILIO_API_KEY_SID, and TWILIO_API_KEY_SECRET from the try-compositions .env file into this file.
While you are in the twilio-video-app-react .env file, uncomment the line that will disable Twilio Conversations in this application, since you will not need Conversations for this project:
Then, in your terminal window, run the React application locally by running the command npm start.
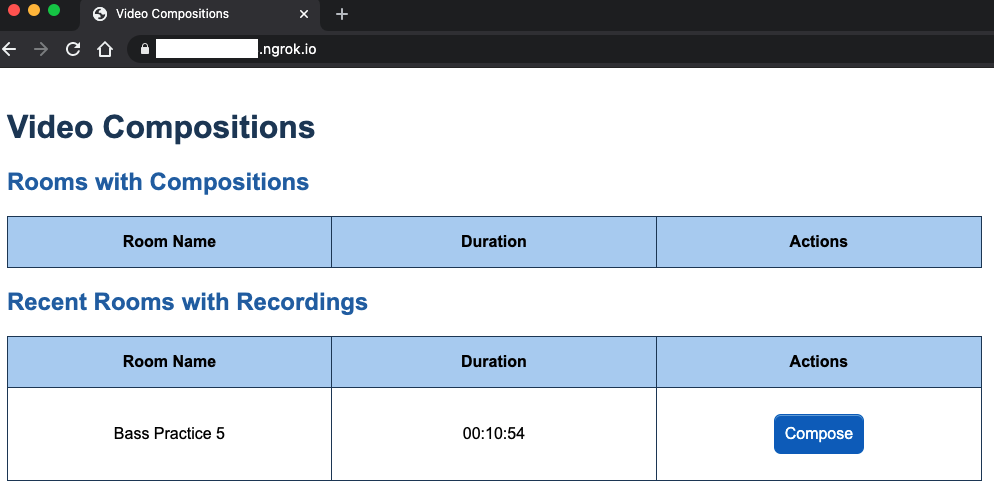
Navigate to http://localhost:3000/ in your browser and you will see that the Twilio React app has started up. Enter your name and a name for your video room. I've named my room "Bass Practice 5" because I'm envisioning recording a bass practice session in this video room, but you can name your room whatever you wish:

Click Continue to enter the lobby, and then click the Join Now button to start the video chat. If you would like, you can open http://localhost:3000/ in a second browser tab and create another version of yourself there.
Once you're in the video chat, create a new recording by clicking the More button and selecting Start Recording. This will begin recording your video. Once you have a short video of yourself, click Disconnect to end the call.
Now you have a video recording you can use to try out composition! You can see a list of all of your recordings in the Twilio Console Recordings log.
Create a video composition
Now that you have created a video recording, if you return to the browser tab that is pointing to your ngrok URL and refresh the page, you should see that the video chat you just finished is listed under Recent Rooms with Recordings. Cool, right?
In the table row containing your video room's name is the Compose button you created earlier. If you click this button, it will not work just yet. You need to add a route to your server to make this Compose button functional.
When the user clicks the Compose button, the video room's sid will be passed into the request to the Twilio Client to get the recordings associated with that room. Then, these recordings will be composed into a playable video file using the Compositions API.
When you send a request to compose a room, you also have the option to pass in a URL to receive StatusCallback events, which will provide you with updates as to how your composition is coming along.
There are also many different ways you can arrange the layout of your composition. For this project, you'll be displaying all of the participants' video tracks in a grid. To learn more about how to create other kinds of layouts, visit the Specifying Video Layouts section of the Composition API documentation to learn more.
To set up the compose route, add the following code to index.ts:
If you take a look at the code above, you'll also notice that once the request to create the composition is made, you use Socket.IO to emit an event to let the client side know that this event has taken place.
Just below the code you added for the compose route, add the following code to create the callback route which will receive the Status Callbacks related to your video composition:
Every time there is a new status update from the Twilio Client, your application will receive Status Callbacks to this callback endpoint. When you receive a status update, this status will be emitted to the client side as well so you can update the UI.
Now that you are emitting events about your video composition's status, it's time to add some JavaScript to your Pug template to handle changing the UI when these events are received.
Display status updates in the UI
Open views/index.pug in your text editor. Just below the code for your HTML body, add the following script:
With this code, when a user clicks on the Compose button or one of the other composition actions, it will begin that composition action by making an API call to your server. Then, as status updates come in via Socket.IO, your statusUpdate div will change its text to show a user-friendly message about the update. Most of these updates are based on the Composition Status Callbacks documentation, however we have added composition-request and composition-deleted to the code in this project because they are useful events to display updates about.
It's time to try out making a composition. Once you have the above code in your project, click the Compose button in the table row containing your video room's name. As the composition status updates come through, you can watch the UI change to display these updates.

Once the composition is ready, the page will reload and display the new composition in the Rooms with Compositions table:
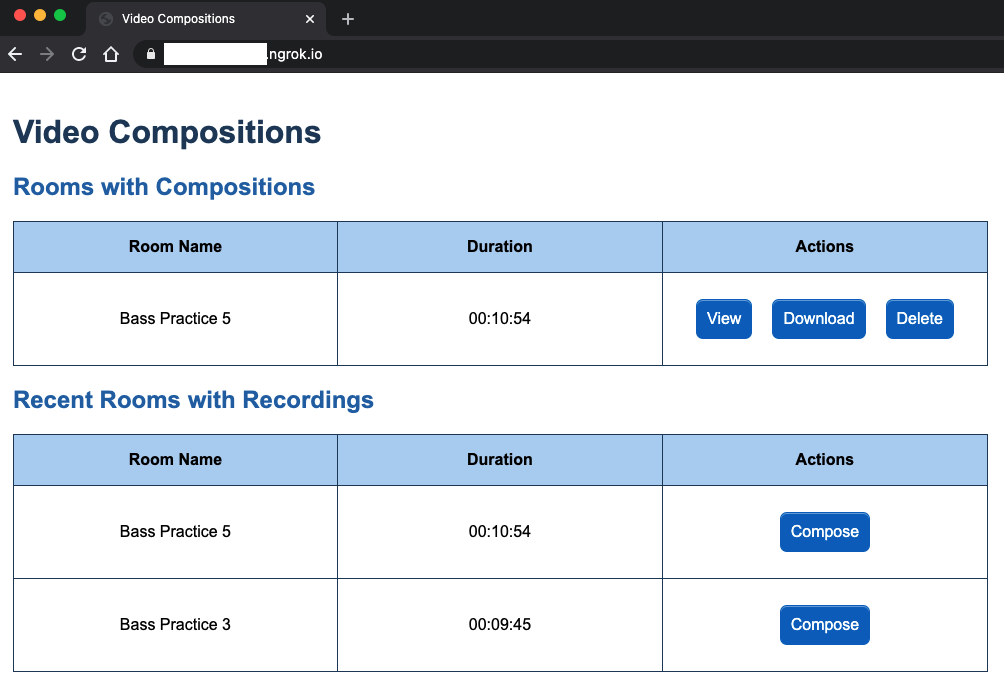
View, download, and delete a video composition
Now that you've created a composition, you probably want to check out the playback of your video call. It's time to add the functions that will allow you to view and download your video composition.
Head back to index.ts and add the following two functions to your file, just below your code for the callback route:
With these two functions, you will be able to get the composition you created by its sid and either view it in the browser window or download it to your machine.
While you're in this file, add the following delete route just below the two you just added above. This will allow you to delete the composition at the click of a button:
Once the composition has been deleted on the Twilio side, this function will emit an event to your client-side template via Socket.IO. Then, your JavaScript code there will update the UI to remove the row in the table that corresponds with the deleted composition.
Try viewing and downloading a video composition
Now it's time to try out viewing and downloading your video composition. Click on a View button, and you will see the video playback in your browser window:
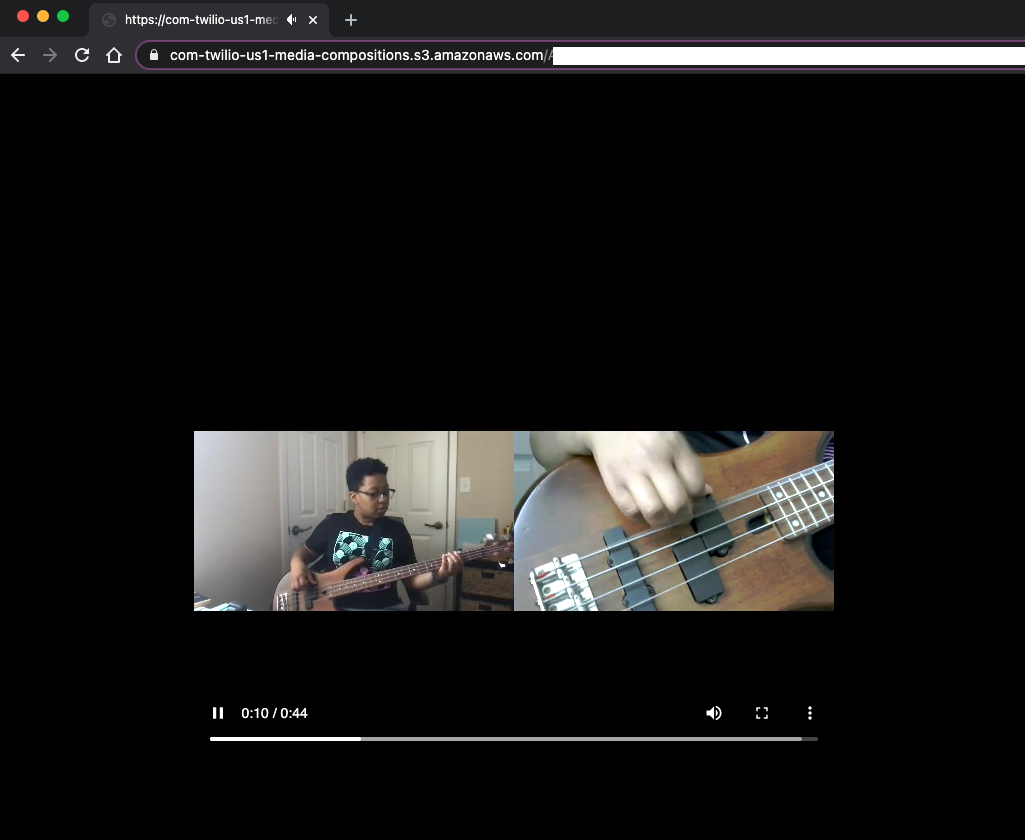
My video room was called Bass Practice 5, so of course I am playing bass in this video! 😄
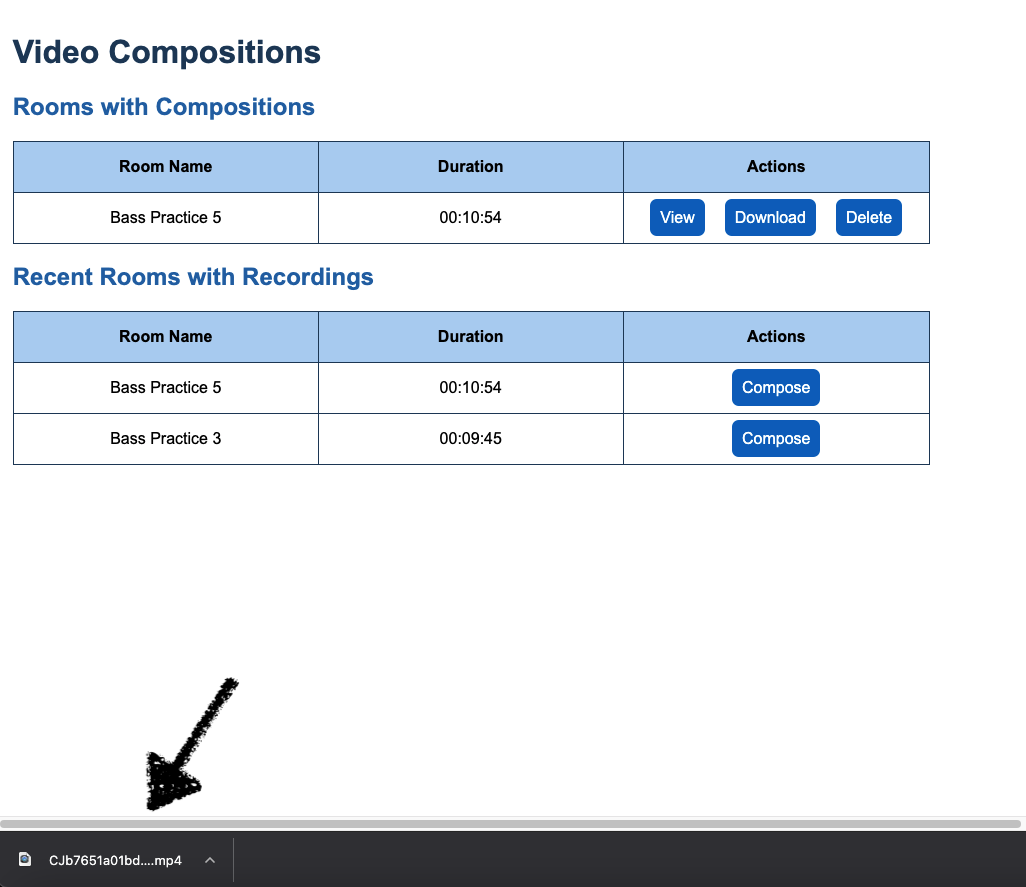
If you click the back button in your browser and return to your ngrok URL, you can try out the Download option as well. When you click download, your browser will prompt you to download the file and save it to your computer.
Finally, if you do not want the composition anymore, you can click the Delete button, and once it is deleted, the composition will disappear from your application.
What's next for video compositions?
You've just built a quick application that allows you to create, view, download, and delete video compositions. Very cool!
If you would like to see the code for this project in its entirety, check out the repository on GitHub here.
What would you like to do next? Perhaps you would like to send your video as an email attachment? Or maybe you're more interested in learning how to build your own video application with breakout rooms? I can't wait to see what you build!
Mia Adjei is a Software Developer on the Developer Voices team. They love to help developers build out new project ideas and discover aha moments. Mia can be reached at madjei [at] twilio.com.


Related Resources
Twilio Docs
From APIs to SDKs to sample apps
API reference documentation, SDKs, helper libraries, quickstarts, and tutorials for your language and platform.
Resource Center
The latest ebooks, industry reports, and webinars
Learn from customer engagement experts to improve your own communication.
Ahoy
Twilio's developer community hub
Best practices, code samples, and inspiration to build communications and digital engagement experiences.