Note Taking On the Go With Evernote and Twilio – Part One
Time to read: 7 minutes
February 11, 2015
Written by

A good note taking system is extremely valuable. There are numerous times in any given week in which there’s some piece of information I need to capture in a reliable place. The safe place for this type of information for me is Evernote. It is available on every device I use and it syncs effortlessly so I know my information will always be available. However, I have been in situations where my phone died during the evening and all of a sudden have no access to the system I use for capturing important data. Pondering this I wondered if there was some way I could leverage someone else’s working phone to still capture new info I might come across during the rest of the evening. An app is not a great solution in this case since it’s someone else’s phone. What would be perfect would be to allow someone to text or call my Twilio number and have that use that communication to send a note to Evernote. Using some Ruby code, the Evernote API and Twilio that’s exactly what we’ll build in this post.
What you will need
- A Twilio account — you can sign up for one here for free.
- An SMS-enabled Twilio phone number
- Ruby
- Twilio Ruby library
- Sinatra
- Evernote API and Developer Key
- Evernote Sandbox Account
- evernote_oauth RubyGem
Getting Started With the Evernote API
Before we build our note taking on the go system we need to take a look at the objects we will be working with in the Evernote API. Take a look at this data model graphic from the Evernote Developer docs:
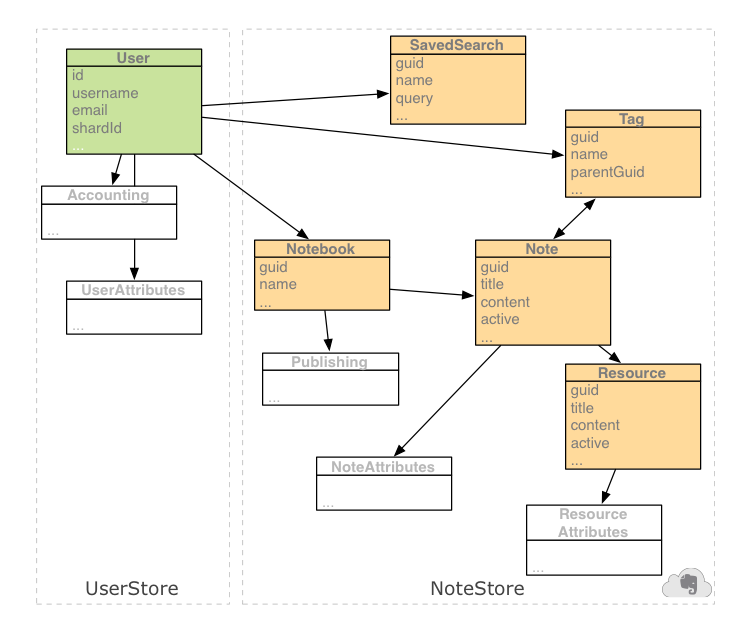
In our system we will be working with the Notebook, Note and Resource nodes inside of the NoteStore. Notebooks contain Notes which can contain one or more Resources. A Resource is similar to an attachment in an email and can represent things like images, audio or video. Notes must be contained in a Notebook so there will always be at least one Notebook in the NoteStore. If a Note is added without specifying a Notebook, the Note will be added to the default notebook in the user’s account. Details about the properties and methods available on each of these objects can be found in the Evernote API Reference.
To use the Evernote API to access an arbitrary user’s account typically would require implementing an OAuth workflow. Thankfully (because sometimes that can be a pain) we don’t need to do this to work with our own accounts. During development we’ll work inside of the Evernote Sandbox which is a separate server where we won’t cause any harm to our actual Evernote data. Start by creating a Sandbox account. We’ll be working inside of the Sandbox a lot so keep it open.
The next thing we need to create to work with the Evernote API is a developer token. We’ll use this in lieu of the auth token that would usually be obtained from the OAuth workflow. This will allow us to work with our own NoteStore objects without needing to authenticate. Any API call that takes a token can receive the developer token you create in this step. Once created there’s no way to retrieve it so make sure to put it in a safe place. The code we write later will retrieve it from an environment variable named EVERNOTE_DEV_TOKEN so that would be a great place to store it:
If you lose the dev token, you can recreate a new one later.
Now that we have an account to test with and a developer token we can begin to work with the Evernote API. Let’s start by creating a Gemfile for the gems we’ll be using in the project:
After creating this file, run bundle install to make sure you have all of the gems installed in your setup. Now that the gems are installed we are ready to create our application. Create a file called app.rb and open it in your favorite editor. To get started we’ll create some helper methods for objects we will be using frequently as well as requiring the gems and libraries we will need:
dev_token is the developer token we created earlier. client is an object we will use to get access to the objects in the Evernote API. note_store gives us access to our Evernote data and notebooks provides us a list of all of the notebooks in our account.
Next, we’re going to build a method that creates a new note in a notebook specific to our app. To do this we’re going to need to do several things: find or create the notebook and retrieve its notebook GUID, create the body of the note (which is specified in a markup language describe below), and then send the request off to Evernote. Let’s tackle each part of this process with an individual method. We’ll start with the method that finds or creates a notebook with a name passed in as a parameter:
This method checks to see if there’s a notebook in the NoteStore named notebook_name. If it exists, the GUID for the existing notebook is returned. If it does not exist, it is created and the GUID for the new notebook is returned. We’ll need this notebook GUID when we create the note.
Next, let’s create the body for the note. Evernote notes are created using a markup language called ENML which is a set of XML tags that define the parts of a note such as text and resources. Add the generate_note_body method:
First we add a fairly standard XML preamble and DOCTYPE to note_body. Then we create the containing the note_text passed in. If we have passed in a Resource (such as an image, sound or video file) to attach to the note we would add this to the note inline after the text (more on that in Part 2!).
The last component of our note making process is a method that we’ll use to create the new note on Evernote. Add the create_note method to app.rb:
Many things can go wrong in the creation of the note so we make sure to catch any exceptions that might occur. With all of the pieces in place we can finally write our make_note method:
This method will create a new note in your Evernote Sandbox account using the methods we have built so far. Let’s try it out to make sure it’s working before moving on. Fire up a terminal window and run the following from your project directory:
This will create a note titled “Test from irb” in the notebook “Twilio-Evernote” with the text “Testing out the make note method to see if it creates a note in the Sandbox.” Head over to the Evernote Sandbox and click on the Twilio-Evernote notebook and then on the note you just created. It should look like this:

With a working note creation mechanism we’re ready to take the next step: creating notes from text messages.
Adding Notes to Evernote With SMS
Before we can send text messages to our Evernote account as notes we need to set our app up to communicate with Twilio. When Twilio receives an incoming message at your phone number it will need to make an HTTP request to our app. If you want to test locally you will need to expose your localhost to the outside world. I recommend using ngrok for this. Once you have that up and running, configure the Messaging URL for your Twilio number in the numbers portal to point at your local server’s /message endpoint which we will write in a moment:

Next, let’s add the /message method to our Sinatra app:
When Twilio makes a POST request on an incoming text message we extract out the text of the message. Then we use the make_note method we created previously to create a new note in the Sandbox containing the body text from the SMS. Now we can add notes to Evernote without needing a smartphone app!
Next Steps
In this first part of a two part series we were introduced to the Evernote API. We then used what we learned to create a note using a text message. In the next post we’ll add a picture to our note using MMS and create voice memo notes using Twilio call recording and transcription. While you’re waiting for the next post to make its way to the blog, try a few of these things using what you’ve built in this post:
- Enable setting the title and notebook name in the SMS message.
- Retrieve notes from any notebook using an SMS workflow.
- Allow the user to send the note to an arbitrary notebook.
- Try this out on your actual account instead of the Sandbox.
I’m super stoked to see what you all create with Twilio so I’d love to hear about what you’re working on. Hit me up on Twitter @brentschooley or through email at brent@twilio.com to show me all the cool stuff you’re building. See you in Part 2.

Related Resources
Twilio Docs
From APIs to SDKs to sample apps
API reference documentation, SDKs, helper libraries, quickstarts, and tutorials for your language and platform.
Resource Center
The latest ebooks, industry reports, and webinars
Learn from customer engagement experts to improve your own communication.
Ahoy
Twilio's developer community hub
Best practices, code samples, and inspiration to build communications and digital engagement experiences.