How to Receive a Phone Call in Node.js with Twilio Functions
Time to read: 4 minutes
March 22, 2021
Written by

Twilio Voice is an easy and highly customizable service that allows you to automate your telephone workflows. In this tutorial you are going to learn how to create a Node.js application, powered by Twilio Functions, in order to receive phone calls on your Twilio number.
Prerequisites
To follow this tutorial you need the following items:
- A free Twilio account. If you are new to Twilio click here to create a free account now and receive $10 credit when you upgrade to a paid account.
- A Twilio phone number
- A phone that can make phone calls, to test the project
- The Twilio CLI
- The Twilio Serverless Toolkit plugin for the Twilio CLI
Project setup
In this section you are going to set up a new Twilio Functions service. Twilio Functions is a serverless environment that lets you deploy backend services without the overhead of setting up a server.
If you haven’t already, install the Twilio CLI using the follow command:
Next, install the Twilio Serverless Toolkit plugin for the Twilio CLI:
Run the following command to login to the Twilio CLI:
You’ll be prompted to enter your credentials, which can be found in the Twilio Console.
Now that you have the plugin installed and you’re logged in, you can initialize a new Functions service:
This command will create a new directory on your computer called phone-answer. Inside this new folder there will be a .env file pre-populated with your account credentials. Open this file and verify that everything looks correct.
Open the sub-folder phone-answer/functions and delete the contents inside, but not the folder itself.
Create a new file inside phone-answer/functions called receive-call.protected.js.
The protected extension on this filename indicates that this is a protected function, and it can only be accessed if the request has a valid Twilio signature.
Create a TwiML webhook
Twilio Voice uses the concept of webhooks to enable your application to perform custom actions as a result of external events such as receiving a phone call. A webhook is nothing more than an HTTP endpoint that Twilio invokes with information about the event. The response returned to Twilio provides instructions on how to handle the event.
The webhook for an incoming phone call will include information such as the phone number of the caller. In the response, the application can provide instructions such as “hangup”, “play a recorded message”, etc. The responses use a language based on XML called TwiML.
Add a new endpoint
Open your new receive-call.protected.js file and add the following code:
This code creates a new TwiML Voice Response. Whenever someone calls your Twilio phone number, the webhook will capture the phone call and direct it to this endpoint (you’ll configure this shortly). The caller will then hear the following message: “Hello, and thank you for your call.”
Deploy your function
Save and close your file. Now that you’ve completed your function, you can deploy it. Run the following command from the phone-answer directory:
Buy a phone number
Log in to the Twilio Console, select Phone Numbers, and then click on the red plus sign to buy a Twilio number. Note that if you are using a free account you will be using your trial credit for this purchase.
In the Buy a Number screen you can select your country and check Voice in the capabilities field. If you’d like to request a number from your region, you can enter your area code in the Number field.

Click the “Search” button to see what numbers are available, and then click “Buy” for the number that you like from the results. After you confirm your purchase, click the “Close” button.
Congratulations, you now have your very own Twilio phone number!
Configure the Voice webhook
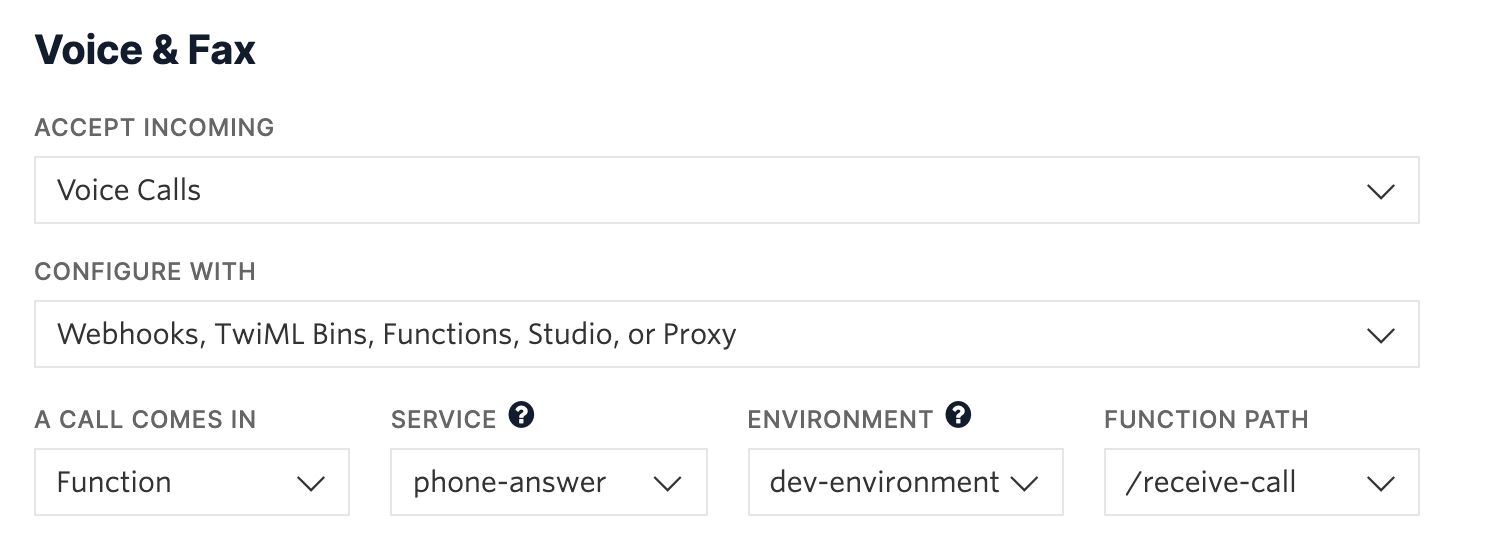
Still on the Twilio Console, click again on Phone Numbers, and then on the phone number that you purchased above. Scroll down to the “Voice & Fax” section and enter the following settings:
- For “Accept Incoming” select Voice Calls.
- For “Configure with” select Webhooks, TwiML Bins, Functions, Studio or Proxy.
- For “A call comes in” select Function in the left dropdown.
- For “Service” select phone-answer, or the name of the service you created earlier.
- For “Environment” select dev-environment.
- For “Function Path” select /receive-call.
Don’t forget to click the Save button at the bottom of the page to record these changes.
Testing your Twilio phone line
And now we get to the moment of truth! Call the Twilio phone number that you purchased earlier from your own phone. After a ring or two, the call should be answered and you should hear a nice voice that speaks the text that you passed as an argument to the say() method.
Next steps
I hope you found this tutorial useful. The TwiML language is extremely rich and provides a large variety of options to automate incoming phone calls. If you would like to explore some of these options, here are some example commands you can use:
- Play: instead of text-to-speech, play a message that is recorded in an audio file
- Dial: connect the call to another phone number or conference call
- Enqueue: put the caller on hold and add it to a queue
- Gather: accept spoken or keyed digits from the caller
- Record: record a message
- Reject: reject the call
Let me know on Twitter what you’re building with Twilio Voice!
Ashley is a JavaScript Editor for the Twilio blog. To work with her and bring your technical stories to Twilio, find her at @ahl389 on Twitter. If you can’t find her there, she’s probably on a patio somewhere having a cup of coffee (or glass of wine, depending on the time).


Related Resources
Twilio Docs
From APIs to SDKs to sample apps
API reference documentation, SDKs, helper libraries, quickstarts, and tutorials for your language and platform.
Resource Center
The latest ebooks, industry reports, and webinars
Learn from customer engagement experts to improve your own communication.
Ahoy
Twilio's developer community hub
Best practices, code samples, and inspiration to build communications and digital engagement experiences.