How To Send SMS Notifications to MS Dynamics 365 Campaign Members
Time to read: 9 minutes
March 02, 2022
Written by
Reviewed by

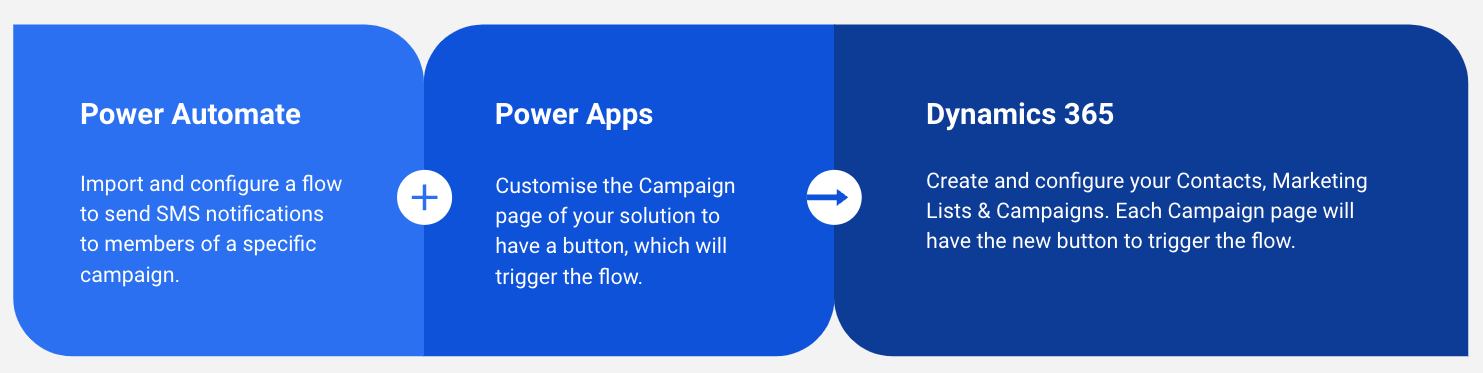
Microsoft Dynamics 365 is a line of enterprise resource planning and customer relationship management software applications. In this tutorial, we will learn how to quickly send SMS notifications to all members in single or multiple Marketing Lists of a selected Campaign from within Microsoft Dynamics 365 using Microsoft Power Apps and Microsoft Power Automate.
Table Of Contents
- Overview
- How does this solution work
- Prerequisites
- Power Automate Setup
- Power Apps Configurations
- Dynamics 365 Configurations
- Testing Solution
- What is next
- Further References
Prerequisites
First, you need to set up your Twilio account, Microsoft account, Dynamics account and purchase a Twilio phone number.
- If you haven't yet, sign up for a free Twilio Account
- Use the free phone number with your free account, or upgrade to Purchase a new phone number from the Twilio Console, if you don't yet have one (you'll need one with SMS capability)
- Create a Microsoft Account, if you don't yet have one
- Sign up for a Dynamics 365 Customer Service free trial, if you don't yet have one
Power Automate Setup
The next step is then to import and configure the flow that will be executed on the selected Campaign to send the notification to all Members. This flow will have the below tasks added, which you can configure and edit as needed:
- Get campaign full details
- Get all campaign marketing lists
- Get full details of each marketing list
- Get all members of each marketing list
- Get full details of each member
- Send text in campaign Offer field to all members’ mobile phone
Import your flow
Here are the steps to import your flow:
- Go to https://flow.microsoft.com and login using your Microsoft Account
- Click on the import button in the top right hand corner of the screen
- Upload the package .zip file from here and wait for the screen to show up the package details
- When configuring the flow settings, you can choose to either create a new flow or update an existing one with the flow definition from the package
- You will also need to select the connections that are required to setup the flow as part of the import process. You should see the Import button light up once you have successfully configured all the required settings
- Click on Import and wait for the process to be completed
![[Import your flow - Figure 1]](/content/dam/twilio-com/global/en/blog/legacy/2022/send-sms-d365-campaign-members/QL2pMTwFOw_OGq-dofzdc9JCCrzfqbP9SGqO8RGzfFk-29fLDM9Wcen0aIJLqYxKnUdBXtrIeyfz_FY8ZotY.png)
Configure your flow
After importing your flow, you will need to apply some configurations. First, click on My flows & find your flow, then click on the three dots beside your flow and click on Edit (or click on the Edit icon)
![[Configure your flow - Figure 2]](/content/dam/twilio-com/global/en/blog/legacy/2022/send-sms-d365-campaign-members/7Ec5nYUGoku0_UMv5uUFlFJPD1LoauILBmscnNkBMhhZtFGjtmCgGRCcKykj2cHf1x9_83R6fBkI_TsyiO4Z.png)
Now, find & expand the Initialize variable - varSMSSendFromNumber step to edit, and then set its value to <your-twilio-number>
![[Initialize variable - figure 3]](/content/dam/twilio-com/global/en/blog/legacy/2022/send-sms-d365-campaign-members/KLeNYfLZnAWGttsrMcO9dVAE92UbA3ikxlljtshsGYjaRP_CtxCSiuhcpdqXbZvGN0u3_ugO9RyZ_iFzLHbX.png)
Next, find and expand When a HTTP request is received step to copy the HTTP POST URL.
![[When a HTTP request is received - figure 5]](/content/dam/twilio-com/global/en/blog/legacy/2022/send-sms-d365-campaign-members/5W6qXDoxRNFK9Rm16jxn5ESPI-GDgi6q0dTcQSCH6XlV9m20N8OBX0UG7uTB1GvcfoKkcUI-3hjZ_SqklJFM.png)
Finally, click on Back arrow, and then click on Turn on to enable your new flow.
![[Turn on your flow - figure 6]](/content/dam/twilio-com/global/en/blog/legacy/2022/send-sms-d365-campaign-members/ko_C6bA_TQx5nwsci5SDUt3lhfg5y1KlvDZp9jsdBPjxhtulUbH1CnCImTj9rNV1UW6G-ZvOBWaf_RE9ispQ.png)
Power Apps Configurations
You have now your flow ready to use and its time now to find a way to trigger this flow from within Dynamics 365. You will start by creating a new solution with your entities, and then customise your Campaign form to have a new command button in its command bar. This command will then be used to trigger your flow.
Create your solution (or edit an existing solution)
Here are the steps to create your new solution and customise your Campaign form:
- Go to https://make.powerapps.com/ and login using your Microsoft Account.
- Go to your target environment and click on Solutions
- Click on New -> App -> Model-driven app from blank
- Choose Modern app designer, then click on Create
- Type in Name and description, then click on Create
- Wait until App is created, then under Pages, click on Add page
- Choose Table based view and form, then click on Next
- Search for Campaign, Marketing List & Contact to select the three of them, then click on Add
- Click on Publish to save & publish your App. The Application home page should look similar to the screen below.
![[Create your new solution - figure 7]](/content/dam/twilio-com/global/en/blog/legacy/2022/send-sms-d365-campaign-members/GH36XVLpwb9aUxRXU6t6YcOcc72TTSqiZdNx8qMUVYFzZK2Pe_DhW6abgdSp-4uGaxRF5kx6-W2q_ORvKfu5.png)
Create your command
Here are the steps to create your new command:
- Click on ellipses beside Campaign (New Page created from previous steps)
- Click on Edit command bar
- Choose Main form, then click on Edit
- Under Commands, click on New Command
- Add values to New Command fields as follows:
- Label: Send SMS
- Icon: Use Icon (Choose Email icon)
- Tooltip title: Send SMS
- Tooltip description: Send SMS to all campaign members using Twilio
- Action: Run JavaScript
- Function name: sendCampaign
- Under Function name, click on Add parameter
- Under Parameter 1, choose PrimaryControl
Create your web resource
- Under Library, click on Add library which open Add JavaScript Library pop up
- Click on New, which open Web Resource new tab
- Provide values to Web Resource fields as follows:
- Name: twilio-campaign-trigger
- Display name: Twilio Campaign Trigger
- Type: Script(JScript)
- Click on Text Editor to add below code, then click Ok
Now, make sure your web resource look similar to below screen, and then click on Publish All Customizations to publish your changes
![[Create your new web resource - figure 8]](/content/dam/twilio-com/global/en/blog/legacy/2022/send-sms-d365-campaign-members/N5AwjZpjLhP4JV-4uK6eQ09IRZFYbyPJPY7h_CfKGBeEJMj31fEVwCwL2geLf7e_vx4DGUt8pErx_jXCHZbQ.png)
Save and publish your form
- Go back to the Main Form browser tab with the Add JavaScript Library popup opened
- Search for Twilio Campaign Trigger (refresh browser if not found), then click on Add
- Make sure you have all values provided, and then click on Save and Publish to publish your customized Main form. Note: The form should look similar to the screen below
![[Publish your form - figure 9]](/content/dam/twilio-com/global/en/blog/legacy/2022/send-sms-d365-campaign-members/Emtcvu-jZxuLoOVKcp6eEDH-w76Txhff96oONsjKm8oXdJGu2xhFhAHQhAbjf1xbPKwltPVPU1Fu_MBkMMEl.png)
Dynamics 365 Configurations
The first step is to configure MS Dynamics to have a campaign with one or more marketing lists. Each marketing list will then have one or more contacts/accounts. (see screen below for more entails)
![[Dynamics Introduction - figure 10]](/content/dam/twilio-com/global/en/blog/legacy/2022/send-sms-d365-campaign-members/gMz13xJefzouxho80ERLMulX19qEl78TYmle24aqCrGLRSgsn5X7ykNsaQA5kA2ReI6-ioZ5dhmS_bRFqnb1.png)
Create your contact(s)
Similar to Microsoft Office Outlook or other email programs, you store data about the people you know and work with in contacts.
Here are the steps to create your new Contact:
- Go to
https://<replace-with-your-tenant.name>.crm6.dynamics.com/main.aspxand login using your Microsoft Account - In the site map, select Contacts
- Specify the details that you know about the contact. (Remember to add a mobile phone number)
- (Optional) Specify the account that the contact belongs to. Associating a contact with an account helps in reaching out to the right people to work with an account
- Save the changes
- Repeat steps 1-5 to add one or more contacts.
![[Create your contacts - figure 11]](/content/dam/twilio-com/global/en/blog/legacy/2022/send-sms-d365-campaign-members/WO9HaiQ5pOdnbZDGokhu5ks_O4smroMxVmP1Fl4Fy6eF5YBHN7Eo5UQqBmH-6rsFuv_OUHrd4Lqj_Y30Ik5v.png)
Create your static marketing list(s)
Here are the steps to create your new Static Marketing List:
- In the site map, select Marketing Lists
- Select New and on the Summary tab, add the required information. Note: To look up records in the Owner field, first select Save, or you'll lose your changes
- Select Save so you can enter information in other areas of the form
- Select the Notes tab to add any other information that applies to your marketing list
- Select Save
- (Optional) Repeat steps 1-5 to create one or more lists
![[Create your static marketing list - figure 12]](/content/dam/twilio-com/global/en/blog/legacy/2022/send-sms-d365-campaign-members/k9mJ2FQwAHqaNgCOsCn71DMSSsbAw1ClSdXq-kLgbtlSjNlnIjGlqTZBIvs2QXG6jLBvrJcB1zzB_zC9wBva.png)
Manage member(s) in your static marketing list
- In the site map, select Marketing Lists
- Click on your static marketing list record, select the down arrow next to Manage Members on the command bar, and then select Add using Lookup
- In the Lookup Records dialog box, select your search criteria
- Select all your contacts that you want to add, and then select Add
![[Manage members in your static marketing list- figure 13]](/content/dam/twilio-com/global/en/blog/legacy/2022/send-sms-d365-campaign-members/xwiTHPZMKN1KfWM07rVI5wWqg3k4xTkms8EjgvZz2PEeRu.width-800.png)
Create your dynamic marketing list(s)
Here are the steps to create your new Static Marketing List:
- In the site map, select Marketing Lists
- Select New and on the Summary tab, add the required information. Note: To look up records in the Owner field, first select Save, or you'll lose your changes
- Select Save so you can enter information in other areas of the form
- Select the Notes tab to add any other information that applies to your marketing list
- Select Save
- (Optional) Repeat steps 1-5 to create one or more lists
![[Create your dynamic marketing list - figure 14]](/content/dam/twilio-com/global/en/blog/legacy/2022/send-sms-d365-campaign-members/fabx7Q5aQubmw_sWNY20p-Aaqz8BtKQ9L_iBOguHk5p331PmLSTN87IRgFTWKq3NGO6ION3PqA5a_gsTI3Hi.png)
Define the member selection criteria for your dynamic marketing list(s)
Here are the steps to add members your new Dynamic Marketing List:
- In the site map, select Marketing Lists
- Click on your dynamic marketing lists, on the command bar, select Manage Members
- In the Manage Dynamic List Members dialog box, the entity that the marketing list is targeted at is automatically selected
- In the Use Saved View drop-down box, select a view for the selected entity, which will be used for filtering
- Select Add, and then select Add row, to define the search criteria. For example, to find all the contacts in the Seattle city, in the first box select the field as Address 1: City. Then, in the second box, select the query relational operator as Equals. In the third box, type Seattle. You can select fields from the current record type, or from related record types
- Select Find
- Select Use Query to add the matching records to your dynamic marketing list
![[Define member selection criteria for your dynamic marketing list - figure 15]](/content/dam/twilio-com/global/en/blog/legacy/2022/send-sms-d365-campaign-members/xTNY6JjQMxN0UdcydqNhkZIdPwArQ7FLiAlKPba7gKzPnN.width-800.png)
Create your campaign(s)
Promote your business, expand your reach to new customers, and improve sales by using campaigns in Dynamics 365 Sales. Use campaigns to store all your marketing information and activities, and to measure the success of your efforts. Campaigns contain planning tasks and campaign activities you need to manage for the marketing campaigns. Campaigns can include planning activities that you want to perform before you launch the campaign, and also the campaign activities you want to manage as part of the campaign.
More information can be found in the post Add an activity to a campaign using in-app marketing
Here are the steps to create a new Campaign:
- In the site map, select Campaigns
- Select New and on the Summary tab, add the required information
- Add text to OFFER field. Note: text in the OFFER field will be used in the SMS notifications sent
- Select Save
![[Create your campaign - figure 16]](/content/dam/twilio-com/global/en/blog/legacy/2022/send-sms-d365-campaign-members/17fX18fVC2r4dMMndcW5-zT8PLU5E6P2odtgJC5tabTX6mJdZBp9UnSTCjRRBsHQctl688NVR2tM9T.png)
Add your marketing list to your campaign(s)
- After Campaign is created, under the Marketing Lists area, click on the three dots and choose Add Existing Marketing List
- In Lookup Records window, type in nsmer of your your two Marketing List and press enter to search
- Click on both of your Marketing Lists found, then click on Add
Testing your solution
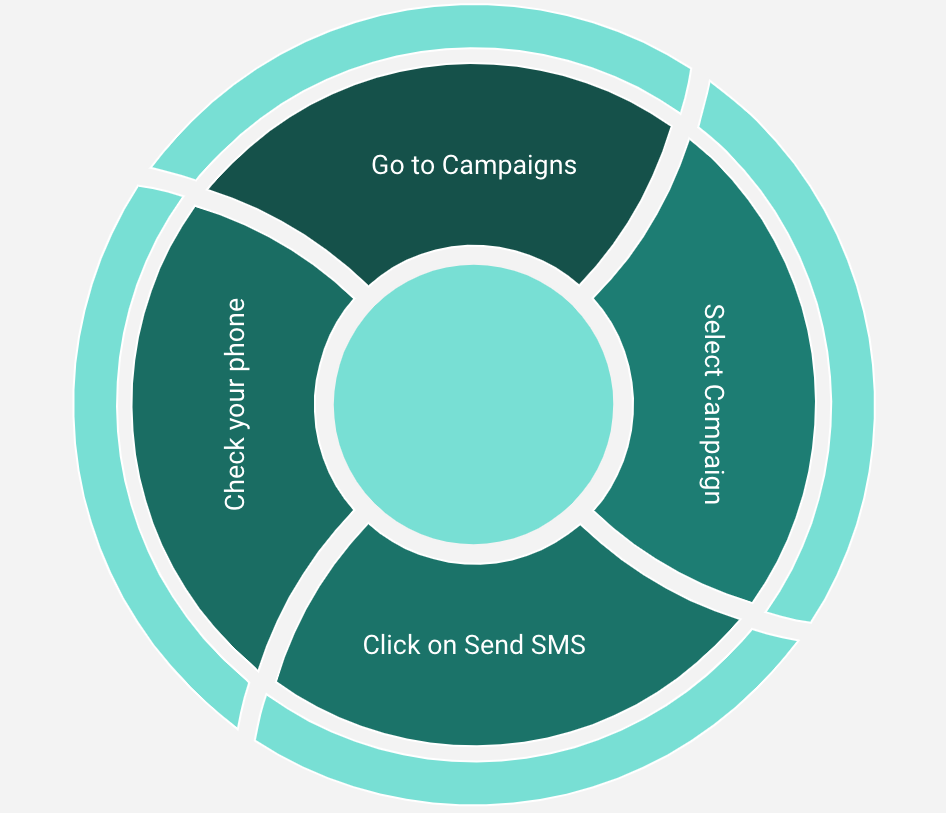
Now you have everything in place to send a notification through to all members in your Campaign. Below are the steps to follow for testing:
- Go to https://make.powerapps.com and login using your Microsoft Account
- Under Apps, click on your new App created
- Click on your campaign to make sure it has value in the Offer field
- Click on your new command Send SMS
Once the flow triggered from your new command run is completed successfully, all Members in all the Marketing Lists of this target Campaign should receive the text you entered in the campaign Description field. You can go to My flows in Power Automate to check the logs and see the status of your target flow.
![[Testing your solution - figure 17]](/content/dam/twilio-com/global/en/blog/legacy/2022/send-sms-d365-campaign-members/Uss5Nsl_IalFmsE_mGGciw7bSig2peEW6eHMG4dA22K3D_ezh0P2-tGMeR7YQ3iLLu0rzRXEiYzg_X1z3n0E.jpeg)
What's next?
Congrats! You now can send SMS to all the members of Marketing lists of a Campaign within Microsoft Dynamics 365.
Looking for what to do next? Here's a list of things to try:
- Try to modify the flow and create your own command to send notifications to members of a marketing list.
- Try to modify the flow and create your own command to send notifications to a specific contact/activity.
- Check out all Actions available in Twilio Connector.
- Check out other Power Automate leveraging Twilio Connector.
- Check out How To Integrate SalesForce With Twilio Flex
- Check out How To Integrate any CRM With Twilio Flex.
Further References
- MS Dynamics 365: Create a marketing list using in-app marketing
- MS Dynamics 365: Create a quick campaign using in-app marketing
- MS Dynamics 365: Manage your customers using accounts and contacts
- MS Power Automate: Export and import your flows across environments with packaging
- MS Power Automate:Create a cloud flow by using Dynamics 365 (online)
- MS Power Apps: Create, edit, or configure forms using the form designer
- MS Power Apps: Customize the command bar using command designer
Sherief Elzoghby is a Principal Solutions Engineer at Twilio. He has spent the past 17 years working on Microsoft products – and riding his cruiser road motorbike, too – in AU & NZ. He moved to Twilio last year, working closely with customers to help them uncover the hidden powers of modern communications within their applications using Twilio products.

Related Resources
Twilio Docs
From APIs to SDKs to sample apps
API reference documentation, SDKs, helper libraries, quickstarts, and tutorials for your language and platform.
Resource Center
The latest ebooks, industry reports, and webinars
Learn from customer engagement experts to improve your own communication.
Ahoy
Twilio's developer community hub
Best practices, code samples, and inspiration to build communications and digital engagement experiences.