Set Phasers to STUN/TURN: Getting Started with WebRTC using Node.js, Socket.io and Twilio’s NAT Traversal Service
Time to read: 14 minutes
December 11, 2014
Written by

It’s been an exciting few weeks of launches for Twilio. My favourite was the launch of our Network Traversal Service. Whilst that may sound a bit dry it’s an important service for WebRTC applications as it removes the overhead of deploying your own network of STUN and TURN servers. I’ve been dying to find an excuse to get playing with WebRTC and this was a great reason to do so.
It would, of course, be remiss of me to keep the code and the process of putting together a WebRTC application to myself. Throughout this post I will share how I got started with it building out a video chat application with WebRTC. Then you can spend fewer late nights wondering which callback you missed or which message you haven’t implemented yet and more time waving at your friends and thinking of cool applications for this technology.
Let’s make some WebRTC happen!
What is WebRTC?
Let’s start with a few definitions just to make sure we all know what we’re talking about.
WebRTC is a set of JavaScript APIs that enable plugin-free, real time, peer to peer video, audio and data communication between two browsers. Simple, right? We’ll see the JavaScript APIs in the code later.
What isn’t WebRTC?
It is also important to talk about what WebRTC doesn’t do for us, since that is the part of the application we actually need to build. Whilst a WebRTC connection between two browsers is peer to peer, we still require servers to do some work for us. The three parts of the application that are required are as follows:
Network configuration
This refers to information about the public IP address and port number on which a browser can be reached. This is where the Twilio Network Traversal Service comes in. As explained in the announcement when firewalls and NAT get involved it is not trivial to discover how to access an endpoint publicly. STUN and TURN servers can be used to discover this information. The browser does a lot of the work here but we’ll see how to set it up with access to Twilio’s service later.
Presence
Browsers usually live a solitary life, blissfully unaware of other browsers that may want to contact them. In order to connect one browser to another, we are going to have to discover the presence of another browser somehow. It is up to us to build a way for the browsers to discover other browsers that are ready to take a video call.
Signalling
Finally, once a browser decides to contact another peer it needs to send and receive both the network information received from the STUN/TURN servers, as well as information about its own media capabilities. This is known as signalling and is the majority of the work that we need to do in this application.
For a much more in depth view on WebRTC and the surrounding technologies I highly recommend the HTML5 Rocks introduction to WebRTC and their more detailed article on STUN, TURN and signalling.
Tools
To build out our WebRTC “Hello World!” (which, excitingly enough, is a video chat application) we need a few tools. Since we are speaking JavaScript on the front end I decided to use JavaScript for the back end too, so we will be using Node.js. We need something to serve our application too and for this project I picked Express). For the presence and signalling any two way communication channel can be used. I picked WebSockets using Socket.io for the simplicity of the API.
All we need to get started is a Twilio account, a computer with a webcam and Node.js installed. Oh, and a browser that supports WebRTC, right now is most of them. Got that? Good, let’s write some code.
Getting started
On the command line, prepare your app:
Enter the information that npm init asks for (you can mostly press enter here). Now, install your dependencies:
Make up the files and directories you’re going to need too.
Then open up public/index.html and enter the following bare bones HTML page:
As you can see this includes two empty <video> elements and some buttons that we will be using to control our calls, the JavaScript files we defined earlier alongside the Socket.io client library.
Finally, we’ll set up our server. Open up index.js and enter the following:
This is a basic setup for Express, we’re not really doing anything special here except attaching the Socket.io process to the Express server object.
We’ve loaded the Twilio node library here too and you can see that I’m including the API credentials from the environment. Before we run the server, we should make sure we have those credentials in the environment.
Now run the server and make sure everything is looking ok.
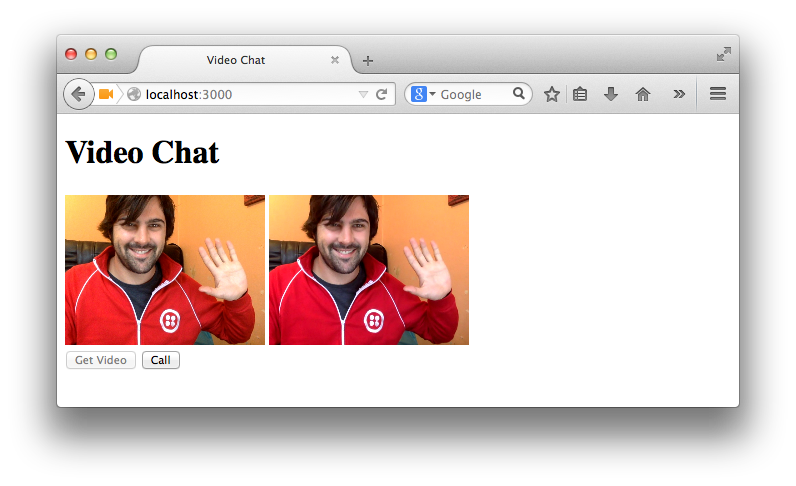
Open up http://localhost:3000 and check to see that you have a title, some empty video elements and two buttons. Is that all there? Let’s continue.
Video and Audio Streams
We’re all set up, so the first thing we need to do to start the video calling process is get hold of the user’s video and audio streams. For this we will use the Navigator.getUserMedia() API.
We’re going to listen for a click on the first <button> element we added to the page and request the streams from the user’s webcam and microphone. Open up public/app.js and enter the following:
The code above does a few things so let’s talk through it. I first set up a VideoChat object, this is to store a few objects and functions that we will be defining throughout the process. First object we grab hold of is the video button, to which we attach a click event listener (no jQuery here I’m afraid, this is all vanilla DOM APIs). When the button is clicked we make the request to access the video and audio streams through the getUserMedia function.
The call to getUserMedia causes the browser to prompt the user to accept or deny the page’s request to use their media. In Firefox this looks like this:
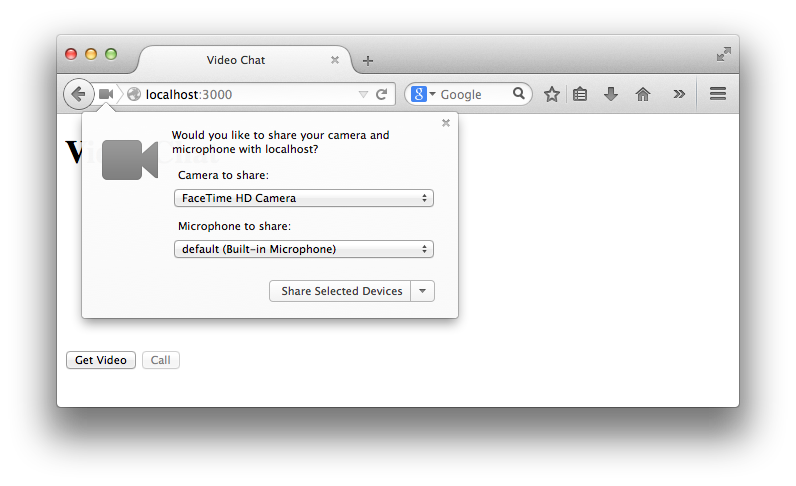
And in Chrome it looks like this:
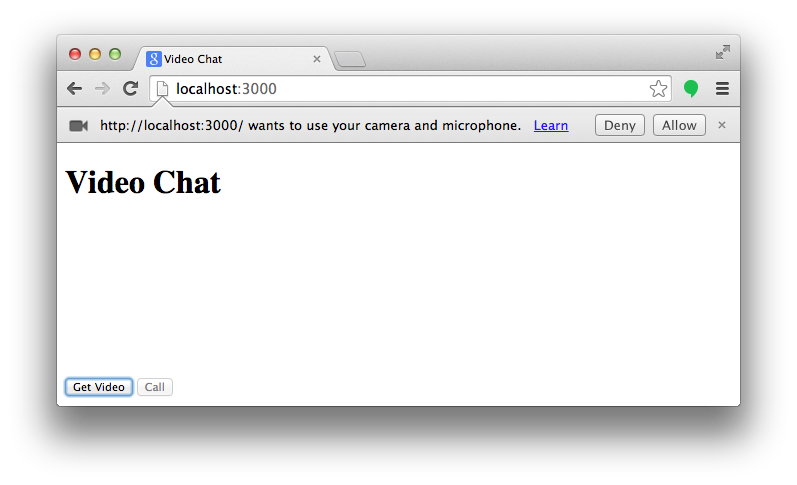
If you accept, the getUserMedia promise is resolved, and the onMediaStream() function is called. If you deny the permissions, the promise is rejected, and the noMediaStream() gets called. When we receive the stream we will save it to our VideoChat object and add it to the video element so you can see yourself (we also turn the volume down to 0 to avoid echoes). To do so we need to assign the stream returned by getUserMedia to the srcObject property of the video element. We also disable the “Get Video“ button as we don’t need that anymore.
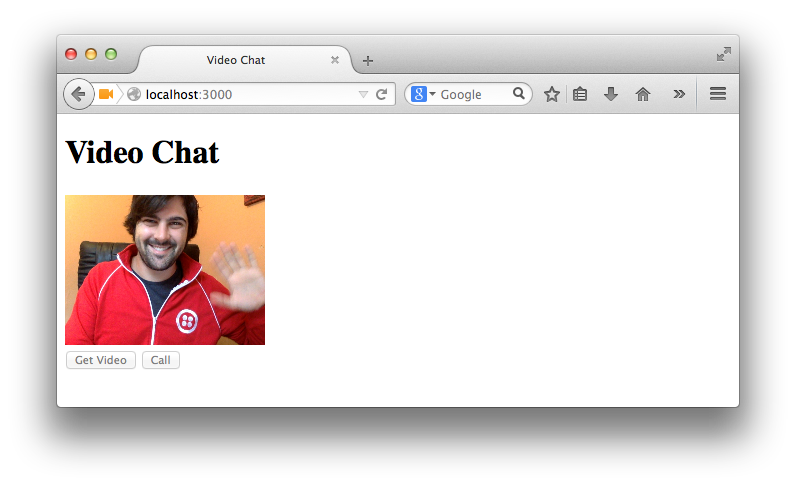
Save that, reload the page, click “Get Video“ and you should see the permissions popup, accept and you should see yourself!
User presence
Next we need to build a way of knowing we have another user on the other end ready to make a call. By the end of this section we will have enabled the “Call” button when we know there is someone on the other end.
In order to start passing messages between browsers as part of our signalling we need to start using our WebSockets. Open up index.js again and copy and paste the following code before the server.start function.
This is a very basic idea of a room and presence. Only two users can join the room at any one time. When a client tries to join a room we count how many clients are in the room right now. If it is zero they can join, if it is one they join and the socket emits to both clients that they are ready. If there are already 2 clients in the room then it is full and no further clients can join for now.
Now we need to join the room from the client. We need to start a connection to the socket server, we can do that by simply calling io(). Assign that to our VideoChat object so we can use it later. Then at the end of the onMediaStream function add two more lines, one to join the room and one to listen for the ready event. We then need a function to callback to once we hear that the room is ready. In that callback we will enable the “Call” button.
We better get hold of that “Call” button too. At the bottom of the file where we grabbed the “Get Video” button, we’ll do the same for the “Call” button.
Let’s create a dummy startCall method in the VideoChat object to make sure things are going as planned.
Now, restart the node server ( Ctrl + C to stop the process and $ node index.js to start again), open 2 browser windows to http://localhost:3000 and click “Get Video” in both. Once both videos are playing the “Call” buttons in each window should be live. And clicking on the “Call” button should log a nice message to your browser’s console.
Start the signalling
Our “Call” button is very important as this is going to kick off the rest of the WebRTC process. It’s the last bit of interaction the user needs to do to get the call started.
The “Call” button is going to set up a number of processes. It is going to create the RTCPeerConnection object that will manage creating the connection between the two browsers. This consists of producing information on the media capabilities of the browser and the network configuration. It is our job to send those to the other browser.
Signalling the network configuration
To set up the RTCPeerConnection object we need to give it details of the STUN and TURN servers that it will use to discover the network configuration. For this we will use the new Twilio STUN/TURN servers. The simplest method is to just use the STUN servers, they are free and don’t require any authorisation. iceServers (and iceCandidates that you will see later) refer to the overall Interactive Connectivity Establishment protocol that makes use of STUN and TURN servers.
In order to get the best possible chance of a connection we will want to use the TURN servers as well. In order to do this, we will need to request an ephemeral token from Twilio using the new Tokens endpoint that will give us access to the TURN servers from our front end JavaScript. We’ll have to request this token from our server and deliver the results back to the browser. Since we have a WebSocket connection already set up, we’ll use that. Here’s the flow we’ll be using in this next section:
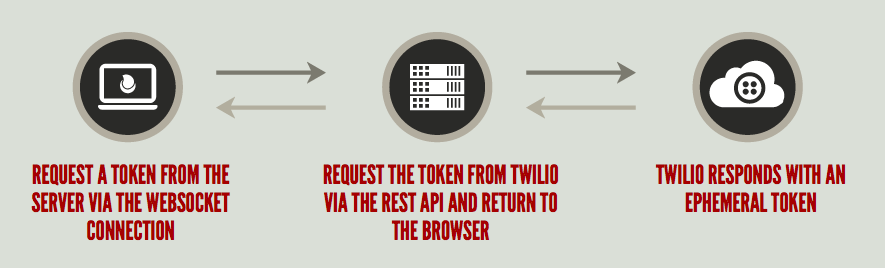
Return to index.js and within the callback to the socket’s connection event place the following code:
Here, when the socket receives a token message it makes a request to the Twilio REST API. When it receives the token back in the callback to the request it emits the token back to the front end. Let’s build the front end part of that now.
Our startCall function now needs to use the socket to get a token, so we simply set up to listen for a token message from the server and emit one ourselves.
And now we need to define the onToken method to initialise our RTCPeerConnection with the iceServers returned from the API. This kicks off the process to get the network configuration so we need to add a callback function to the peerConnection to deal with the results of that. This is the onicecandidate callback and it is called every time the peerConnection generates a potential way of connecting to it from the outside world. As the developer, it is our job to share that candidate with the other browser, so right now we’ll send it down the WebSocket connection.

On the server, we need to send that candidate straight on to the other browser:
Then, we need to be able to receive those messages in the front end, this time on behalf of the other browser. We’ve set up the listener for the socket within the onToken function, since that is when we create the peerConnection and will be ready to deal with candidates.
The onCandidate method receives the stringify’d candidate over the socket, turns it into an RTCIceCandidate and adds it to the browser’s peerConnection. You may be wondering where the second browser got a peerConnection object from since we only created that object when the user clicked the “Call” button in the first browser. You’re right to wonder but don’t worry, that is coming up very soon.
We can’t test this just yet, as the peerConnection object doesn’t start generating candidates until the next part is complete as well. We’re doing well, but there’s more information we need to share between browsers.
Sharing media configuration
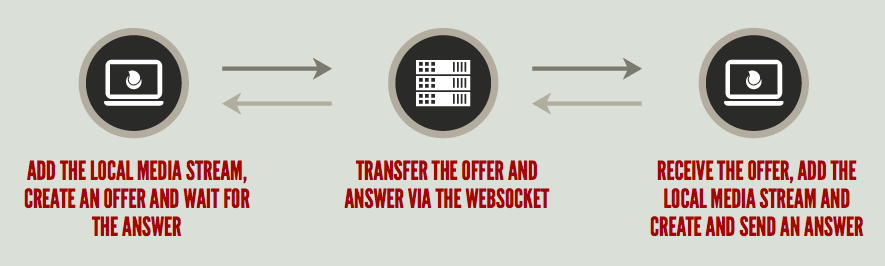
In the last section we set up how the call initiator starts sharing their network config. Now we need to sort out sharing media information. The peerConnection objects in each browser will need to generate descriptions of their media capabilities. The caller will create an offer detailing those capabilities and send it over the WebSocket connection. The other browser takes that offer and creates an answer containing its own capabilities and sends it back to the caller. We will implement this below, but here’s a diagram to show what should happen.
Making the offer
To start this process, we start with the offer. Once we have created the peerConnection object, we add our localStream to it. Once we’ve done that we call createOffer on the peerConnection. This generates the media configuration and calls back to the function passed in. In the callback, we call setLocalDescription with the offer on the peerConnection and send the offer over the socket to the other browser. We also need a callback for errors if createOffer isn’t successful.
On the server, we need to pass this message along again.
Receiving the offer
Then in the front end we need to receive the offer. We’re setting up the listener in the onMediaStream this time as it will trigger the creation of the peerConnection in the other browser.
Let’s run this to make sure we’re on track so far. Restart the server and go back to your open browser windows. Refresh both, click “Get Video” in both and accept the permissions request. Open a developer console in one window and click “Call” in the other browser. You should see “Got an offer” printed to the console followed by a JSON string of the offer that was sent. One side of our signalling is working!
There’s a lot of information in the offer but thankfully we don’t need to look deeply into that right now. It just needs to be passed between the peerConnection objects in each browser. Let’s carry on building.
At this point, we could make a call to VideoChat.startCall but that’s eventually going to create an offer and send it over the socket to the first browser which will then go through that process again in a loop. What we actually want to do here is create an answer and return it to the first browser. I think we need a refactor at this point.
Refactoring
What we need is a way to create a peerConnection object for ourselves and set up the listeners but decide whether we create an offer or an answer to send to the other browser.
To do this, I’m going to update the onToken function to take a callback function that will allow us to describe what happens once the peerConnection is set up. Since onToken is also used as a callback the function definition will now return a function that will become the callback:
So the callback function replaces our original method of creating the offer, which we will need a new function for:
Then we change startCall to set up the callbacks like this:
Now we can start defining the functions for creating an answer.
In this case we want to use createAnswer as the callback to the creation of the peerConnection but we also need to use the offer to set the remote description on the peerConnection. This time, we create a closure by calling the function with the offer and return a function to use as the callback. Now when the peerConnection is created we return to the inner function and turn the offer we received over the socket into a RTCSessionDescription object and set it as the remote description. We then create the answer on the peerConnection object, very much the same as we created the offer in the first place, and send it back over the socket.
This is how we set up our onOffer function now:
Making the connection
Now that we are sending an answer back over the socket, all we need to do is pass that on to the original caller and then wait for the browser to do its magic.
Back in index.js let’s set up the relay for the answer.
Then, we need to set up receiving the answer in the browser. We’ll add one more listener to the socket when the peerConnection is created and build the callback function to save the answer as the remote description of the peerConnection.
The browsers are now passing media capabilities and connection information between them leaving one more thing to do. When there is a successful connection the peerConnection will receive an onaddstream event with the stream of the peer’s media. We just need to connect that to our other <video> element and video chat will be on. We’ll add the onaddstream callback in where we create the peerConnection.
Load up a couple of browsers next to each other, open up your development URL at localhost:3000 on both browsers, get the video stream in both browsers and then click “Call” from one of them. You should find yourself looking at yourself. Four times!
One final touch
Before implementing the last piece of code, let's summarize what's happening when the "Call" button is pressed:
- Client A (the client that place the call) is requesting and obtaining a token from the server
- Client A uses the information in the token to add the Twilio ICE servers to a new
RTCPeerConnection - Client A is sending to the server an offer to be sent to the other peer
- Client A can now start to receive ICE candidates and sending them to the other peer through the server
- Client B (the client that receives the call) upon receiving an offer is requesting and obtaining a token from the server
- Once Client B receives a token, it creates a new
RTCPeerConnectionand an answer and send it to Client A through the server - Client B can now register a callback for local (
onIceCandidate) as well as remote (onCandidate) ICE servers' candidates
Can you see the problem here? In step 4, Client A can potentially send ICE candidates before Client B is ready to receive them (after step 7). The reason why it works when you tested it, it's because both clients are on the same localhost. But if you try on two devices on two different networks, you will see that the Client B is not able to reach the Client A.
To solve this issue (and let you videocall your friends) we are going to implement a buffer of ICE candidates on Client A.
Here we are checking if the VideoChat is connected before sending the candidate to the server. If the VideoChat is not connected, then we add them to a local buffer (the array localICECandidates).
But how can we detected if VideoChat is connected, i.e. how does Client A know that Client B is ready to receive candidates? On Client A this is happening when it receives an answer from Client B.
On Client B we can set the connected status, just before sending the answer back to the other peer.
If you want to test it with someone on a different network, you can expose your localhost on a public address using a free service such as ngrok. Remember to use the HTTPS url to connect to the public address, otherwise the browser will not be able to acquire the video and audio input (this is not a problem when you connect to localhost)
This is just the beginning
This is just step one to building out all sorts of potential WebRTC applications. Once you get your head around the process required to set up the connection between two browsers, then what you do with that connection is up to you. In this instance, creating a way for users to hang up might be a start, or making a lobby area with much better presence controls.
Then there’s more fun stuff you could try out. You can alter the video streams by passing it to a canvas and playing about with it there, you could use the WebAudio API to change the sound and with the data channel (which I haven’t covered in this post) pass any data you wanted between peers.
You can see all the code from this post, fully commented, on GitHub.
I’d love to hear about the sorts of things you want to do or are already doing with WebRTC. Give me a shout on Twitter or drop me an email at philnash@twilio.com.

Related Resources
Twilio Docs
From APIs to SDKs to sample apps
API reference documentation, SDKs, helper libraries, quickstarts, and tutorials for your language and platform.
Resource Center
The latest ebooks, industry reports, and webinars
Learn from customer engagement experts to improve your own communication.
Ahoy
Twilio's developer community hub
Best practices, code samples, and inspiration to build communications and digital engagement experiences.