Store Opt-Out data on Twilio with Functions and Sync
Time to read: 6 minutes
June 16, 2022
Written by
Reviewed by

Staying compliant is an important part of your messaging strategy. It ensures that your senders have a high trust level from carriers and, as a result, experience lower filtering and lower risk of being blocked.
Maintaining a clean opt-out list is one of the key pillars for compliant messaging. The Twilio platform helps you maintain customer trust via automated opt-out management (more here), and it's a great start, but under certain circumstances, opt-out information can be lost. Additionally, Twilio does not yet provide an API to retrieve opt-out data.
All that's to say: we at Twilio strongly recommend you maintain and store opt-out data yourself. In this blog post, I'll show you how storing opt-out information can be done on the Twilio platform with Serverless Functions and Sync.
Tutorial prerequisites
Before we can get started building, you need to make sure you have an account with Twilio. You can sign up for a free account here.
Once you've got your account, note the following details – you will need them later:
- Twilio Account SID: You can find your account SID in the admin console.
- Twilio Auth Token: You can find your auth token in the admin console.
And with that, you're ready to start.
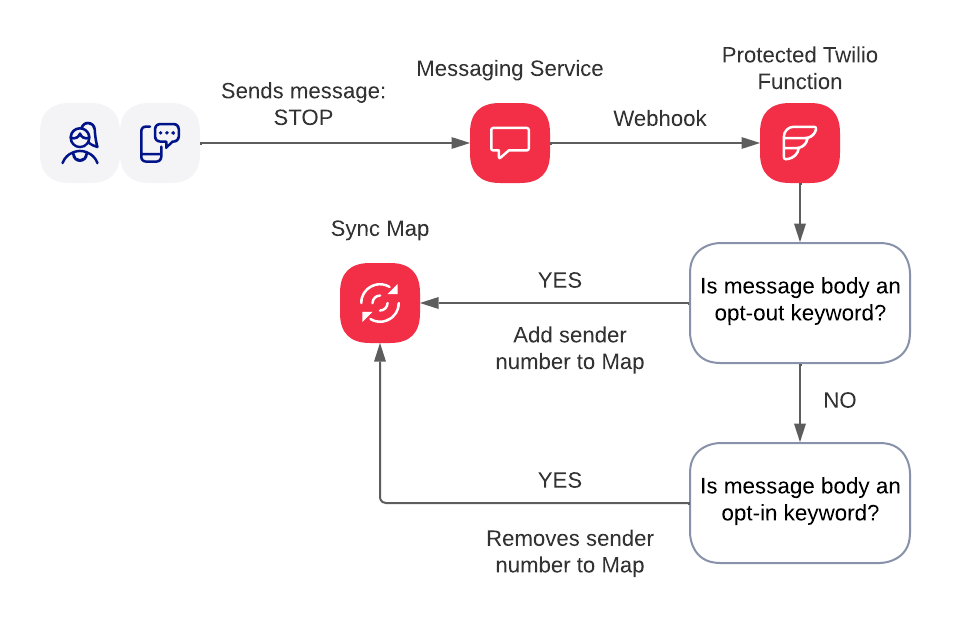
As I mentioned, we will be leveraging Twilio Functions and Sync. But before we get to writing code, here is our high-level plan:
- Create a Messaging Service and add a phone number to it
- Create a Sync service and a Map object in it; the Map will be our opt-out data storage.
- Create a Function that will be called once the customer sends a message to the phone number. The function will be responsible for:
- analyzing the message body to see if it is one of opt-out or opt-in words
- if the body is an opt-out word the function will add the sender number to the Sync Map
- if the body is an opt-in word the function will remove the sender number from the Sync Map
- Update Messaging Service settings to direct a webhook on an incoming message to the function URL.
Here is a diagram of the solution we will be building:
Sync setup
As mentioned before, we will be storing our opt-out data in a Sync Map.
First, we need a Sync Service and then a Map within the service. In your Twilio account, a Sync Service with the name `Default Service` should already exist – it is okay to use this service, and for this blog post, I will be using the default service. Alternatively, you can create a new one if you navigate to the Sync Services page in the Twilio Console.
For configuring your environment variables later, you will need Sync Service SID. You can see the SIDs of all your services if you go to the Sync Services page in the Twilio Console (note the SID of the service you will be using).
Next, navigate to the chosen Sync Service, select Maps on the left, and create a new Sync Map. You will have to provide a name for your new Map – make sure to leave Time to blank. After the Map is created, take a note of its SID... we will need it later.
Once you have a Sync Service and Map, we are ready to move on.
Developer Environment Setup
Before we continue, let's make sure you have the software you need:
I will use Typescript for this tutorial, but it should work just as well with JavaScript.
Now we can start coding!
Create project
We will start by creating a project using the Twilio Serverless Toolkit. For this run, issue the following command in your shell:
A couple of notes here:
- in the command, I used
opt-out-data-storageas my project name, feel free to use a different name - adding the
--typescriptparameter will create a project ready for Typescript. You can omit this parameter if you prefer JavaScript
With this step completed, you have a project that you can run in your local environment or deploy directly to Twilio Functions.
Configure environment
In order to run the code, we'll need environment variables to be in place. Go to .env in the root folder of the project, and update the file to have following keys and values. Make sure to replace placeholders with the values you collected in previous steps.
Create function
Now it is time to create the file you will be working inside. Navigate to src/functions, and create a file namedcapture-opt-out.protected.ts.
We will start with the following snippet as it contains a bare minimum code to complete a function:
We know what parameters our function will take and what environment variables it will use. Reflected in the code this will look like:
Next, we can add a list of our opt-out and opt-in keywords (here I will use the default lists. You can find defaults under "Opt-Out Management" section in your Messaging Service.)
Now we can start working on the logic to add or remove a number from the Map once we detect opt-out or opt-in keywords.
First, we will construct a messaging response object. We will use it to send feedback and we will always send an empty response, meaning no message will be sent to the sender. Second, we will have if-else with three branches: opt-out, opt-in, and default. The default branch will do nothing; we want to ignore everything that is not an opt-out or opt-in keyword.
Next, we will write code to add a number to the Map if we detect an opt-out keyword. A couple of notes here:
- If the Map already contains the number, an exception will be thrown. This is going to happen if a user who opted-out already sends an opt-out keyword again. We can ignore the exception as the state in our storage should not change.
- We will use the sender number as the "key" for our new Map Item and keep that "data" as an empty JSON object. In production, you can add other useful information to the data object, for example a timestamp.
Now, let's look at the last piece of code – the opt-in branch. Here, we remove a sender number from the Map. Once again, if the number is not in the Map we will ignore the exception.
With this, our function is completed!
Deploy function
The next step is to deploy our code to Twilio Functions. To do this, execute the following command in the root of your project:
Once deployment is complete, you will see the URL of your newly created function. It will look like the following:
Copy the URL – we are ready to configure Messaging Service.
Configuring a Messaging Service
Creating a Messaging Service and adding a phone number to it is out of scope for this tutorial. It can be achieved via the Twilio Console or via API.
Assuming you have a Messaging Service already, go to your Twilio Console and navigate to the Integrations section under your Messaging Service. On the Integrations page, find the Incoming Messages section and select the Send a webhook radio button. Enter the function URL that you copied in the previous step into the Request URL field and click Save configuration.
Testing
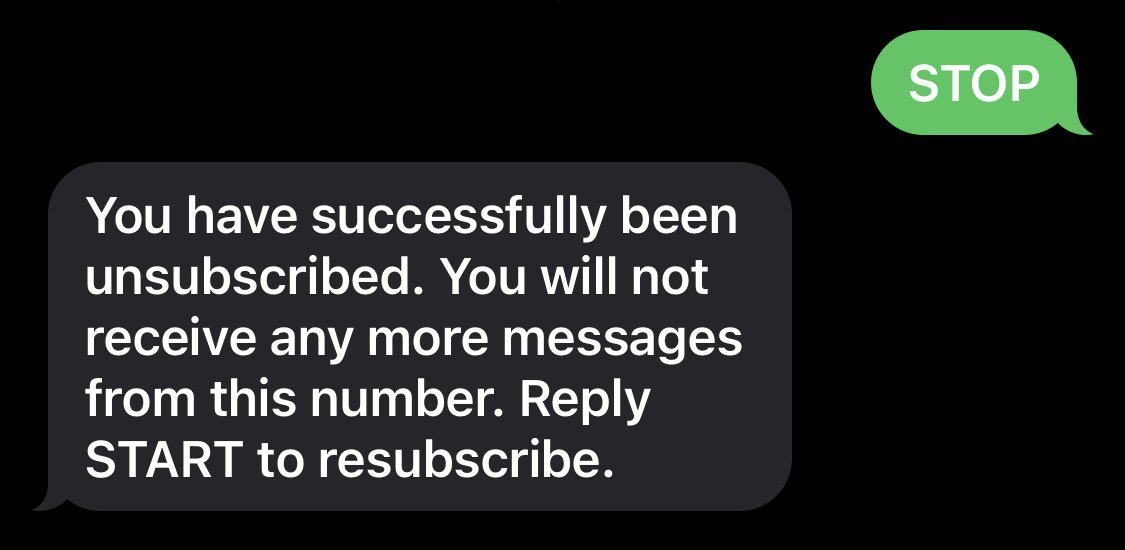
To test our solution, send an SMS to one of the numbers that you have in the Senders Pool of your Messaging Service with the body "STOP" (assuming STOP is one of opt-out keywords). You should get an automatic reply about being successfully opted-out:
As soon as you get the automatic reply, check that the sender number was added to the opt-out Map.
You can see the Map content in the Twilio Console or by using the Twilio CLI. The CLI command would be:
The output should look like this:
If you see the sender number in the Map, it means that our setup works as expected – and now we can test the opt-in flow. For this, send an SMS message to one of the numbers that you have in the Senders Pool of your Messaging Service with the body "START" (assuming START is one of your opt-in keywords).
As soon as you get an automatic reply that you have successfully opted in, check that the sender number was removed from the opt-out Map.
Conclusion
Using Twilio Functions and Sync, we built reliable opt-out list and stored it on the Twilio platform without relying on any 3rd party tools. The data can be viewed and exported at any time using the Twilio Console, Twilio CLI, or REST API. The great thing about our solution is that it is not limited to SMS only; you could store opt-out information for other messaging channels such as WhatsApp or any other channel you employ.
The full code for the project is available on GitHub at https://github.com/kuschanton/capture-opt-out.
Like what you built? See some of our other Functions and serverless tutorials on the blog.
Anton Kushch is a Senior Solutions Engineer at Twilio. He is helping companies in Emerging Markets in EMEA build powerful customer engagement solutions powered by Twilio. He can be reached at akushch [at] twilio.com, or you can collaborate with him on GitHub at https://github.com/kuschanton.


Related Resources
Twilio Docs
From APIs to SDKs to sample apps
API reference documentation, SDKs, helper libraries, quickstarts, and tutorials for your language and platform.
Resource Center
The latest ebooks, industry reports, and webinars
Learn from customer engagement experts to improve your own communication.
Ahoy
Twilio's developer community hub
Best practices, code samples, and inspiration to build communications and digital engagement experiences.