Creating an OCR Communication App with Tesseract.js and React (Part 1)
Time to read: 6 minutes
November 10, 2021
Written by
Reviewed by
")
Background
Optical Character Recognition (OCR) is a technology that optically recognizes handwritten or printed characters as data, and converts them into characters that can be used in computer programs. OCR is used in a variety of fields. For example, OCR is used to detect stolen vehicles by recognizing their license plates, and to digitize printed books.
Tesseract.js is an open source OCR library that supports over 100 languages. Tesseract.js compiles the Tesseract OCR engine written in C into JavaScript WebAssembly. With Tesseract.js, you can easily build OCR programs that run in the browser.
In this tutorial, we will show you how to build a React application using Tesseract.js to perform OCR on images directly in the browser, and send the recognized text to you as an SMS.
Goal
If you follow this tutorial to the end, you will be able to learn the basics of Tesseract.js and create an OCR communication app using React like so:
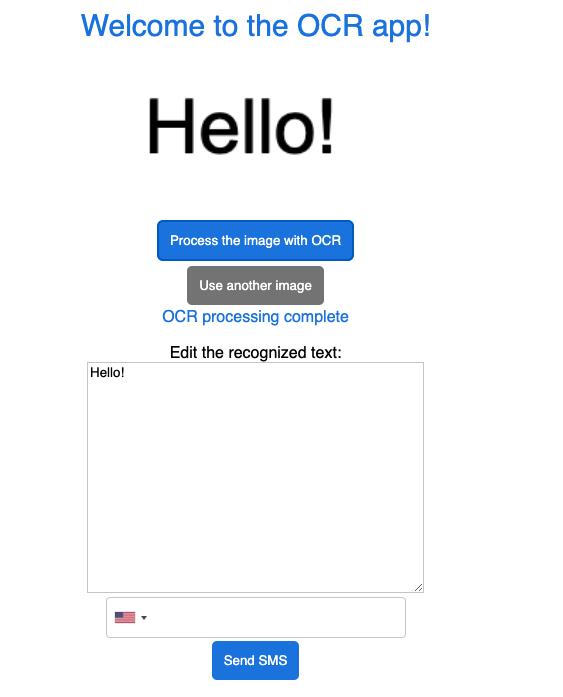
The operation flow of the app is as follows:
- User uploads an image
- Image is OCR-processed with Tesseract.js
- User edits the recognized text as needed
- The text is sent as an SMS to the specified phone number
Assumed knowledge
This tutorial assumes the basic knowledge of:
- JavaScript
- Node.js
- React
Tools required
- Stable version of Node.js and npm
- A free or paid Twilio account
- A Twilio phone number
App structure
In the application you’ll create, you’ll prepare a front end and a back end. The front end displays the image upload button, OCR processing button, text editor and SMS sending fields. The back end uses Node.js and Express to handle the SMS sending process.
The specific structure of the app is as follows:
Front end:
App: The root component, which is the execution entry point for the project.OcrReader: Component for the image upload function and OCR processing button.SmsSender: Component for an editor for the recognized text and a field for sending SMS.
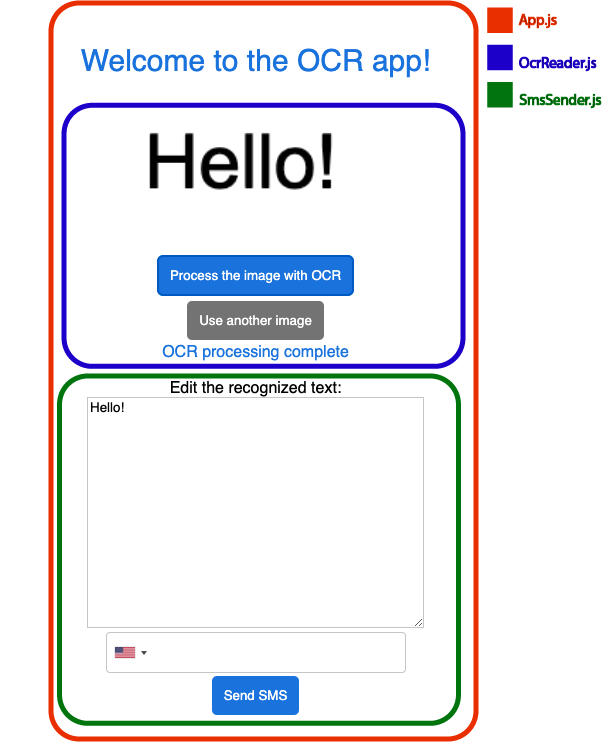
Back end:
server.js: Server file for sending SMS with Node.js and Express.
Now that you understand the general structure of the app, let’s move on to creating the project.
Basic setup
Creating a React project with create-react-app
First, we’ll create a React application.
Open a terminal and execute the following command:
This command will create a React app, move into the directory, and launch the app.
Access localhost:3000 with a browser. If the app starts without any problems, you will see a screen like so:

At this point, terminate the terminal process once.
Install dependencies
Next, we’ll install the necessary dependencies for the app.
Execute the following command in a terminal:
The details of the dependencies installed are as follows:
tesseract.js: JavaScript OCR library that runs in the browser.twilio: Twilio Node helper library, a package to send HTTP requests to the Twilio API using Node.js.express: A web server framework used in Node.js. In this tutorial, we will use it to send SMS.dotenv: Package for importing the values defined in .env as environment variables.intl-tel-input: International Telephone Input. A JavaScript package for entering and verifying international phone numbers.
Once the installation is complete, the next step is to build the front end.
Building the Front End
First, we’ll create the front end components. In the terminal, create a /components folder inside the /src directory.
Create OcrReader.js and SmsSender.js files in the /components folder.
Building the App component
Let’s build the root App.js component. Edit the App.js file located in /src that was automatically created when you ran create-react-app. Open the App.js file in a text editor.
Change the contents of the file to the following code:
Save the file.
This code imports the OcrReader component, which is responsible for the OCR processing of the images, as well as the SmsSender component, which is responsible for editing the text read by OCR and sending it as an SMS.
In App.js, the text read by the OcrReader child component is passed to the SmsSender sibling component as ocrData through the props object.
The onReadOcrData function receives ocrData. In the JSX attribute of <SmsSender>, we’re passing ocrData as readText through a prop.
The onRemoveClicked function also initializes the text data to be passed to <SmsSender> when the “Use another image” button is clicked in the OcrReader component.
Building the OcrReader component
Next, we will build the OcrReader functional component. This component is responsible for selecting the image to be processed with OCR, displaying the selected image, and the OCR processing button. Open the OcrReader.js file.
Paste the following code into the file:
This code imports the createWorker function from Tesseract.js.
We’re defining the OCR processing statuses with the STATUSES object. Using export default OcrReader, we’re exporting the OcrReader component to the App parent component.
Next, we’ll define the main function of the component, OcrReader. Paste the following code between the STATUSES block and export default OcrReader:
Let’s go through the above code in detail.
In the parameter of the OcrReader function, we’re passing onReadOcrData and onRemoveClicked as props to the parent component. Then we’re defining the state regarding whether the image to be processed is selected (selectedImage), and the state regarding the execution status of OCR processing (ocrState) with the useState hook. We’re also defining and instantiating Tesseract.js’s worker as a variable.
The OCR process is handled by the readImageText asynchronous function.
As soon as the function is called, we’re setting the OCR processing status to PENDING. This status is updated whenever the processing status of Tesseract.js changes.
There are several methods in the worker instance. First, we call the load method.
We specify the language to be recognized by the OCR process using the loadLanguage method. In this tutorial, we use eng, which represents English.
To initialize the OCR process, we call the initialize method.
Once the OCR process is ready, we call the recognize method to actually start the process.
Finally, we call the terminate method to terminate the worker and clean up when the OCR process is completed.
Next, paste the following code after the readImageText function block:
This code updates the state of `selectedImage`, which is the image selected with `setSelectedImage`, to `null` when the “Use another image” button is clicked. `onRemoveClicked` will pass the state to the parent component.
Finally, we’ll add JSX to the component. Paste the following code under the `handleRemoveClicked` function block:
Save the file.
The OcrReader component is now complete. The full code for the OcrReader component can be found in the Github repository.
Building the SmsSender component
Next, we’ll build the SmsSender functional component. Open the SmsSender file.
Paste the following code into the file:
This code imports intl-tel-input. It also defines the SMS sending status as a STATUSES object.
Next, we’ll define the main function of the component, SmsSender. Paste the following code between the STATUSES block and export default SmsSender:
Using the parameter of the SmsSender function, we’re receiving readText, which is passed from the OcrReader component as a prop from the parent component. We’re defining the state of the SMS text to be sent (smsText), the state of the phone number to send the SMS to (iti), and the state of the SMS sending process (smsSendingStatus) with the useState hook.
We’re defining inputRef to access the phone number that the user enters in the input element using useRef. Using the Init function, we’re initializing intl-tel-input and setting it to be able to input phone numbers.
Using useEffect, we’re initializing intl-tel-input once the render result is reflected.
The sendSMS function sends a HTTP request to the send-sms endpoint that we will create later.
We’re sending a HTTP POST request with fetch and specifying the text read by the OCR process as the body. The SMS sending status is updated with STATUS based on the response from the endpoint.
Next, we’ll define the handleSubmit function that defines the behavior of the “Send SMS” button. Paste the following code under the sendSMS function block:
This code calls the sendSMS function when the “Send SMS” button is clicked.
By default, when a click event occurs in an HTML page and the processing is completed, a page transition occurs. In addition, when a click event occurs, the event will propagate to the parent element. We’re using preventDefault() and stopPropagation() to prevent the transition and propagation respectively.
Finally, we’ll add the JSX for the component. Paste the following code under the handleSubmit function block:
Save the file.
The SmsSender component is now complete. The full code for the SmsSender component can be found in the Github repository.
Add CSS
Next, we’ll define the CSS for the app.
Open the index.css file under /src with a text editor. Change the content of the file to the following:
Save the file.
The front end of the app is now complete!
Next step
In part 1, we demonstrated how to set up a project and build the front end. In part 2, we’ll go through how to build the back end and test the app.
Part 2: Creating an OCR Communication App with Tesseract.js and React (Part 2)
Stephenie is a JavaScript editor in the Twilio Voices team. She writes hands-on JavaScript tutorial articles in Japanese and English for Twilio Blog. Reach out to Stephenie at snakajima[at]twilio.com and see what she’s building on Github at smwilk.


Related Resources
Twilio Docs
From APIs to SDKs to sample apps
API reference documentation, SDKs, helper libraries, quickstarts, and tutorials for your language and platform.
Resource Center
The latest ebooks, industry reports, and webinars
Learn from customer engagement experts to improve your own communication.
Ahoy
Twilio's developer community hub
Best practices, code samples, and inspiration to build communications and digital engagement experiences.