Track email statuses in Ruby on Rails with SendGrid
Time to read: 6 minutes
November 28, 2019
Written by

When your application sends emails it is useful to know what happens to those emails, like whether it has been delivered or opened. Or, sometimes more importantly, whether it bounced. The Twilio SendGrid email API doesn't just send emails, it can also send you events via webhook that tell you what happened to your emails.
In this post we'll build a small application using Ruby on Rails to send emails and update their status based on the Twilio SendGrid event webhooks.
What you'll need
In order to build this application along with this post, you will need:
- Ruby and Bundler installed
- ngrok - my favourite way to tunnel webhooks to my local machine
- A Twilio SendGrid account (if you don't have one, you can sign up for a free SendGrid account now)
If you have all of that, then you're ready to get building.
Preparing the example application
I have created an application that gets us started with this. The application creates and lists messages, but doesn't send them anywhere yet. We're going to take the messages, turn them into emails and send them out, then track their status using SendGrid event webhooks.
Start by cloning or downloading the starter application from GitHub:
Install the dependencies:
Copy the config/env.yml.example file to config/env.yml:
Migrate the database:
Start the application:
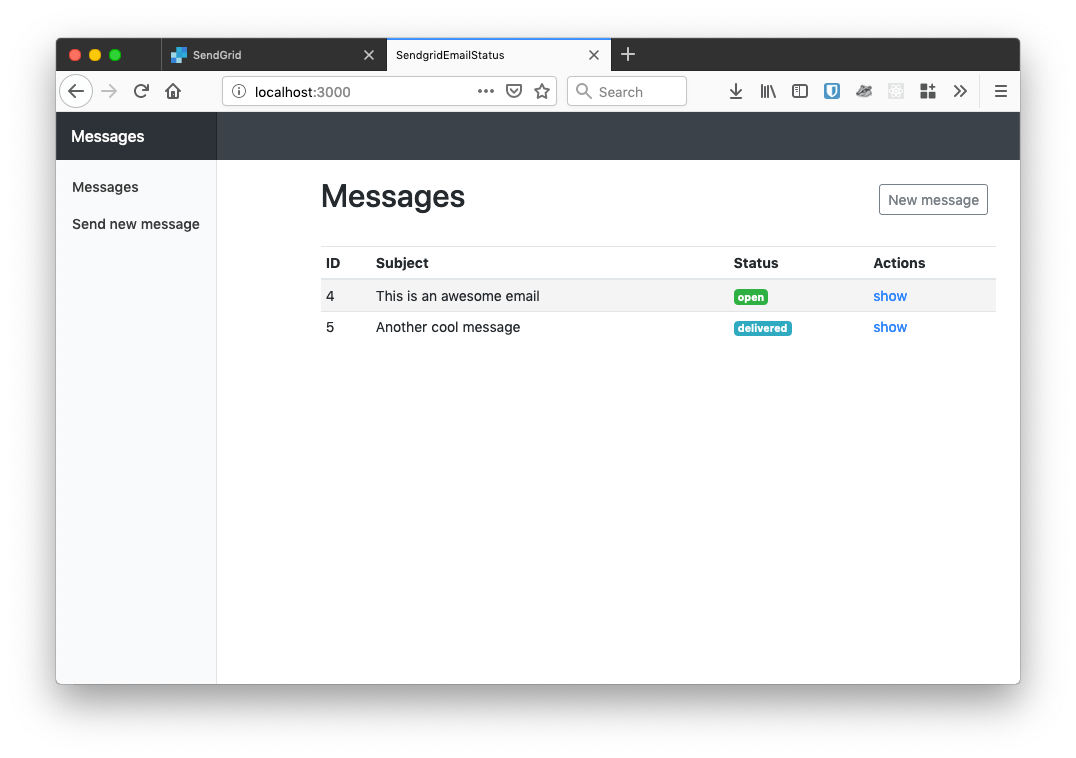
You can now visit the application at http://localhost:3000/. You can use the application to create messages, but no emails will be sent yet.
Sending emails in Rails with SendGrid
We're going to be sending emails with Action Mailer so we'll need to configure it to use SendGrid. You could do this by integrating with the SendGrid SMTP API, but that doesn't give us the full power of the full SendGrid API. Instead, let's install the sendgrid-actionmailer gem (originally built by former Twilion and Gridder Eddie Zaneski).
Configuring Rails with SendGrid
Open the Gemfile and add gem 'sendgrid-actionmailer', '~> 2.4.0' to the bottom of the file. Install the gem by running bundle install on the command line. Now we need to configure the gem with our SendGrid account.
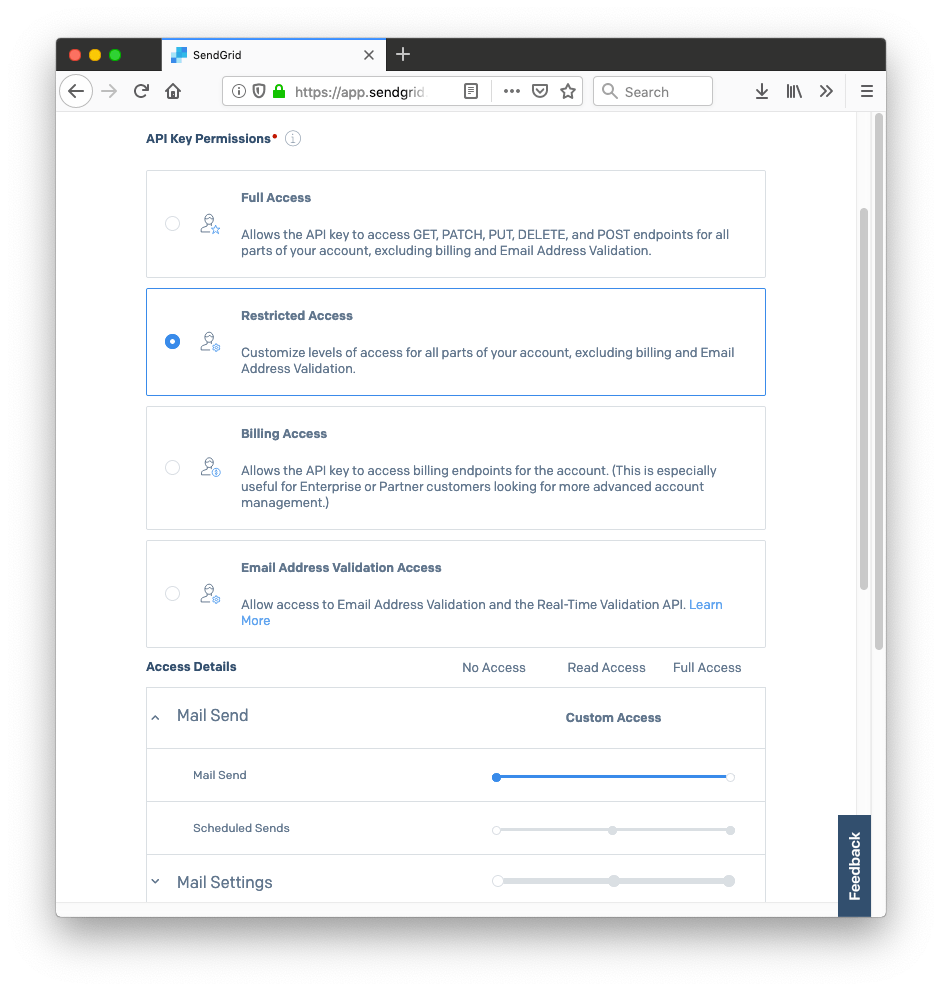
Create a new SendGrid API key to use with the application, it only needs the "Mail send" permission.
Open config/env.yml and enter the new API key you created as well as an email address you want to use as the “from address” for your emails. Next, open config/application.rb and within the Application class add the following:
This configures Action Mailer to use the sendgrid-actionmailer gem to send emails and configures the gem with the API key we just created. Now we can create and start sending emails.
Building an email with Action Mailer
Now we have everything configured we can start to turn our messages into emails. We'll start by generating a new mailer class for our message model.
We're going to create the entire content of the email from the message object in the database. In app/mailers/message_mailer.rb create a new method to generate an email. Within a mailer method you can access any arguments passed in via the params hash. When we call this we'll pass in a message object. We need to return a mail object that we construct with the mail method. Here we set the to, from and subject of the email.
You'll note that we are also passing a custom_args hash with the ID of the message in our database. custom_args are arguments we are passing to the SendGrid API and will be sent back to our application with any webhook request that references the email we are sending. Support for custom arguments is the main reason we chose to use the sendgrid-actionmailer gem for this application.
Email templates
We need to create templates within our Rails application for sending the email too. We'll create both text and HTML templates and they will both contain the body of our message object. Create the two files app/views/message_mailer/email.text.erb and app/views/message_mailer/email.html.erb. In the text file add:
In the HTML file add:
We're ready to send our messages as emails now.
Sending emails from a controller
Open up app/controllers/messages_controller.rb and add the code to create a mail object and send it if the message is saved successfully.
We're using deliver_now for the purposes of this demo app, but you would probably use deliver_later and a background job in a real application. Background jobs allow you to make API requests outside of the context of the web request. This improves performance of your application and keeps your users from waiting. You can read more about how this works for other calls in my post on delaying API calls to Twilio with Active Job and Sidekiq.
Restart your application and create a new message object. It should save successfully in your database and send an email to the address you input in the form (if you don't have a domain set up in SendGrid and you're testing with your personal email address, check your spam inbox in case it doesn't appear in your main inbox).
Congratulations, you're now sending emails with SendGrid through Rails. Let's look at how to get updated on the status of these emails now.
Updating email status using the Event Webhook
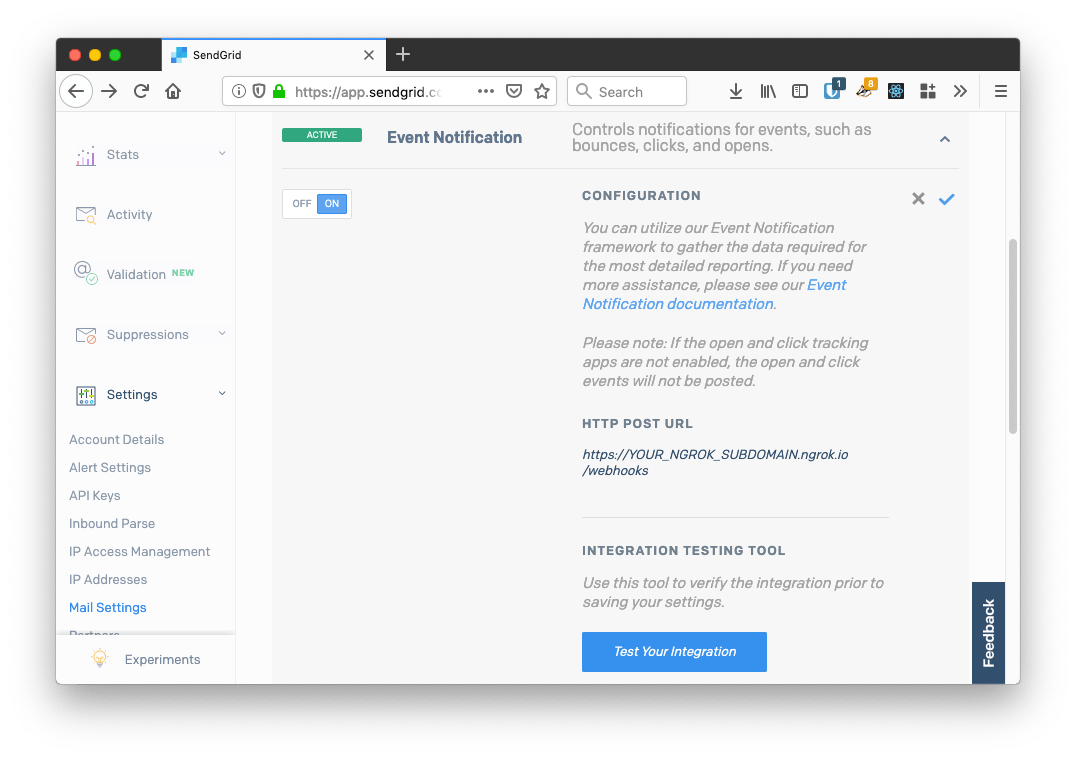
In your SendGrid dashboard open the Mail settings and check out the Event notifications. If you follow the instructions you will see a sample of an event webhook. Let's build an endpoint in our application to receive these requests.
Receiving webhooks
Generate a new controller to receive the webhook requests:
Open up the new controller at app/controllers/webhooks_controller.rb. First up in this controller we need to skip the cross site request forgery (CSRF) protection. This controller will be used to receive webhooks which won't include the CSRF token that Rails includes in requests. As this is just a demo app, we won't add any more protection to this endpoint, but you can do so with either HTTP basic authentication or by including a secret within the request.
Add this code to skip the CSRF check:
When SendGrid sends an event webhook, it collects the events for multiple emails at the same time. For the purposes of this application, we will loop through all the events sent in the webhook and update each Message referenced. This is also something that would be better to do in the background using Active Job in a production application.
The custom parameter we added earlier is sent as part of the data in the event, so we can use the event "id" to find and update our Message object. Add the following to your WebhooksController:
Let's add a route for this action too. In config/routes.rb add:
Now we need to hook this action up to SendGrid.
Connecting our webhook
To receive webhooks while running the application locally we'll need to open up a tunnel to our machine. This is where I recommend using ngrok and if you've not used it before you can follow my post on how to install and use ngrok. There's one extra step for Rails though. Once you have started ngrok with the command ngrok http 3000 you will get a URL you can use to access your application. You need to add the host name to your Rails configuration so that Rails will serve requests from that domain.
Open config/environments/development.rb and after the rest of the config, add the ngrok hostname to config.hosts.
Once you have restarted your application and have ngrok pointing at it, add your ngrok URL plus the path to the webhooks controller as the HTTP POST URL under Event Notification in your Mail settings in your SendGrid dashboard. The URL should look like https://YOUR_NGROK_SUBDOMAIN.ngrok.io/webhooks.
Testing it all out
Create a new message in the application and send it. Then wait.
SendGrid batches up event notifications by a maximum size or every 30 seconds, whichever comes soonest. We'll probably have to wait 30 seconds for this one. Once the event arrives we can see it triggered in the logs and if we refresh the list of emails we can see that the status of our message has updated. Head into your email account and read the email, wait again for the event and see that the message now has the status opened.
Sending and updating emails is easy
In this post you saw how to connect Rails, Action Mailer and SendGrid together via the SendGrid API and receive event notifications via webhook from SendGrid.
To make this happen we sent a custom parameter along with the email, set up event notifications and were able to use the custom parameters sent back with the webhook to update objects in our system. The whole application can be found on GitHub.
There's more you can do with this, starting with taking all the synchronous calls to APIs and handling events and turning them into background jobs. You could also make the email dashboard work live, using Action Cable to send update events to the UI. This email program only sends one email at a time too, it could be extended to create multiple email objects for multiple recipients.
If you have any questions or if you're doing anything interesting with SendGrid email and Rails, I'd love to hear. Leave me a comment below, drop me an email at philnash@twilio.com or hit me up on Twitter.

Related Resources
Twilio Docs
From APIs to SDKs to sample apps
API reference documentation, SDKs, helper libraries, quickstarts, and tutorials for your language and platform.
Resource Center
The latest ebooks, industry reports, and webinars
Learn from customer engagement experts to improve your own communication.
Ahoy
Twilio's developer community hub
Best practices, code samples, and inspiration to build communications and digital engagement experiences.