Unit Testing Twilio Programmable SMS in .NET Core with xUnit, Moq, and Visual Studio 2019
Time to read: 19 minutes
May 04, 2020
Written by
Reviewed by

Testing your C# code is important, and it’s even more important when your code relies on external services. Writing tests will not only help you catch bugs, it will help you write better code by thinking about factors that affect the structure and resilience of your software.
Visual Studio 2019 includes some great tools for creating and running unit tests, and you can put them to work without a lot of setup or configuration. Whether you’re writing a new app or trying to improve a brownfield program, it’s easy to integrate unit testing into your workflow.
Twilio understands the importance of testing and provides resources for you to use when you’re creating unit tests for code that interacts with Twilio products, like Programmable SMS. To show you how easy it is to get started, this post will walk you through the process of building and testing a .NET Core console application that sends SMS messages with Twilio.
Understanding testing strategies
When your application uses third-party resources, like Twilio Programmable SMS, you need to consider how you’re going to test the components of your application that interact with the external functionality. You need to consider how to test both internal functionality that uses data from an external component, but doesn’t interact with it directly, and internal components that interact directly with an external resource. These tests have to verify that:
- your app’s internal components work with the external resource correctly when everything is working normally
- errors from the external resource are handled appropriately
- problems with interacting with remote resources are handled effectively
When you’re using web APIs you’ll need to handle problems that are inherent with the internet: slow response times, dropped connections, and unavailable services.
There are two basic strategies for building tests to meet these requirements. Which you use will depend on the type of external resource you’re using and the testing capabilities available for the external resource.
Unit testing
The best scenario from a testing perspective is to perform unit tests that make actual calls to the external resource. This can come with some consequences, such as requiring a large number of calls. Consider a basic unit testing scenario with 5 to 10 tests that execute each time you run your builds. In an active development project it would be easy to imagine a situation where you would make hundreds, if not thousands, of API calls in a single day, particularly if your project has multiple developers or if there are multiple build processes.
Some vendors may not want you to exercise their APIs in this way; testing traffic can degrade performance for production users. Other vendors may limit the rate at which you can call the API for test purposes or cap the number of API calls in an hour or day. You might also be using an API that incurs a cost for each API call, or a cost above a certain number of calls. These constraints need to be addressed in your test plan.
As you’ll see, Twilio has resources that address these concerns. When you’re building solutions using Twilio Programmable SMS you can make actual API calls in your unit tests.
Integration testing
An alternative would be to move testing of external resource calls into integration testing. This isolates the external components from unit tests and requires them to be called less frequently than when you are doing unit testing. This approach works best when you are able to abstract out your entire implementation of the external resource to an interface and when you only need to test the external resource when you are making changes to the implementation of its interface.
In this post you’ll see how to make actual calls in unit tests and how to build your components so you can simulate actual calls with a mocking framework. When you use mocking to perform unit tests you can move actual calls to integration tests.
Creating a unit testing strategy
The first level of a test plan is verifying integration with the external resource to be sure the code you’re writing adequately handles its states and behaviors in normal operation. Consider how to verify that your code is interacting with the external resource correctly and that you’re getting the responses you expect. Think about what data and conditions are considered out-of-bounds.
The next tier of testing should be focused on handling exceptions. These can be problems in your code, problems in the way your code is interacting with the external resource, and problems that the external resource is experiencing on its own. For example, most web APIs will return HTTP status codes to indicate client (4XX) or server (5XX) errors. They might also return a success (2XX) response and include a status code in the body of the response that indicates an error condition.
The third level of your unit test plan should address what happens when the external resource is unavailable. In some cases your app might not be able to fulfill its must-have requirements. In others it may be possible to fail gracefully. Sometimes it’s also possible to retry and succeed without involving the user. The code under a unit test is often on the front lines of all these scenarios. Testing for them will give you a better understanding of how your app should handle them.
Understanding the tutorial project
In this tutorial you’ll build a simple .NET Console application to send SMS text messages using Twilio Programmable SMS by entering a destination phone number and message through the command line interface. The Twilio REST API helper library makes it easy to access Programmable SMS and other Twilio products. It’s installed as a NuGet package.
The messaging application will be one of two projects in a Visual Studio solution. The second project will be a test project. Using the test project, you’ll be able run unit tests against the functionality in the console app, including the parts that interface with Twilio.
The test project will use the xUnit.net testing tool for .NET Core. The xUnit.net tool is free, integrates with the Visual Studio test runner, and is installed as a NuGet package.
The test project will also use the Moq library for .NET, which is also free and installed as a NuGet package. The Moq library provides a way to test code that relies on external dependencies, like databases and APIs, without having to use those resources. This helps separate problems in the code from problems with the external resources.
Prerequisites
You’ll need the following tools to build and run the case study project:
.NET Core SDK 3.1 (includes the APIs, runtime, and CLI)
Visual Studio 2019 (the Community edition is free)
C#
.NET Core cross-platform development workload
GitHub extension (for cloning the companion repository)
You should also have a working knowledge of C# and the Visual Studio user interface.
The complete source code for this tutorial is available in a companion repository on GitHub.
Getting your Twilio phone number and account credentials
If you haven’t already done so, sign up for a free Twilio trial account using the link above.
You’ll need to verify a personal phone number capable of receiving SMS messages to be able to test the SMS application in this tutorial. Trial accounts can only send messages to a verified phone number.
You’ll also need a Twilio phone number. Go to the Phone Numbers page on your Twilio console and add a number with SMS capabilities. You won’t be charged for the number you register in your trial account. Copy the phone number someplace handy.
For more information on getting started with your Twilio trial account, see How to Work with your Free Twilio Trial Account.
Your Twilio account credentials enable you to access the Twilio products available in your Twilio account. Get your Twilio Account SID and Auth Token from the upper right-hand side of the dashboard in your Twilio console. These are user secrets, so handle them securely.
One of the best ways to handle user secrets on a development system is to store them as environment variables; this helps prevent them from accidentally being checked into a publicly accessible source code repository. You can also store them in the appsettings.json file for your solution or use the Secret Manager tool. For more information on the options, see Safe storage of app secrets in development in ASP.NET Core on docs.microsoft.com.
Storing your account credentials as environment variables makes them automatically accessible to the Twilio CLI. While the CLI isn’t necessary for this tutorial, it’s a handy thing to have.
The code in this tutorial will work with either environment variables or appsettings.json values. In addition to your Twilio credentials, you can also use your Twilio phone number this way.
To store these values as environment variables on Windows, open a Command console window and execute the following command-line instructions, substituting your credentials for the placeholders. Store the phone number in E.164 format (“+18005551212”).
For more information about storing your credential as environment variables, including instructions for macOS and Linux, see Setting Twilio Environment Variables in Windows 10 with PowerShell and .NET Core 3.0.
If you choose to put your Twilio credentials in an appsettings.json file, remember to be sure to go to the properties window and set the Copy to Output Directory property to “Copy if Newer” or “Copy Always” to ensure that the appsettings.json file will be there for debug runs of your application.
Setting up the Visual Studio solution and SMS project
Create a new C# Console App (.NET Core) named TwilioSmsConsole in a directory location under which you’d like to place the folder structure for the solution. The solution name can be the same as the project name. Because this solution will have multiple (two) projects, don’t put the solution files in the same directory as the project.
When the tooling is finished generating the solution and project, you should see a Program class with a Main method with one line of “Hello World!” code. Now would be a good time to add the solution to source code control.
Open the Package Manager Console window and confirm the value for the Default project is “TwilioSmsConsole”.
Execute the following Package Manager Console command-line instructions:
The VS 2019 package manager will install a number of dependencies along with each of the NuGet packages.
Creating a settings class
Your Twilio credentials, Account SID and Auth Token, and your Twilio phone number will be used in a number of places in the application. It will be convenient to have a class to represent them.
Under the TwilioSmsConsole project, create a C# class file named TwilioSettings.cs and replace the entire contents with the following C# code:
Because this is a C# POCO (“plain ol’ class object”) that doesn’t rely on any .NET APIs, it doesn’t need any using directives.
Creating an SMS service interface and implementation
Using interfaces to define in an abstract way what the components of a program are going to do in a specific way helps implement the dependency inversion (inversion of control) principle that’s considered to be an important element of good software design. It makes it possible to use the dependency injection middleware in .NET Core to reduce class coupling.
Interfaces also make it easier to implement tests by substituting a mock object that implements an interface for the actual implementation. This is how code that depends on external resources can be tested without involving the external resource. It’s how the Moq library facilitates testing.
Interfaces can be simple. For the SMS service in this project, the interface only needs to define one method with two parameters.
Under the TwilioSmsConsole project, create a new C# class file named ISmsService.cs and replace the contents with the following C# code:
By convention, an interface name begins with a capital “I”. While it’s sometimes convenient to put simple interfaces like this one in the same file with the class that implements it, this project follows the more canonical pattern of putting them in separate files. Since there isn’t always a one-to-one mapping of interfaces and implementations, separate files make it easier to manage the growth of the application’s code.
The ISmsService interface implementation will use the Twilio helper library for .NET to create and send SMS messages.
Create a new C# class file named TwilioSmsService.cs in the project root and replace the contents with the following C# code:
Note that the maximum length of a single SMS message is 160 characters. Twilio SMS can send a message of up to 1,600 characters as a segmented SMS message.
You can also see that new instances of the TwilioClient class are instantiated using a static method, Init instead of the more conventional new way of doing things in C#.
The same is true of the MessageResource class, which represents an inbound or outbound message. You can learn more about the Message Resource in the Twilio Programmable SMS API reference documentation.
Your Account SID, Auth Token, and Twilio phone number are provided to the TwilioSmsService implementation through dependency injection. You’ll configure dependency injection for the TwilioSmsService class in a forthcoming step.
Creating an internal job process
It’s not uncommon for a service, such as an external resource like Twilio, to be used by other components which are themselves provided to still more components through dependency injection. To provide comprehensive testing coverage, you’ll want to create unit tests for each component. Dependency injection facilitates this, and you can see how through a simple example using an interface and an implementation.
Create a new C# class file named ISampleJob.cs in the project root and replace the contents with the following C# code:
Create C# class file in the project root named SampleJob.cs for the implementation and replace the contents with the following C# code:
In real life — like in a production app — the code in an internal process implementation will be more complex. For example, the app might retrieve a list of phone numbers from a data persistence layer through a data repository, which would itself be made available through dependency injection.
The internal process could check the numbers to determine if they’re capable of receiving SMS messages using Twilio Lookup. Then it could iterate through the SMS-enabled numbers and send a message to each.
The interface for the repository could be used to construct tests, with the implementation provided by a mocking framework so the actual database wouldn’t be required. This would focus the test on the relevant code, provide predictable results, and make the component easier to debug.
Setting up application configuration and dependency injection
When a .NET Core application starts up it runs the Main method of the Program class, as you likely know. By convention, this is the place to put code that performs any configuration the application requires to run.
The TwilioSmsConsole application needs to use the Twilio credentials stored in environment variables or the appsettings.json file. You can add these resources to the application’s configuration using the ConfigurationBuilder class. The configuration process in .NET Core is similar to configuration for ASP.NET Core apps, but starts at a more basic level because console apps don’t require the same infrastructure as web apps.
A couple of APIs from the Microsoft.Extensions.Configuration namespace are required to build the app’s configuration.
Add the following using directives to the top of the Program.cs file in the project root:
To generate the configuration, replace the “Hello World!” statement in the Main method of the Program class with the following C# code:
Both the appsettings.json file and environment variables are included as configuration providers. Values from providers added later take precedence over values derived from providers loaded previously, so environment variables will take precedence over appsettings.json settings. Since the appsettings.json file is optional, if it doesn’t exist the configuration will continue with environment variables.
You can learn more about the .NET Core configuration process in Setting up .NET Core Configuration Providers. This post is helpful for understanding how configuration works in projects that aren’t ASP.NET Core projects.
For more detail on the configuration process — except which configuration method to use — and how specific configuration providers work, see the Configuration in ASP.NET Core article on docs.microsoft.com.
Configuring dependency injection is another task that’s part of application startup. In a simple app like this one you can put the code in the Main method.
Insert the following C# code below the block of code you previously added to the Main method:
As you build the service collection you can also configure the classes you’re making available through dependency injection. The code configures the TwilioSettings class this way, pulling the values out of the configuration just created.
Dependency injection (DI) in .NET Core requires you to identify the service lifetime associated with a dependency. This tells the DI middleware when to create a new instance of the dependency and how long those objects should live. A single-user console application only requires one instance of the TwilioSmsService and SampleJob classes, but a web application is likely to require an instance for each client request.
Creating a user interface
Even a console application has to interact with a user. The TwilioSmsConsole app needs to collect the recipient’s phone number and the SMS message to send, then invoke SampleJob.SendMessage using those arguments. It also needs to report on the status of the messaging process. In this simple example, you can do this right in the Main method.
Insert the following C# code at the bottom of the Main method:
Notice how the message is actually sent. An instance of the ISampleJob is retrieved from the serviceProvider service collection, rather than directly calling an instance of the concrete class SampleJob. If the implementation of ISampleJob changes in SampleJob the calling code in Main doesn’t have to change.
You can also see that it’s possible to use a resource from IServiceProvider through a mechanism other than dependency injection in a class constructor. GetService(Type) is the only method of IServiceProvider.
Running the application
You’re ready to start sending messages! Just remember that with a trial account you can only send them to your registered phone number.
Run the app and enter your phone number and a message. If everything is working correctly you should see a new text message on your phone in a few moments.
If you don’t receive an SMS message you can investigate by checking your Twilio Programmable SMS Dashboard. There you can see the status of all the messages sent and received through your Twilio phone number.
If you don’t see any entries your messages are not getting through to Twilio. This might be because your Account SID, Auth Token, and Twilio phone number aren’t being passed to the Twilio helper library correctly.
But it could also be because of other issues with the code, particularly as your application grows. Sounds like a good candidate for unit testing!
Creating a testing project
Unit testing with xUnit.net, and other testing frameworks, is done with a separate testing project in the Visual Studio solution with the project(s) containing the code to be tested. The convention is to name the test project with the name of the project to be tested followed by “.Test”. This helps with organization in a solution with many projects because the test projects are arranged next to the code projects.
In the TwilioSmsConsole solution, create a new C# xUnit Test Project (.NET Core) project named TwilioSmsConsole.Test. The settings on the Configure your new project page should be as follows:
Project name: TwiloSmsConsole.Test
Location: C:\localpath\TwilioSmsConsole
Solution: Add to solution
Solution name: TwilioSmsConsole [This option will not be editable.]
The .NET Core tooling will add the new project to the Solution Explorer. The project icon includes a green Erlenmeyer flask.
Delete the UnitTest1.cs file. You’ll be creating your own class files for tests.
Open the Package Manager Console window and select “TwilioSmsConsole.Test” in the Default project list. Then execute the following command-line instruction:
The Package Manager will install the Moq framework and a bunch of dependencies. Verify they have been added to the right project by opening the Dependencies > Packages node under the TwilioSmsConsole.Test project and ensure that Moq version 4.41.1 (or higher) is listed.
Because the test project is a separate assembly from code being tested, it needs a reference to the TwilioSmsConsole project to find the namespaces it needs there.
Right-click on the Dependencies node under the TwilioSmsConsole.Test project and click Add reference. In the Reference Manager window, click the checkbox next to TwilioSmsConsole and click OK. There should now be a Projects node under the Dependencies node and TwilioSmsConsole should appear as a project dependency.
Testing the SampleJob component
The SampleJob class is an example of a true business process that has a dependency on an ISmsService implementation. As you write unit tests for this process your objective is to make sure that the code is properly calling the ISmsService. Your tests will trust that the implementation of ISmsService itself will deliver the messages. This illustrates how you are able to decouple your business code from the actual implementation in this case.
Create a new C# class file named SampleJobTests.cs under the TwilioSmsConsole.Test project root and replace the contents with the following C# code:
This defines the test class with a default constructor that builds objects needed for testing using the Moq framework’s functionality. A mock ISmsService is created which will allow you to simulate the behavior of the SMS service and the _smsServiceMock object is used to create an instance of the SampleJob class so you can implement tests for the SampleJob class. The Moq Quickstart will give you an overview of what you can do with the framework.
Unit testing in .NET Core typically follows the Arrange, Act, Assert pattern of writing tests:
Arrange by initializing objects and setting the data values to be passed to the method being tested.
Act by invoking the method under test.
Assert by comparing the results of the method call to a set of expected results.
For a more complete introduction to unit testing in Visual Studio, see Unit test basics in the Visual Studio docs.
The most basic test you can perform is to test the “happy path”, the one the code follows when everything works as expected. For the SampleJob.Send method, this means arranging the phone number and SMS message, acting by calling the SendMessage method, and asserting that the mocked SMS service, _smsServiceMock accepts these parameters and successfully sends a message once.
Add the following C# code below the SampleJobTests() constructor in the SampleJobTests.cs file:
Verify the test is working properly by opening the Visual Studio Test Explorer window and clicking the green double-arrow Run All Tests button (Ctrl+R, A) to run all the tests. You should see a hierarchy of green circles with white check marks indicating the tests pass if everything is set up correctly.
If the SampleJob class did more things, like call a method on another class to verify that the value of toPhone is a valid phone number in E.164 format, there would be more tests necessary. The Arrange, Act, Assert pattern can help you think of what data to pass, what actions to perform, and what results to expect if the method is working correctly. For example, if you’re checking for valid phone numbers a test would pass if an error was raised for trying to use “Gary” as a phone number.
The SampleJob class, and its corresponding interface, are a good place to start experimenting with Test-driven development. You can expand the capabilities of SampleJob, or a class like it, by thinking about requirements first, then coding an interface and an implementation.
Testing Twilio Programmable SMS services with xUnit
Testing, particularly automated testing, usually involves many iterations. When you’re using services like SMS messaging that cost money this can be a concern. Even when you have free credit on your trial account, you don’t necessarily want to be spending it running and rerunning tests.
Fortunately, Twilio has anticipated these concerns and furnished your account with test credentials that enable you to use automated testing with Programmable SMS and other Twilio products without getting charged for buying a phone number or sending SMS messages.
Twilio Test Credentials also come with some “magic values” that enhance the testing process. They are specific phone numbers and area codes that always work or fail so your tests will have predictable results.
The test credentials include their own Account SID and Auth Token. By using these credentials you can prevent your tests from interacting with your production account in any way.
To get your test credentials, log into your Twilio console and locate the Test Credentials section under Dashboard > Settings > General. Copy the Account SID and Auth Token to a safe place. These are user secrets, so you won’t want to hard-code them into your tests.
Fortunately, you can store them as environment variables and retrieve them in your tests to mock up the TwilioSettings object.
Execute the following command-line instructions in a Windows Command Prompt or PowerShell console window, substituting the values from your Twilio console for the placeholders:
You’ll be using one of the magic values as the “from” number in your tests.
Create a new C# class file named TwilioSmsServiceTests.cs in the root of TwilioSmsConsole.Test project and replace the contents with the following C# code:
This code will load your test credentials from your environment variables. If you’re using the appsettings.json file for configuration, you’ll have to create a corresponding file in the TwilioSmsConsole.Test project.
The TwilioSmsConsole.TwilioSmsService.Send method includes input validation for the recipient and message parameters. They’ll each throw an ArgumentNullException if they’re blank. This is an excellent place to start testing the method: you can verify that the exceptions are being thrown as expected.
Add the following C# code to the TwilioSmsServiceTests class below the constructor:
The [Theory] decorator enables you to run the same test with varying data supplied in [InlineData()] decorators. In this way you can test a method with a number of different values without having to repeat the test code.
These tests arrange some invalid values as InlineData and act by passing them to the TwilioSmsService.Send method. Then they assert that the Send method will throw an ArgumentNullException with the name of the offending parameter.
These are runnable tests, so go to the Test Explorer panel and try them out. You should see a series of green lights as the tests chug through to completion.
So far you’ve verified some aspects of the code you wrote in the TwilioSmsService class: it’s throwing errors when it should. But what about testing how TwilioSmsService handles responses from the Twilio Programmable SMS API?
This is where the “magic numbers” from the Twilio test credentials are useful. The next two tests demonstrate how to test for an API error using a magic number that always fails and a magic number that always works (making it more reliable than real-life SMS).
Insert the following C# code below the current tests in the TwilioSmsServiceTests class:
Go to the Test Explorer panel, expand the list of tests, and click the Run All button. You should see a series of green lights. If you click on the top node, TwilioSmsConsole.Test, you’ll see some statistics displayed in the pane at the bottom of the panel, including the number of tests and the duration of the testing process. 807ms is the value for an i7-8550U CPU with 16 GB RAM.
Go back to the Solution Explorer and open TwilioSmsService.cs. All editions of Visual Studio 2019 provide at least some features of CodeLens, so you can see not only the number of references to code elements, but also the total number of tests and total passing tests for referenced methods, as shown in the following screenshot:
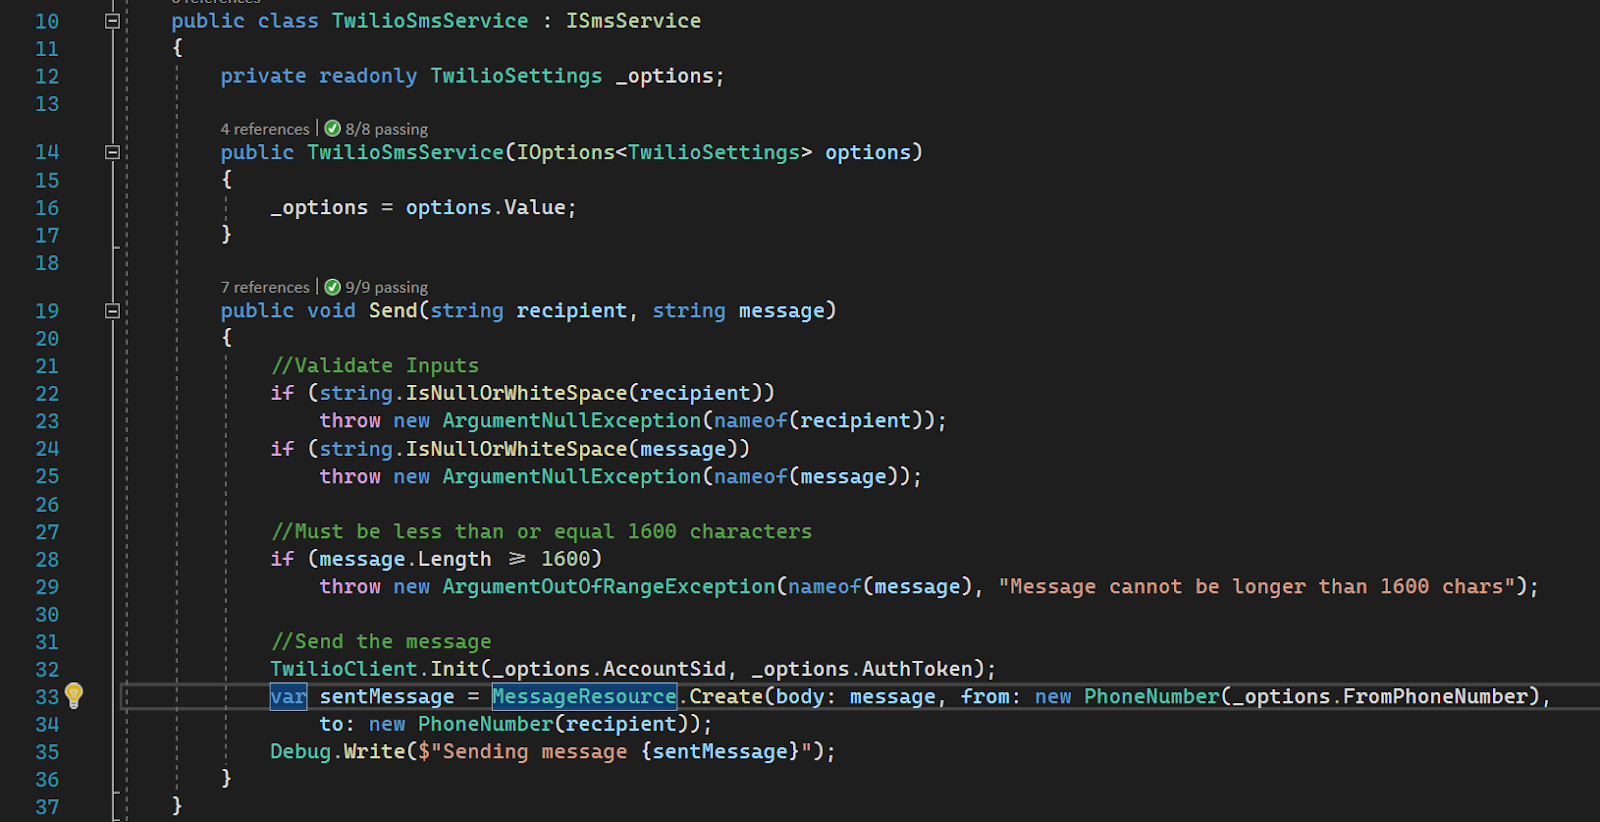
Click on “9/9 passing” for the Send method. you’ll see a list of the tests and their running time. You can even run the tests without leaving the open file. How cool is that?
Debugging .NET Core unit tests
You can set breakpoints in tests and debug tests just like in program code. You can also use code coverage and profiling tools to gain more insight into why a test might take so long to run or whether or not your tests are exercising all your code.
Potential enhancements
There are a number of ways you can build on this project to learn more about unit testing in VS 2019 and about using and testing Twilio products.
- Pull the user interface code out of
Program.Mainand abstract it with an interface to facilitate enhancement and testing. - Create additional services to validate phone numbers and their capabilities with Twilio Lookup.
- Build a service to load phone numbers and messages from JSON files.
- Make your services and your calls to the Twilio API asynchronous.
- Use the return values from Twilio to let the user know the status of message delivery.
- Create a data persistence layer and store information about the messages you’ve sent and their delivery status.
As you can see, there are a number of enhancements you can make to this humble demonstration project that can help you learn more about the concepts, techniques, and resources discussed in this post.
Summary
In this post you saw how to create a .NET Core 3.1 application that sends SMS messages with Twilio Programmable SMS using the Twilio helper library for .NET Core. You saw how to store your Twilio credentials securely as environment variables and how to load them into your app using the .NET Core configuration builder. You saw how to create interfaces for your implementation classes and how to set up dependency injection using the .NET Core service provider. You also saw how to create a test project and build unit tests with the xUnit framework. The tests included creating mocks for the SMS service using the Moq library.
Mitchel Sellers, a Microsoft MVP and ASPInsider, enjoys sharing his experience in software development with others. He has operated his company IowaComputerGurus since 2006 focusing on delivering quality technology solutions to customers across the globe. He regularly blogs about technology on his personal blog. When he is not working with technology you will find him with his family and/or in an airplane somewhere! Mitchel can be reached on Twitter or via email.


Related Resources
Twilio Docs
From APIs to SDKs to sample apps
API reference documentation, SDKs, helper libraries, quickstarts, and tutorials for your language and platform.
Resource Center
The latest ebooks, industry reports, and webinars
Learn from customer engagement experts to improve your own communication.
Ahoy
Twilio's developer community hub
Best practices, code samples, and inspiration to build communications and digital engagement experiences.