You Too Can Tweet like Larry King
Time to read: 8 minutes
June 23, 2015
Written by

Earlier this year I wrote about sending and receiving Tweets using the Twilio and Twitter API. It turned out that I published the post on the same day as this article in the Washington Post on veteran broadcaster Larry King. Ricky, my buddy and fellow developer evangelist, sent me the link because of the following description of how Larry King sends Tweets.
When Larry King wants to tweet, he doesn’t log onto the Internet. He pops open the flip phone stored in the shirt pocket between his suspender straps and calls the number for a voicemail set up specifically for this purpose. Then he dictates a thought that will be picked up by an assistant and transcribed onto his @KingsThings Twitter account. And nearly 2.6 million followers are there to receive it.
This burned away in the back of my mind for a while until eventually inspiration hit. What if everyone could have an assistant to send Tweets for them? Sadly, that would cost quite a lot. Larry King can afford it of course, but could we build this service for everyone? If you’re thinking that this is something we can solve with Twilio, then you’re right! Twilio can record calls, like a voicemail system, and then transcribe them. Let’s see how we can add this to our existing application.
From SMS to Voice
As part of the series on Tweeting by SMS, we built up an application that could send Tweets when we sent a text message and send Twitter notifications back via SMS. We could extend this application once more to let us send Tweets from a voice call. To do this, we’ll need a few things:
- Ruby 2.2.2, the latest version, to run the application
- A free Twilio account and a phone number
- A Twitter application with read and write privileges
- The Twitter SMS application available from GitHub
If you already have the Twitter SMS application setup then jump on down to the next part where we start to implement this. If you’re just getting started, then clone the app from GitHub and we’ll walk through where to enter your credentials.
To enter your credentials you need to copy the config/env.yml.example file to config/env.yml.
Then grab your Twilio Account SID, Auth Token and phone number, your Twitter application credentials and your own phone number into the spaces in config/env.yml. If you need to find out how to create any of those credentials, this blog post has all the answers.
Once you have everything set in your config/env.yml file, install the dependencies with bundler and start the app to make sure everything is working.
Now we’re all set up, let’s set off down the road to tweeting like Larry King and build our own Twitter voicemail assistant.
Phoning it in
So far the application has two endpoints and some other features:
- /messsages receives SMS messages sent to your Twilio number and sends them out as Tweets
- /heath, a simple health check for a monitoring service
- the twilio method, a shortcut to an authenticated Twilio REST client
- the twitter method, a shortcut to an authenticated Twitter REST client
- a Twitter streaming client, which listens for notifications from Twitter and sends SMS messages to your phone number
In order to Tweet like Larry King, we’re going to use Twilio’s recording and transcribing facilities. When we phone our Twilio number we’re going to need a new endpoint so that we can tell Twilio to record and transcribe our message. We’ll also need an endpoint for when the transcription is complete and Twilio sends us the text.
Open up app.rb and let’s build that new endpoint. We’ll call it /voice and we need to return some TwiML. I’m going to build in a message to greet the caller and then the instruction to record the call.
The <Say> verb speaks the instructions to the caller. I’ve set the voice to Alice and the language to “en-GB” so that she speaks with a British accent. King might be a fan if I got it to tell jokes too.
The <Record> verb then sets the parameters for the recording. I’m only going to record for 30 seconds, that’s enough time to speak a Tweet (and the transcription only works to a maximum of 2 minutes anyway). I’ve set transcribe to true and included a transcribeCallback to which Twilio will send an HTTP POST request when the transcription is done. Notably the transcription is done once the call has ended, so this callback comes asynchronously. If you don’t include the callback Twilio will still transcribe the message, but you will have to call to the REST API to retrieve the transcriptions.
One further point about the <Record> verb, once recording is complete Twilio will make another HTTP request to your application to find out what to do next. You can set the endpoint to make that call to using an action attribute on the <Record> element, but if you leave it blank Twilio will use the current endpoint. For this application this will keep recording messages in a loop until you hang up the call. This could be useful if you have many thoughts in a row that need to be tweeted, so we’ll leave it like this for now.
Let’s add the transcription callback too. Twilio sends the contents of the transcription in the body of the request. To test, we’ll just log out the contents of the text.
Testing it out
In order to test all of this, we’ll need to start the application up and make it available publicly so that Twilio can send the webhooks through.
The application should be running on localhost on port 3000. To make the application visible publicly I like to use ngrok. Follow the installation instructions on ngrok.com for your platform and then start an http tunnel to port 3000.
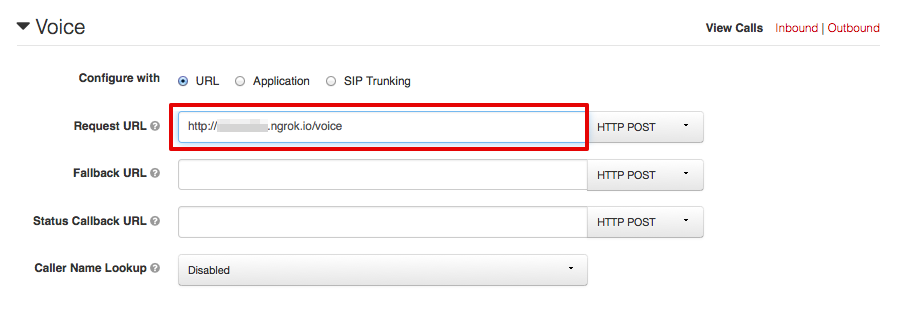
Ngrok will show you the URL that is now forwarding to your localhost, grab that URL and head to your Twilio numbers dashboard. We need to set our phone number voice URL to point at this URL. Edit your phone number and enter the ngrok URL with the path /voice into the Request URL field as shown below:
With all that in place, we can test our recording and transcription out. Give your number a call, leave a message and then check out the server log to see the transcription arrive. If it all works, it should look a bit like this:

Sequence has been shortened
If that works, then all we have to do is connect the transcriptions endpoint up to Twitter and we’ll be Tweeting like Larry King in no time.
Sending to Twitter
Since we’re using the existing SMS to Twitter app, we have a helper method available that gets us access to an authorised Twitter client. All we need to do is call the update method on the client, with our transcribed text and we’re tweeting. To tweet more like Larry King, you could throw a hashtag in there. King likes to use #itsmy2cents.
Restart your server, pop open the flip phone stored in the shirt pocket between your suspender straps call your Twilio number and dictate your thoughts. Now you’re on your way to amassing 2.6 million followers as you Tweet like Larry King.
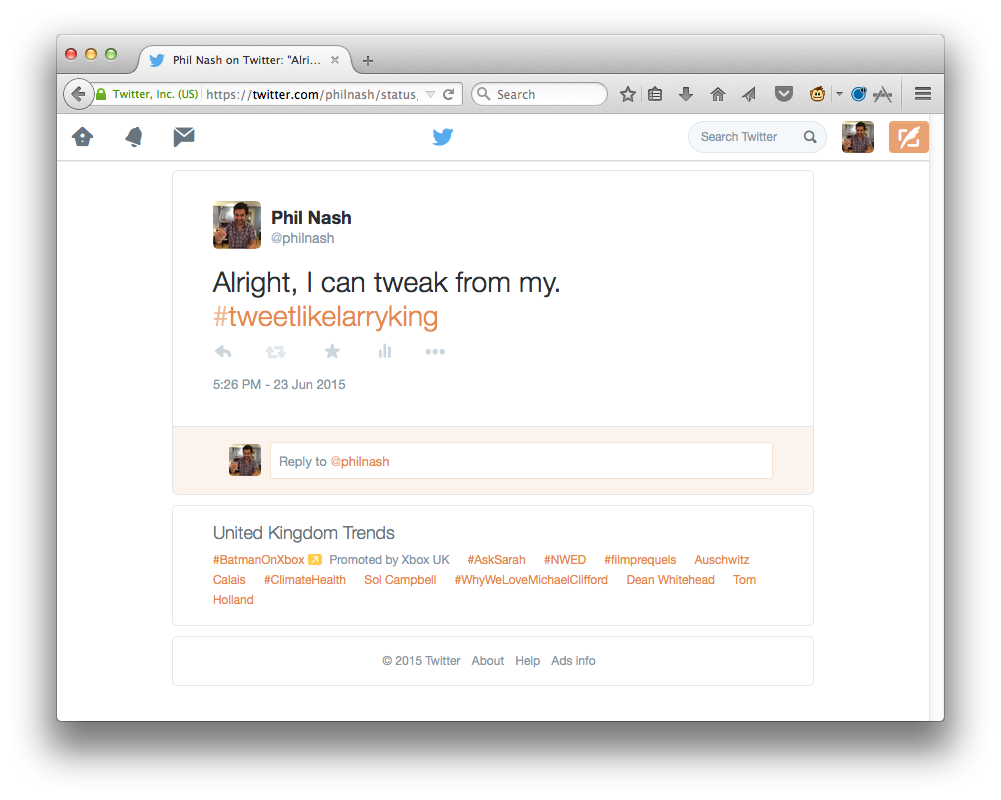
Ok, so my first go wasn’t perfect…
Do other things like Larry King too?
Now, thanks to the simple power of Twilio we can all Tweet like Larry King! I don’t know if he does other things by phoning up and leaving messages, but using this outline we could do a whole bunch of other tasks with voice and transcription. You could:
- Transcribe voicemails and email yourself the text
- Take notes on the go and save them to Evernote (thanks to Brent)
There are other things you could do with this Twitter example too, you could
- Watch the limits, if you do manage to record more than 140 characters worth of text, your tweet is going to be too long right now.
- Get contextual, with a bit more work to search for the word(s) “hash tag” or “hashtag” turn the next word into a hash tag
- Get personal, look out for the word “at” and if it precedes one of your follower’s names turn it into a proper @mention
- Relax, just sit back, Tweet and feel like you have your own personal assistant
You can check out the full code for this example in the GitHub repo. Let me know if you have any questions in the comments below or by email on @philnash when you #tweetlikelarryking.


Related Resources
Twilio Docs
From APIs to SDKs to sample apps
API reference documentation, SDKs, helper libraries, quickstarts, and tutorials for your language and platform.
Resource Center
The latest ebooks, industry reports, and webinars
Learn from customer engagement experts to improve your own communication.
Ahoy
Twilio's developer community hub
Best practices, code samples, and inspiration to build communications and digital engagement experiences.