Works with Super SIM: Thales Cinterion EXS62-W
The Thales Cinterion EXS62-W is a Low Power Wide Area (LPWA)-focused module that specifically supports LTE Cat-M1 and NB-IoT 1 and 2. It includes a services engine built to support a range of Internet protocols, including TLS, FTP, HTTP, MQTT, and CoAP, and optimized operations for accessing these services.
Warning
Super SIM does not support NB-IoT, but it does deliver full LTE Cat M1 connectivity for the EXS62-W.
Info
Learn more about the EXS62-W on the Thales website.
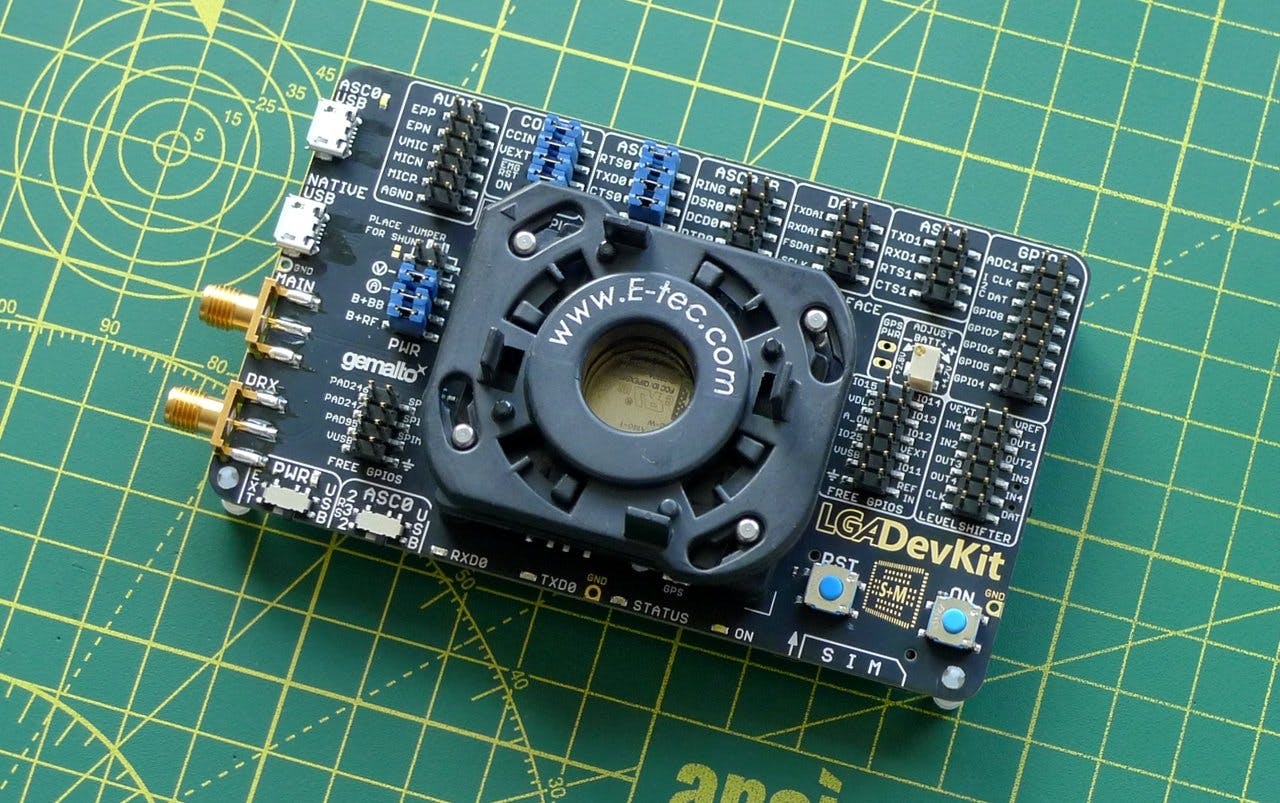
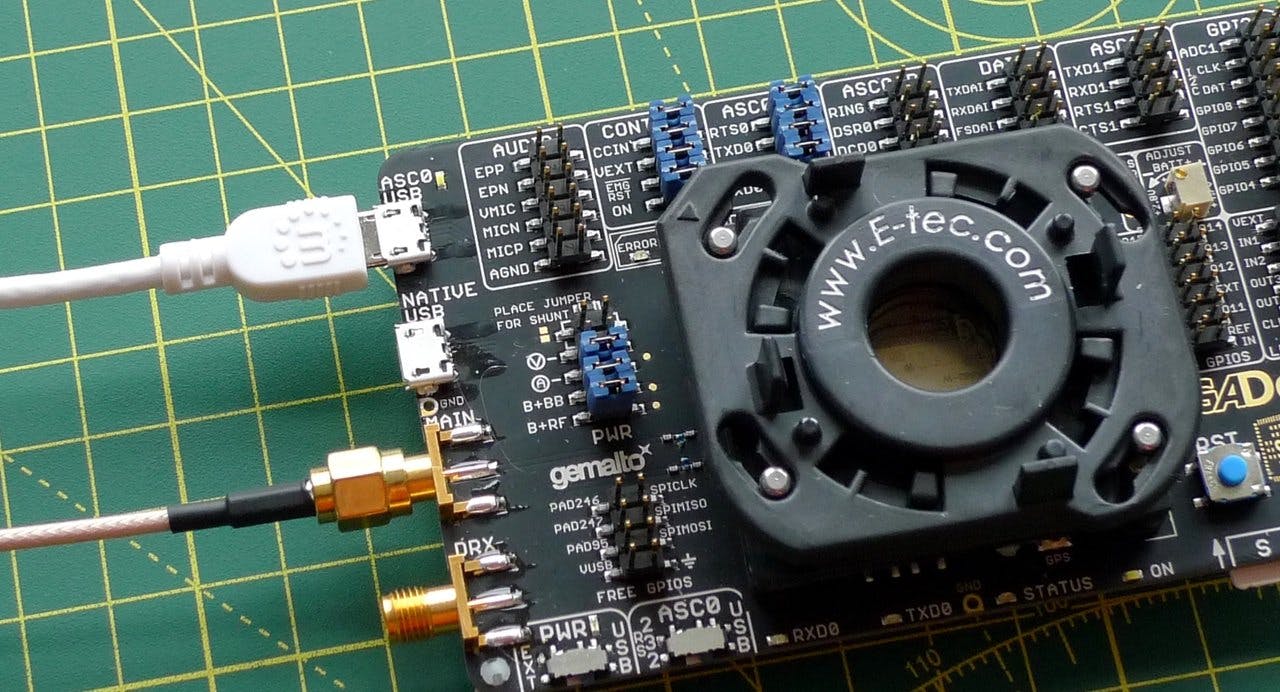
The best way to begin working with the EXS62-W is to take advantage of Thales' Cinterion LGA DevKit. It's ready to work with a variety of Thales modems, including the EXS62-W. You will need to purchase the 'SM' variant of the board, which comes with the correct adapter for EXS62-W's LGA (Land Grid Array) pinout. The modem is available separately. The kit can be connected to and used with a Windows 10, Linux or macOS computer.
The LGA DevKit and EXS62-W modules can be purchased from the following suppliers:
Info
Working with the LHA DevKit and EXS62-W requires a configured Super SIM. If you haven't set up your Super SIM in the Console, please do so now. The Super SIM First Steps guide has help if you need it.
-
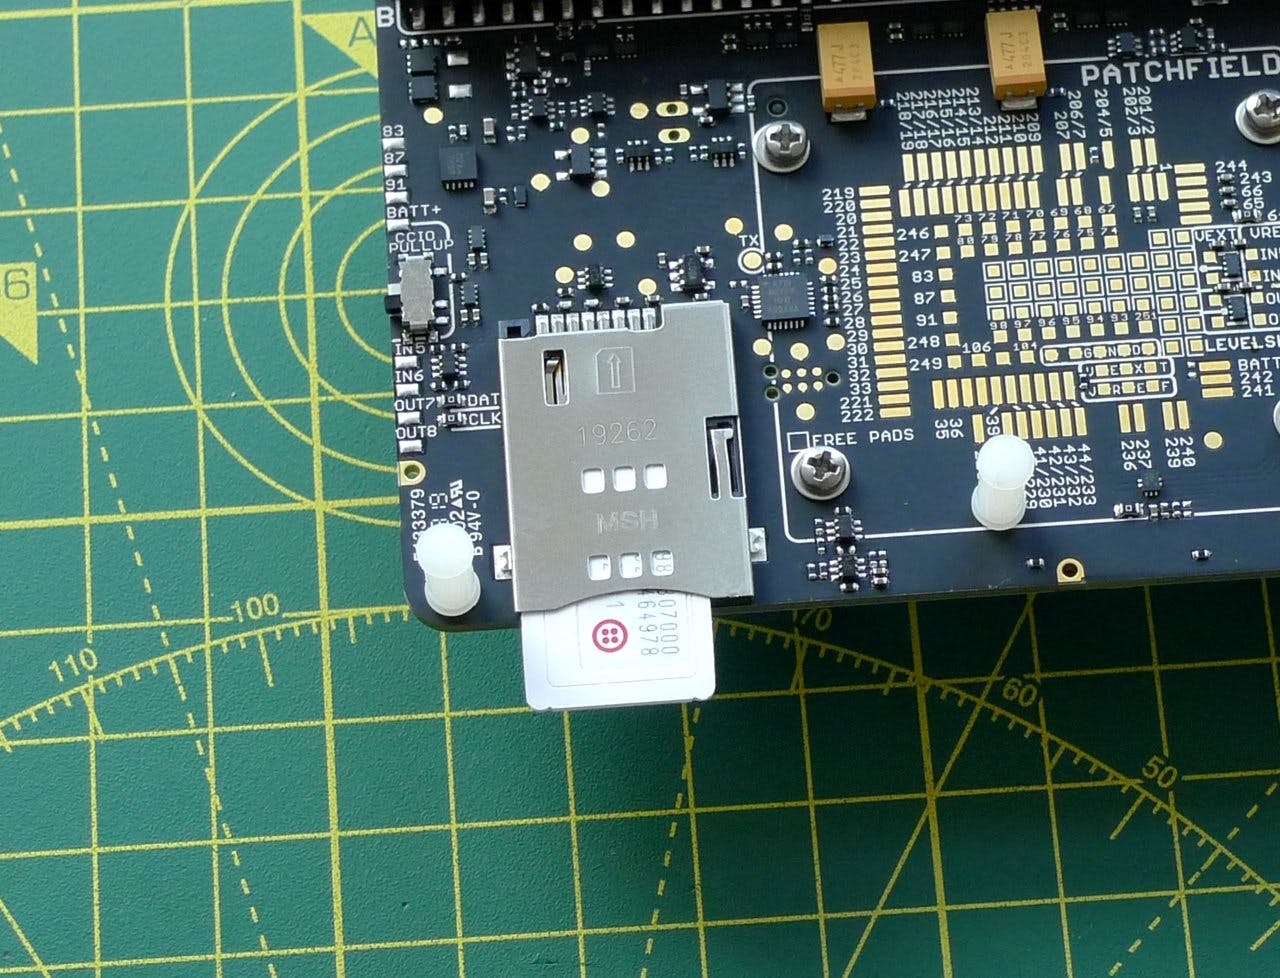
Slot a Super SIM into the DevKit's SIM holder on the underside of the board. It takes a standard-sized SIM, or a micro- or nano-SIM first fitted into an adapter:
-
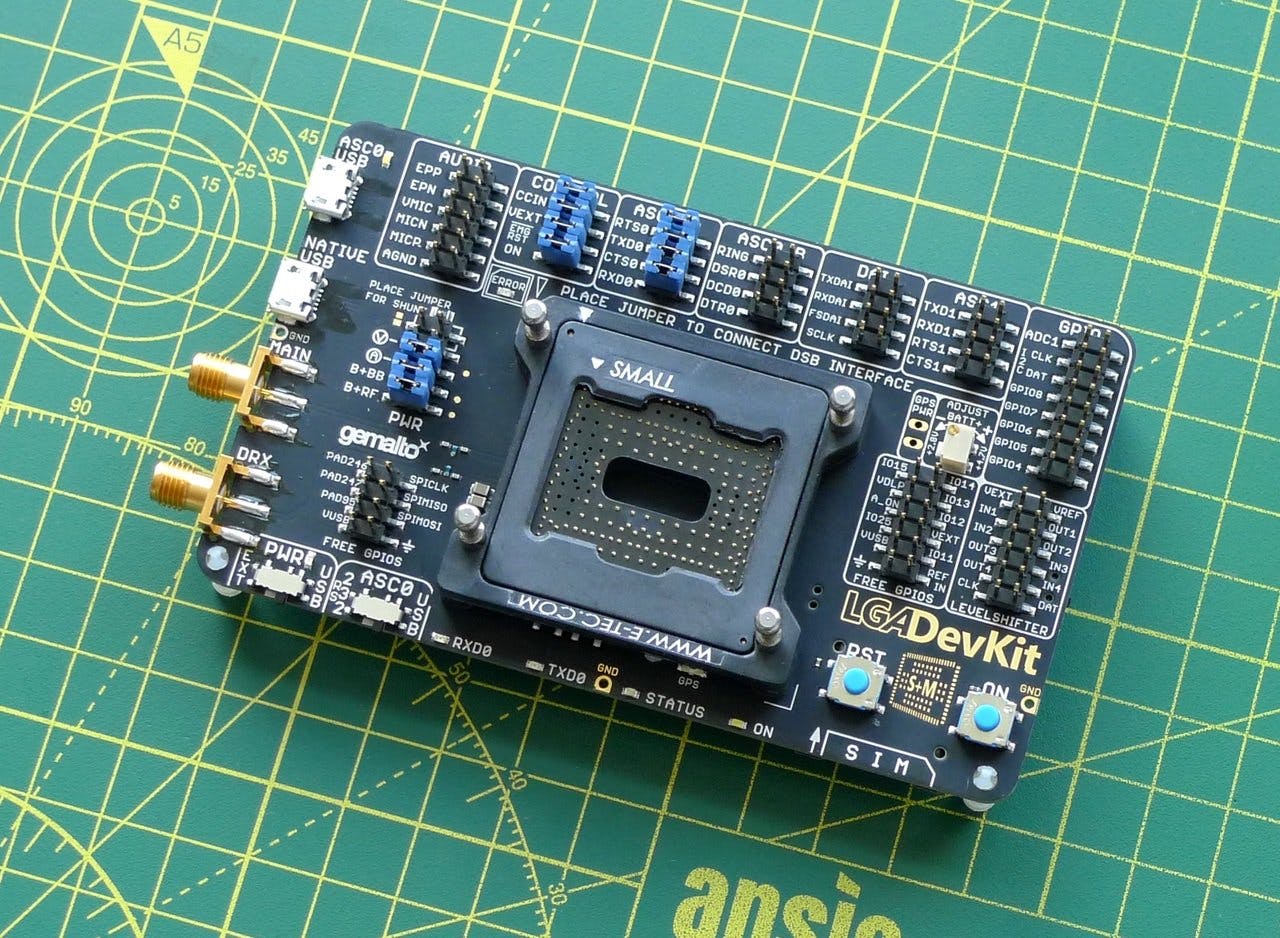
Turn the DevKit over and fit the module holder onto the board. Make sure the white arrow is oriented toward the top edge of the board. Drop in the adapter marked SMALL so that its label is adjacent to the holder's white arrow:
-
Fit the EXS62-W module into the adapter, making sure the notch on its corner is aligned with the adapter's white arrow, as shown. This will orient the module upside down relative to the board:

-
Clip the large retainer onto the holder's four metal pins. Push it down onto the board and rotate it clockwise until its horizontal axis aligns with that of the board. Keep it held down while you turn it:
-
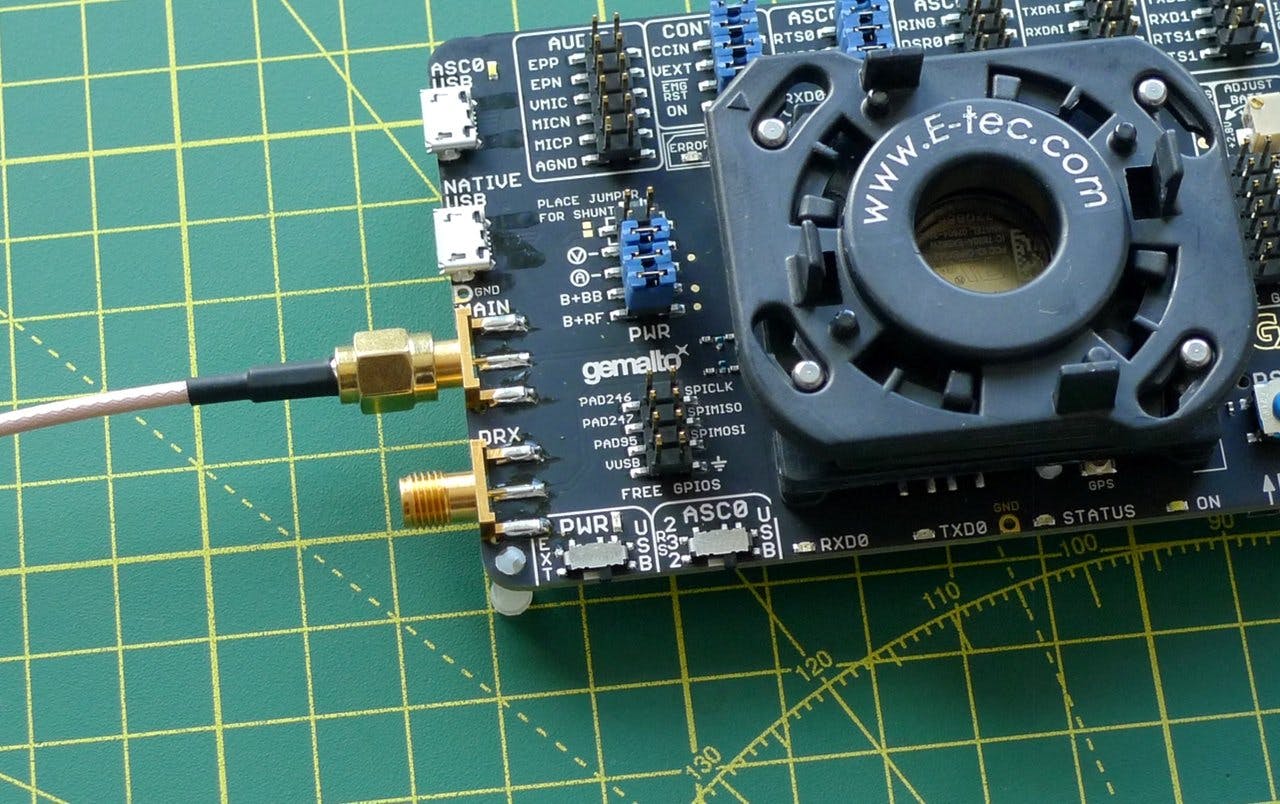
Connect the SMA adapter cable to the supplied black antenna plate, and then to the DevKit's MAIN connector:
-
Connect the supplied USB cable to your computer and fit the cable's micro jack to the DevKit's ASC0 USB port:
-
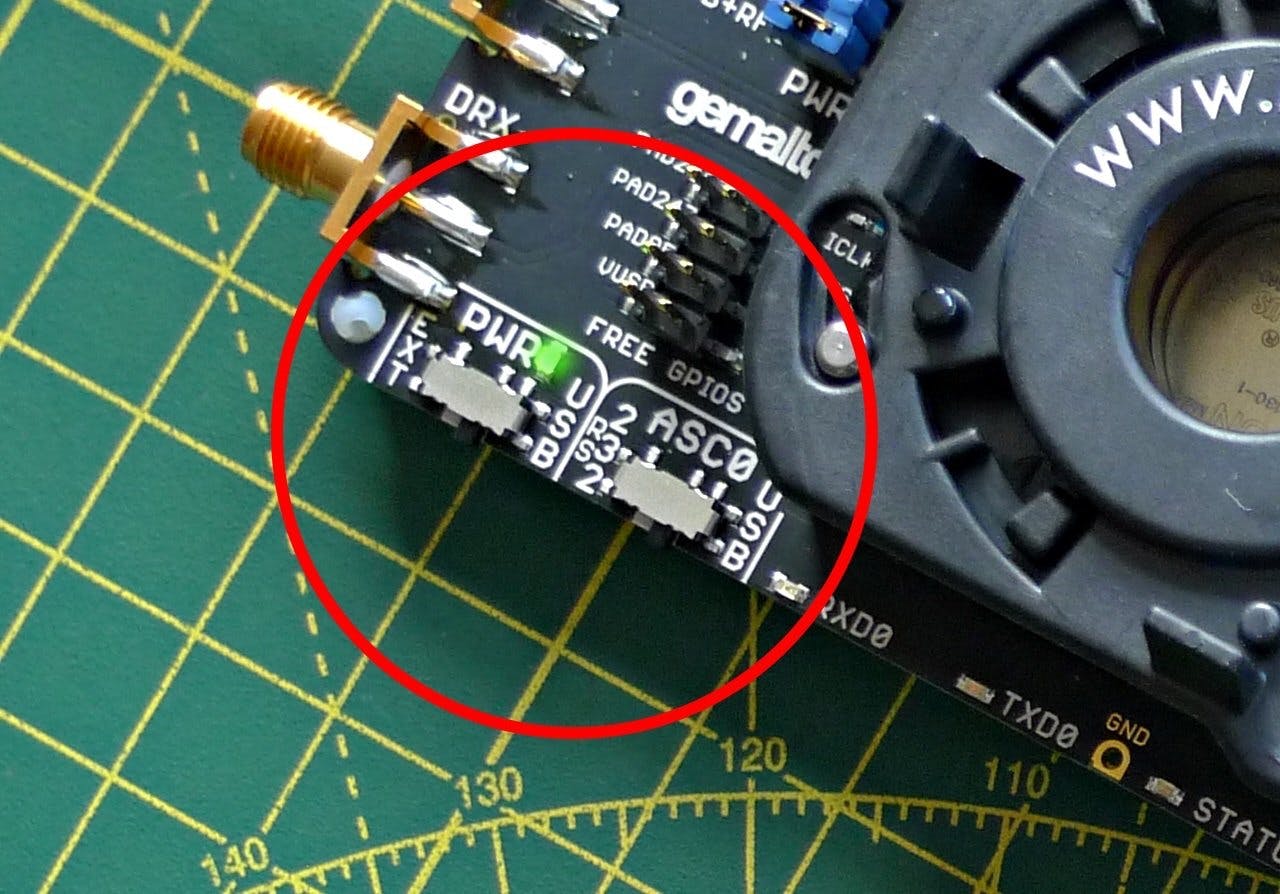
The PWR LED will go green. If not, make sure the PWR and ASC0 switches on the front edge of the board are set to the USB position:
-
Briefly press the ON button once:
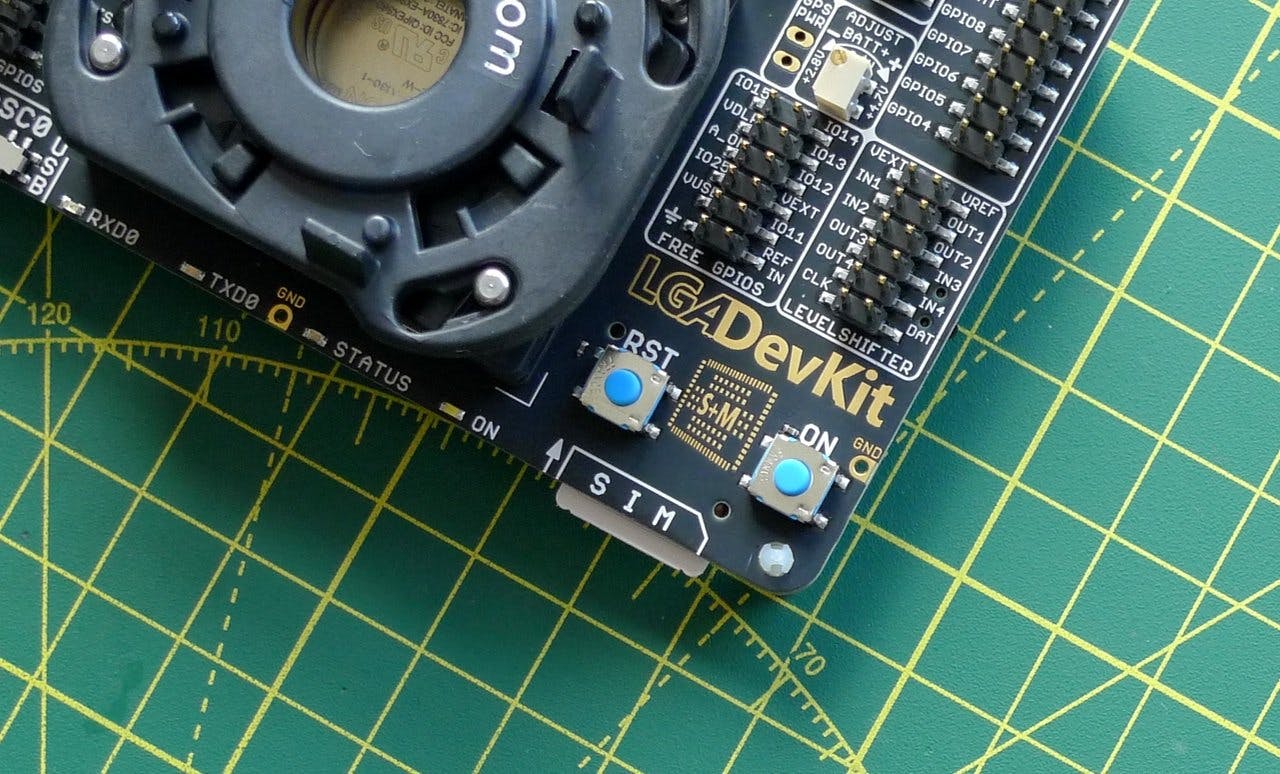
At this point the board's ON LED will be white, and the RXD0, TXD0, and ASC0 USB LEDs will blink. The STATUS LED will be off.
Info
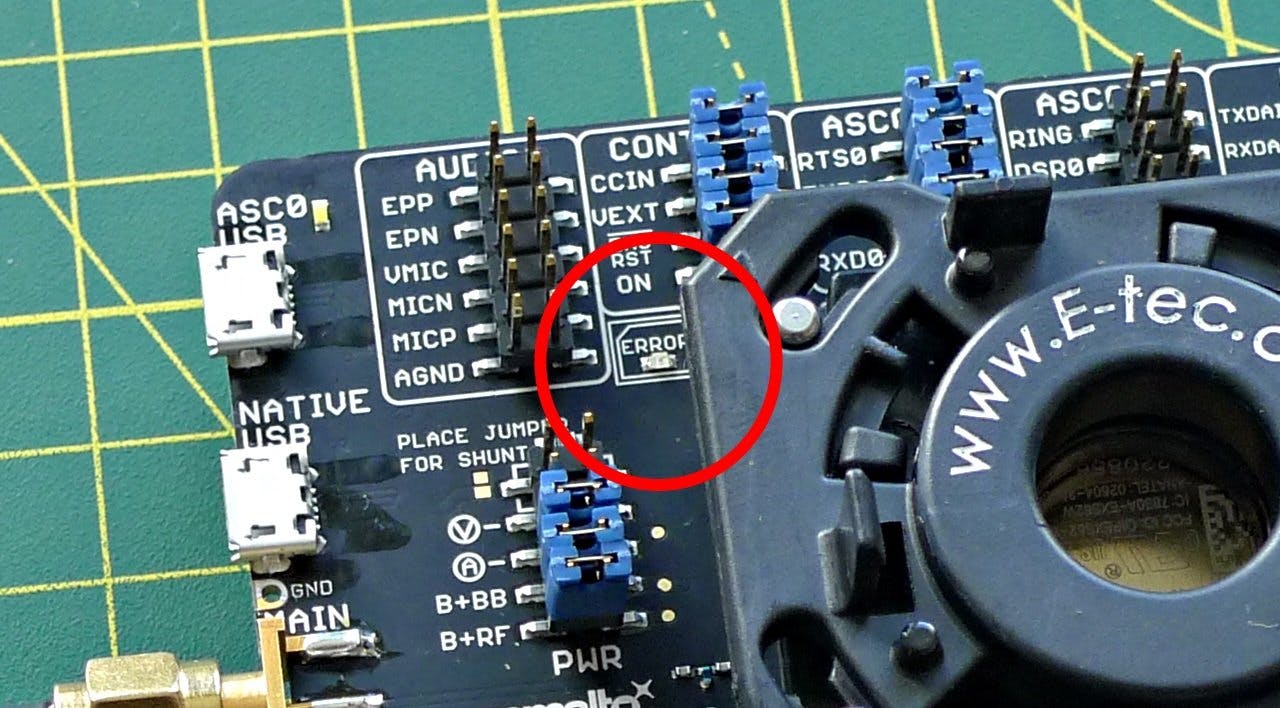
If the ON LED does not light, check the ERROR LED. If it blinks briefly or continuously red, the EXS62-W module has not been fitted correctly. Check the card that ships with the DevKit for the exact diagnosis, but the codes indicate the module is missing or placed incorrectly.
- Open your distribution's terminal app.
-
Confirm connection with
ls /dev/ttyUSB*— you should see a single device listed:/dev/ttyUSB0. This is the USB-to-serial device you'll use to communicate with the DevKit. -
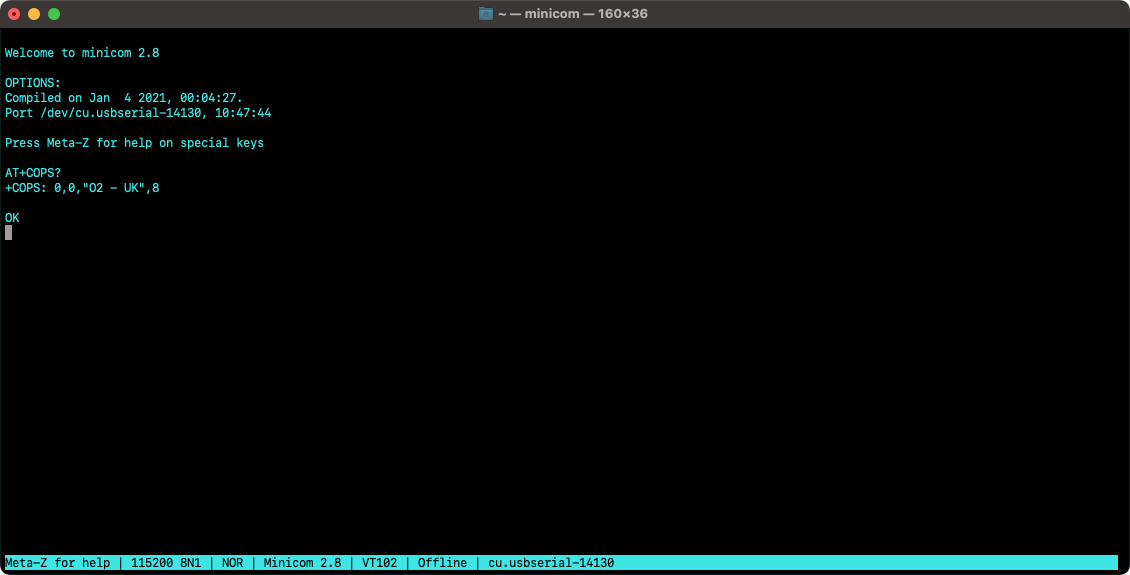
Using a serial tool like
minicom— you will have to install this separately from source or a package manager likeapt— access the board withminicom -o -D /dev/ttyUSB0.
Within minicom or PuTTY, enter the AT command AT+COPS? to see which carrier your EXS62-W is connected through:
The EXS62-W supports LTE Cat-M1 in NB-IoT in bands 1-5, 8, 12-13, 18-20, 25-28, 66, 71, and 85. A variant, the EXS82-W adds legacy 2G connectivity. The EXS62-W does not support circuit-switched data transmission.
Super SIM does not support NB-IoT so we recommend disabling NB-IoT entirely, to prevent the module from attempting to connect to NB-IoT services in areas where it might appear to the module to be preferable to do so. Switch to and prefer Cat-M1 by issuing:
_10AT^SXRAT=7,7
This sets the current Radio Access Technology (RAT) to Cat-M1 (7) and sets the reconnection RAT preference to the same value. The RAT has to be set while the modem is not in airplane mode, and will be reset to favoring both Cat-M1 and NB-IoT if you subsequently issue AT+COPS=0.
This setting will be applied immediately if the device is registered with a network, otherwise it will be applied on the next registration.
Issue this AT command first to apply the Super SIM Access Point Name (APN):
_10AT+CGDCONT=1,"IP","super"
The first parameter is the ID of the PDP (Packet Data Protocol) context to be used for this data connection, in the range 1-16. You will use this ID in all of the following examples.
By default, the EXS62-W will roam automatically.
Having set the modem's APN, establish an Internet connection with the following command:
_10AT^SICA=1,1
The first parameter is the required action: 1 for enable, 0 for disable. The second parameter is the ID of the PDP context to be used to host the connection. It should match the first parameter in the CGDCONT call discussed above.
Use the same command in its read form, AT^SICA?, to get the device's current Internet connection state. For the device's IP address, issue:
_10AT+CGPADDR=1
The modem will respond with:
_10+CGPADDR: 1,"<DEVICE_IP_ADDRESS>"
The first numeric parameter is the PDP context ID.
Issue the Cinterion-specific command:
_10AT^SISX=Ping,<PDP_CONTEXT_ID>,"<IP_ADDRESS>",<PINGS>,<TIMEOUT_IN_MS>
to ping a server. Using one of Google's DNS servers as an example, this will yield:
_10^SISX: "Ping",1,1,"8.8.8.8",546_10^SISX: "Ping",1,1,"8.8.8.8",515_10^SISX: "Ping",1,1,"8.8.8.8",457_10^SISX: "Ping",1,1,"8.8.8.8",443_10^SISX: "Ping",1,1,"8.8.8.8",375_10^SISX: "Ping",2,1,5,5,0,0_10^SISX: "Ping",3,1,375,546,467
To issue an HTTP GET request using the EXS62-W's built-in Internet services engine, run the following commands. It's assumed there is no active connection at present, which you can ensure by first issuing AT^SICA=0,1.
-
Set at least one DNS server:
AT^SICS=1,"dns1","8.8.8.8" -
Activate the Internet connection:
AT^SICA=1,1 -
Configure the HTTP operation's Internet service profile. This is referenced by its ID, in the range 0-9:
-
Set the profile 0's service type to HTTP:
AT^SISS=0,srvtype,"http" -
Set the connection ID to match that of the current PDP context:
AT^SISS=0,conid,"1" -
Set the target URL, including the path:
AT^SISS=0,address,"http://ifconfig.co/ip"Note You can specify HTTP by including the protocol as a URL prefix, or by adding:80to indicate the required port. -
Specify the request's HTTP method:
AT^SISS=0,cmd,"get"
-
Set the profile 0's service type to HTTP:
-
Open the Internet service:
AT^SISO=0 -
The modem will attempt to make the request. You may see these URCs as the response is processed:
_10^SIS: 0,0,2200,"Http connect 172.67.133.228:80"_10^SIS: 0,0,2201,"HTTP/1.1 200 OK"_10^SIS: 0,0,2201,"Content-Length: 13"_10^SISR: 0,1 -
The last line above indicates there is data available for you to read. In this case, the header data shows how much, so read 13 bytes:
AT^SISR=0,13 -
You will see:
_10^SISR: 0,13_1044.204.32.14_10OK -
Watch for the URC
^SISR: 0,2, which indicates that all the available data has been read. If you don't see this — perhaps the response's content length was much larger and you only read a portion of it — continue to issueAT^SISR=0,<NUMBER_OF_BYTES_TO_READ>commands until all the data has been read — i.e., you do receive^SISR: 0,2 -
Close the Internet service:
AT^SISC=0
Warning
This example uses a service that returns the IP address of the requester.
If you need to provide extra HTTP request headers, such as Authorization: Basic <API_KEY> or a custom header required by your server, issue
_10AT^SISS=0,hcprop,"<HEADERS>"
when you are configuring your Internet service profile. Pass each header in the form <key>: <value>. Multiple headers can be included by separating them with the sequence \0d\0a. Don't add a separator after the last header and ensure your <HEADERS> string is 255 bytes or less.
If you wish to include a User-Agent header, don't add it to your headers string but instead supply it to the module with the hcuseragent option:
_10AT^SISS=0,hcuseragent,"<USER_AGENT>"
To issue a secure HTTP GET request using the EXS62-W's built-in Internet services engine, you follow the same procedure outlined above but with some extra steps to configure TLS. Again, it's assumed there is no active connection at present, which you can ensure by first issuing AT^SICA=0,1.
-
Initialize the module's certificates:
AT^SSECUA="CertStore/TLS/PreconfigureCerts" -
Set at least one DNS server:
AT^SICS=1,"dns1","8.8.8.8" -
Activate the Internet connection:
AT^SICA=1,1 -
Configure the HTTP operation's Internet service profile:
-
Set the profile 1's service type to HTTP:
AT^SISS=1,srvtype,"http" -
Set the connection ID to match that of the current PDP context:
AT^SISS=1,conid,"1" -
Set the target URL, including the path:
AT^SISS=1,address,"https://jsonplaceholder.typicode.com/todos/1"Note You can specify HTTPS by including the protocol as a URL prefix, or by adding:443to indicate the required port. -
Specify the request's HTTP method:
AT^SISS=1,cmd,"get"
-
Set the profile 1's service type to HTTP:
-
Open the Internet service:
AT^SISO=1 -
The modem will attempt to make the request. You may see these URCs as the response is processed:
_10^SIS: 1,0,2200,"Http connect 172.67.131.170:443"_10^SIS: 1,0,2201,"HTTP/1.1 200 OK"_10^SIS: 1,0,2201,"Content-Length: 83"_10^SIS: 1,0,2201,"Etag: W/"53-hfEnumeNh6YirfjyjaujcOPPT+s""_10^SISR: 1,1 -
The last line above indicates there is data available for you to read. In this case, the header data shows how much, so read 83 bytes:
AT^SISR=1,83 -
You will see:
_10^SISR: 1,83_10{_10"userId": 1,_10"id": 1,_10"title": "delectus aut autem",_10"completed": false_10}_10OK -
Watch for the URC
^SISR: 1,2, which indicates that all the available data has been read. If you don't see this — perhaps the response's content length was much larger and you only read a portion of it — continue to issueAT^SISR=1,<NUMBER_OF_BYTES_TO_READ>commands until all the data has been read — i.e., you do receive^SISR: 1,2 -
Close the Internet service:
AT^SISC=1
Sending data from the modem via an Internet-hosted API follows the paths outlined above for the HTTP and HTTPS protocols. Primarily, you call AT^SISS=0,cmd,"post" instead of AT^SISS=0,cmd,"get".
The EXS62-W provides a way to load up a small amount (1-255 bytes) of body data: issue
_10AT^SISS=0,hccontent,"<DATA_AS_STRING>"_10AT^SISS=0,hccontlen,0
If the size of the data you wish to send is greater than 255 bytes, set the size with AT^SISS=0,hccontlen,<SIZE_IN_BYTES> and then upload data to the module after opening the the Internet service with AT^SISO=0. Issue AT^SISW=0,<CHUNK_SIZE> to trigger the modem to input the data over the UART. Up to 1500 bytes can be sent to the modem at a time, and each chunk will be sent out as they are received from your application.
While the EXS62-W supports low-power modes for eDRX and PSM, support for these features will vary by visited network and location. The commands to enable each of these settings on the EXS62-W are, respectively:
_10AT+CEDRXS=1_10AT+CPSMS=1
Both settings, but especially PSM, can prevent the modem from being accessible through the terminal during its sleep time. It's best to experiment with these features with the modem local. To disable all power saving if needed, send:
_10AT+CEDRXS=0_10AT+CPSMS=0
Keen to find out more about how the Thales EXS62-W cellular module can power your IoT product design? Contact Thales sales to line up a conversation.
And don't forget, we're always ready to discuss how Super SIM can help you too.