Send SMS and MMS Messages with A LinkIt ONE using Programmable Wireless, AWS IoT and Lambda
Time to read: 10 minutes
March 28, 2018
Written by
Reviewed by

Today we're going to make a contribution to the Internet of Things by sending SMS messages with a Seeed Studio LinkIt ONE. We'll use Twilio's Programmable Wireless for connectivity and Amazon Web Services' IoT and Lambda as our backend. To make it equally at home at... home, we'll also demonstrate how to accomplish the same task using WiFi.
Sound like a deal? Let's shake on it!
Sign Into (Or Sign Up For) a Twilio and AWS Account
Sign in to your Twilio account. If you don't have an account yet, create one by signing up for a free Twilio trial. You'll need values from the console to finish this guide, so please keep a tab handy.
You should also create an account with Amazon Web Services, which you'll need for the AWS IoT and Lambda steps.
Find or Purchase an SMS (and MMS) Capable Number
For this project, you need a number that is both SMS and MMS capable.
- Enter the Twilio Console.
- Select the hash tag/Phone Numbers ('#') section on the left side
- Navigate to your current active numbers.
In 'Capabilities', you'll see the functions available with your currently held Twilio phone numbers.
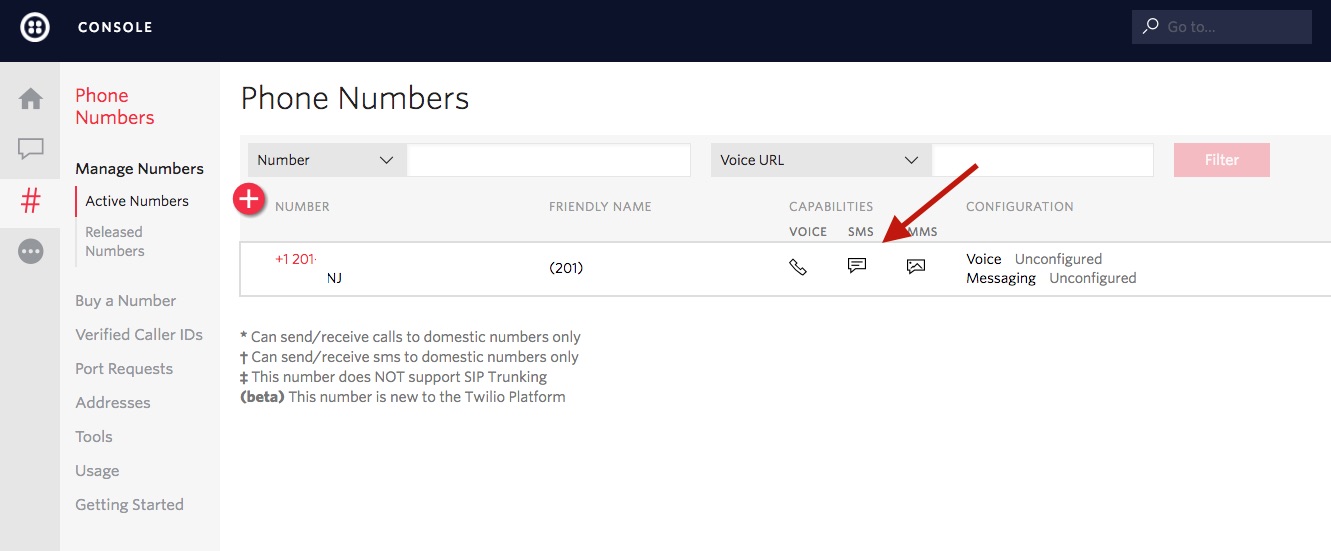
If you don't yet have a number with SMS and MMS, you'll need to buy one. Navigate to the 'Buy a Number' link and click the SMS and MMS checkbox (countries without MMS support can comment out optional_image_path in the LinkIt code.)

Purchase and Activate a Programmable Wireless SIM Card (Optional)
We've provided code to connect to the internet over WiFi or 2G/GPRS. If you are using - or testing with - WiFi, you can set WIFI_USED to true. (See more detail in the connection section below).
- Navigate to the Programmable Wireless section of the console
- Click the 'Getting Started' section on the left side
- Select 'Order SIMs'
- Wait for SIMs to arrive
- Go back to the Programmable Wireless section of the console
- If your SIM is associated with your account, follow the instructions on the SIMs page (Click the plus '+' button)
- If you have a SIM that is not associated with your account, follow the instructions in 'Starter SIMs'
Once your SIM is in-hand, associated, and has a data plan, you can insert it into the LinkIt ONE. Be careful to only punch out to the medium sized SIM (if you do accidentally punch out too much, friction should hold the SIM in the medium SIM size). Note: the correct orientation is the reverse of most phones; the angled side should face outward.
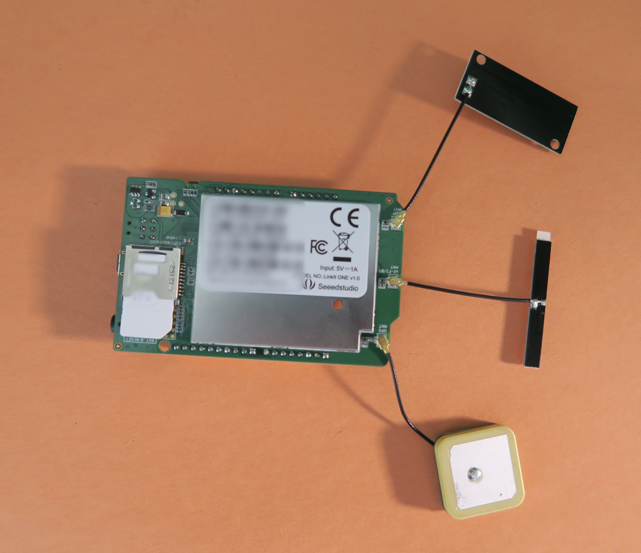
Note the orientation of the SIM card. Also, if you haven't yet, attach the antennas as shown above.
A General Warning About 2G Development
While most of your code will be transferrable, it’s important to note: for new product development 2G isn’t a good choice.
American 2G networks are being deprecated. For new product development, we suggest researching alternatives or discussing your idea with the Twilio Programmable Wireless team.
Safety in Abstraction: Protecting Credentials where Cloud Meets Field
The LinkIt ONE with the Mediatek MT2502A SoC onboard has the power to hit the Twilio APIs directly with TLS. However, it's safer to build a more abstract infrastructure that doesn't leave any keys on the device.
Take note: We do not suggest putting your Twilio Account SID or API Secret directly on your final product. As your device will be in the field, many people will have physical access; it is best to follow a similar model to the one we've built today.
Here's how sending SMS messages looks in this infrastructure:
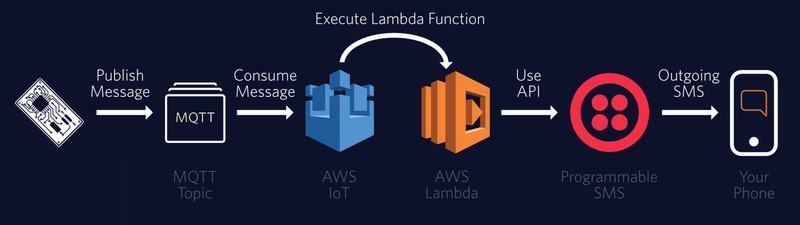
By using AWS IoT as a middleman, we're able to revoke a certificate simply and quickly if a device goes missing - without invalidating the certificates on all the rest of the devices.
Add the LinkIt ONE to AWS IoT
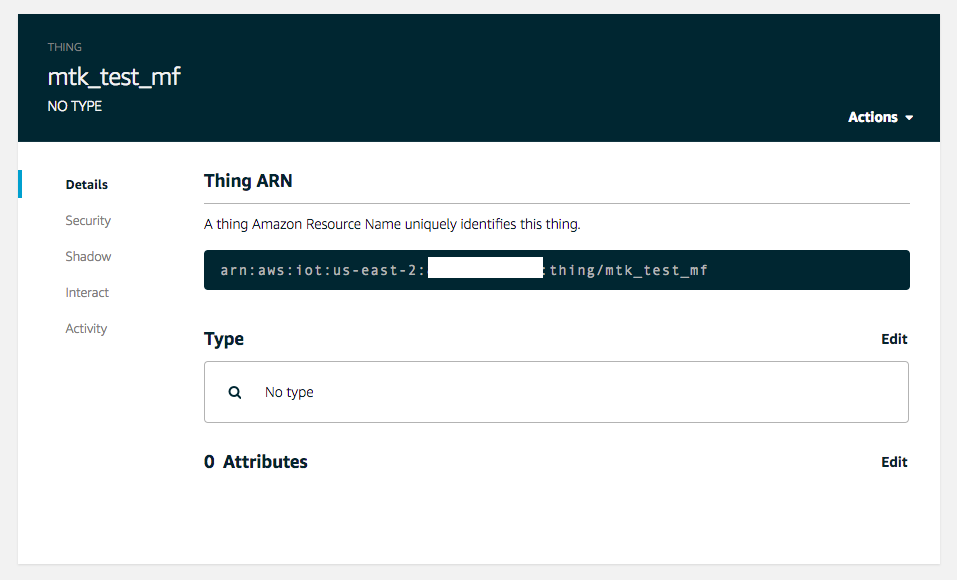
Visit the AWS IoT console.
- On the left side, go into ‘Registry’ -> ‘Things’
- In the upper right-hand corner click the button to ‘Create’ a new thing.
- Show the optional configuration and create a new type, something like ‘LinkIt_One’. You don’t need attributes yet.
- Name your thing ‘mtk_test_mf’. (That name is currently hard coded in the MediaTek library.)
- ‘Create’ your thing, and you should see a new sidebar with five options:
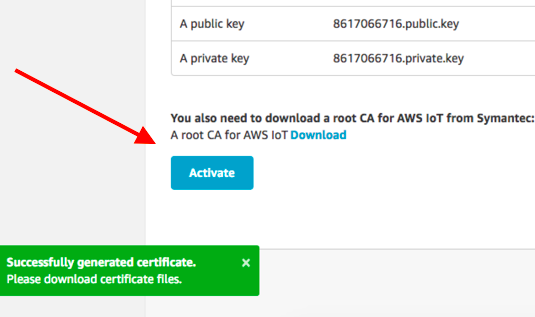
- Go to ‘security’ and ‘Create Certificate’.
- DOWNLOAD EVERY CERTIFICATE THAT'S CREATED (this is your only chance to download the private key!). You’ll have 4 downloads total:
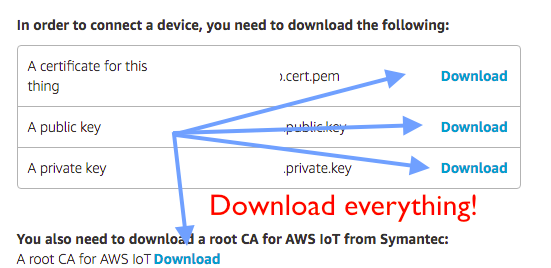
For the Root CA, you may need to Right-Click or Ctrl-Click and save it (name it something like root.pem).
Before leaving 'ACTIVATE' the certificate.
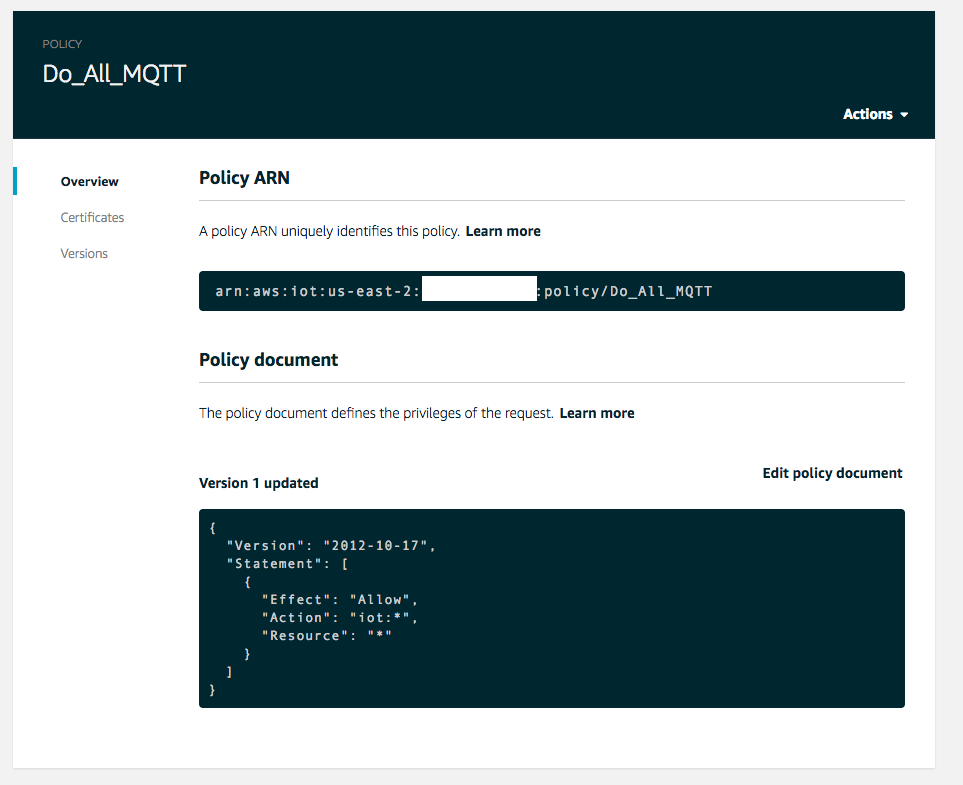
Add a Policy
- Go to the main AWS IoT Console (not the Thing’s console)
- Select ‘Security’ -> ‘Policies’.
- Create a new policy with an action of ‘iot:*’ and Resource ARN of ‘*’
- Here’s how it should look:
{
  "Version": "2012-10-17",
  "Statement": [
    {
      "Effect": "Allow",
      "Action": "iot:*",
      "Resource": "*"
    }
  ]
}
After you've finished that step, go back to the main IoT console.
Attach the Policy to Our Certificate
- Go to ‘Security’ -> ‘Certificates’ and select the certificate we made.
- Click ‘Policies’ in the left sidebar, then in the ‘Actions’ menu, select ‘Attach Policy’:
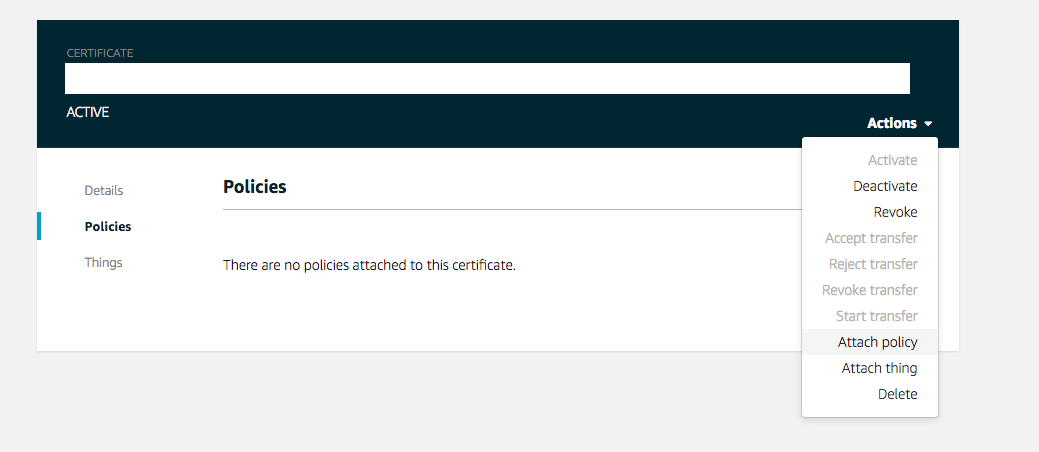
- Attach the policy we just created to our certificate.
- Go back to the main console.
Open the Web MQTT Client
Now you’ll want to open a Test client to verify our Thing is working when it's finally all hooked up.
- Select 'Test' in the main console.
- Subscribe to the ‘twilio’ (lowercase) topic.
You can leave the other settings alone - that's all we need for our AWS IoT Setup! Now, let's move over to the board.
Prepare the LinkIt ONE for Programming
Whether you will be using Programmable Wireless or WiFi, ensure your antennas are attached to the board (see the picture in "Purchase and Activate a Programmable Wireless SIM Card") - it's time to load some code!
Familiarize Yourself with the LinkIt ONE's Settings
Familiarize yourself with how the switches work on the LinkIt. With the board oriented as it is in the following picture,
- Left: MASS STORAGE is up, needed for firmware updates and uploading certificates. NORMAL is down, needed for running sketches.
- Middle: USB Power is up, use this for the demo. BATTERY power is down.
- Right: SPI Mode is up, you should use this because of the pins we are using. SD Mode is down if you add an SD card.

When changing modes, this is the safest order of operations:
- Power down the board (disconnect USB or battery)
- Flip the switches needed
- Power on the board again, or follow step specific instructions
Set Up Your Board and the Arduino IDE
For our demo today, we're going to be using the Arduino IDE. Arduino abstracts some of the more common issues we see on the hardware front.
- If needed, grab the latest version of the Arduino IDE here.
- Copy this URL to your clipboard: http://download.labs.mediatek.com/package_mtk_linkit_index.json
- In Preferences, find the 'Board Manager':
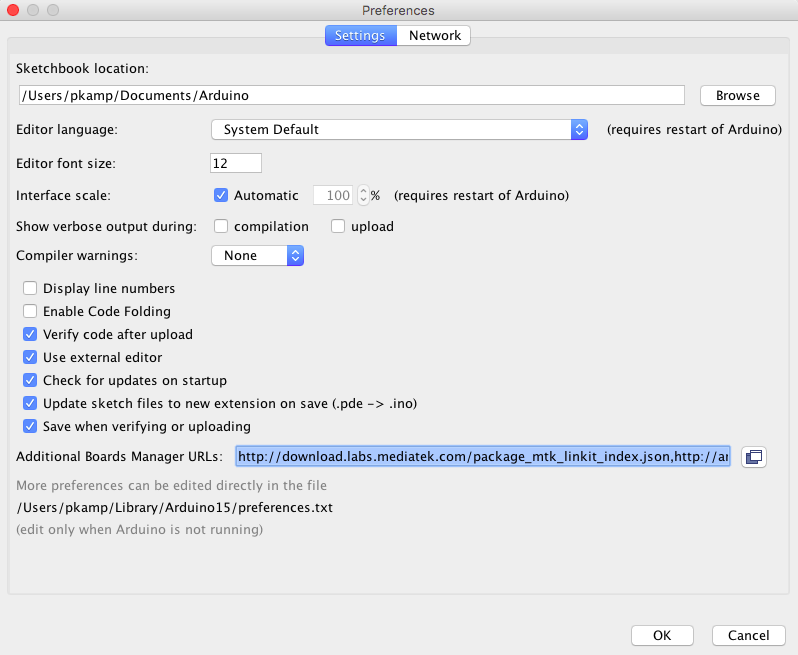
(If you have many development boards put a comma between each one’s JSON path)
- Go to ‘Boards Manager’ in the ‘Tools’ -> ‘Board’ submenu
- Search for "LinkIt"
- Install the Boards Manager
Next, we need to install a USB COM/Serial Port driver for your operating system.
Install the Serial Port Driver
Unfortunately, this part is platform dependent.
Please follow the instructions for your operating system:
- Mac: https://docs.labs.mediatek.com/resource/linkit-one/en/getting-started/get-started-on-os-x/get-the-hardware-and-software-for-mac-os-x
- Windows: https://docs.labs.mediatek.com/resource/linkit-one/en/getting-started/get-started-on-windows/get-the-hardware-and-software
When you are done, restart your computer.
(Maybe) Update Your Firmware
Reopen the Arduino IDE.
Some batches of LinkIt ONEs are delivered with an older version of board firmware. If you plug in your LinkIt in 'Normal' mode (see above) and still do not see Serial Ports in the 'Tools' menu of the Arduino, you probably need to update the firmware.
Note: It is non-destructive to update the firmware if you already have the newest firmware, this should not brick your board.
Here is our write-up for how to update the onboard firmware.
Install Arduino Libraries with the Library Manager
If you haven't yet, reopen the IDE.
- Select ‘Sketch’ -> ‘Include Library’ -> ‘Library Manager’ from the menu bar.
- In the screen that shows up, search ‘json’ and click to install
ArduinoJSONby Benoit Blanchon.
Install Arduino Libraries from a ZIP File
- From the AWS mbedTLS MediaTek Demo repository, choose ‘Download ZIP’ from the ‘Clone or Download’ menu.
- In Arduino, select ‘Sketch’ -> ‘Include Library’ -> ‘Add .ZIP Library’, and the ZIP file.
Add the AWS IoT Certificates to the LinkIt ONE
Follow along with the main MediaTek instructions at the same time as this section.
- Unplug the LinkIt from power
- Change your board to
MASS STORAGEmode - Plug the LinkIt ONE into USB - you should now see a USB disk
Copy every single certificate you downloaded to the board (in the disk root, do not put anything in a directory). Check the LinkIt ‘disk’, you should see everything inside after:
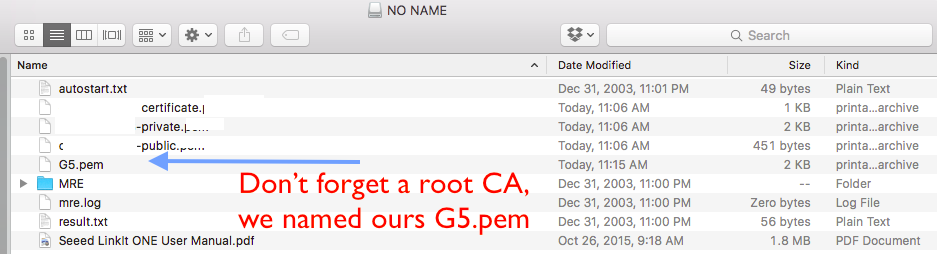
- Note the full name of the certificates, and also note the extension.
- You need the names to match perfectly in the code.
Program The LinkIt ONE
You're now ready to start programming the LinkIt ONE.
- Clone our repository
- Double click the '.ino' file inside, which will open the sketch* in the Arduino IDE.
* An Arduino 'sketch' is a project, and all code is contained inside the same folder. For more on sketches, see here.
Choose to Connect Through Twilio's Programmable Wireless or WiFi
The sample application is set up to either connect through Twilio's Programmable Wireless over GPRS or via WiFi.
To use WiFi, you should change WIFI_USED to true, as well as edit the variables WIFI_AP, WIFI_PASSWORD, and WIFI_AUTH.
If you choose to use GPRS, you can leave the details in place.
Change the Certificate Names and Phone Numbers
Let us warn you now: transcription errors between the certificate names and the code cause a lot of issues in this step. You should edit the certificates here to exactly match the names of the certificates in the root directory of the LinkIt.
Also, the root certificate's name must be shorter than 32 characters long. You will see a flashing error if you do not use a shorter root certificate name - we have ours named as G5.pem.
Additionally, at this point change the 'from' and 'to' phone numbers to be a Twilio number you own and a number that can receive SMSes or MMSes. If you cannot receive MMSes, you can add an empty quote in optional_image_path.
(If you get any issues in the eventual serial output in the certificate section, this is the first place to check.)
Send SMSes and MMSes from the LinkIt ONE via MQTT
This section of code is where we prepare our outgoing message. We assemble a to and a from number, a message, and an image (you can comment it out to send an SMS instead).
We prepare the eventual message and publish it to an MQTT topic.
Not that this code runs on a timer every 3 seconds:
LTask.remoteCall(main_thread, NULL);
delay(3000);
The actual SMS or MMS sending only happens the first time because we have it wrapped in logic with a static boolean. Behind the scenes, the handle_requests() method comes into play, where we perform periodic functions like watching for replies - but that's the topic of another tutorial.
You merely need to compile and run the code now. If you still have the 'test' MQTT Client open from the AWS IoT steps, you should see a single message published on the twilio topic.
You did? Awesome! Now let's move to the AWS Lambda integration.
Use AWS Lambda to Talk to Twilio
So now you've got the LinkIt ONE and AWS IoT conversing over MQTT - you're most of the way to the prize. Our second middleman is AWS Lambda, where we will set up a function which is called for certain MQTT messages and will do the actual conversing with Twilio.
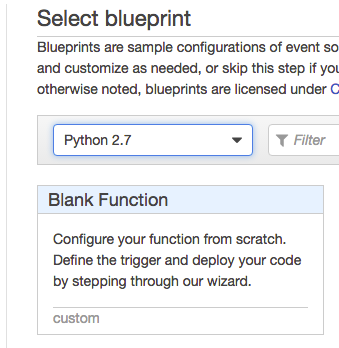
Create a New Lambda Function
- In the Lambda Console, create a new function in the same region as the location of your IoT setup.
- Use the ‘Blank Function’ as a starting point and choose
Python 2.7for a runtime:
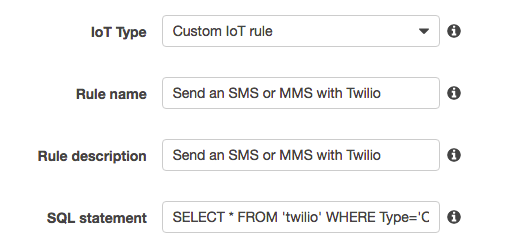
Create a Lambda Trigger
- In the ‘Trigger’ window, select Amazon AWS IoT as the trigger
- Create a nice trigger name you'll remember
- Use the following SQL to trigger the action:
SELECT * FROM 'twilio' WHERE Type='Outgoing'- Your screen should match the following before continuing (but don’t put whitespaces in the rule name - just use camelCase. This won't work):
Configure the Function and Upload the ZIP File
- First, check the runtime is still
Python 2.7(it probably has changed) - For ‘Code Entry Type’ pick ‘Upload a ZIP File.’
- DOWNLOAD THIS ZIP FILE. It contains our SMS-sending code.
twilio_functions.pyis where the magic happens:
We enter in the function iot_handler and do some very brief exception handling. If we are sending an MMS, we append an image URL to the message.
From there, we create a dictionary in the send_message function. Then we use the Twilio Python Helper Library's client to create and send the message out.
The ZIP file packages all of the dependencies so you don't have to worry about installing them on Lambda - just upload the ZIP file and you'll be 90% of the way there. Next up, let's get you that last 10%.
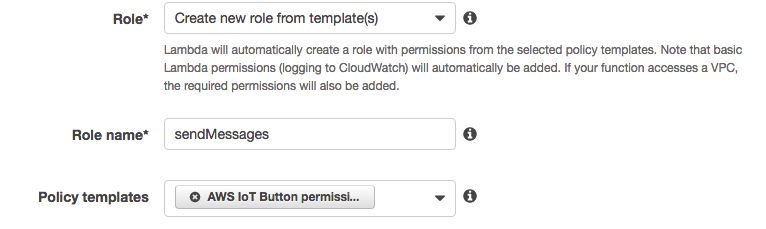
Create a New Role in Lambda
- Select ‘Create new role from template(s)’.
- Amazon has an IoT product, the IoT Button, which has the rules we can reuse. Use that template:
Edit Advanced Settings
The final settings are up to you, but we were successful with these settings:
- Memory (MB)*: 128 (This may or may not be the default)
- Timeout: 10 seconds (Ditto)
In production, you will want to keep a careful eye on these.
- Hit ‘Next’
- On the next screen, select ‘Create Function’
Point AWS Lambda at Your Function
- In 'Handler', use
twilio_functions.iot_handlerto tell Lambda where to enter - ‘Save’ it (this button is on the top of your screen)
- Head back to the ‘Code’ Tab.
Add Your Twilio Environment Variables to Lambda
You need to set two Environmental variables for Lambda to communicate with Twilio: AUTH_TOKEN and ACCOUNT_SID.
Find those in the Twilio Console:
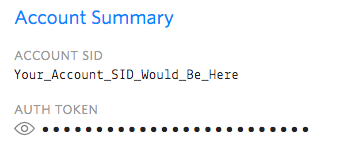
When you find them, enter them in the ‘Environment Variables’ section in Lambda:

Save one more time, and we're ready to move on from Lambda. There is just one more step in AWS IoT before everything is ready!
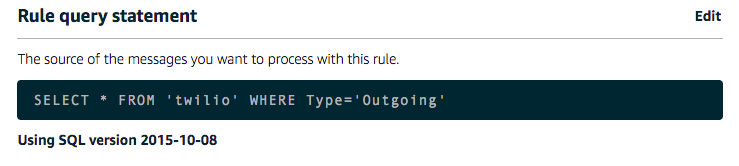
Return to AWS IoT
- Go back to the AWS IoT Console
- Click ‘Rules’ on the sidebar on the left side
- Click on the new rule you recently created
- Click ‘Edit’, then select the
2015-10-08SQL version and 'Update' - You should now see:
Excellent work! Now you've got everything in place:
- The LinkIt ONE can publish to the twilio topic through AWS IoT
- Certain messages trigger AWS IoT to passthrough to Lambda
- Legal messages that hit Lambda are sent to Twilio
- Twilio sends your messages into the world
If you're confident, it's time - power cycle your board and see if you get a text message!
Communications from a LinkIt ONE with Twilio's Programmable Wireless and AWS Lambda
Look at what you've now built: a device equally at home with 2G or with WiFi that can be deployed in the field and send SMSes at will. If the device is compromised, you can revoke the certificate near-instantly through AWS IoT without impacting the rest of your Things. Nifty, right?
What's next? Since you've now built outbound messaging on the LinkIt ONE, perhaps you'd next like to visit our guide on receiving SMSes and MMSes with the LinkIt ONE, Programmable Wireless, and AWS IoT and Lambda. We also have some awesome beginning to end Blueprints that use Programmable Wireless.
Whether you've now got what you need or you're going to keep building, keep in touch with us on Twitter! We're very interested in your Internet of Things project, and we can't wait to see what you build.

Related Resources
Twilio Docs
From APIs to SDKs to sample apps
API reference documentation, SDKs, helper libraries, quickstarts, and tutorials for your language and platform.
Resource Center
The latest ebooks, industry reports, and webinars
Learn from customer engagement experts to improve your own communication.
Ahoy
Twilio's developer community hub
Best practices, code samples, and inspiration to build communications and digital engagement experiences.