Announcing External AWS S3 Storage Support for Voice Recordings
Time to read:
May 09, 2022
Written by

We’re excited to announce that you can now store your voice recordings in your own AWS S3 bucket.
By default, the media associated with a voice recording is stored within Twilio. Although this is convenient for many customers, there are customers who want their recordings to be stored on their systems for additional processing, storage, or compliance reasons.
To achieve this in the past, customers have had to set up a webhook to be notified when a recording is completed with the recordingStatusCallback, download the recording, save it into their storage and then delete it from Twilio. Starting today, it's now possible to specify an AWS S3 bucket where media must be stored without the need for additional software development and additional API requests to programmatically download and upload each recording independently.
The release of this feature represents Twilio’s commitment to serve their customers and help them meet their security and privacy needs, as well as data sovereignty and other means of local regulatory compliance.
How it works
By default, voice recordings are stored on Twilio. Starting today it is possible to configure the voice recording service to automatically upload and save the media directly to an AWS S3 bucket of your choice. External storage for voice recordings can be enabled from voice settings within the Twilio Console.
When the external AWS S3 voice recording storage is active in an account, Twilio will not store or keep the media files associated with a recording in the Twilio cloud, and it will be your responsibility to manage the security and lifecycle of your recorded content. As a result, it won’t be possible to play media from the Twilio Console nor to fetch a recording media file. However, the recording resource metadata will be available at Twilio until explicit deletion.
If there is a failure to write to a previously working configuration, Twilio will automatically retry for two hours to write to your S3 bucket. After two hours Twilio will stop retrying and will cache your recording on the host that created the recording for when it is possible for Twilio Engineering to restart the retries to upload your recording to your S3 bucket. The recording will only persist as long as the host is alive and you need to contact support to request the manual retries.
If the upload fails due to a fatal error such as access denied to an external bucket or an invalid public key while encrypting, the recording will deleted by Twilio immediately and no retries will happen.
How to enable external storage
In order to configure the voice recording service to automatically upload and save the media directly to an AWS S3 bucket of your choice, you will need the following:
- The AWS S3 bucket URL: The URL for the AWS S3 bucket of your choice.
- The AWS credentials: AWS credentials (i.e. an access key ID and a secret access key) for an AWS Identity and Access Management (IAM) user with write access to the bucket.
Step 1: Prepare your AWS account
Create an AWS S3 bucket and obtain its URL
First, create an S3 bucket. Use a bucket configuration that works for your application; Twilio does not have any special bucket requirements. Next, get the URL for your S3 bucket. You can use virtual-host-style or path style however, we recommend that you use the virtual-host-style URL:
Virtual-host-style looks like this: https://bucket-name.s3.Region.amazonaws.com/key-name
Path-style looks like this: https://s3.Region.amazonaws.com/bucket-name/key-name
Create an IAM user and get its credentials
Create an IAM user using the AWS Console, and set the access type for the IAM User to “Programmatic access”. Then, grant write-bucket permissions so Twilio is allowed to upload files on your behalf. We recommend attaching permissions policies directly to the user and creating a policy document with write permissions. You can use the following JSON snippet as a template for the policy document:
Considerations:
- Replace
my_bucket_nameat the bottom of the snippet with the actual bucket-name. - Replace the string
/folder/for/storage/with the specific path where you want Twilio to store your recordings within your bucket (note that/is a valid path). Don't forget the*wildcard at the end.
Once the IAM user is created with the required permissions, you need to annotate and store the credentials in a secure location for later use. Credentials include an access key ID and a secret access key. You must also note down the path (e.g. /folder/for/storage/) where you provide Twilio write permissions to upload the media associated with the voice recordings.
Step 2: Add AWS credentials to your Twilio account
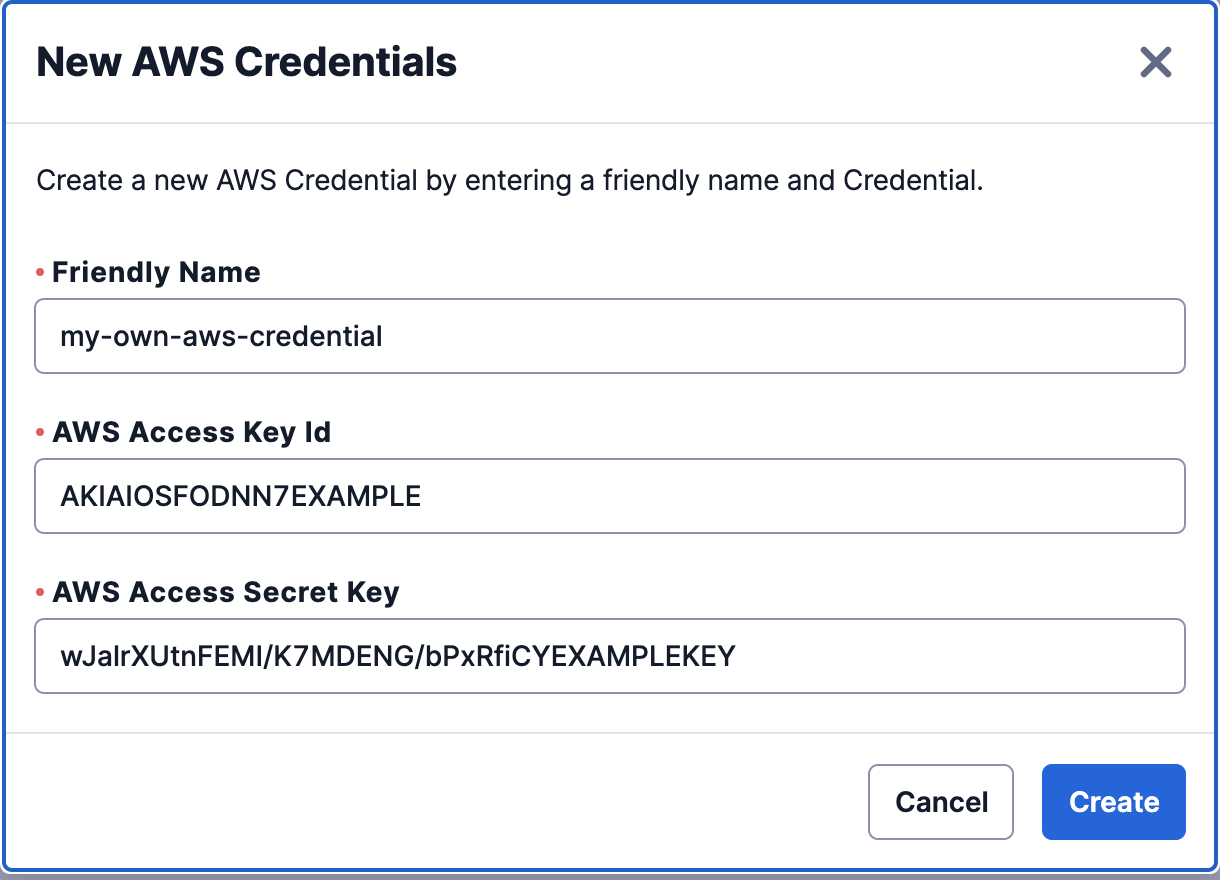
You need to add a new AWS Credential to your Twilio accounts so it can be used to authenticate in AWS and access your S3 bucket to store the media associated with voice recordings. You can do this from the new voice credentials page in the Twilio Console. When pressing on Create a new AWS Credential, a popup will open where you can specify the friendly name you wish. Then, provide the AWS access key ID and the AWS access secret key that you obtained in step 1.
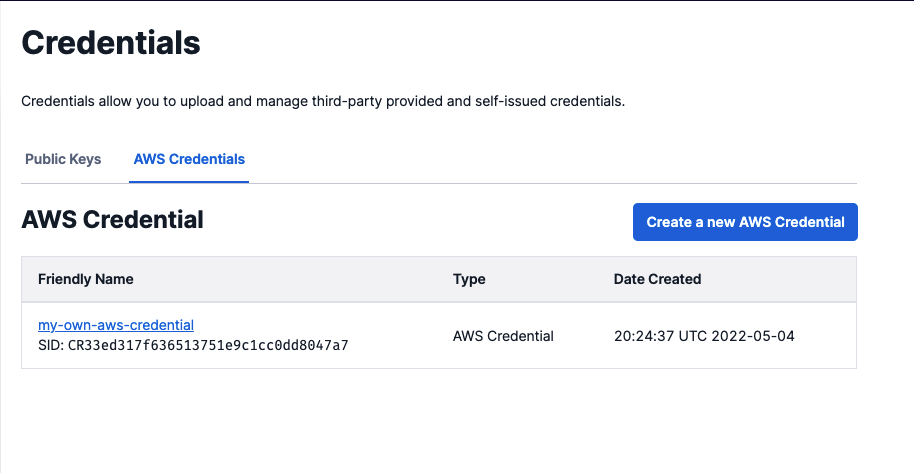
After that, a newly created Twilio AWS Credential is listed in the “Credentials” page. Write down the AWS Credential SID that has the form CRxx.
Step 3: Configure voice recordings to store media in AWS S3
To configure AWS S3 storage for voice recordings, open the Twilio Console in your account or project, and navigate to voice settings. Enable external storage by specifying the AWS credential created in step 2 and the AWS S3 bucket URL you obtained in step 1 along with the folder path (if applicable). After saving your settings, all voice recordings created going forward will be stored at the specified bucket URL.
How to know where recording media is stored
The recording resource has been updated with a new mediaUrl attribute that contains the URL of the media file associated with the recording resource. When stored externally, this is the full URL location of the media file. The existing RecordingUrl property from the RecordingStatusCallback will also contain either the location of the media hosted at Twilio cloud or the URL location when stored externally.
In addition, the recording details log page will have a disclaimer indicating that media can’t be played from Twilio since external storage was enabled for the recording and media was stored externally.
Unlock the power of voice
Here at Twilio, we believe in the power of voice to intimately connect us. We are on a mission to ensure that voice interactions strengthen human relationships in our global economy. We want to make it effortless for all organizations to create delightful voice experiences that make every one of their customers feel valued and understood.
Twilio call recording helps organizations like yours get the most out of your conversations, driving growth, compliance, quality assurance, and a better understanding of your customers through conversation analytics, all while ensuring you have full control of your data.
Stay tuned for more to come, and we can’t wait to see what you build with Twilio!
Related Posts


Related Resources
Twilio Docs
From APIs to SDKs to sample apps
API reference documentation, SDKs, helper libraries, quickstarts, and tutorials for your language and platform.
Resource Center
The latest ebooks, industry reports, and webinars
Learn from customer engagement experts to improve your own communication.
Ahoy
Twilio's developer community hub
Best practices, code samples, and inspiration to build communications and digital engagement experiences.