Get Started with Twilio Studio
Twilio Studio is a visual tool that you can use to build communications applications with little or no code. This guide will walk through the information you need and the mechanics you'll use to start building with Studio. Once you feel comfortable with these mechanics, you'll be ready to start building out more complex flows that combine multiple Widgets and Transitions.
Here are some of the key Studio terms that will help you as you get started:
| Term | Definition | Example |
|---|---|---|
| Flow | Flows are individual workflows that you create. They can handle one or more use cases. | You can create a Flow to handle inbound Voice calls by playing a prerecorded message. |
| Widget | Widgets are individual items that can be dragged onto the Flow canvas. They represent pieces of logic, and can connect to each other via Transitions. | You can use the Send Message Widget to send an outbound SMS to a user in your Flow. |
| Transition | Transitions define how a Flow advances from one Widget to the next based on specific conditions. | After you place an outbound call with the Outgoing Call Widget, you could create a Transition to the Say/Play Widget to play a message to the connected caller. |
| Step | A Step is the runtime processing of a Widget, starting when that Widget is entered. Variables get set at the end of a Step. | If you're prompting a user for a text input, when they receive the inbound SMS prompt, they are actively in a Step until they exit the Widget (send a response or timeout). If the prompt is intended to set a variable, this happens at the end of the Step. |
| Execution | An Execution represents a specific person's progress through a Flow. An Execution is active while the user is in the Flow, and it is considered ended when they stop or are kicked out of the Flow. | When you call the Twilio number connected to a Flow, an Execution is created to represent your call to that number and your path through the Flow. The owner of the Flow can see this Execution, as well as the Executions of other users who run through the Flow. |
The first step to use Studio is to create a Flow, which will represent the workflow that you want to build for your project.
To create a new Flow:
-
Log into your Twilio account in the Twilio Console
-
Navigate to the Studio Flows section in the Console
-
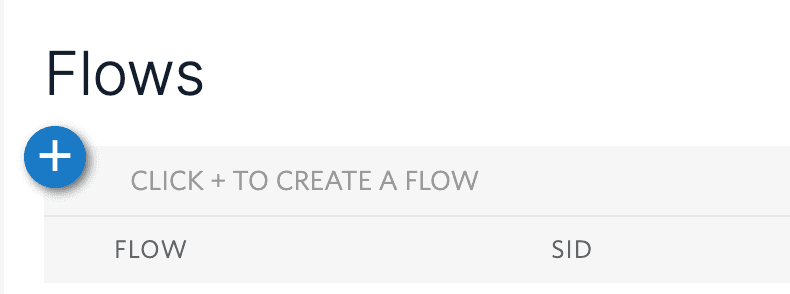
Click Create new Flow. Note that if you have already created a Flow before, you will see a view similar to the one below. Click the + icon underneath the Flows heading to create a new Flow.
-
Name your Flow. You can name it anything you like. Then, click Next.
-
After you've named your Flow, you'll see a list of possible templates you can use. If you want to start with an empty Flow, you can select the Start from scratch option. You can also start with a pre-existing template for several common application flows, such as chatbots or Interactive Voice Response (IVR) menus, and customize them for your use case. Once you've selected your template, click Next.
When you've created the Flow, you'll see the Flow's Canvas. The Canvas is where you will build out the rest of the logic for the project.
You can create Subflows which allow you to break apart large, complex Flows into smaller Flows and link them together. Common use cases include reuse of common functionality, organizing complex Flows into logical subsets, and passing live Exectutions between Flows. For example:
- Create a reusable logging Subflow to
POSTdata back to your own systems - Transfer a Contact to another self-contained IVR or chatbot
- Encapsulate the gathering and verifying of a Contact's identity
- Pass a Contact's language preference to a Subflow to dynamically load the localized content
Visit the Subflow docs to learn more about how to use Subflows, work with variables, limitations, and more.
The Canvas is where you'll build your Flow.
The Canvas can sometimes get crowded, especially in complex Flows, so it's important to be able to control the area of focus. You can use the mouse to click and drag to reposition the Canvas, and you can use the Zoom In and Out links in the top menu bar (+ and -) to change the zoom. You can also pinch and squeeze to zoom if you are using a trackpad, or press + and - on your keyboard to zoom in and out.
Below is a video demonstrating how to navigate around the Canvas and zoom in and out:

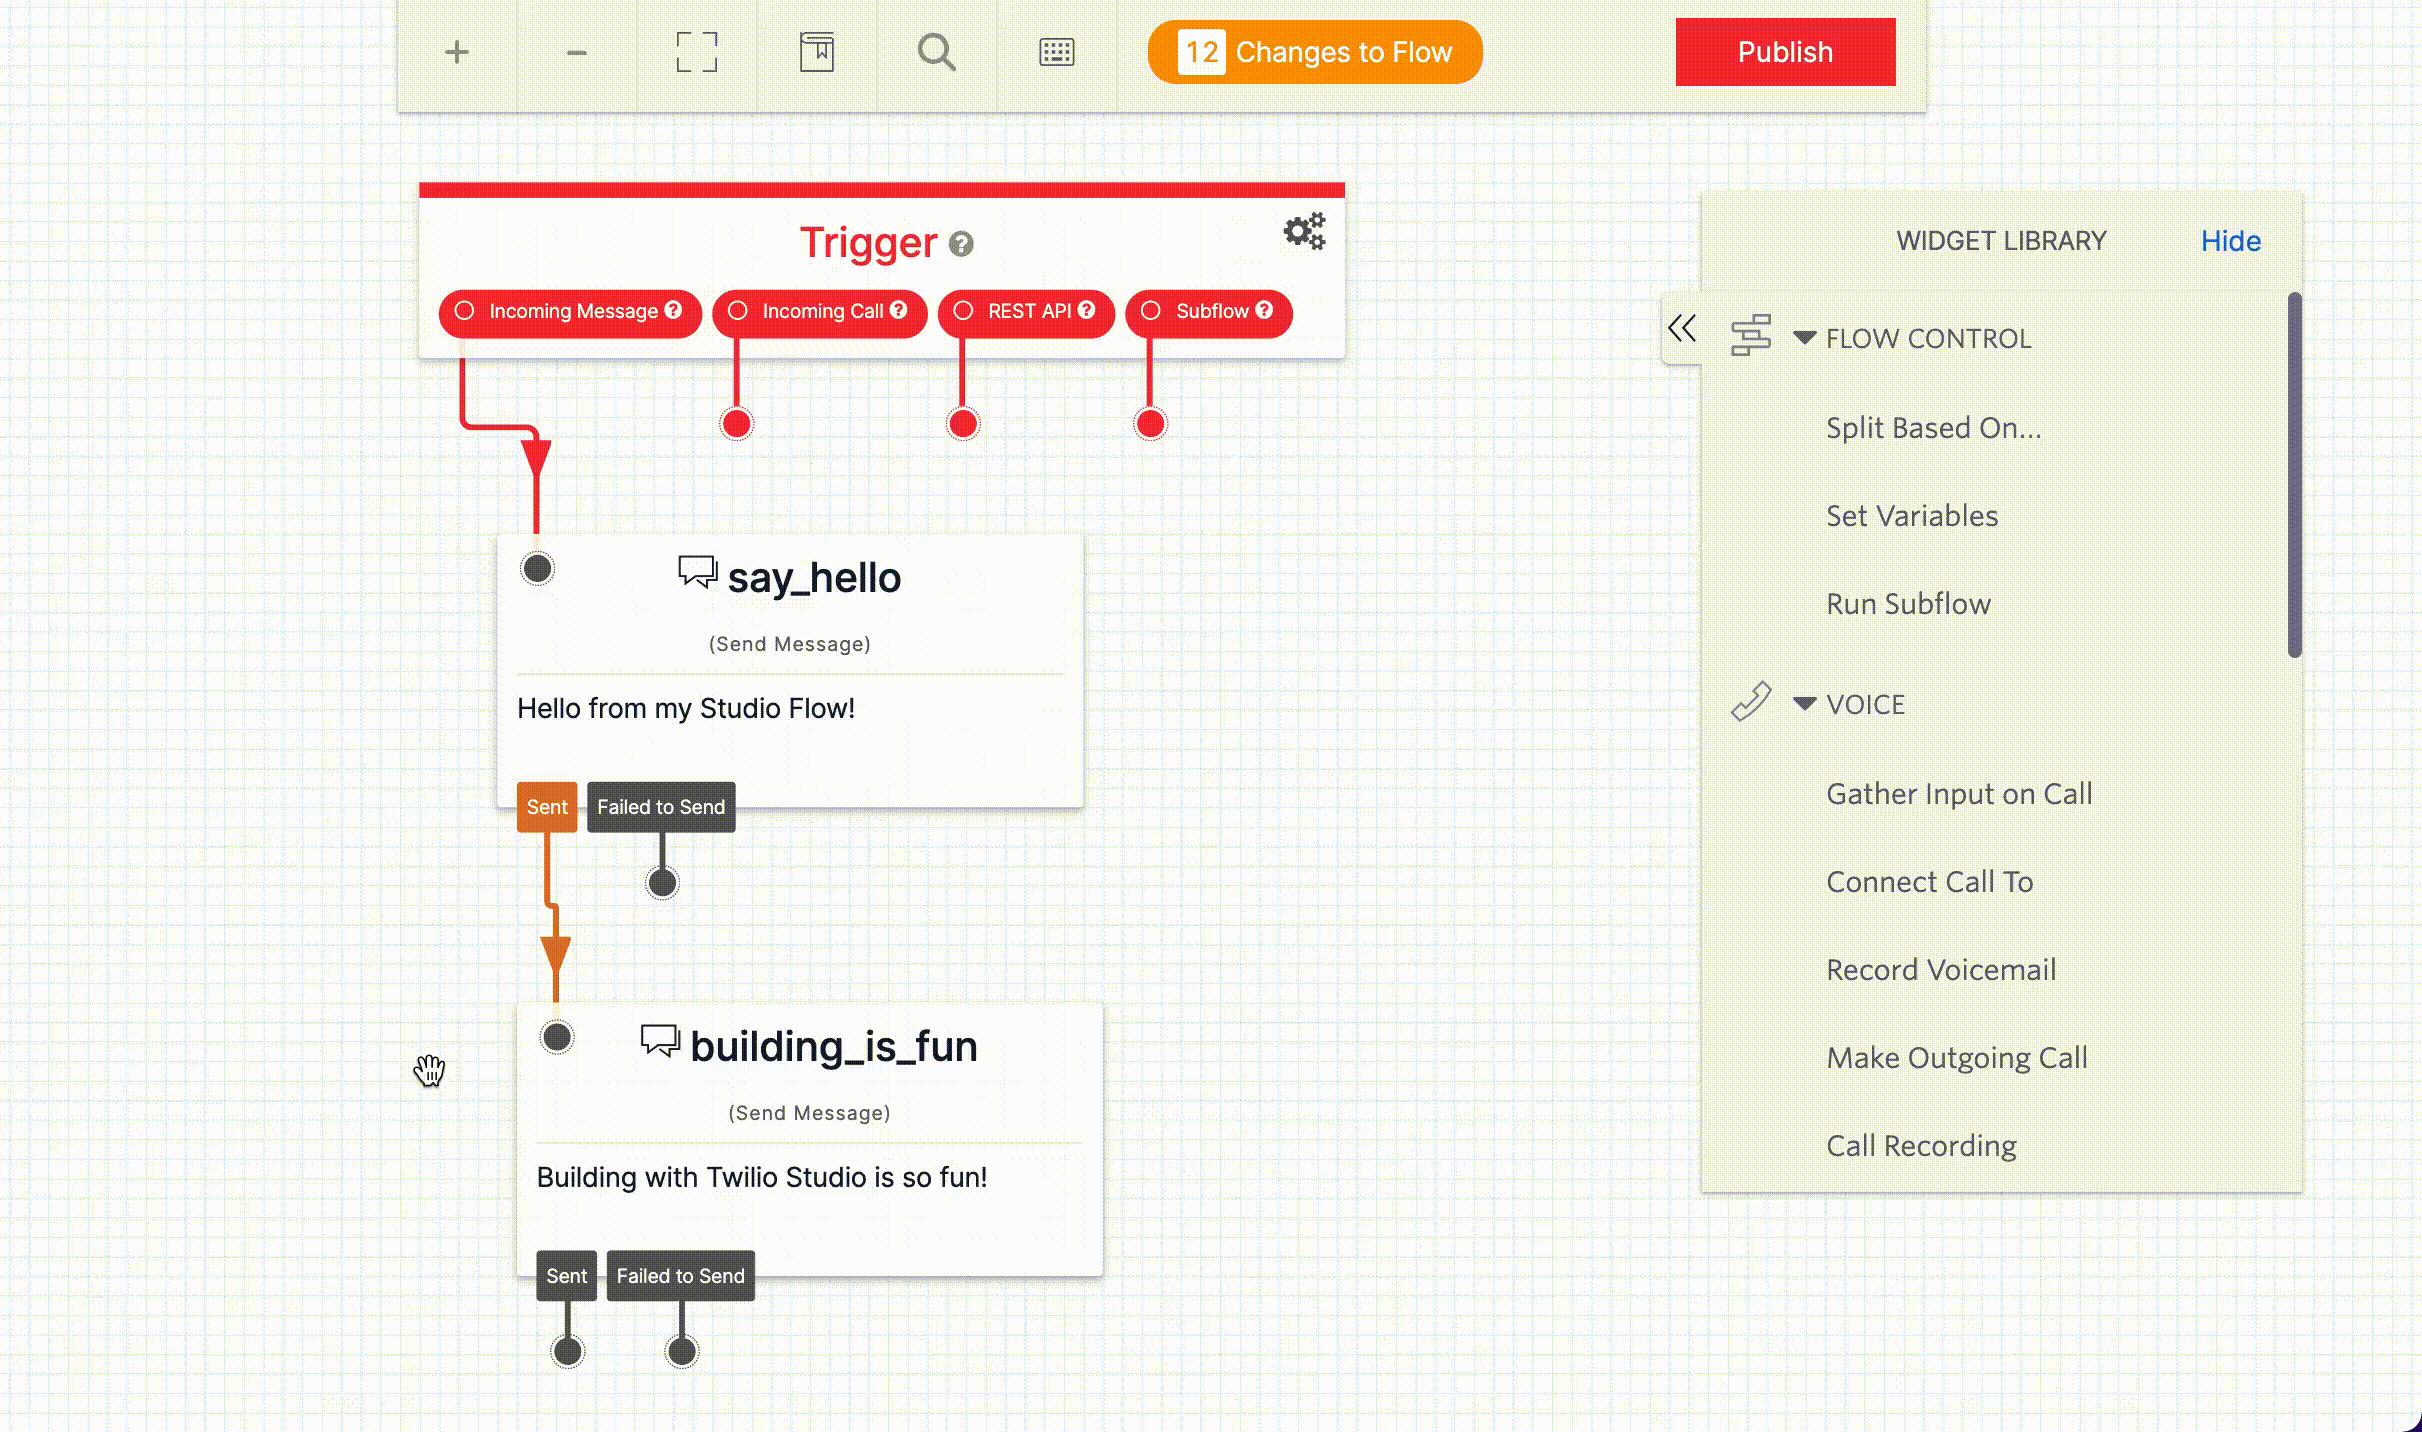
Widgets are the building blocks of a Studio Flow. They allow you to handle incoming actions and respond accordingly by performing tasks like sending a message, making a phone call, routing the user to another part of the Flow, capturing information, and more.
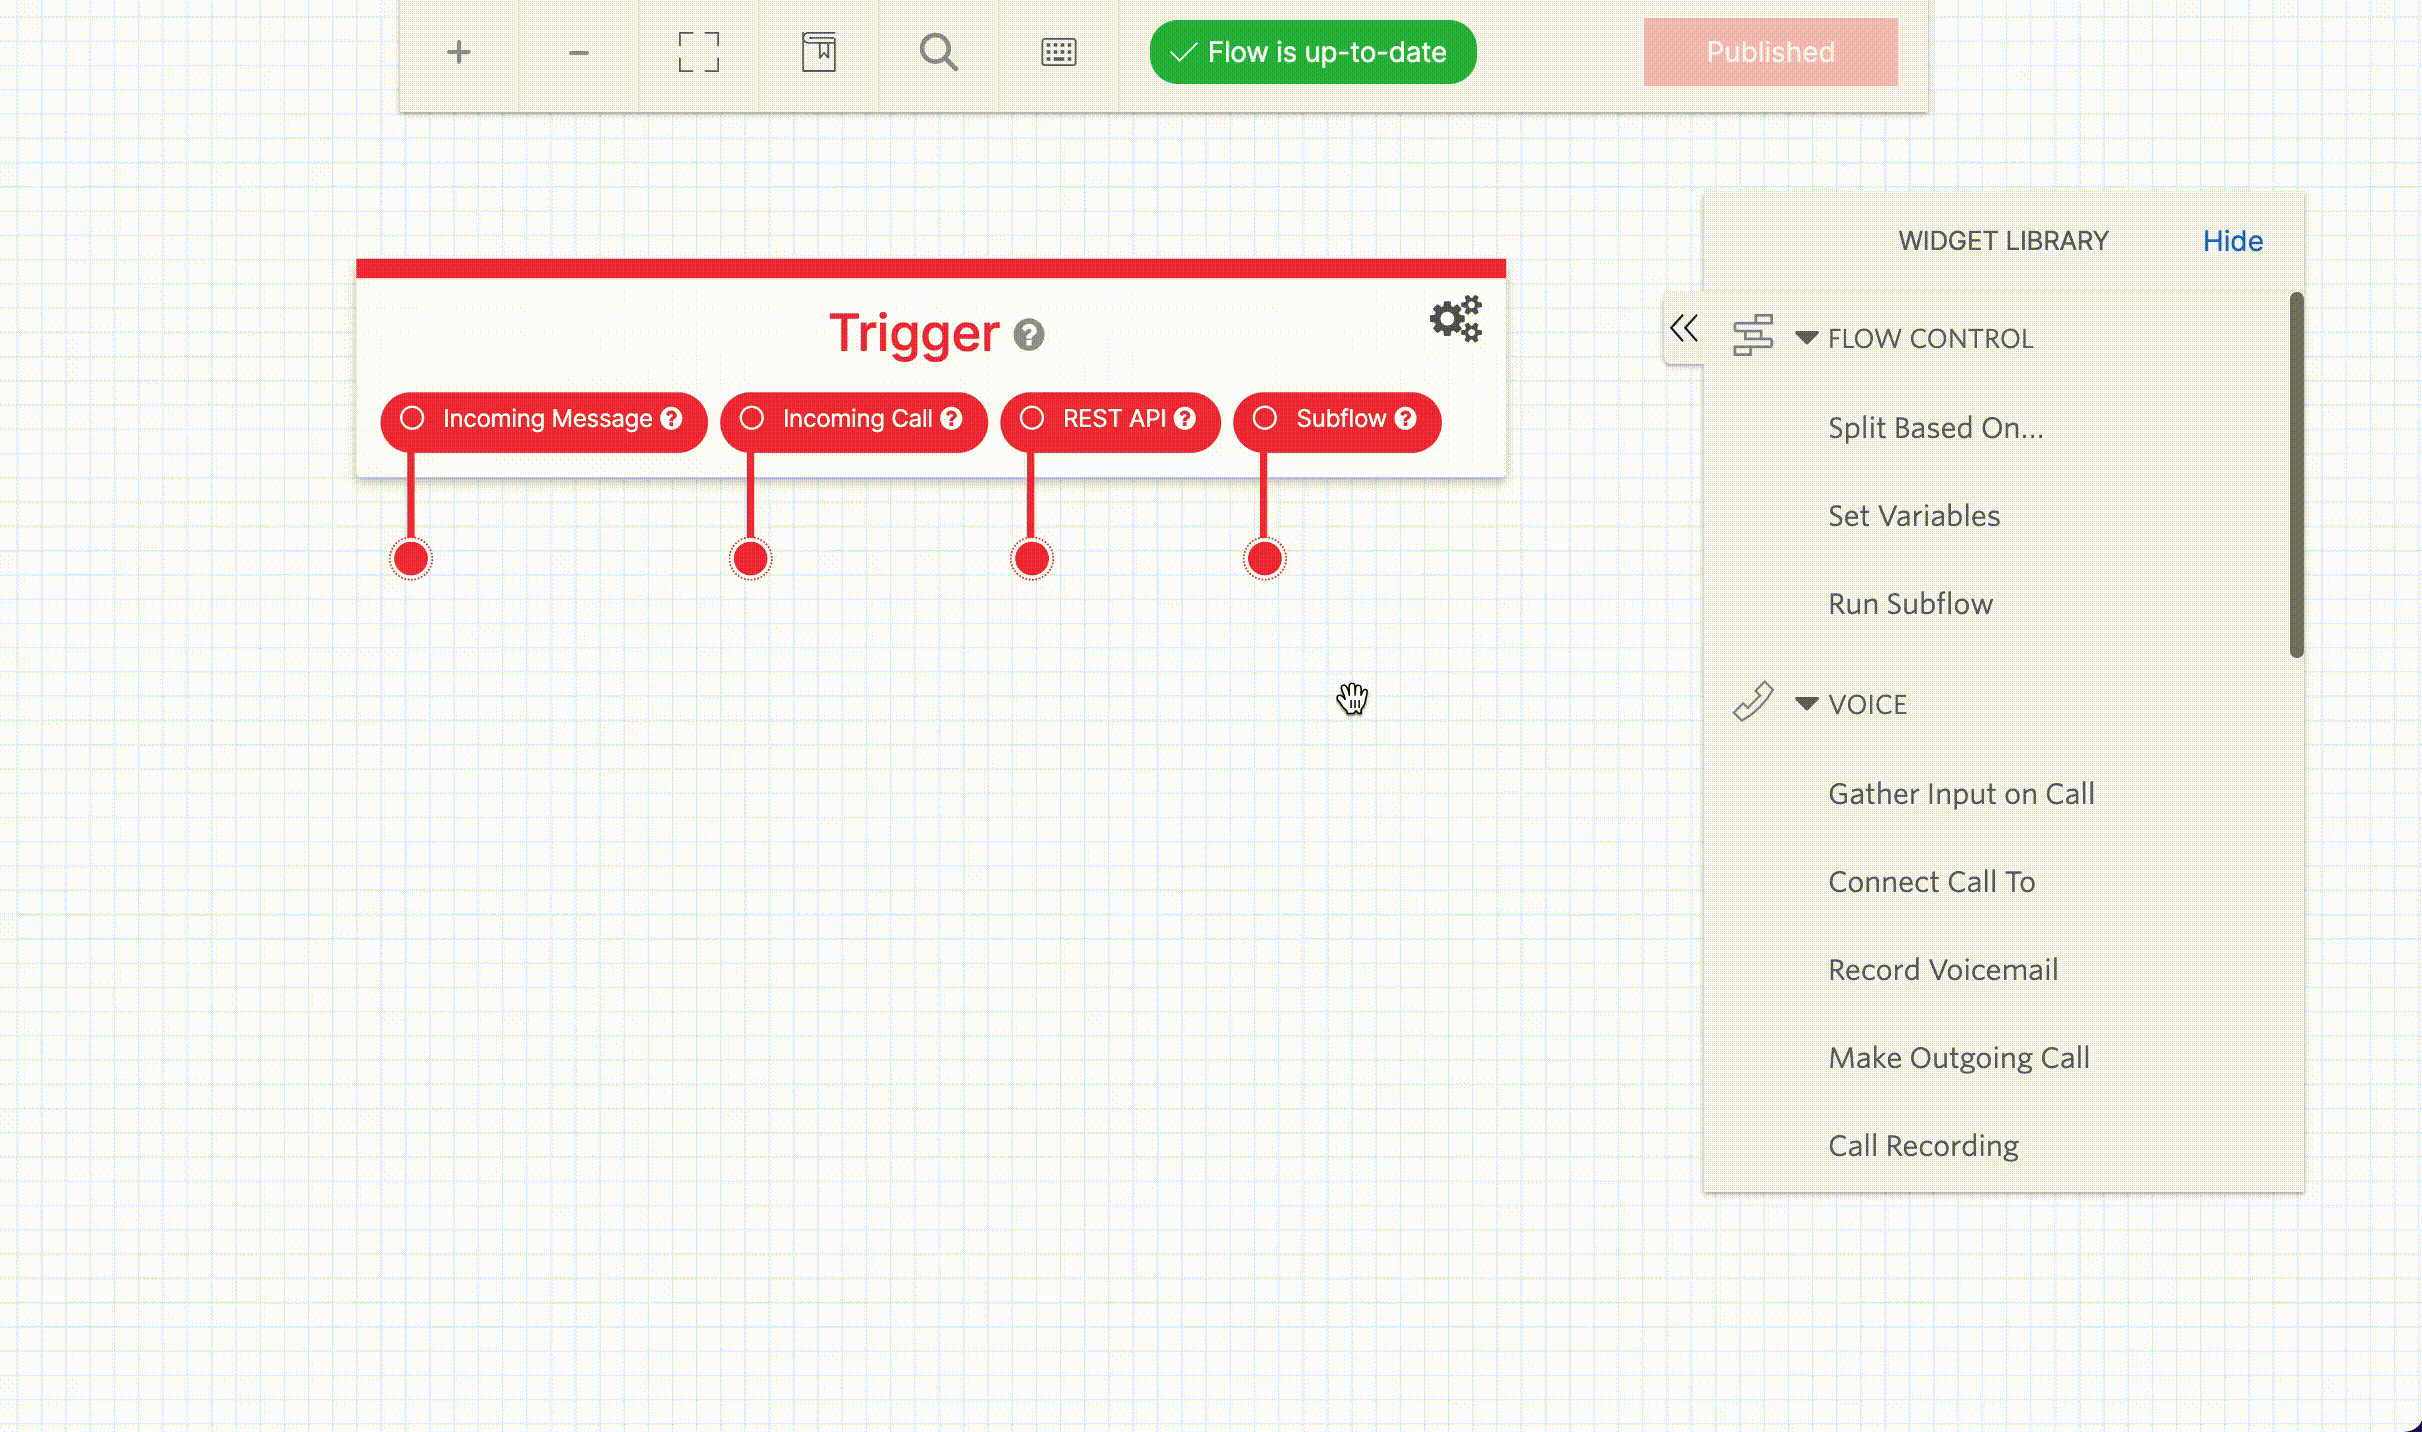
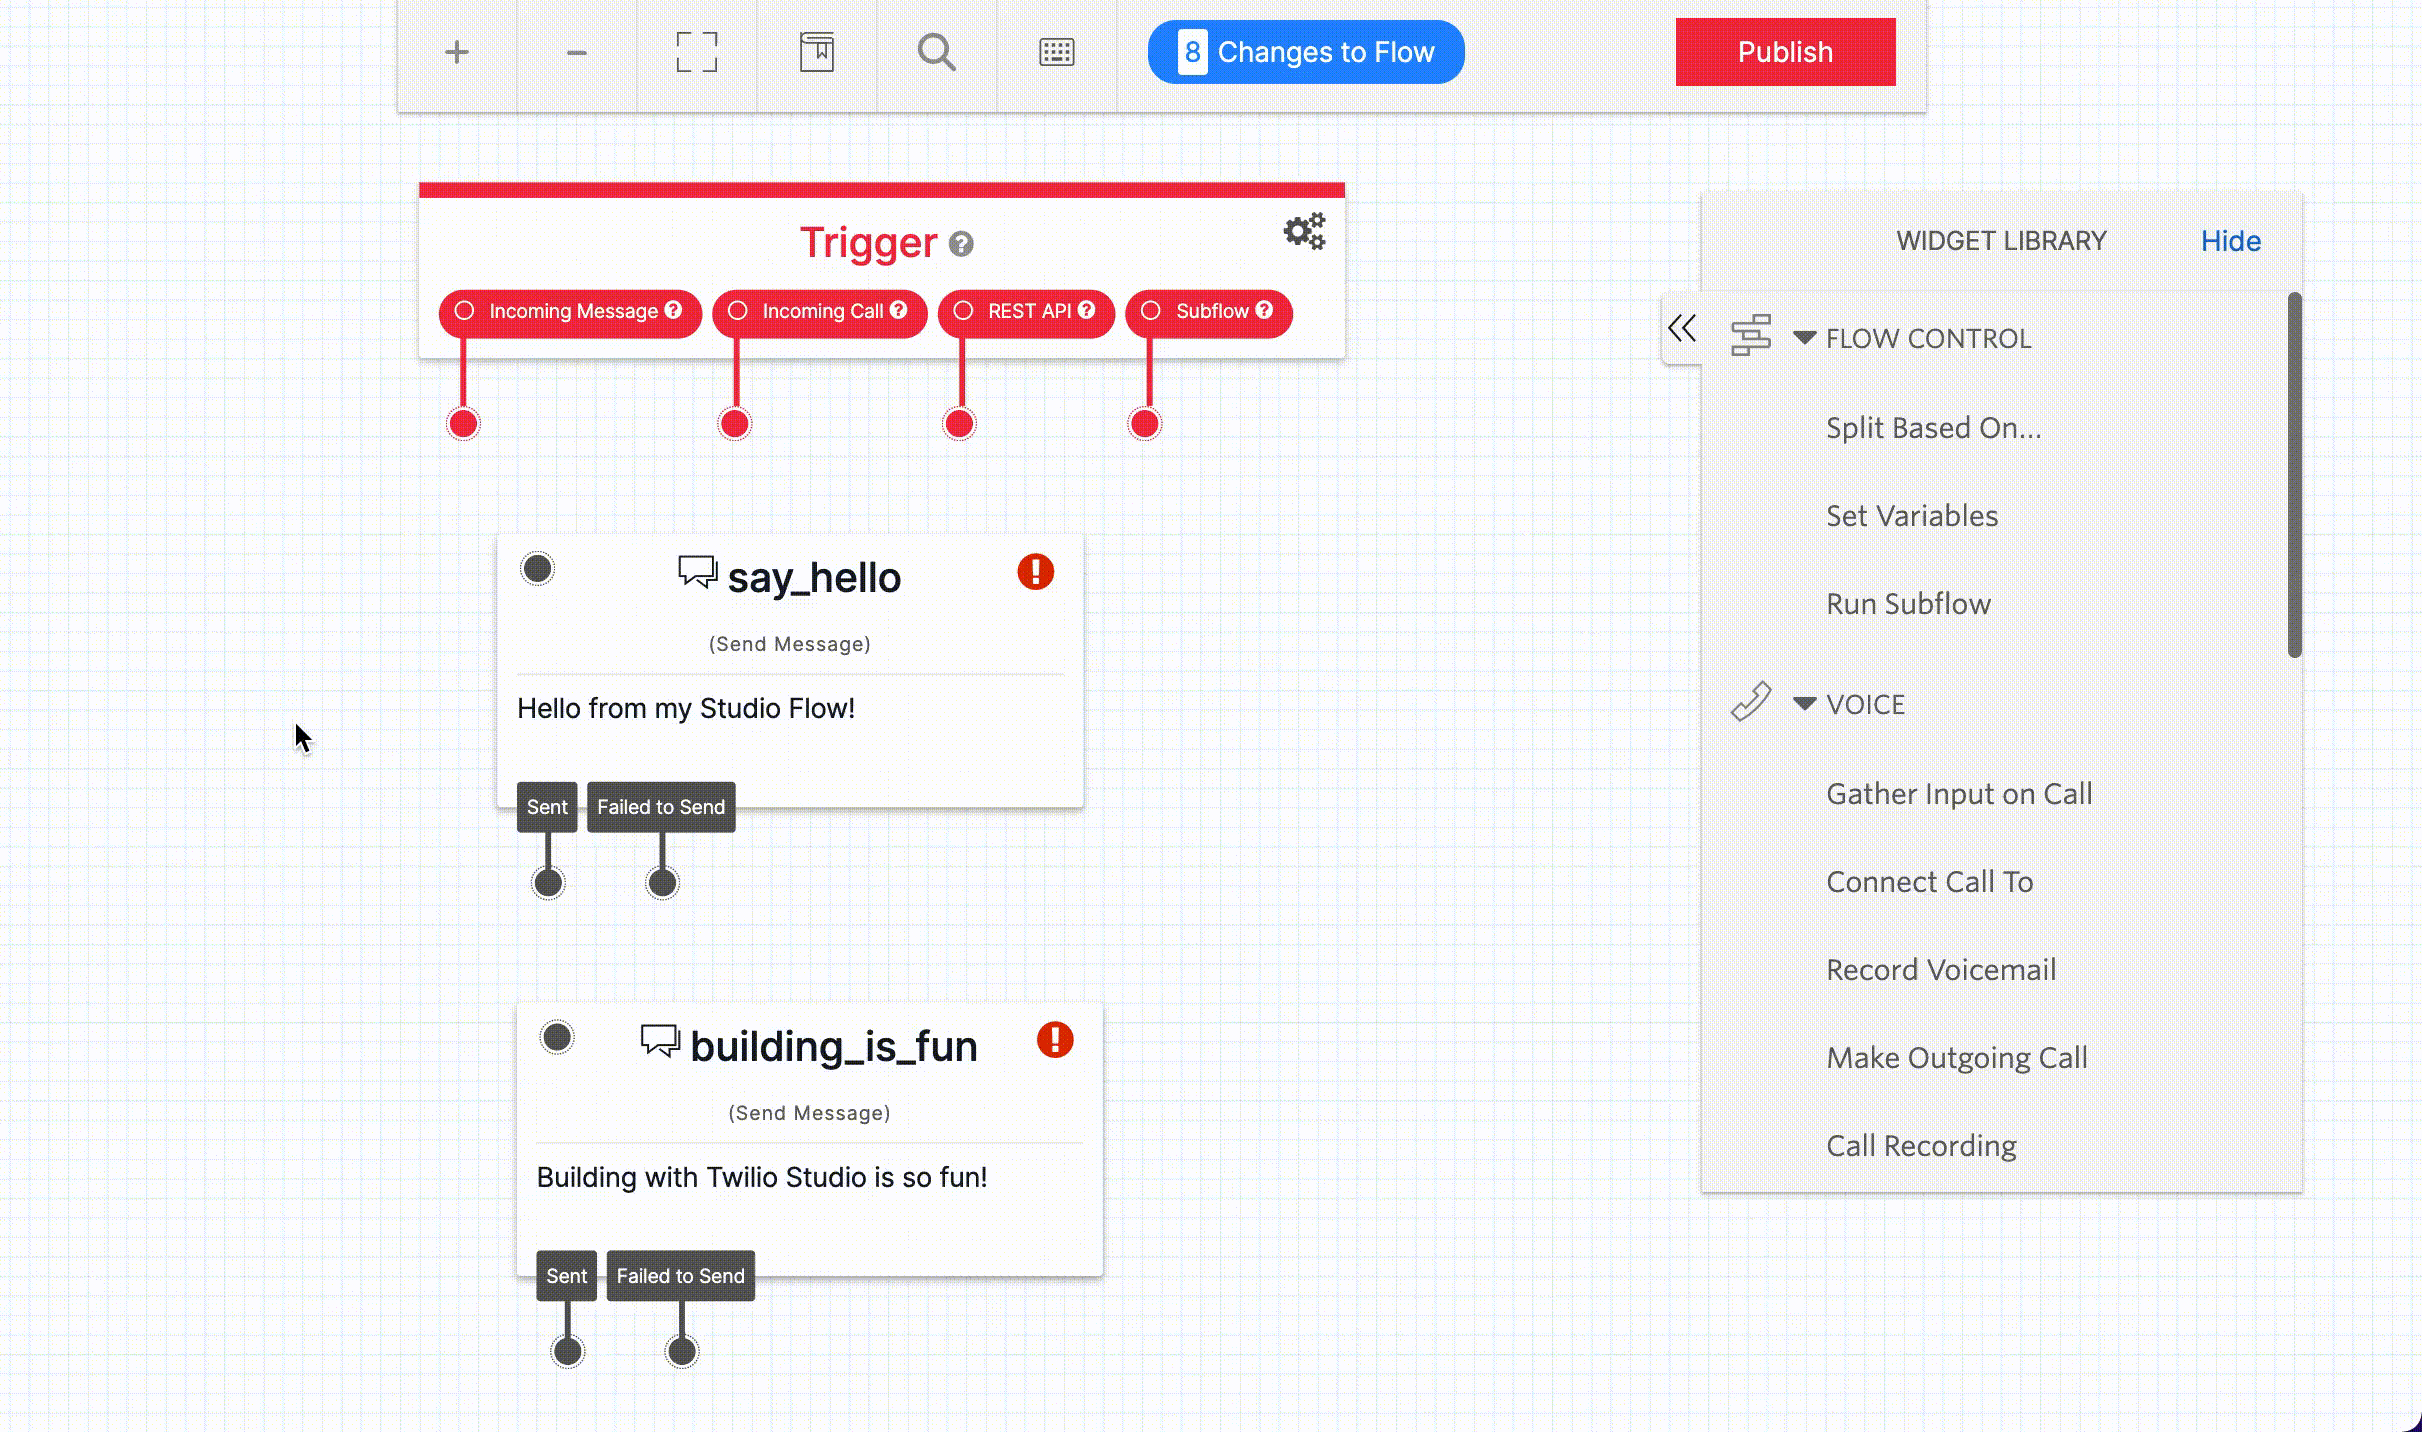
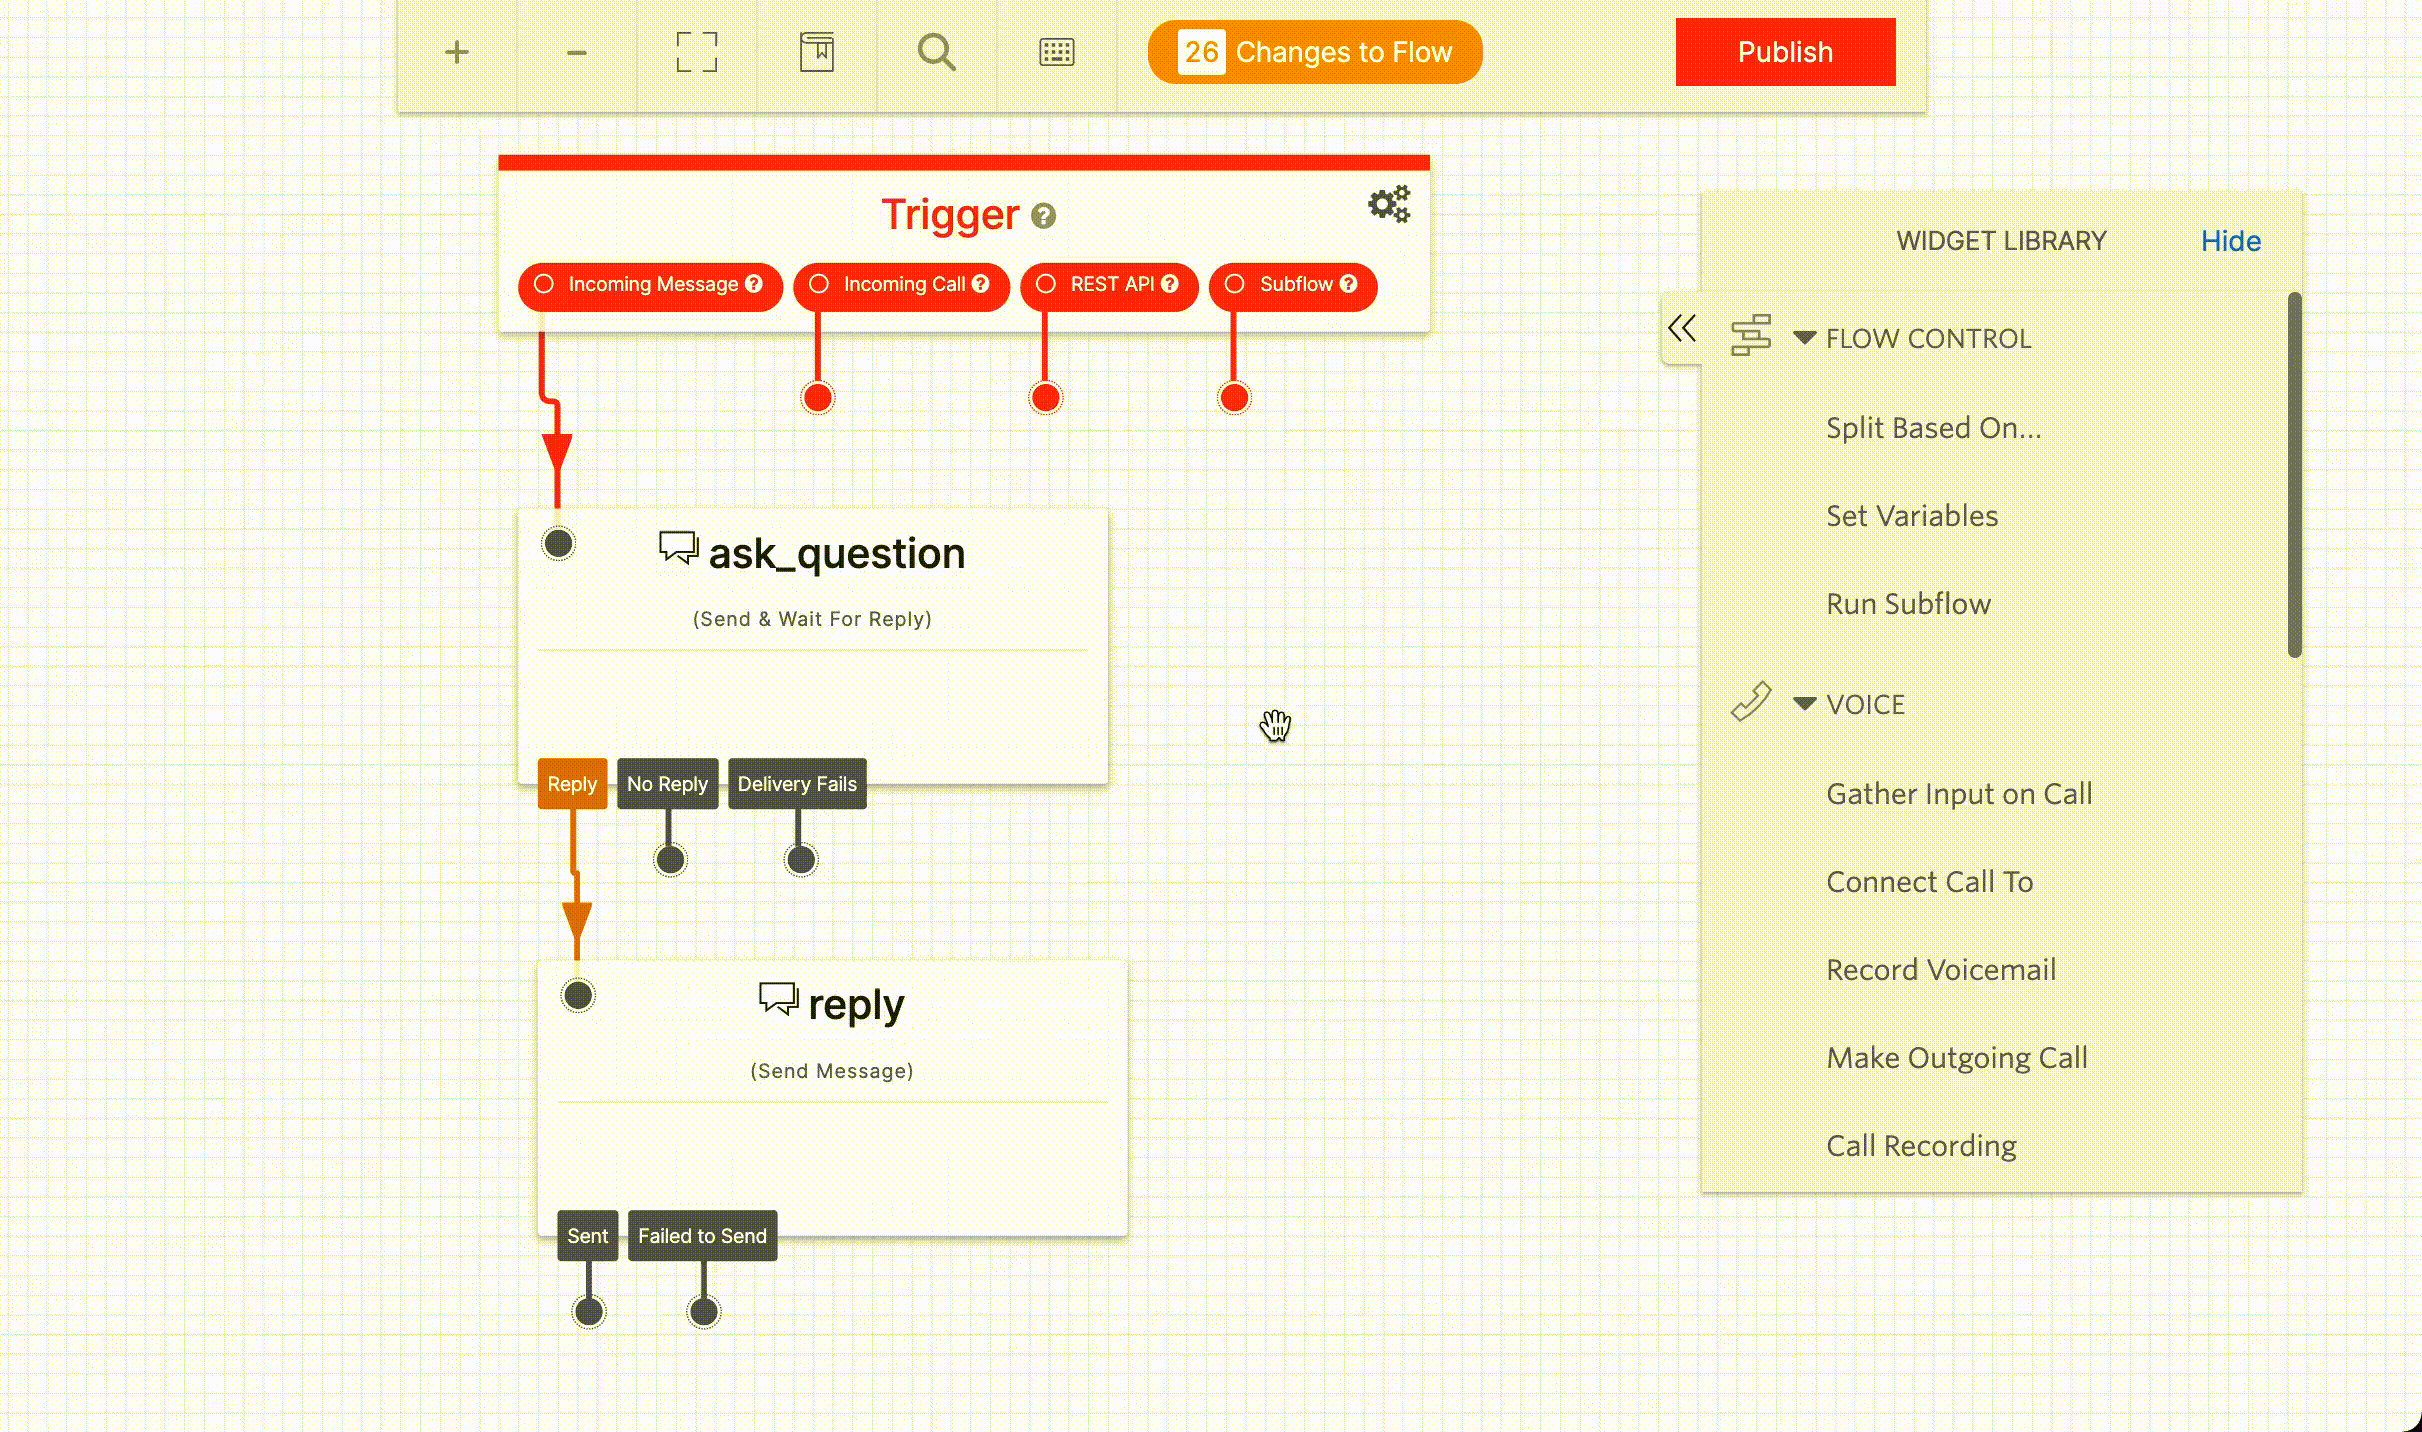
Every new Canvas has a Trigger Widget, which you'll use to indicate how the Flow should start. You can then add other Widgets onto the Canvas to build the rest of your project's logic.
There are four ways to trigger a Flow's start:
- Incoming Message
- Incoming Call
- REST API
- Subflow
All four of these appear in the Trigger Widget. You can start your Flow with any number of these Triggers. For example, you could design your Flow to provide information to users who both text and call in. In this scenario, your Flow could be triggered by both an Incoming Call and an Incoming Message. Your Flow might respond to an Incoming Message with a Send Message Widget that sends information back to the user over text, and it might respond to an Incoming Call with a Say/Play Widget that speaks the message back to the caller. You can design your Flow to respond to any number of the possible Triggers.
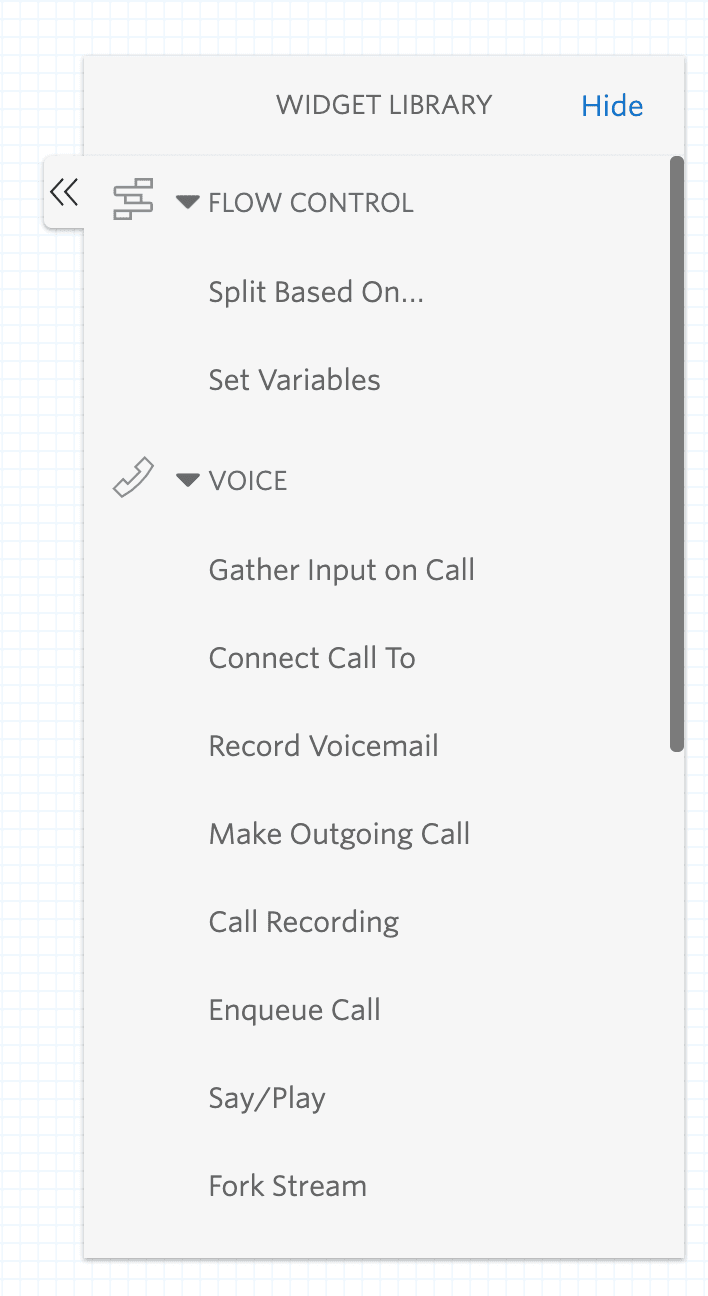
The Widget Library panel is on the right side of the Canvas, and includes Widgets that you can drag and drop onto the Canvas.
When you click on a Widget that's already on the Canvas, the Widget will be highlighted in blue and the Widget Library panel on the right side of the Canvas will transform into the Inspector Panel, where you can configure the Widget.
To get back to the Widget Library panel, you can click back onto an empty space on the Canvas. You can also click the single back arrow (<) on the Inspector Panel to get back to the Widget Library.
Below is a video demonstrating how to switch between the Widget Library and a Widget's Inspector Panel.
To add a Widget to the Canvas, click and drag the name of the Widget from the Widget Library and drop it onto the Canvas. You can click and drag the Widget around the Canvas to reposition it.
The video below demonstrates how to add a Widget to the Canvas and how to move the Widget around the Canvas.

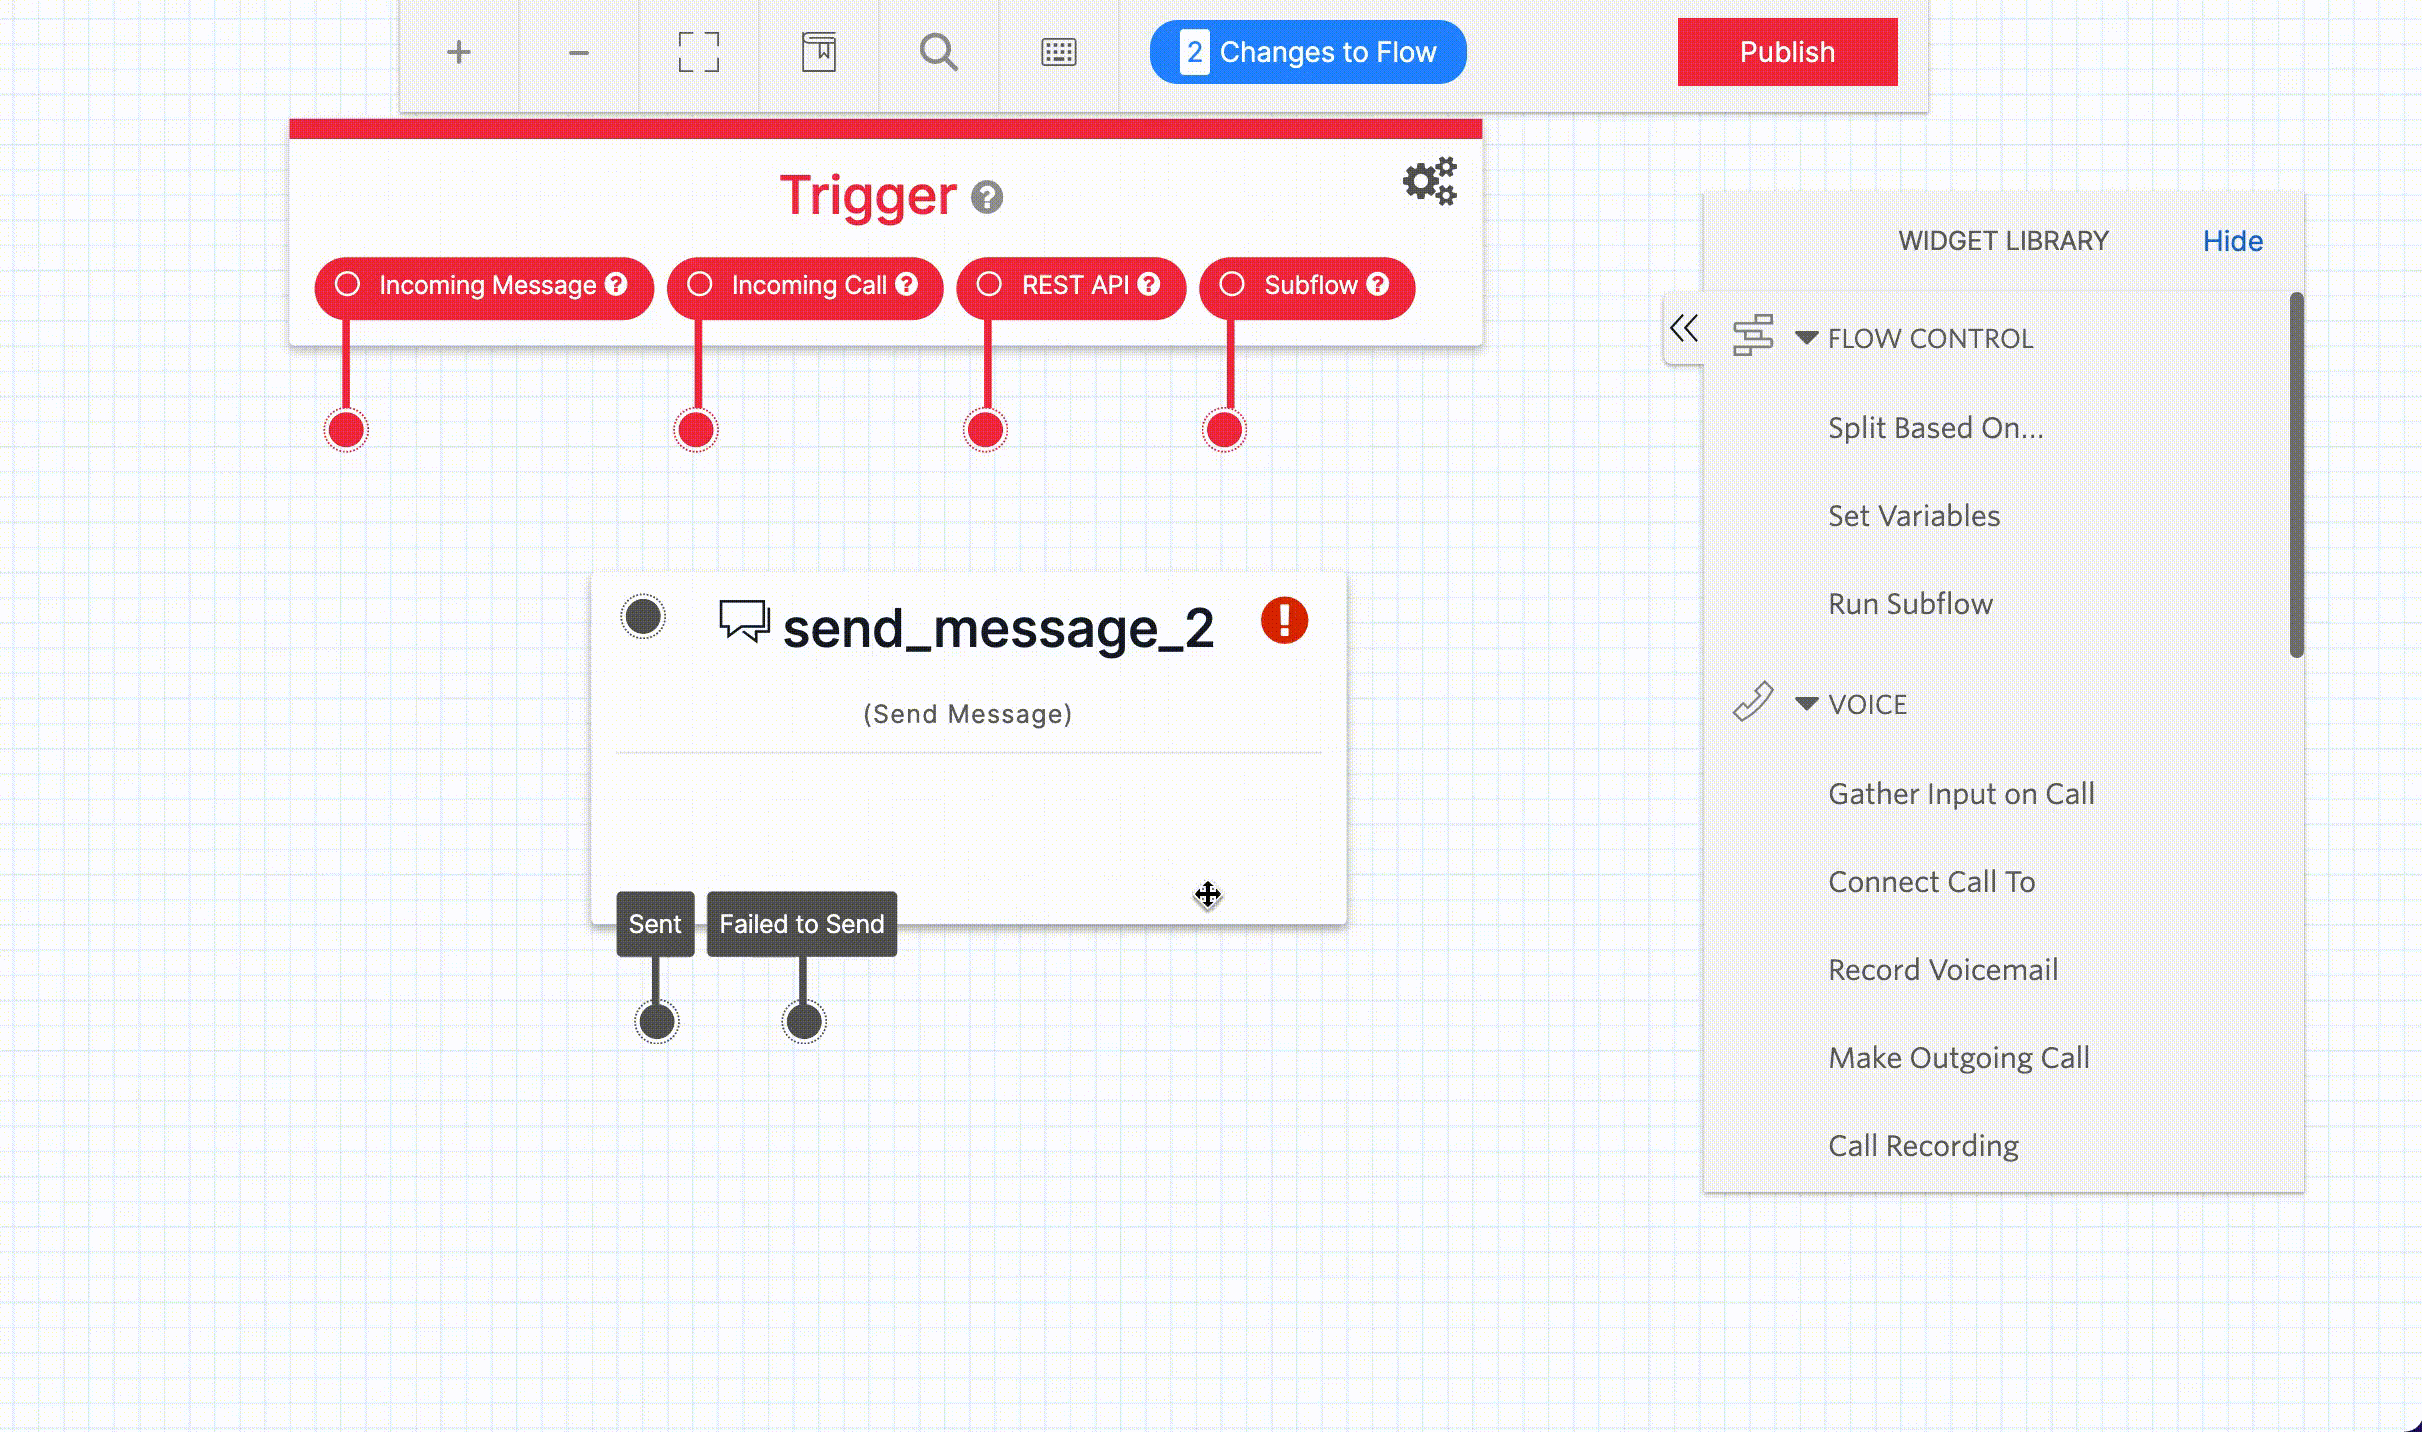
You can configure and edit Widgets via the Inspector Panel. Click on a Widget to show its Inspector Panel and configuration options.
Widgets will have a default name when you drop them onto the Canvas. You may give Widgets custom names. Note that Widget names must have the following requirements:
- Must be unique. You cannot name two Widgets the same thing within the same Flow.
- Must start with a letter.
- Cannot include spaces or periods. Use the underscore character (_) to separate words.
The Widget type will show in parentheses underneath the name so you can tell what the Widget does.
Danger
You should not use directly identifying information (aka personally identifiable information or PII) like a person's name, home address, email or phone number, etc., in Flow names or Widget Names because the systems that will process this attribute assume it is not directly identifying information. You can read more about how we process your data in our privacy policy.
Some Widgets have required configuration settings. These will be indicated with a red asterisk in the Inspector Panel, and will also be specified in the Widget's documentation. You won't be allowed to save your Flow if any required configurations are missing or invalid.
To save your edits to the Widget, you can either press the Save button at the bottom of the Inspector Panel, or click back onto the Canvas (the Widget will save automatically when you click away from it).
The video below demonstrates how to edit a Widget and save it by clicking back onto the Canvas after editing. Note that the Widget Name and Message Body are both required for this Widget, as the red asterisk next to each field indicates.
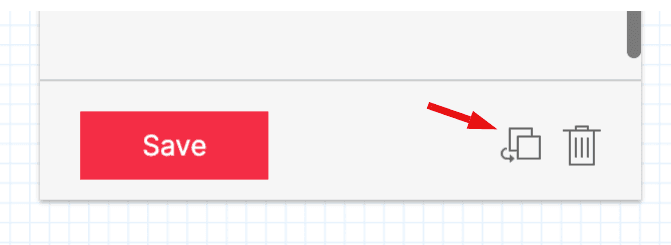
To copy a Widget, you can open the Widget's Inspector Panel and click on Copy icon at the bottom (in between the Save button and the Delete icon).
You can also use keyboard shortcuts to duplicate Widgets on the Canvas. Select a widget (it will highlight in blue) and then copy (Command + C on Mac or Ctrl + C on Windows) and paste (Command + V on Mac or Ctrl + V on Windows).
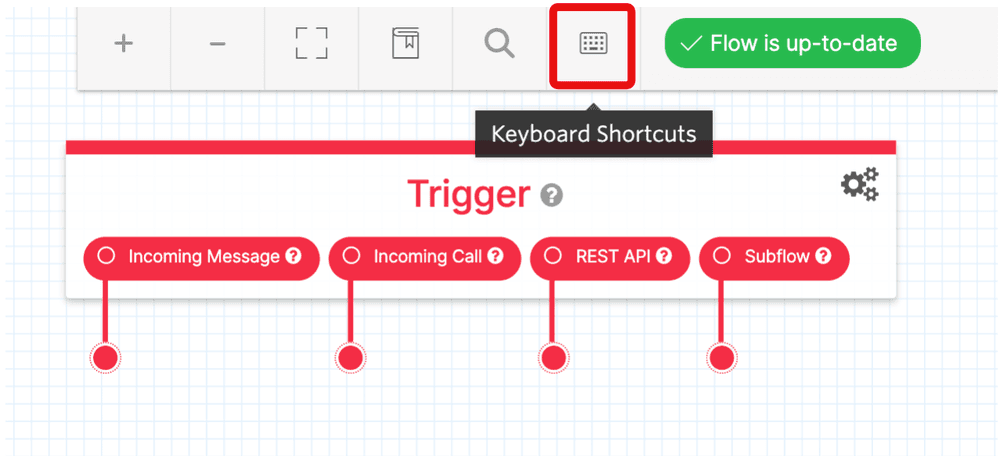
To see more keyboard shortcuts, you can click the Keyboard icon in the top menu bar of the Canvas.
To delete a Widget, you can click the X button in the top right corner of the Widget on the Canvas, or click the Delete icon at the bottom of the Widget's Inspector Panel. (The Delete icon looks like a trash can).

A Transition defines how a Flow advances from one Widget to the next based on events and specified conditions. Each Transition connects one Widget to another Widget.
Widgets can have multiple different Transition conditions. For example, the Send Message Widget contains a Transition condition for when the message is sent, and another one for if the message fails to send. You can define separate workflows for each one of these conditions. For example, if the message fails to send, you might want to retry it. If the message does send, you might want to move to a different Widget.
You can create a Transition in one of two ways.
You can draw Transitions between two Widgets on the Canvas. To do so, click and hold the dot underneath the first Widget. Then, drag your cursor onto the second Widget that you would like to connect to. As you drag the cursor, you should see a line following the arrow. Drop the line on the top left dot on the Widget you want to connect to. You should see a line appear on the Canvas, indicating the Transition.
From the Canvas, click on the Widget to open the Widget's Inspector Panel. Then, click on the Transitions tab. There will be a dropdown menu of Widgets for each possible Widget event.
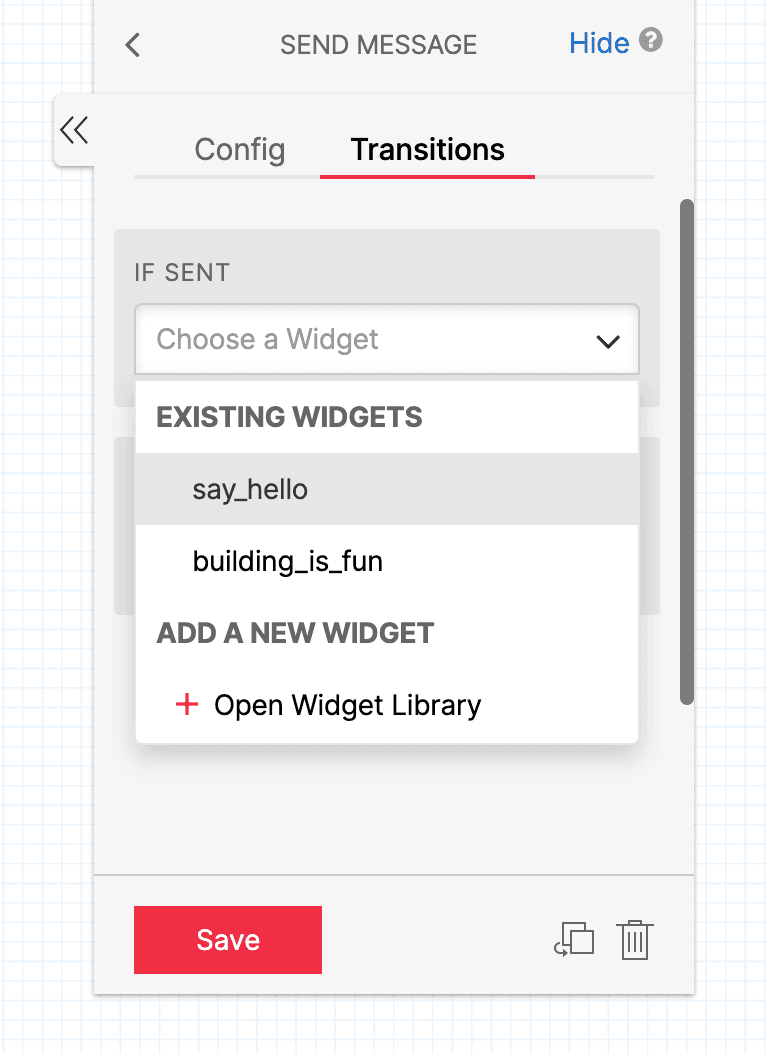
Select the Widget you would like the Flow to transition to from the dropdown menu. After you save the Widget, you will see a line with an arrow connecting the first Widget to the new connected Widget.
You can similarly remove a Transition in two ways.
You can remove a Transition by drawing on the Canvas. To remove the Transition, click on the gray dot at the top the second Widget in the Transition (the Widget that the Transition moves towards). Then, drag and drop the line somewhere on the empty Canvas (not on a Widget). You should see that the Transition line has been removed from the Canvas.
Click on the Widget that starts the Transition you want to remove to open its Inspector Panel. Select the Transitions tab and click Disconnect under the Transition you would like to remove.
Changes are automatically saved on the Canvas but will not be made live for consumers until you explicitly click Publish. This lets you safely make changes while you are developing your Flow without impacting any current users. When you are ready for your changes to go live, click Publish from the top Canvas menu.

Studio also includes a revision history. You will be able to see a list of every change made to your flow and the differences between the currently published version. You can also revert to a previous revision if you want to backtrack to an older version of the Flow.
To view the revision history, hover over the text in the top Canvas menu that indicates whether there are changes to the Flow or the Flow is up to date.
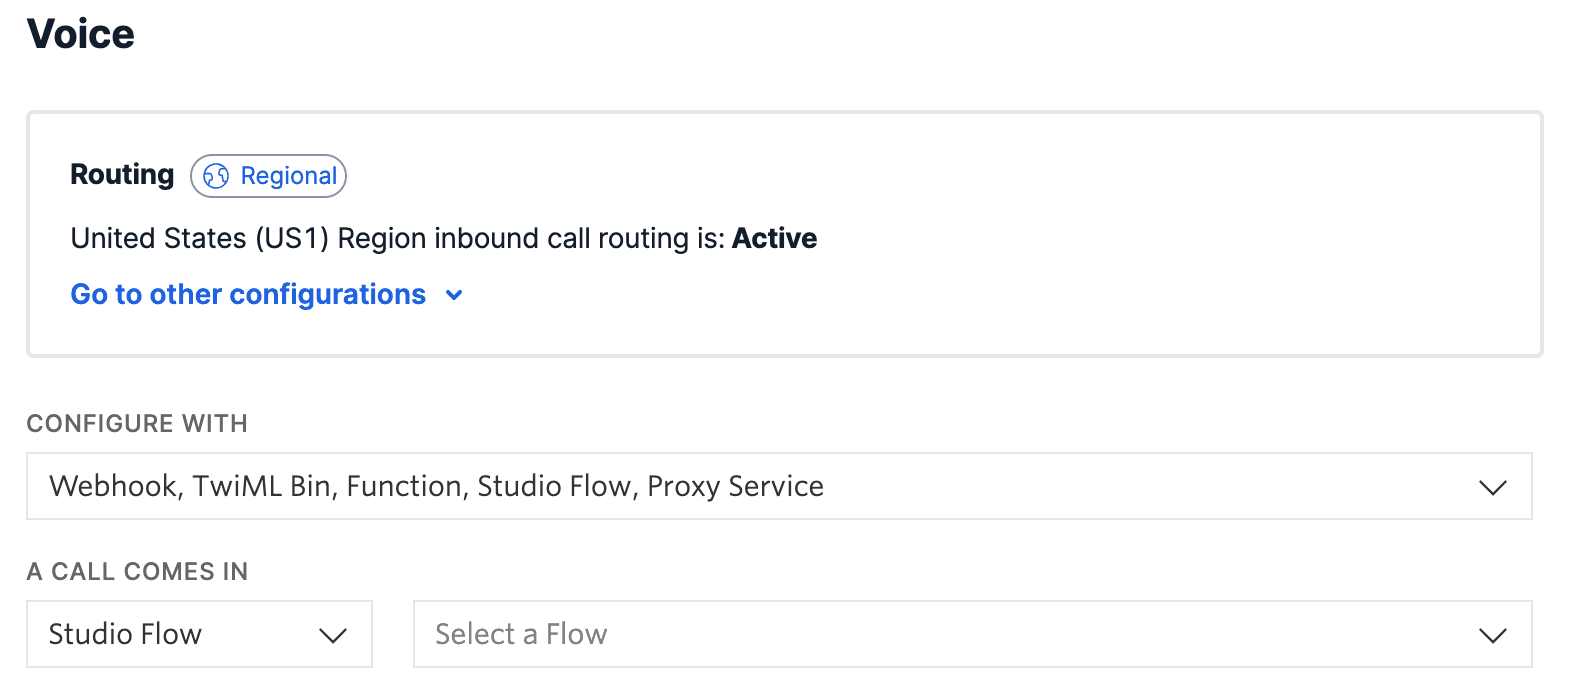
Once you're happy with your Flow and you've published all changes, you can connect it to a Twilio Number so people can start interacting with it. You can use this for Flows that are triggered through Incoming Messages or Incoming Calls.
Navigate to the Active Numbers section of the Twilio Console and click on the number you'd like to connect to the Flow. (If you do not have any phone numbers, you can purchase one from the Console.)
After clicking on the number, you will see its configuration menu where you can connect the number to your Studio Flow.
If an Incoming Call triggers your Flow, scroll down to the Voice & Fax section of the configuration menu. Under Configure With, select the dropdown option "Webhook, TwiML Bin, Function, Studio Flow, Proxy Service". Then, under A Call Comes In, select the dropdown option "Studio Flow". You'll see another dropdown menu appear where you can select the Studio Flow you'd like to connect to when a call comes in to this number.
If an Incoming Message triggers your Flow, scroll down to the Messaging section in the configuration menu. Under Configure with Other Handlers, select the dropdown option "Webhook, TwiML Bin, Function, Studio Flow, Proxy Service". Then, under A Message Comes In, select the dropdown option "Studio Flow". You'll see another dropdown menu appear where you can select the Studio Flow you'd like to connect to when a message comes in to this number.
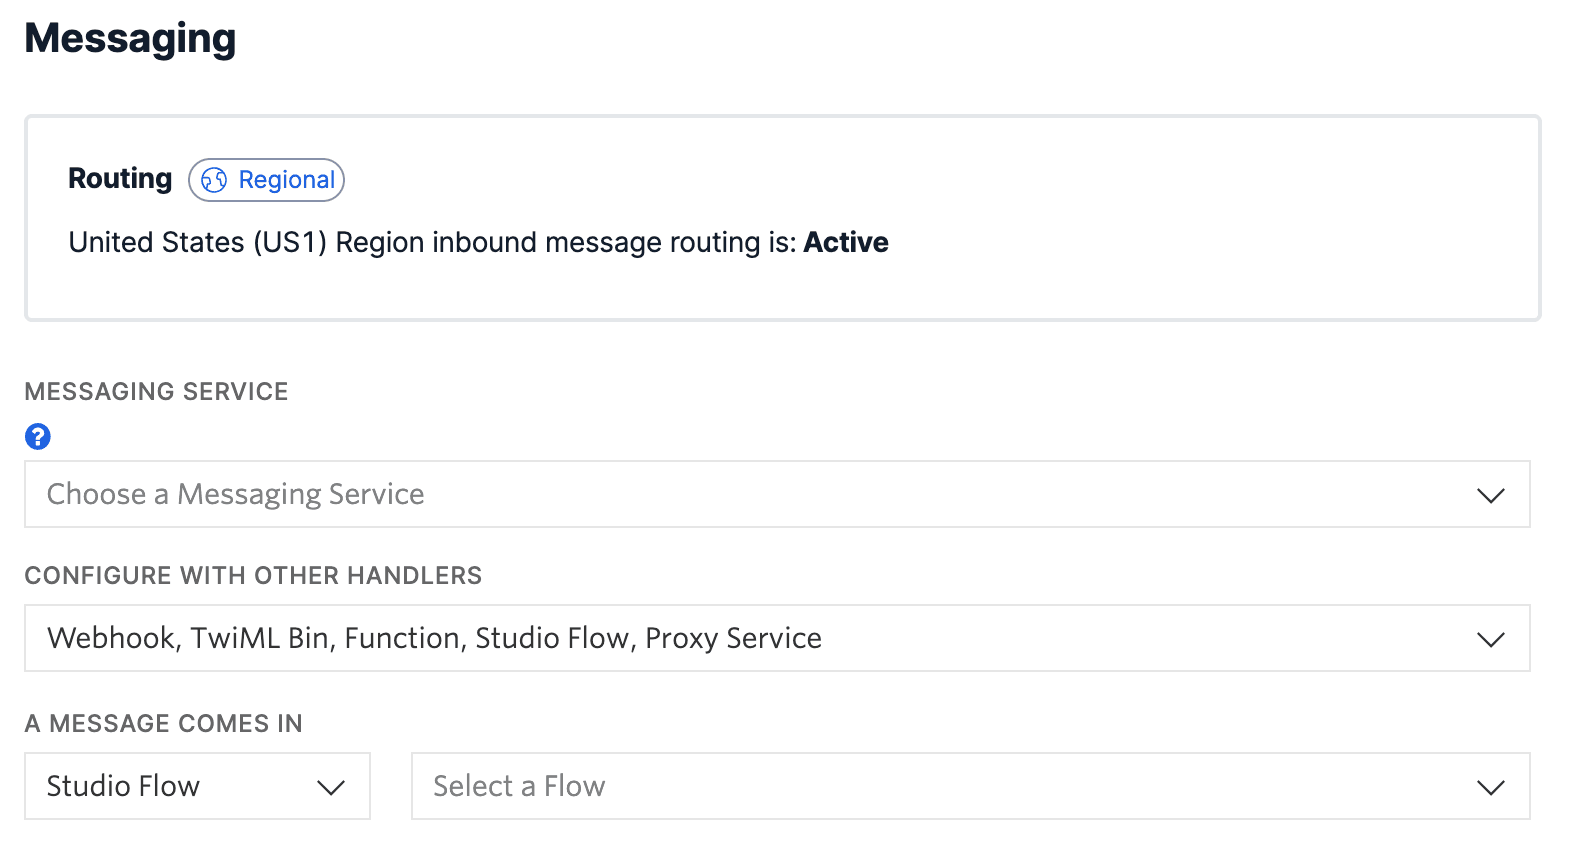
Press Save to save these changes. Your Flow is now connected to your Twilio number!
Info
A Twilio phone number can only route inbound messages and calls to a single Studio Flow (one-to-one), but that Flow can process messages and calls from multiple phone numbers (one-to-many).
You can also use the Flow's Webhook URL with Twilio resources that take a callback URL, including Messaging Services, Short Codes, and Channels. Depending on the product, this can be done in the Console, via API, or both. The documentation for the product you are using will specify how to connect to a Studio Flow if that option is available.
You can find your Studio Flow's Webhook URL in the Trigger Widget's Inspector Panel.
As your Flow executes, Twilio will save the state of the Execution in the Flow Context. You can access any data in the Flow Context from your Widgets, either in configuration fields or in text areas.
There are four types of data stored in the Context:
- Flow: data intrinsic to the Flow, such as the phone number associated with it
- Trigger: data that gets set when a flow is initiated, such as the initial incoming message, phone call, or REST API call.
- Widgets: data that each widget sets itself and adds to the context as it gets executed, such as the digits a user presses or the body of an incoming or outgoing message.
- Contact: data about the current contact engaging with your Flow, such as their phone number
You can also store additional variables in the Flow's context with the Set Variable Widget.
Warning
Variables can only be updated within the Set Variables Widget. When modifying a variable, create a new variable in the Set Variables Widget and modify the original variable using Liquid filters.
Studio uses the Liquid template language, which you can use to add variables into your Widgets. You can use Liquid to reference the various context variables available in a Studio Flow.
Liquid supports both output tags and logic tags. To insert a variable in a Widget, start by typing two open curly braces, {{. Then, you will see a list of possible values to use as a variable. You can scroll down in the list until you find the variable you want to insert, or you can type the name of the variable you want.
Below is a video demonstrating adding two variables into a Studio Flow. One is a variable containing Trigger data (which phone number sent the incoming message to start the Flow), and the second variable contains Widget data (what the user replied to the Send & Wait for Reply Widget).
You can also build additional logic into Widgets using Liquid, such as if/else statements and for loops. The example below uses Liquid to check if a Flow contains a variable for the contact's first name (which could have been set earlier in the Flow) before trying to reference it. It then greets them with "Hello" and the contact's first name, if the first name is in the Flow's data. If it is not, it just says "Hello friend".
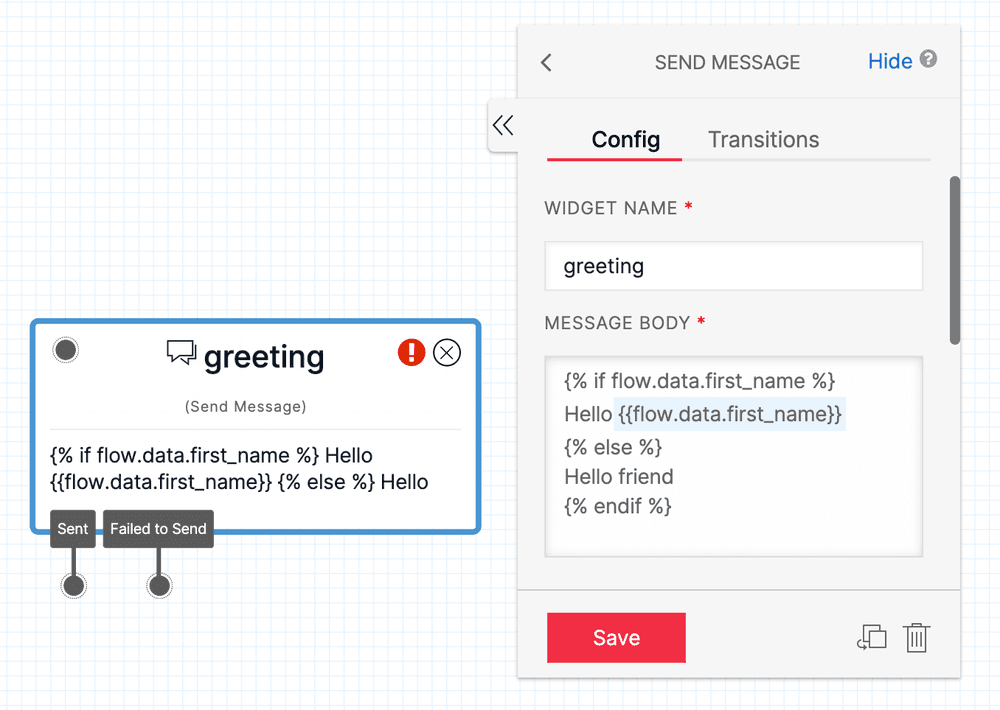
1{% if flow.data.first_name %}2Hello {{flow.data.first_name}}3{% else %}4Hello friend5{% endif %}
Liquid is a powerful templating language. You can see the full list of tags and actions in the Liquid Template Language documentation.
Warning
Variable names will only show dropdown options/autocomplete when you are writing output tags ({{...}}). Variable names will not autocomplete inside logic tags ({% ... %}).
Info
Liquid template variables can render up to 16KB strings max.
For more details on debugging your Flow, view the Studio troubleshooting guide.
Twilio Studio provides logs for each Studio Flow Execution. The logs contain helpful information about the Steps that a Flow runs and can provide information for debugging Flows that are not functioning as you intended.
You can see the Logs for a Studio Flow by clicking on "Logs" next to the Flow in the Console.
- Sometimes Executions become stuck for Inbound Calls. Review best practices to avoid stuck Executions.
- Infinite loops are possible! Studio has a built-in Step limit, so your Execution will end after 1,000 Steps. But be careful when creating loops over a set of Widgets. If you think you are in a loop, you can manually end an Execution via the Studio Logs.
- Flows are limited to a maximum of 1,000 Widgets.
- Execution of a Flow will be halted by Studio if the same Widget is executed 10 times in a row.
- Can't find your Flow in the dropdown when attaching it to a phone number? Learn how to connect the Flow manually.
- Review other common issues and troubleshooting tips here.
Once you feel comfortable navigating a Studio Flow and Studio Canvas, you're ready to start building! Here are some resources to help you as you build your project:
-
Tutorials
-
Learn more about Liquid template language
Let's build something amazing.