Dialogflow CX Onboarding Guide
Twilio's Dialogflow CX Connector provides native telephony integration with Google Dialogflow CX. With this integration, Twilio offers rich conversational AI experiences to customer applications. A common use case for this would be enterprises with medium to large sized contact centers.
This guide explains the integration process between your Twilio application and your Google Dialogflow CX virtual agent.
Info
Google is rebranding Dialogflow CX as Conversational Agents. Until that rebranding concludes, this guide continues to use Dialogflow or Dialogflow CX. Consider these equivalent terms.
Before starting the integration, complete these prerequisites.
To start using Dialogflow CX in Google Cloud, consult Google's Dialogflow CX setup documentation.
Before setting up one-click integration, Google Cloud requires you to grant access to Twilio's service account. To run your Dialogflow agent, grant Twilio's production service account permission to use Google Cloud.
- Log in to your Google Cloud console.
- Select the Google Project in which you want to set up your Dialogflow CX Agent.
To find the project, use the dropdown menu to the right of the Google Cloud logo. - Verify that you have turned on the Resource Manager API.
If you need to turn on this API, confirm that you selected your desired project, click Next, then click Enable. - Verify that your Google Cloud administrator has granted you the
resourcemanager.projects.setIamPolicypermission for your project. - Click the menu button at the top left of the page.
- Navigate to IAM & Admin > IAM from the left navigation.
- Click the Allow tab, then click the View by Principals tab.
- Click +Grant Access.
- In the New Principals box, add
virtualagent-ccai-prod@dialogflow-prod-env.iam.gserviceaccount.com. - Under Assign roles, click the Role combo box and search for
Dialogflow API Reader. - Click Dialogflow API Reader.
- Click + Add another role.
- Click the second Role combo box and search for
Dialogflow API Client. - Click Dialogflow API Client.
- Click Save.
When successful, a box appears stating Policy updated.
Before performing the one-click integration with Google Dialogflow, verify that you have logged into the Twilio console with the appropriate account.
- Choose which account or sub-account to integrate with your Dialogflow CX agent.
- Log in to the Twilio Console with that account.
Once you have completed the prerequisite steps, you are ready to use the one-click integration to connect your Twilio Dialogflow CX Connector to your desired Dialogflow CX agent.
- Log in to your Google Dialogflow CX cloud console.
- Choose your project from the Select Project modal.
- Click Enable API if prompted. This may take a few seconds.
- Create or choose an agent.
- Consider choosing a pre-built agent.
- Choose your agent's location with care.
- Click the Manage tab on the left toolbar.
- Scroll to Integrations then click Integrations.
-
Scroll to
One-click telephony
.
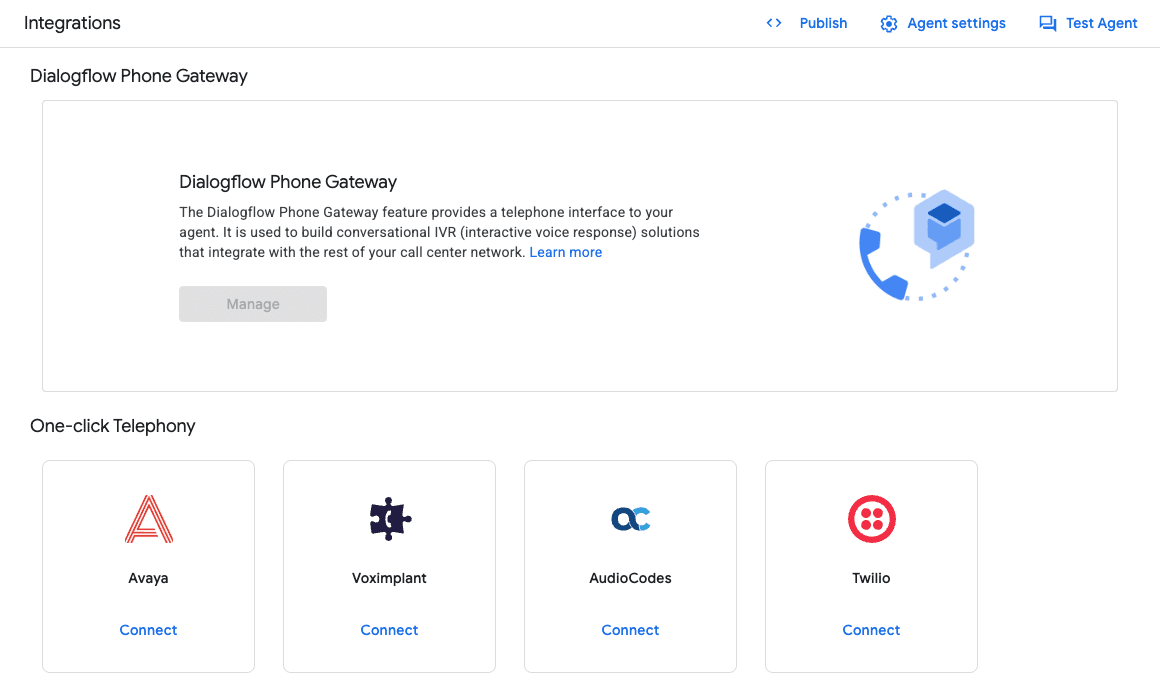
- Click Connect under Twilio. A pop-up modal appears.
- Type the name of your integration in the Create a new integration box.
- Select the Environment and Language for your Dialogflow CX agent.
To choose your environment and language, build your own agent. Dialogflow CX pre-built agents use English only. - Click Add. This starts the integration process and launches the Twilio Console.
If any of these steps return an error, consult Google's troubleshooting guide.
Warning
Make sure you have granted Twilio access to Google Dialogflow CX. If you haven't, the Twilio console redirects you back to Google with an authentication error.
After you complete the Google Cloud Console steps, the Twilio Console opens to finish the Dialogflow integration. The Dialogflow CX one-click integration page displays with some pre-populated values.
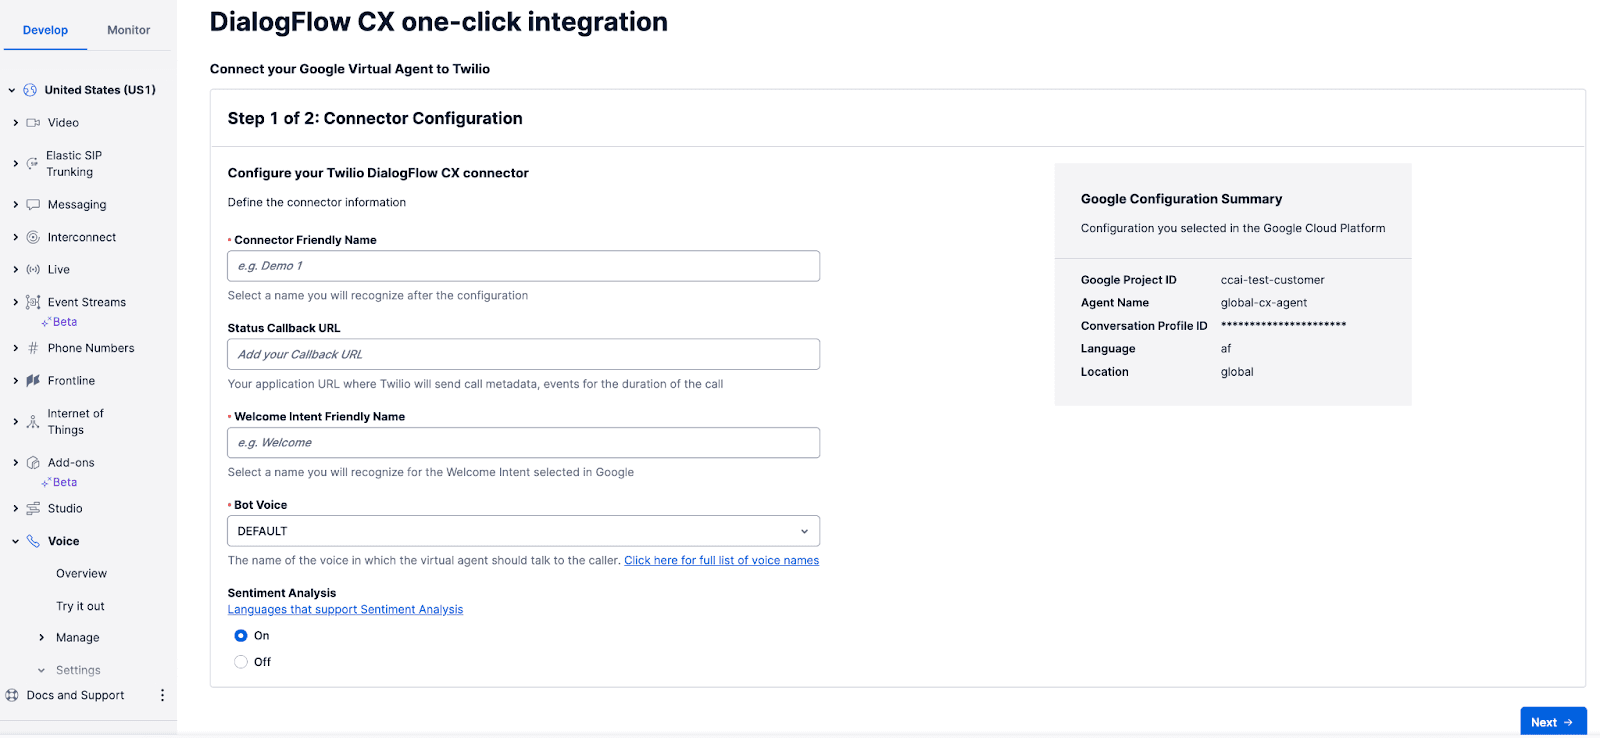
-
To complete the Connector Configuration form, provide the following values:
Field name Purpose Suggestion for this tutorial Connector Friendly Name Unique name of the Connector. Use this name to identify the connector in Twilio Studio or using TwiML. Dialogflow_CX_Test1Status Callback URL (optional) Endpoint URL where Twilio should send requests on call status, intents triggered, sentiment scores, agent-caller text, etc. Twilio Functions Welcome Intent Friendly Name Name of the Dialogflow CX agent welcome intent to trigger when connecting the caller to the agent. System generated default welcome intent called WELCOME Bot Voice Text-To-Speech voice the bot uses for audio responses. Twilio supports all of Google's list of voices, but this dropdown only includes a subset. To use an unlisted language, use the Twilio <VirtualAgent>widget.DefaultSentiment Analysis When toggled On, Dialogflow performs sentiment analysis on the end user input and status callbacks relay sentiment scores. Sentiment analysis availability depends on the language support in Dialogflow CX. Consult Google documentation for their list of languages that support sentiment analysis. On -
Click Next. The Review and Confirm page displays.
-
Review the Connector configuration.
- If the displayed configuration needs changes, click Previous to update the connector setting.
- If the displayed configuration appears correct, click Confirm Configuration Details.

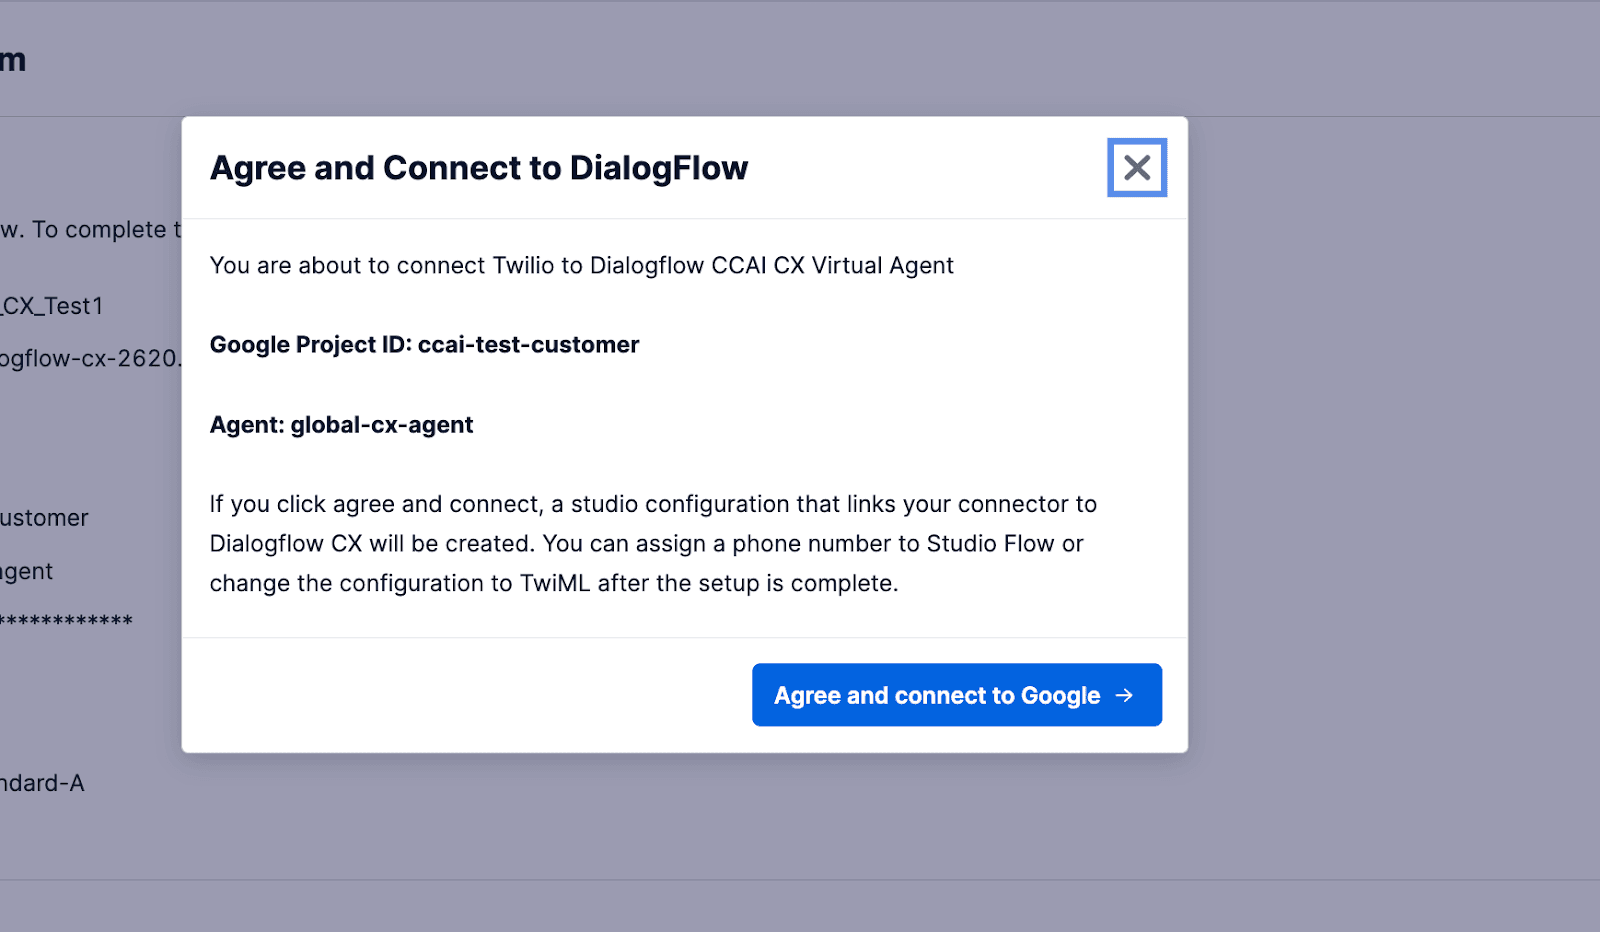
-
The Agree and Connect to DialogFlow pop-up modal appears. To connect your Twilio Connector to your Dialogflow CX agent, you need to give your consent.
- To abandon the setup, click the X at the top right corner of the modal pop-up or close your browser tab.
-
To finish the integration setup, click
Agree and connect to Google
.
This completes your Dialogflow CX integration. The Google Cloud console displays with the completed integration listed in the Twilio Integration modal.
To create another integration, click Add.
To find this integration in the Twilio console, go to Marketplace > Installed in the left side navigation.
With the Dialogflow CX integration with Twilio complete, you can send a Twilio call to your Dialogflow CX agent in two ways: using the Twilio Studio Connect Virtual Agent Widget, or TwiML <VirtualAgent> noun.
When you complete the integration, Twilio creates a new Studio Flow with a Connect Virtual Agent Widget in it.
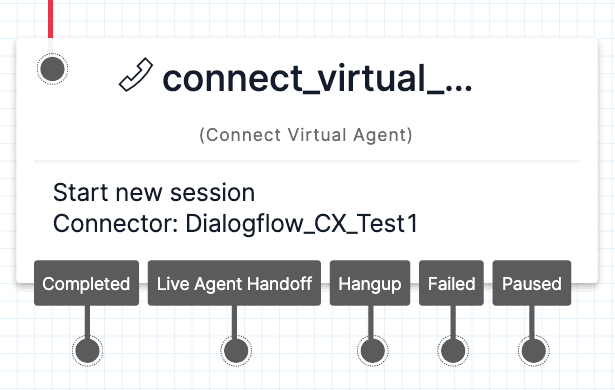
You can find this new Flow in your Studio Flows dashboard. It has the name that you provided for the Connector Friendly Name field when configuring the Connector.
The Connect Virtual Agent widget includes the settings you provided during the Connector setup. You can customize the Widget further. This could include passing additional parameters from Twilio to the Dialogflow agent.
To learn more about the available parameters, consult the Connect Virtual Agent Widget documentation.
To control what happens before and after the Twilio call, add other Widgets to the Studio Flow.
For example: If a call with Dialogflow CX agent ends with a Live Agent Handoff transition, you might add a Connect Call To Widget. This connects the caller to a live agent's phone.
Once you're happy with your Flow and you've published all changes, you can connect it to a Twilio Number so people can start interacting with it.
Navigate to the Active Numbers section of the Twilio Console and click on the number you'd like to connect to the Flow. (If you do not have any phone numbers, you can purchase one from the Console.)
After clicking on the number, you will see its configuration menu where you can connect the number to your Studio Flow.
To configure this number to trigger your Studio Flow from an Incoming Call, scroll down to the Voice & Fax section of the configuration menu. Under Configure With, select the dropdown option "Webhook, TwiML Bin, Function, Studio Flow, Proxy Service". Then, under A Call Comes In, select the dropdown option "Studio Flow". You'll see another dropdown menu appear where you can select the Studio Flow you'd like to connect to when a call comes in to this number.
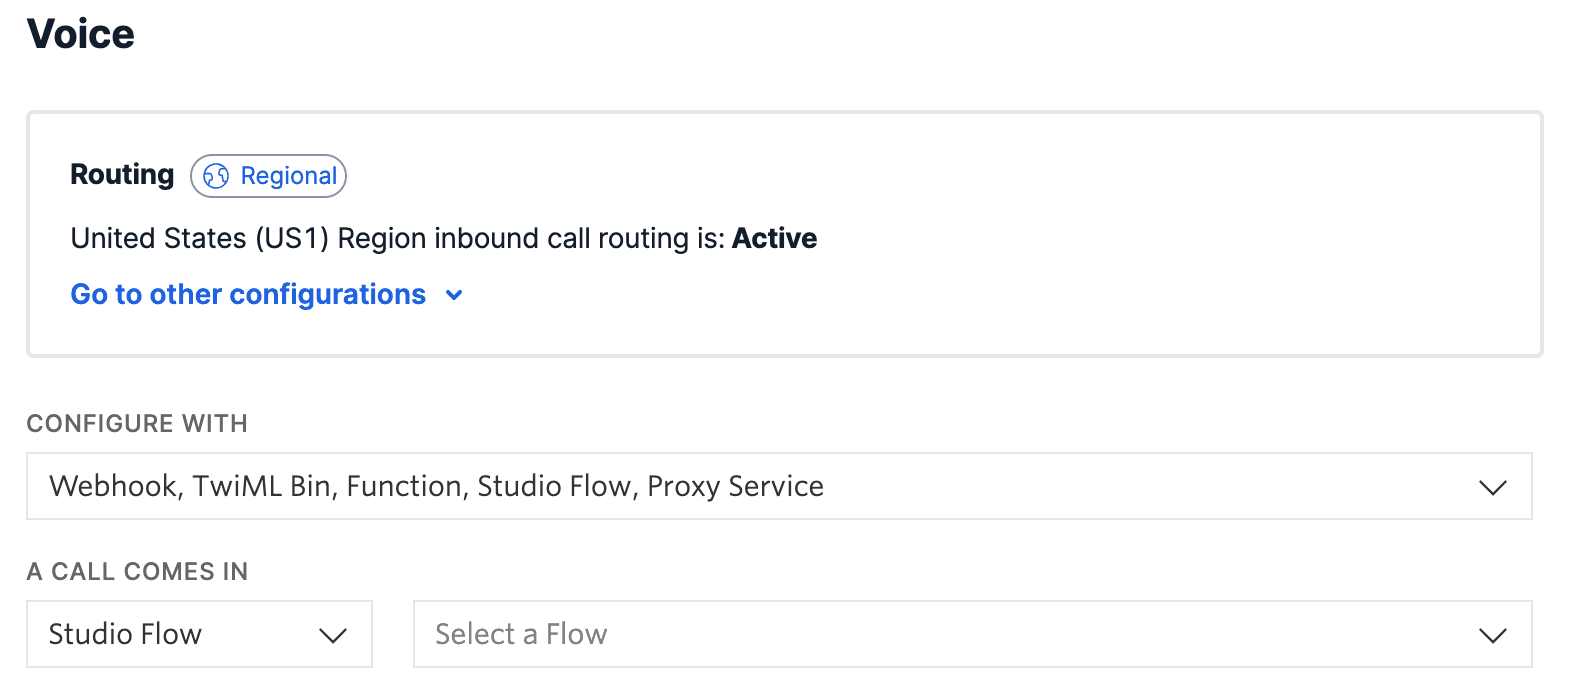
Choose the Flow you'd like to connect the number to, and then press Save to save these changes. Your Flow is now connected to your Twilio number!
You can also integrate your Dialogflow CX agent using the TwiML <VirtualAgent> noun.
Info
New to using TwiML? Consult the TwiML overview and learn how it handles Twilio Voice calls.
To generate TwiML, use one of Twilio's helper libraries.
Example 1: Connect a call to Dialogflow CX agent
1const VoiceResponse = require('twilio').twiml.VoiceResponse;23const response = new VoiceResponse();4const connect = response.connect({5action: 'https://myactionurl.com/twiml'6});7connect.virtualAgent({8connectorName: 'project',9statusCallback: 'https://mycallbackurl.com'10});1112console.log(response.toString());
Output
1<?xml version="1.0" encoding="UTF-8"?>2<Response>3<Connect action="https://myactionurl.com/twiml" >4<VirtualAgent connectorName="project" statusCallback="https://mycallbackurl.com"/>5</Connect>6</Response>
To learn how to use this TwiML noun, consult the <VirtualAgent> documentation.
By default, Dialogflow CX integration includes the following GenAI features. These features leverage GenAI to build workflows, provide answers, create LLMs using your data, and respond in native languages. Twilio supports these features at an additional cost. You incur this cost only after you configure one or more of these features for your agent.
Reduce agent creation time with these playbooks. You need only provide natural language instructions and structured data to an LLM. It then generates agent behavior and responses for you. These differ from flows which use LLMs to figure out intent. Flows grant you more control over the agent's behavior and answers.
To learn more, consult Google's documentation on Generative playbooks.
Have GenAI respond when Twilio doesn't recognize a caller's answers or intent. If a caller has a question that doesn't match any training phrases, Twilio can create a response using Dialogflow CX.
To learn more, consult Google's documentation on Generative fallback.
Create responses and agent behavior runtime through the combination of Google LLMs and your prompts. By querying an LLM using a Generator, your agent can create a response in real time.
To learn more, consult Google's documentation on Generators.
Configure retrieval-augmented generation (RAG) of your own data. As part of a Generative Playbook, you can link to an LLM of your own data. Any queries then use that data to craft a response.
To learn more, consult Google's documentation on Data store agents.
Use the training data and intents of your default language to generate training phrases in another language.
To learn more, consult Google's documentation on generating language-specific data.
When you configure the Dialogflow CX Connector within Twilio, you can specify a welcome intent. When Twilio connects a call to your Dialogflow CX agent, this triggers the welcome intent. For example: the agent could say "Hello" to the caller before they start speaking.
You can use and customize the Dialogflow CX agent's default welcome intent. Edit this default welcome intent within Dialogflow.
You can pass custom parameters to the Dialogflow CX agent either within the Connect Virtual Agent Studio Widget or from the <VirtualAgent> TwiML noun. You can also configure parameters in your agent's setting in the Google Cloud console.
You can pause and resume a Dialogflow CX session. While keeping the session context intact, Dialogflow and Twilio can pass the call back and forth. When Twilio passes the call to Dialogflow, the caller won't need to repeat themselves or start over.
You can use pause and resume a session either within the Connect Virtual Agent Studio Widget or from the <VirtualAgent> TwiML noun. A session can be paused and resumed anytime within its 30 minute time-to-live (TTL) window.
To tell the virtual agent to end the conversation after it responds with a particular response, set the transition target for an intent to End. To learn more, consult Google's docs.
When an intent matches the "end of the conversation" intent, the virtual agent ends the conversation. The Connect Virtual Agent Studio Widget moves the call into the Completed transition state.
When an intent matches the "end of the conversation" intent, the virtual agent ends the conversation. Twilio creates a request to your action URL. Before sending the request, it sets the VirtualAgentStatus field in the request to completed. To execute the next TwiML in your application, use either the action parameter or the next TwiML step <Connect> verb.
If you configure status callback, Twilio can pass one or more parameters at any virtual agent transition state. Status callbacks can pass parameters in requests to your application URL. These parameters include, but aren't limited to, the following:
- call status
- intents triggered
- sentiment scores
- agent-caller text
With support for all transition states, you can write custom code against the parameter values for your own contact center application.
Twilio can pass multiple parameters at any virtual agent transition state. Status callbacks can pass the following parameters in requests to your application URL.
- last intent triggered
- last sentiment score at last matched intent
With support for all transition states, you can write custom code against the parameter values for your own contact center application.
Twilio supports creating prompts and responses using your own voice talent. Record and upload the samples to Google Cloud. Using your own voice talent comes at an additional cost.
- To learn how to create your own agent voice, consult Google's documentation on User-supplied training audio data.
- To learn how to integrate your agent voice, consult this example in the VirtualAgent guide
You can turn on barge-in within Dialogflow CX agents. This allows callers to interrupt the virtual agent at any time. For example: You turned on "barge-in". A caller starts speaking in the middle of the agent's response. Dialogflow stops sending audio to the caller and processes the caller's next input.
To learn how to turn on the barge-in feature, consult Google's docs.
An end user can also press numbers on their keypad. This sends dual-tone multi-frequency (DTMF) signaling through their telephone keypad. You can configure DTMF for a parameter in your Google Dialogflow CX console. Once turned on, your customer can use their telephone keypad to provide parameter values for an agent using a telephony integration.
We appreciate hearing from you! Contact your Twilio Account Manager or our Sales Team. We're looking for feedback on the following features:
- Developer experience
- Level of configurability
- Status callbacks
- Ease of transferring control of the call back to Twilio (to execute the next TwiML)
- Regional implications
- Applicable use cases