Building a Subscription Function
Subscription Functions allow you to write custom JavaScript code that sends Segment Event Data to existing APIs. This guides explains how to write custom functions.
Developer Center no longer accepts new components.
Segment is redeveloping the Developer Center and will launch a new version when complete. To stay up to date, add your contact information in this Airtable form.
Review the steps outlined in the Developer Center Overview. This document outlines specific details for Step four as it relates to building a Subscription Function.
- Understand Segment's Conceptual Model and Spec.
- Follow Segment's security guidance.
- Request access to the Segment Developer Center.
- Create an App.
- Build and test your Component(s).
- Publish documentation.
- Submit your App for review.
- Launch into Public Beta.
Begin by selecting the Subscription card in your Developer Center UI after creating an App and selecting I want Segment to run functions I write. Next, you will see the code editor where you can take full control of your Subscriptions's logic. Segment provides boilerplate functions that make it simple to send data to your API Endpoint. You can delete the example code and implement your own functions.
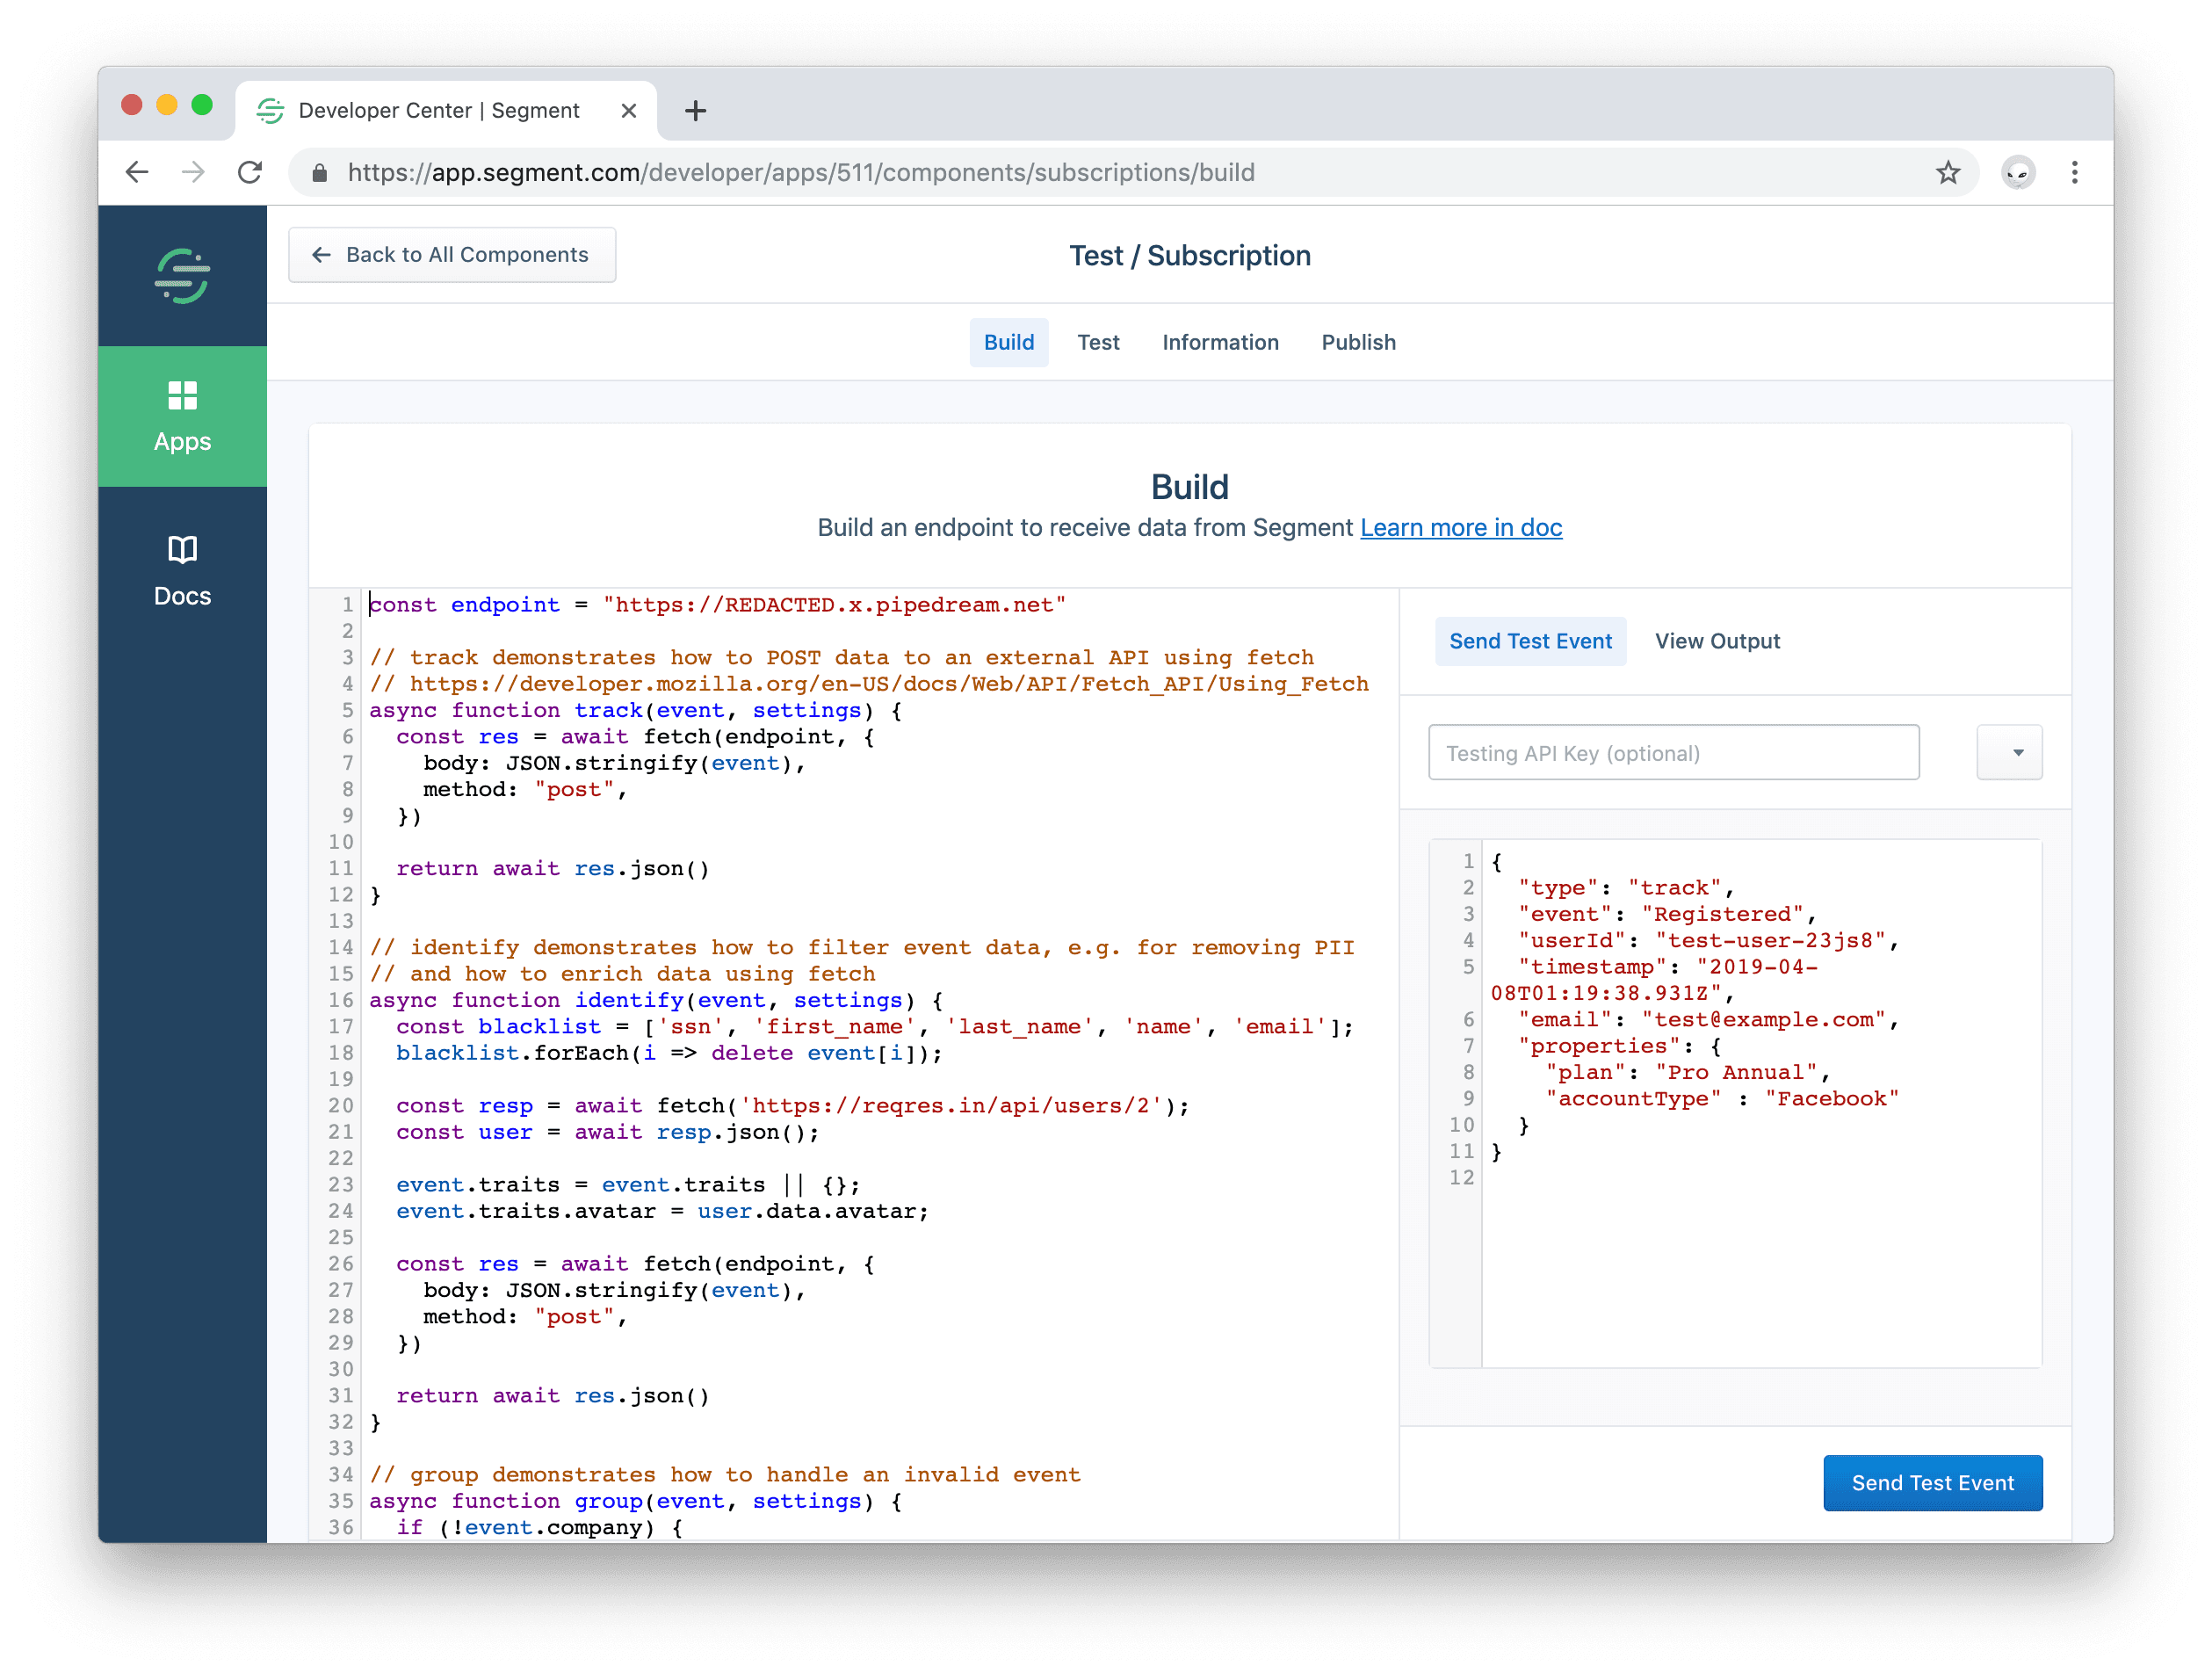
For every event you send to Segment, Segment invokes a function you provide for the event type. So you must define functions named after every type in the Segment Spec that you support:
onIdentifyonTrackonPageonScreenonGrouponAliasonDelete
The two items passed into the functions are the event payload and the settings. All subscriptions have an apiKey setting by default. To add more custom settings, go to the Settings Builder page under App Info. Use your custom setting key (which is generated for you from your custom setting label) to access your custom setting from the settings argument.
- The Event argument to the function is the Segment Event Data
- The Settings argument to the function contains user settings like apiKey and any custom settings you have added.
The functions are "async/await" style JavaScript, and should use the Fetch API using the pre-loaded fetch package.
Here's a basic example of a function that POSTs the event to a "request bin" for introspection. You can go to RequestBin to create your own endpoint to experiment with. This builds a query string for the URL, sets a basic auth header, and sends a JSON body:
1const endpoint = "https://REDACTED.x.pipedream.net"23async function onTrack(event, settings) {4const url = new URL(endpoint);5url.searchParams.set("ts", event.timestamp);67const res = await fetch(url.toString(), {8body: JSON.stringify(event),9headers: new Headers({10"Authentication": 'Basic ' + btoa(`${settings.apiKey}:`),11"Content-Type": "application/json",12}),13method: "post",14})1516return await res.text() // or res.json() for JSON APIs17}
The function should return data to indicates a success. In the above example Segment returns the request body.
You can also throw an error to indicate a failure.
In the example, try changing the endpoint to https://foo and you'll see it throws a FetchError with the message request to https://foo/ failed, reason: getaddrinfo ENOTFOUND foo foo:443
There are three pre-defined error types that you can throw to indicate the function ran as expected, but data could not be delivered:
- EventNotSupported
- InvalidEventPayload
- ValidationError
Here are basic examples using these error types:
1async function onGroup(event, settings) {2if (!event.company) {3throw new InvalidEventPayload("company is required")4}5}67async function onPage(event, settings) {8if (!settings.accountId) {9throw new ValidationError("Account ID is required")10}11}1213async function onAlias(event, settings) {14throw new EventNotSupported("alias is not supported")15}
If you do not supply a function for an event type, Segment will throw an implicit EventNotSupported error.
A modern JavaScript utility library delivering modularity, performance & extras.
The official Amazon Web Services SDK.
The crypto module provides cryptographic functionality that includes a set of wrappers for OpenSSL's hash, HMAC, cipher, decipher, sign, and verify functions.
The Fetch API provides a JavaScript interface for accessing and manipulating parts of the HTTP pipeline, such as requests and responses. It also provides a global fetch() method that provides an easy, logical way to fetch resources asynchronously across the network.
The fetch() method starts the process of fetching a resource from the network, returning a promise which is fulfilled once the response is available.
The Request interface of the Fetch API represents a resource request.
The Response interface of the Fetch API represents the response to a request.
The Headers interface of the Fetch API allows you to perform various actions on HTTP request and response headers. These actions include retrieving, setting, adding to, and removing. A Headers object has an associated header list, which is initially empty and consists of zero or more name and value pairs.
The URL interface is used to parse, construct, normalize, and encode URLs. It works by providing properties which allow you to easily read and modify the components of a URL.
The URLSearchParams interface defines utility methods to work with the query string of a URL.
The atob() function decodes a string of data which has been encoded using base-64 encoding.
The btoa() method creates a base-64 encoded ASCII string from a binary string.
When testing your integration, proceed through two separate flows:
- Test that your endpoint successfully ingests data in the way you would expect.
- Mimic a user implementing your integration within their Segment workspace.
Test your code directly from the Developer Center UI. Use the Send Test Event button and review the test event to make sure your function works as expected.
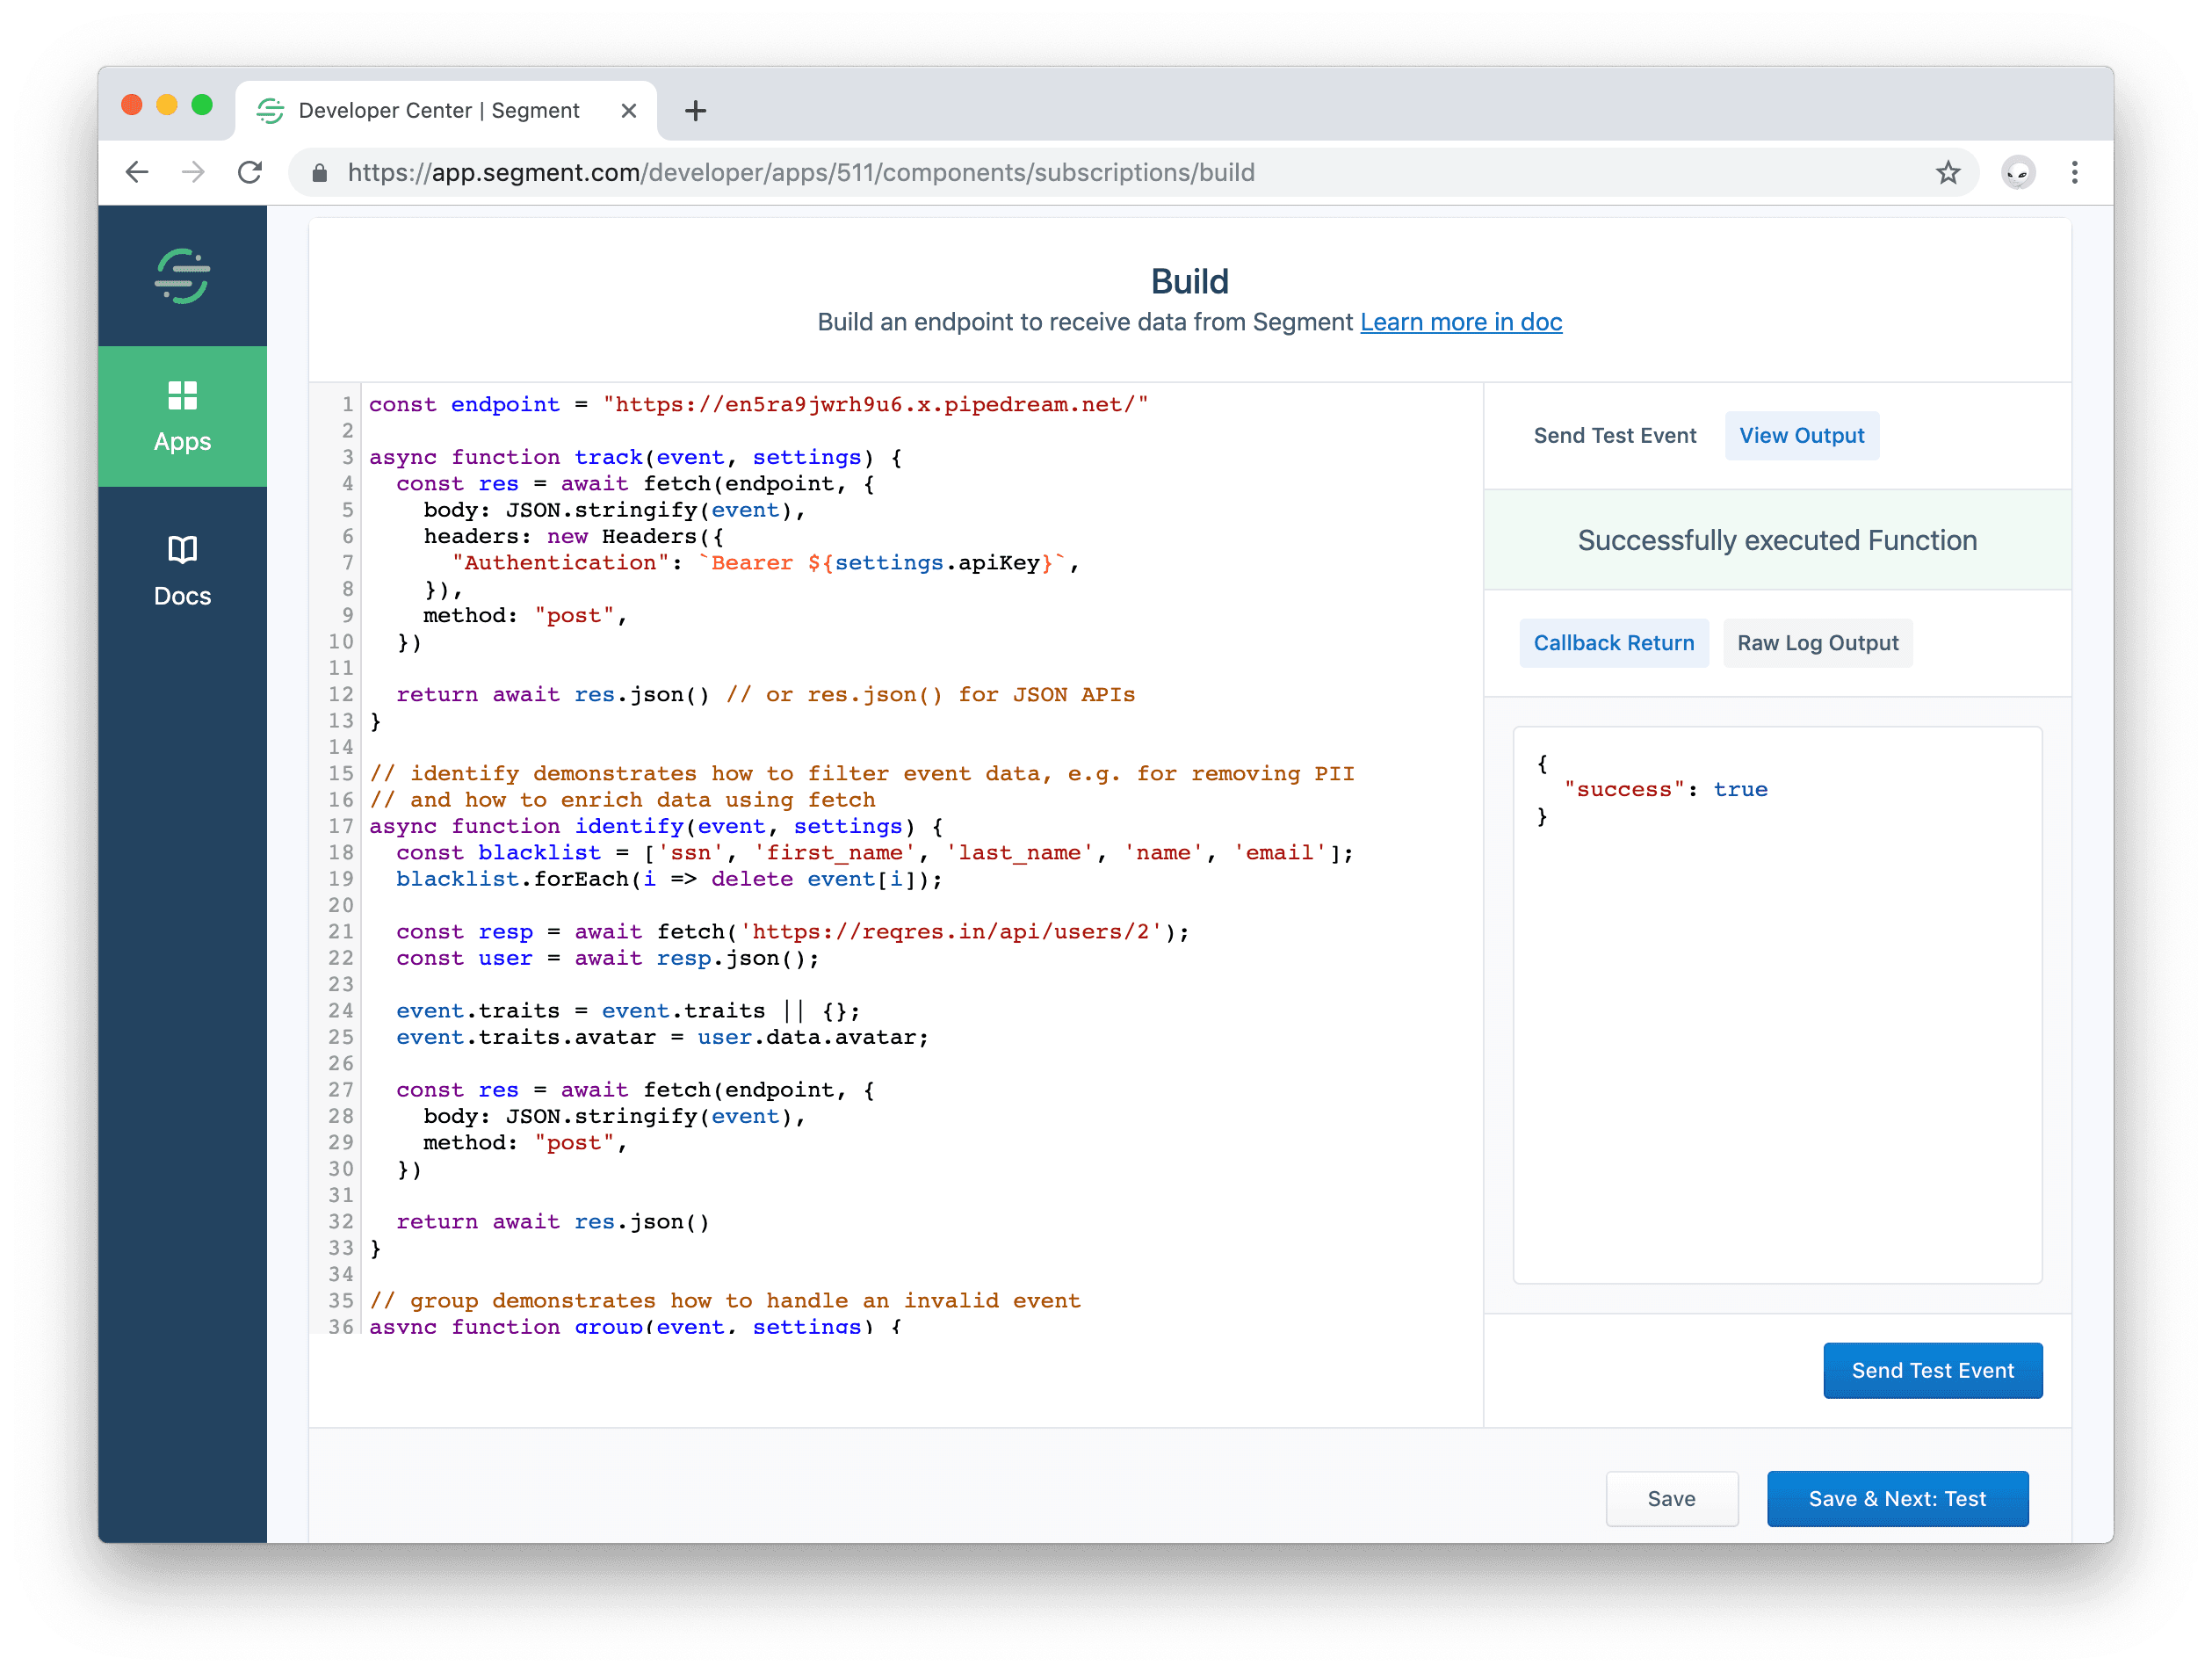
In the debugger panel, check the two outputs. The Callback Return and the Log Output.
- Callback Return - What data your function returned or error it threw.
- Log Output - The raw log. Any messages to
console.log()from your function appear here.
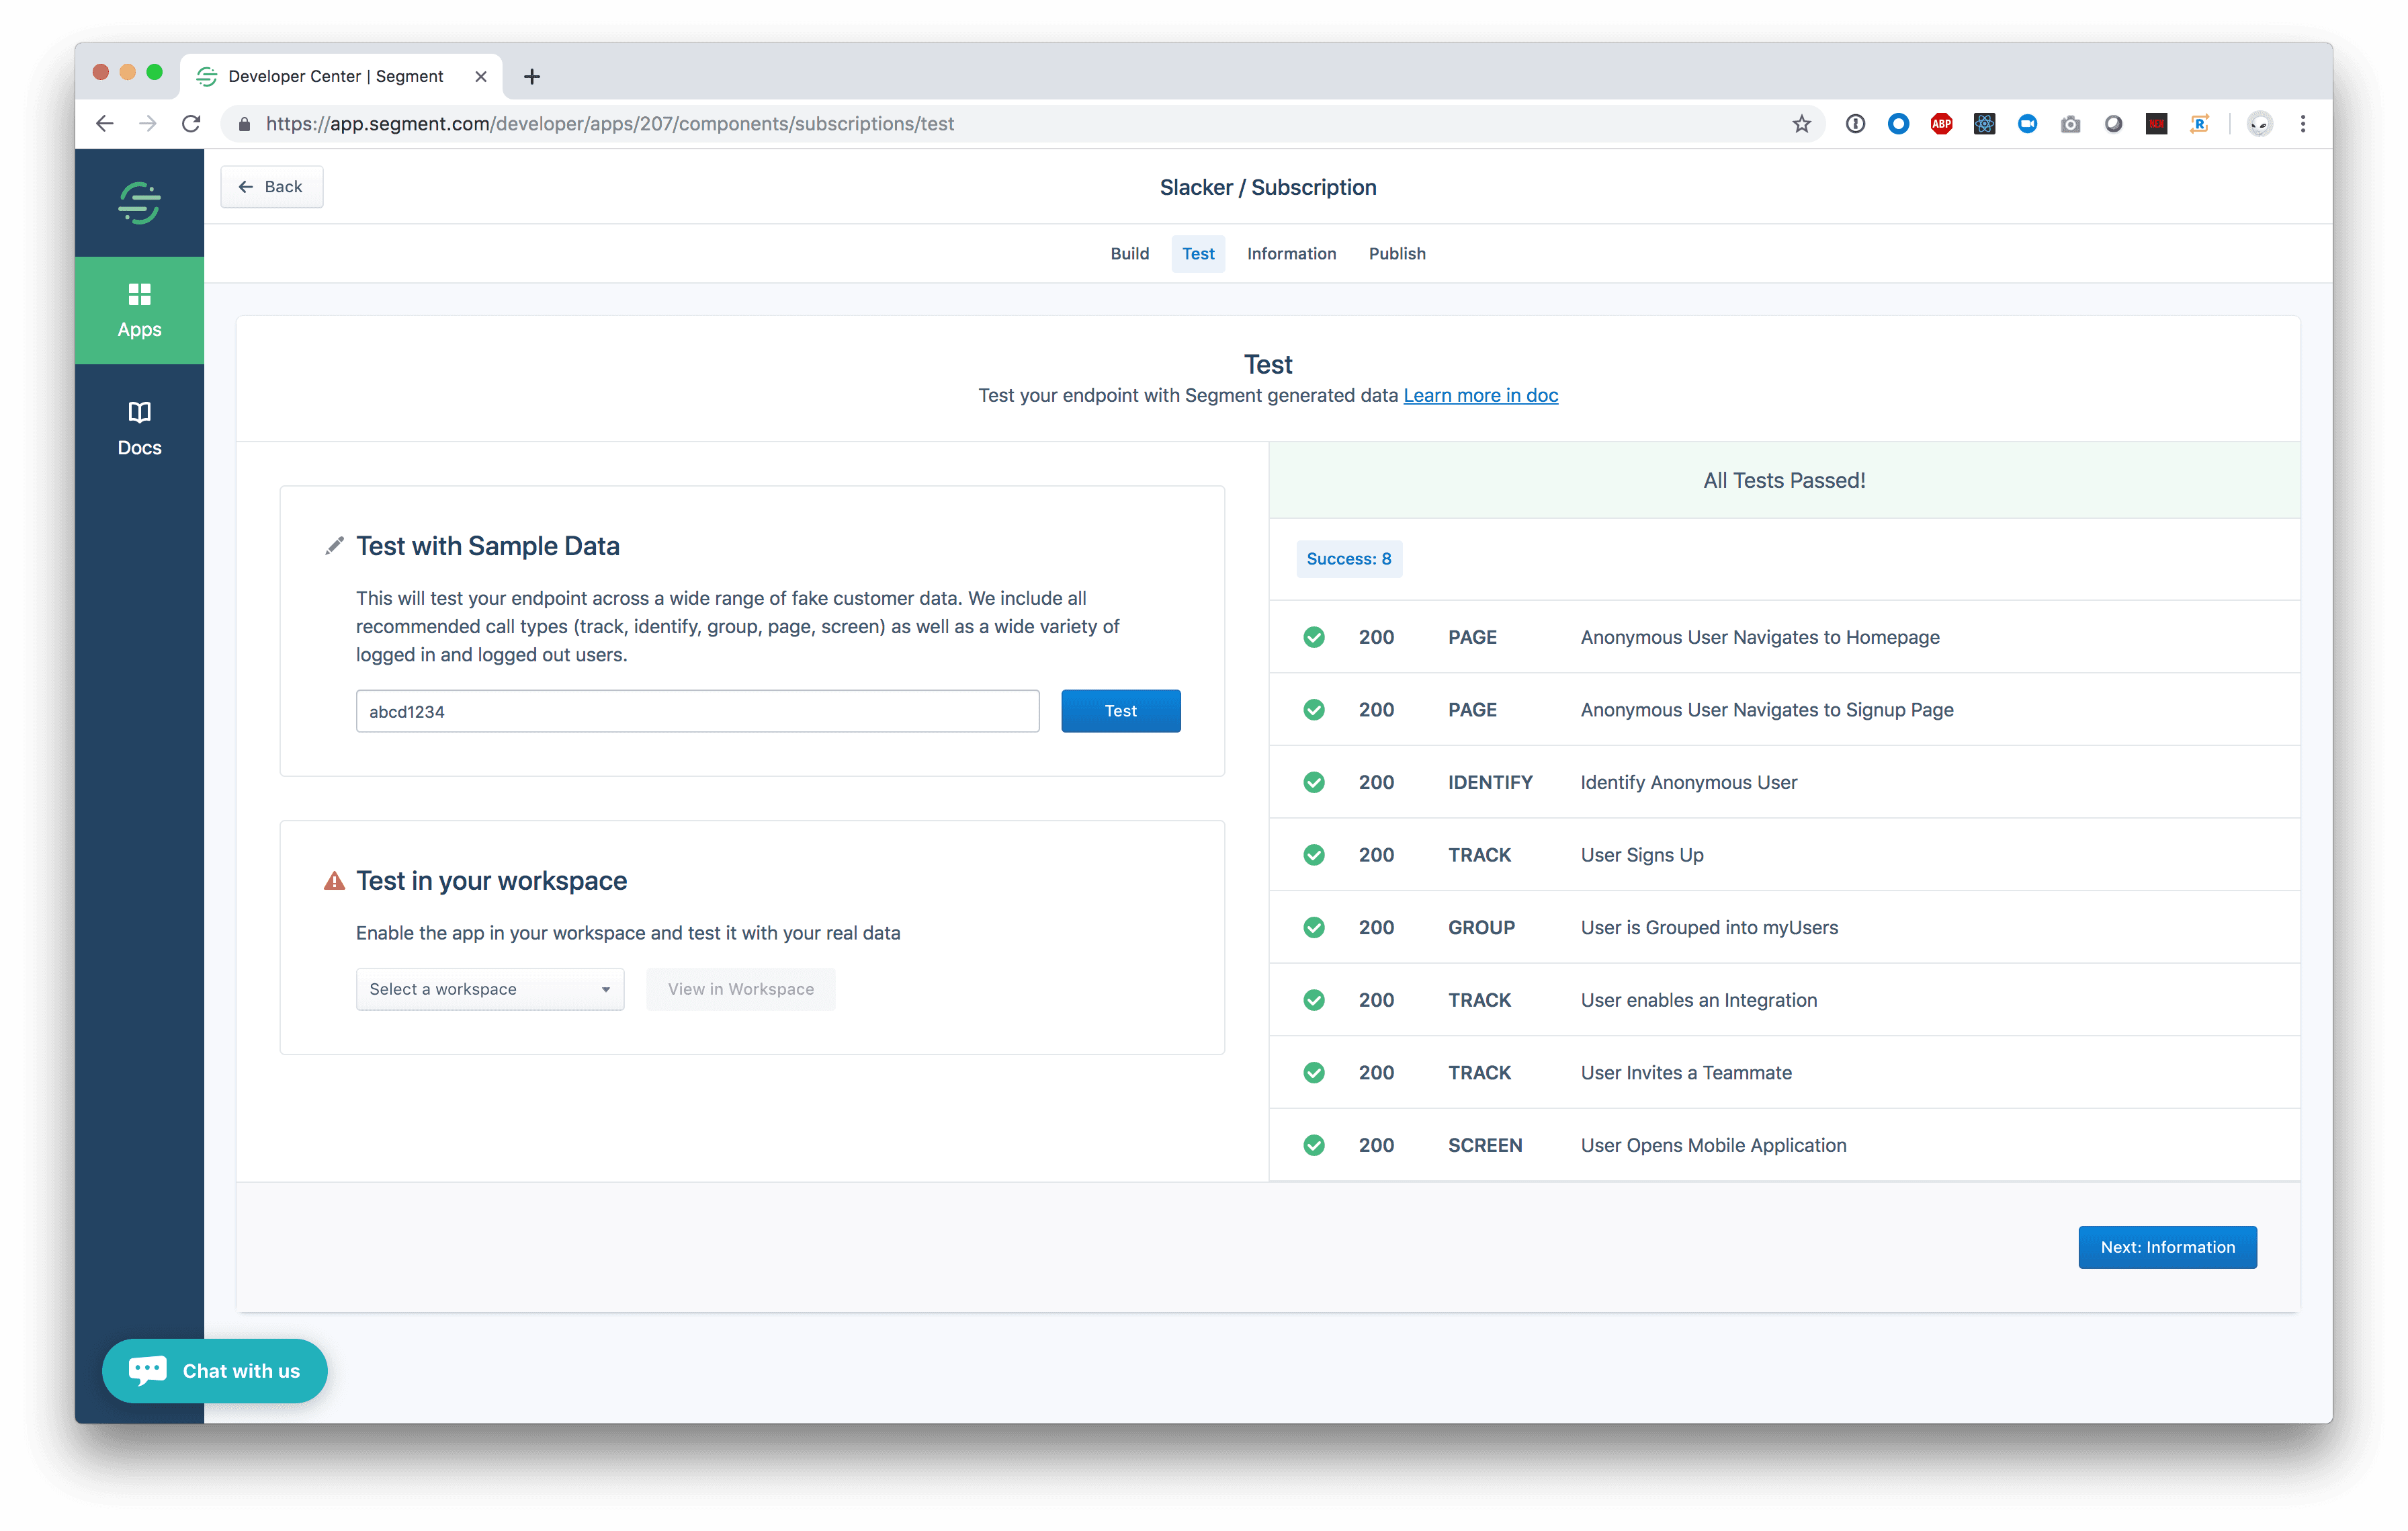
When your code is working with one event you can test it with a suite of more Segment events. Click Save and Next: Test, fill in an API Key and click Test. You will see the results of additional types of Segment data.
The ultimate goal is for Partners like yourself to create and publish high quality Destinations in the Segment Catalog. Your Segment account doubles as a sandbox account to test your destination while you are still in a private "building" state.
To test your Destination in the Catalog, click the "Test" tab in the Developer Center Component builder. In the "Test in your workspace" section, select your personal workspace and click "view". This redirects to you a URL like https://app.segment.com/WORKSPACE-SLUG/destinations/catalog/APP-SLUG, which is your catalog entry.
From here, click "Configure App", select a Source, and click "Confirm Source". You can now configure your destination by setting the "API Key", then clicking the toggle to enable the destination.
Next you can click the "Event Tester" tab to send data to your destination. Here you can see what requests Segment sends to your destination and introspect the response you are returning.
Now you can use the JavaScript SDK in a browser to generate real analytics events.
Finally you should verify the data in your service.
In addition to the five primary spec methods, Segment forwards partners a sixth message type for customer-requested deletions. Destination Partners with access to the Developer Center are required to implement and document support for this federated user deletion.
Here's what a payload for deletion request looks like.
1{2"type": "delete",3"channel": "server",4"messageId": "delete-022bb90c-bbac-11e4-8dfc-aa07a5b093db",5"projectId": "abcd123",6"userId": "5678",7"context": [],8"integrations": [],9"receivedAt": "2019-02-19T23:58:54.387Z",10"sentAt": "2019-02-19T21:58:54.387Z",11"originalTimestamp": "2019-02-19T23:58:54.387Z",12"timestamp": "2019-02-19T23:58:54.387Z"13}
Complete the remaining steps as outlined in the Developer Center Overview.