Building a Subscription Webhook
Developer Center no longer accepts new components.
Segment is redeveloping the Developer Center and will launch a new version when complete. To stay up to date, add your contact information in this Airtable form.
Subscription Webhooks allow Segment Partners to ingest Segment Event Data using a webhook. This guide explains how to set up your webhook with Segment.
Review the steps outlined in the Developer Center Overview. This document outlines specific details for Step four as it relates to building a Subscription Webhook.
- Understand Segment's Conceptual Model and Spec.
- Follow Segment's security guidance.
- Request access to the Segment Developer Center.
- Create an App.
- Build and test your Component(s).
- Publish documentation.
- Submit your App for review.
- Launch into Public Beta.
Begin by selecting the Subscription card in your Developer Center UI after creating an App and selecting I want to build my own HTTP Endpoint. Next, you will see a field to input your API endpoint and an interface to test events against this.
Continue reading below to understand what is expected when accepting and responding to Segment data.
To receive data from Segment, you must provide a server with a static endpoint that can accept HTTPS requests.
The endpoint must:
- Accept
POSTrequests. Segment sends customer data to the endpoint you designate inPOSTrequests. - Accept JSON data. Segment sends data in JSON.
- Use HTTPS. Segment transmits potentially sensitive data on behalf of customers, and HTTPS is the first step in making sure their data stays safe.
All subscriptions have an API key setting by default, which Segment will send in the Authorization Header. To add more custom settings, go to the Settings Builder page under App Info.
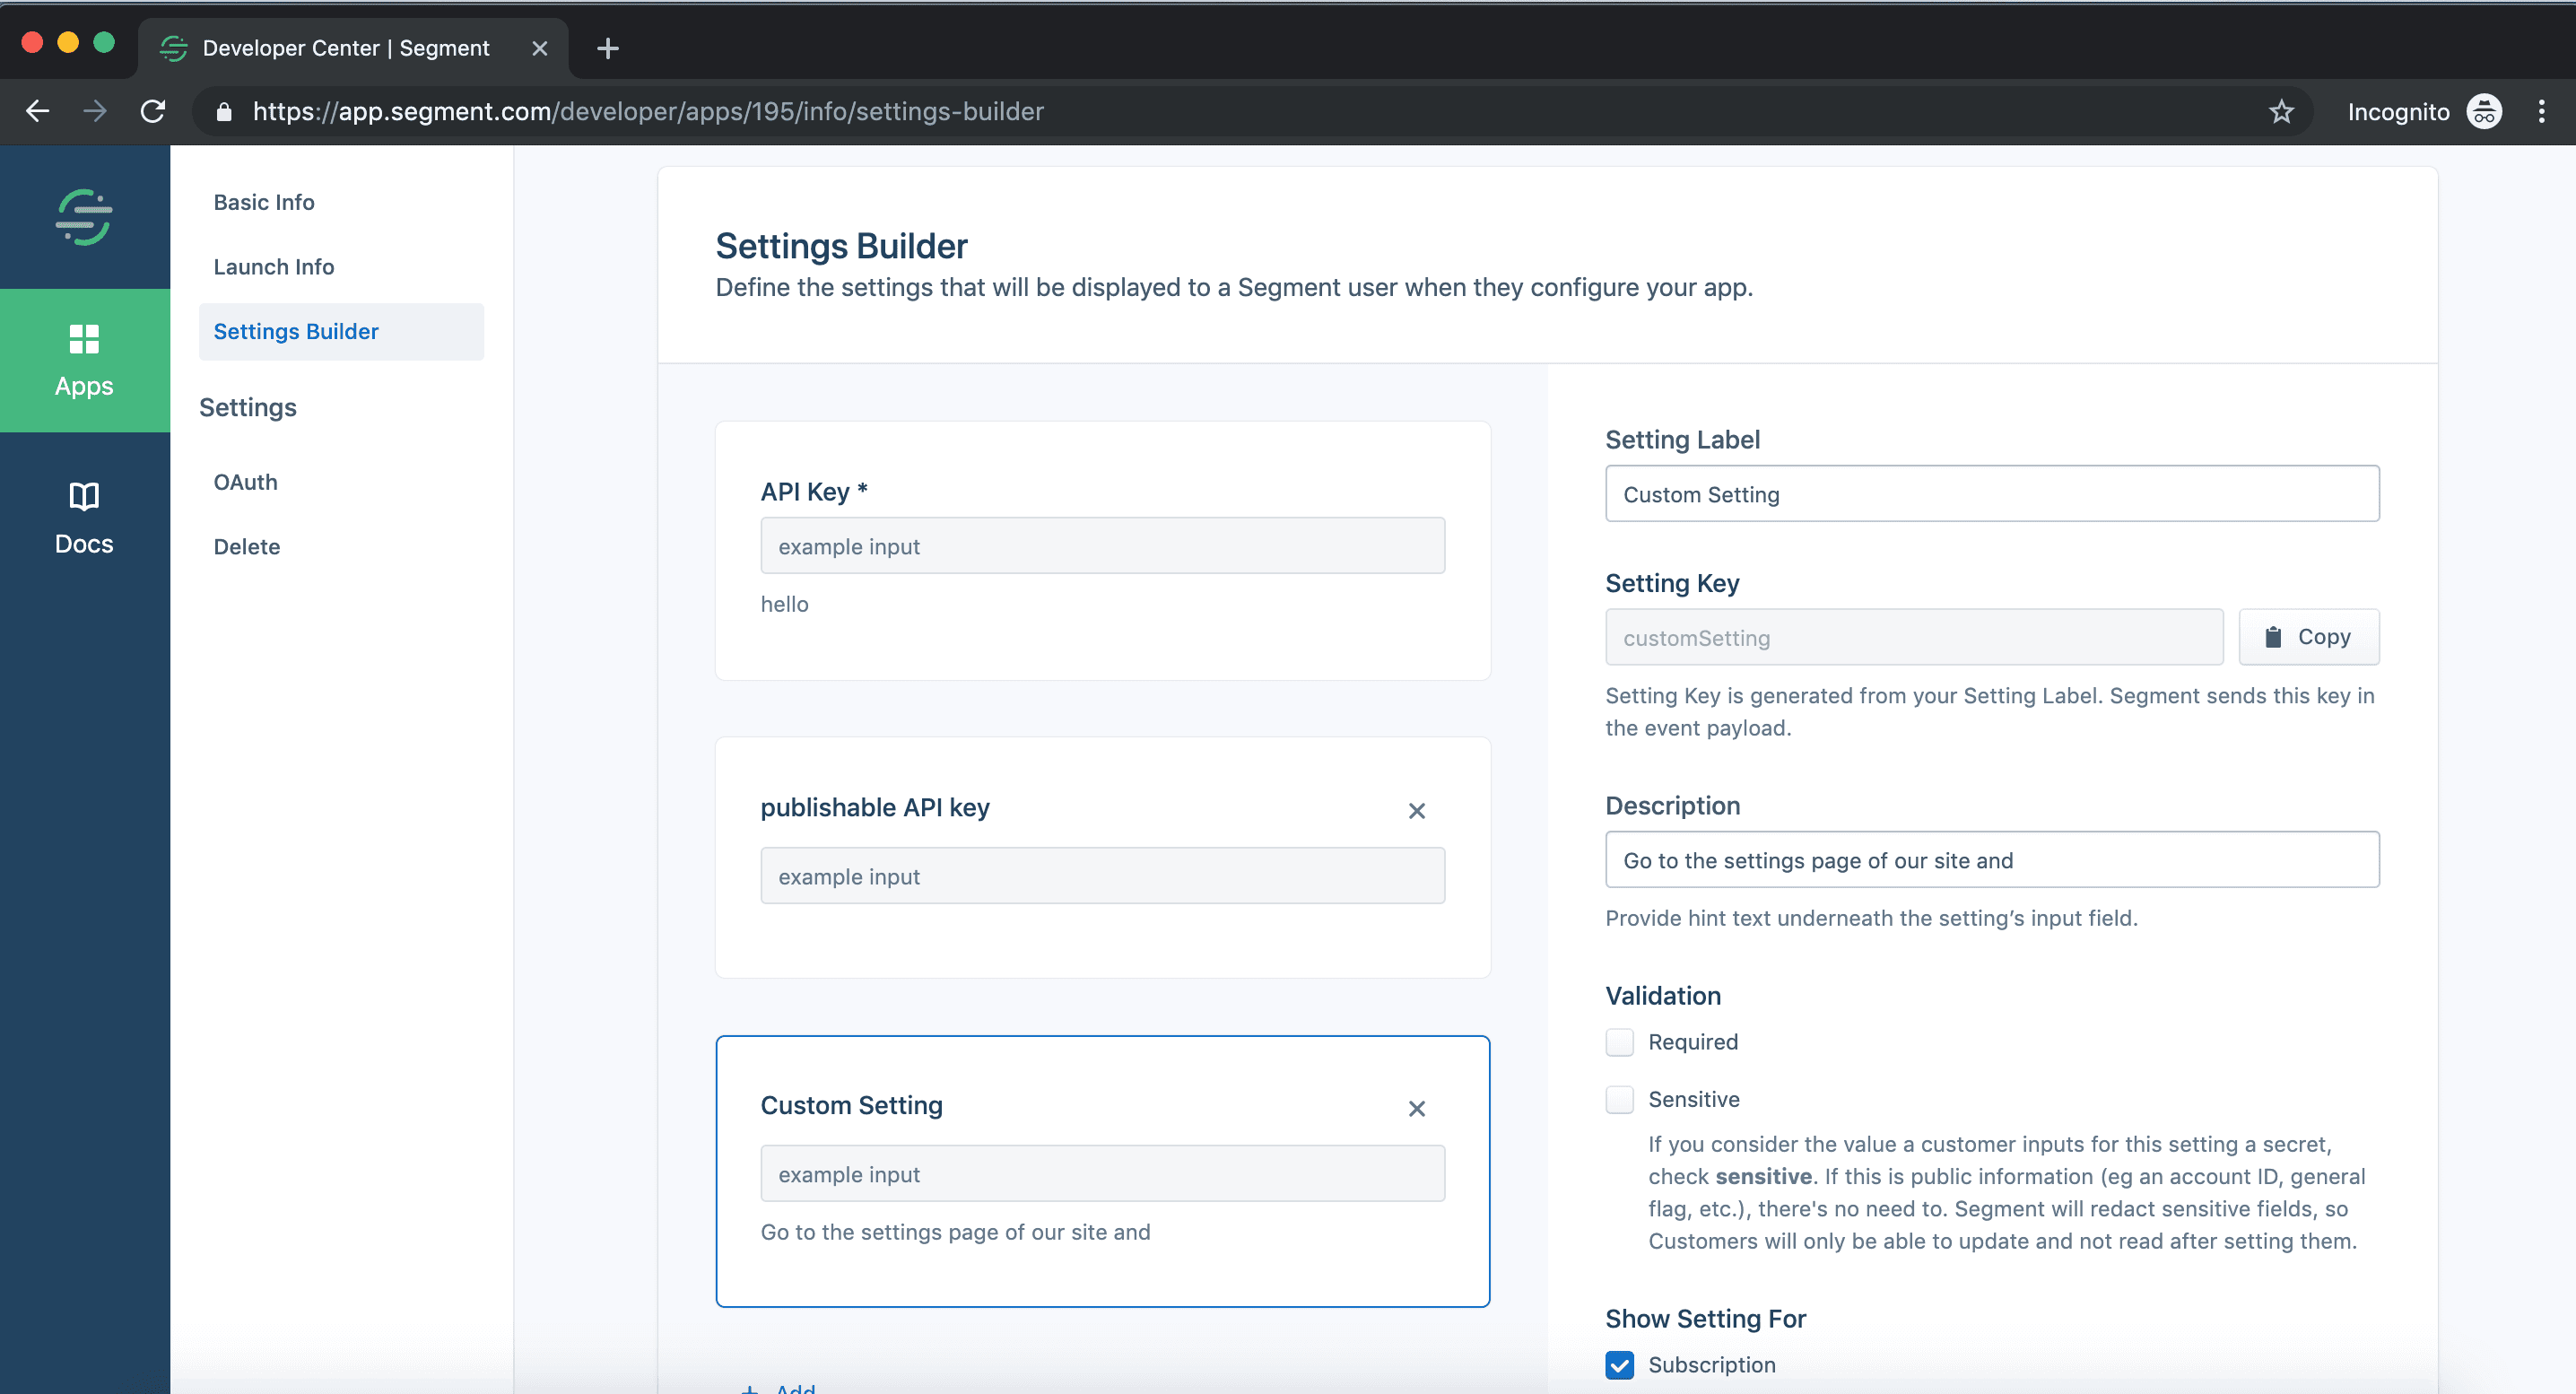
Any custom settings you add will be sent in the custom header X-Segment-Settings (See the headers section for more details.)
Segment sends you the following HTTP headers with all requests:
| Header | Description | Example |
|---|---|---|
Accept | Segment accepts any content type, but ignores responses unless this header is set to application/json. | Accept: */* |
Authorization | Segment sends your user's API token in this header, with the Basic authentication type. | Authorization: Basic c2VnbWVudDo= |
Cache-Control | Each request Segment sends is a new event. Segment does not expect your application to cache. | Cache-Control: no-cache |
Connection | Segment uses HTTP/1.1's keep-alive functionality whenever possible, however this is optional. | Connection: Keep-Alive |
Content-Length | Segment always sends you the length of the request in bytes. | Content-Length: 348 |
Content-Type | Segment indicates the type of data it sent you (this will always be JSON), along with Segment's vendor type. | Content-Type: application/json |
User-Agent | Segment sends you this field every time. | User-Agent: Segment.io/1.0 |
X-Segment-Settings | Except for the API key (which is sent in the Authorization header), Segment will send the base 64 encoding of the rest of your custom settings encoded in this header. | X-Segment-Settings: eyJjdXN0b21TZXR0aW5nT25lIjoiY3VzdG9tIHNldHRpbmcgdmFsdWUifQ== |
Segment's Spec standardizes the data that you can expect from Segment. You can choose to implement four types types of calls:
- Who is this?
.identify(userId, traits) - What are they doing?
.track(userId, event, properties) - Where are they doing it?
.page(userId, pageName, properties) - What group are they part of?
.group(userId, groupId, groupTraits)
For example, you might implement the .identify(userId, traits) call to create contacts in an email marketing application. You can expect the following customer information as a JSON object in the call body:
1{2"anonymousId": "1234",3"context": {4"ip": "8.8.8.8",5"userAgent": "Mozilla/5.0 (Macintosh; Intel Mac OS X 10_9_5) AppleWebKit/537.36 (KHTML, like Gecko) Chrome/40.0.2214.115 Safari/537.36"6},7"messageId": "022bb90c-bbac-11e4-8dfc-aa07a5b093db",8"receivedAt": "2015-02-23T22:28:55.387Z",9"sentAt": "2015-02-23T22:28:55.111Z",10"traits": {11"name": "John Doe",12"email": "john.doe@email.com",13"plan": "premium",14"logins": 515},16"type": "identify",17"userId": "5678",18"version": "1.1"19}
Info
The casing on these fields will vary by customer, so be ready to accept any casing.
Segment uses standard HTTP status code conventions to help diagnose problems quickly and give better insight into how the destination is working.
Upon receiving data, your endpoint should reply with one of the following status codes:
| Code | Reason |
|---|---|
200 | You've accepted and successfully processed the message. |
202 | You've accepted the message, but have not yet processed it. |
400 | The message is malformed, or otherwise contains an error that is the client's fault. |
401 | The client's API key is malformed, has expired, or is otherwise no longer valid. |
403 | The client's API key is valid, but has been rejected due to inadequate permissions. |
500 | If you encounter an internal error when processing the message, reply with this code. (Hopefully you won't have to send too many of these.) |
501 | If Segment sends you an API call type (indicated by the type property included on all messages) you don't support, reply with this code. Read more about the API call types Segment supports in the Segment Spec documentation. |
503 | Send Segment this code when your endpoint is temporarily down for maintenance or otherwise not accepting messages. This helps Segment avoid dropping users' messages during your downtime. |
You can normally send back an empty body, but when sending back a 4xx- or 5xx-class error, you can optionally send Segment a diagnostic message that explains the error. This message is displayed to the user in the Segment debugger, and is be used in Segment's Event Delivery summaries.
Be sure to send JSON (and set your Content-Type header to application/json), and send your message in the message property.
Here's an example of a 401 response that helps a user track down why their calls aren't appearing in your tool's UI:
1{2"message": "API token expired"3}
Or, if your tool requires an email address in order to accept calls, use this example 400 reply:
1{2"message": "Missing email address"3}
When testing your integration, proceed through two separate flows:
- Test that your endpoint successfully ingests data in the way you would expect.
- Mimic a user implementing your integration within their Segment workspace.
Test your code directly from the Developer Center UI. Use the Send Test Event button and review the test event to make sure your function works as expected.
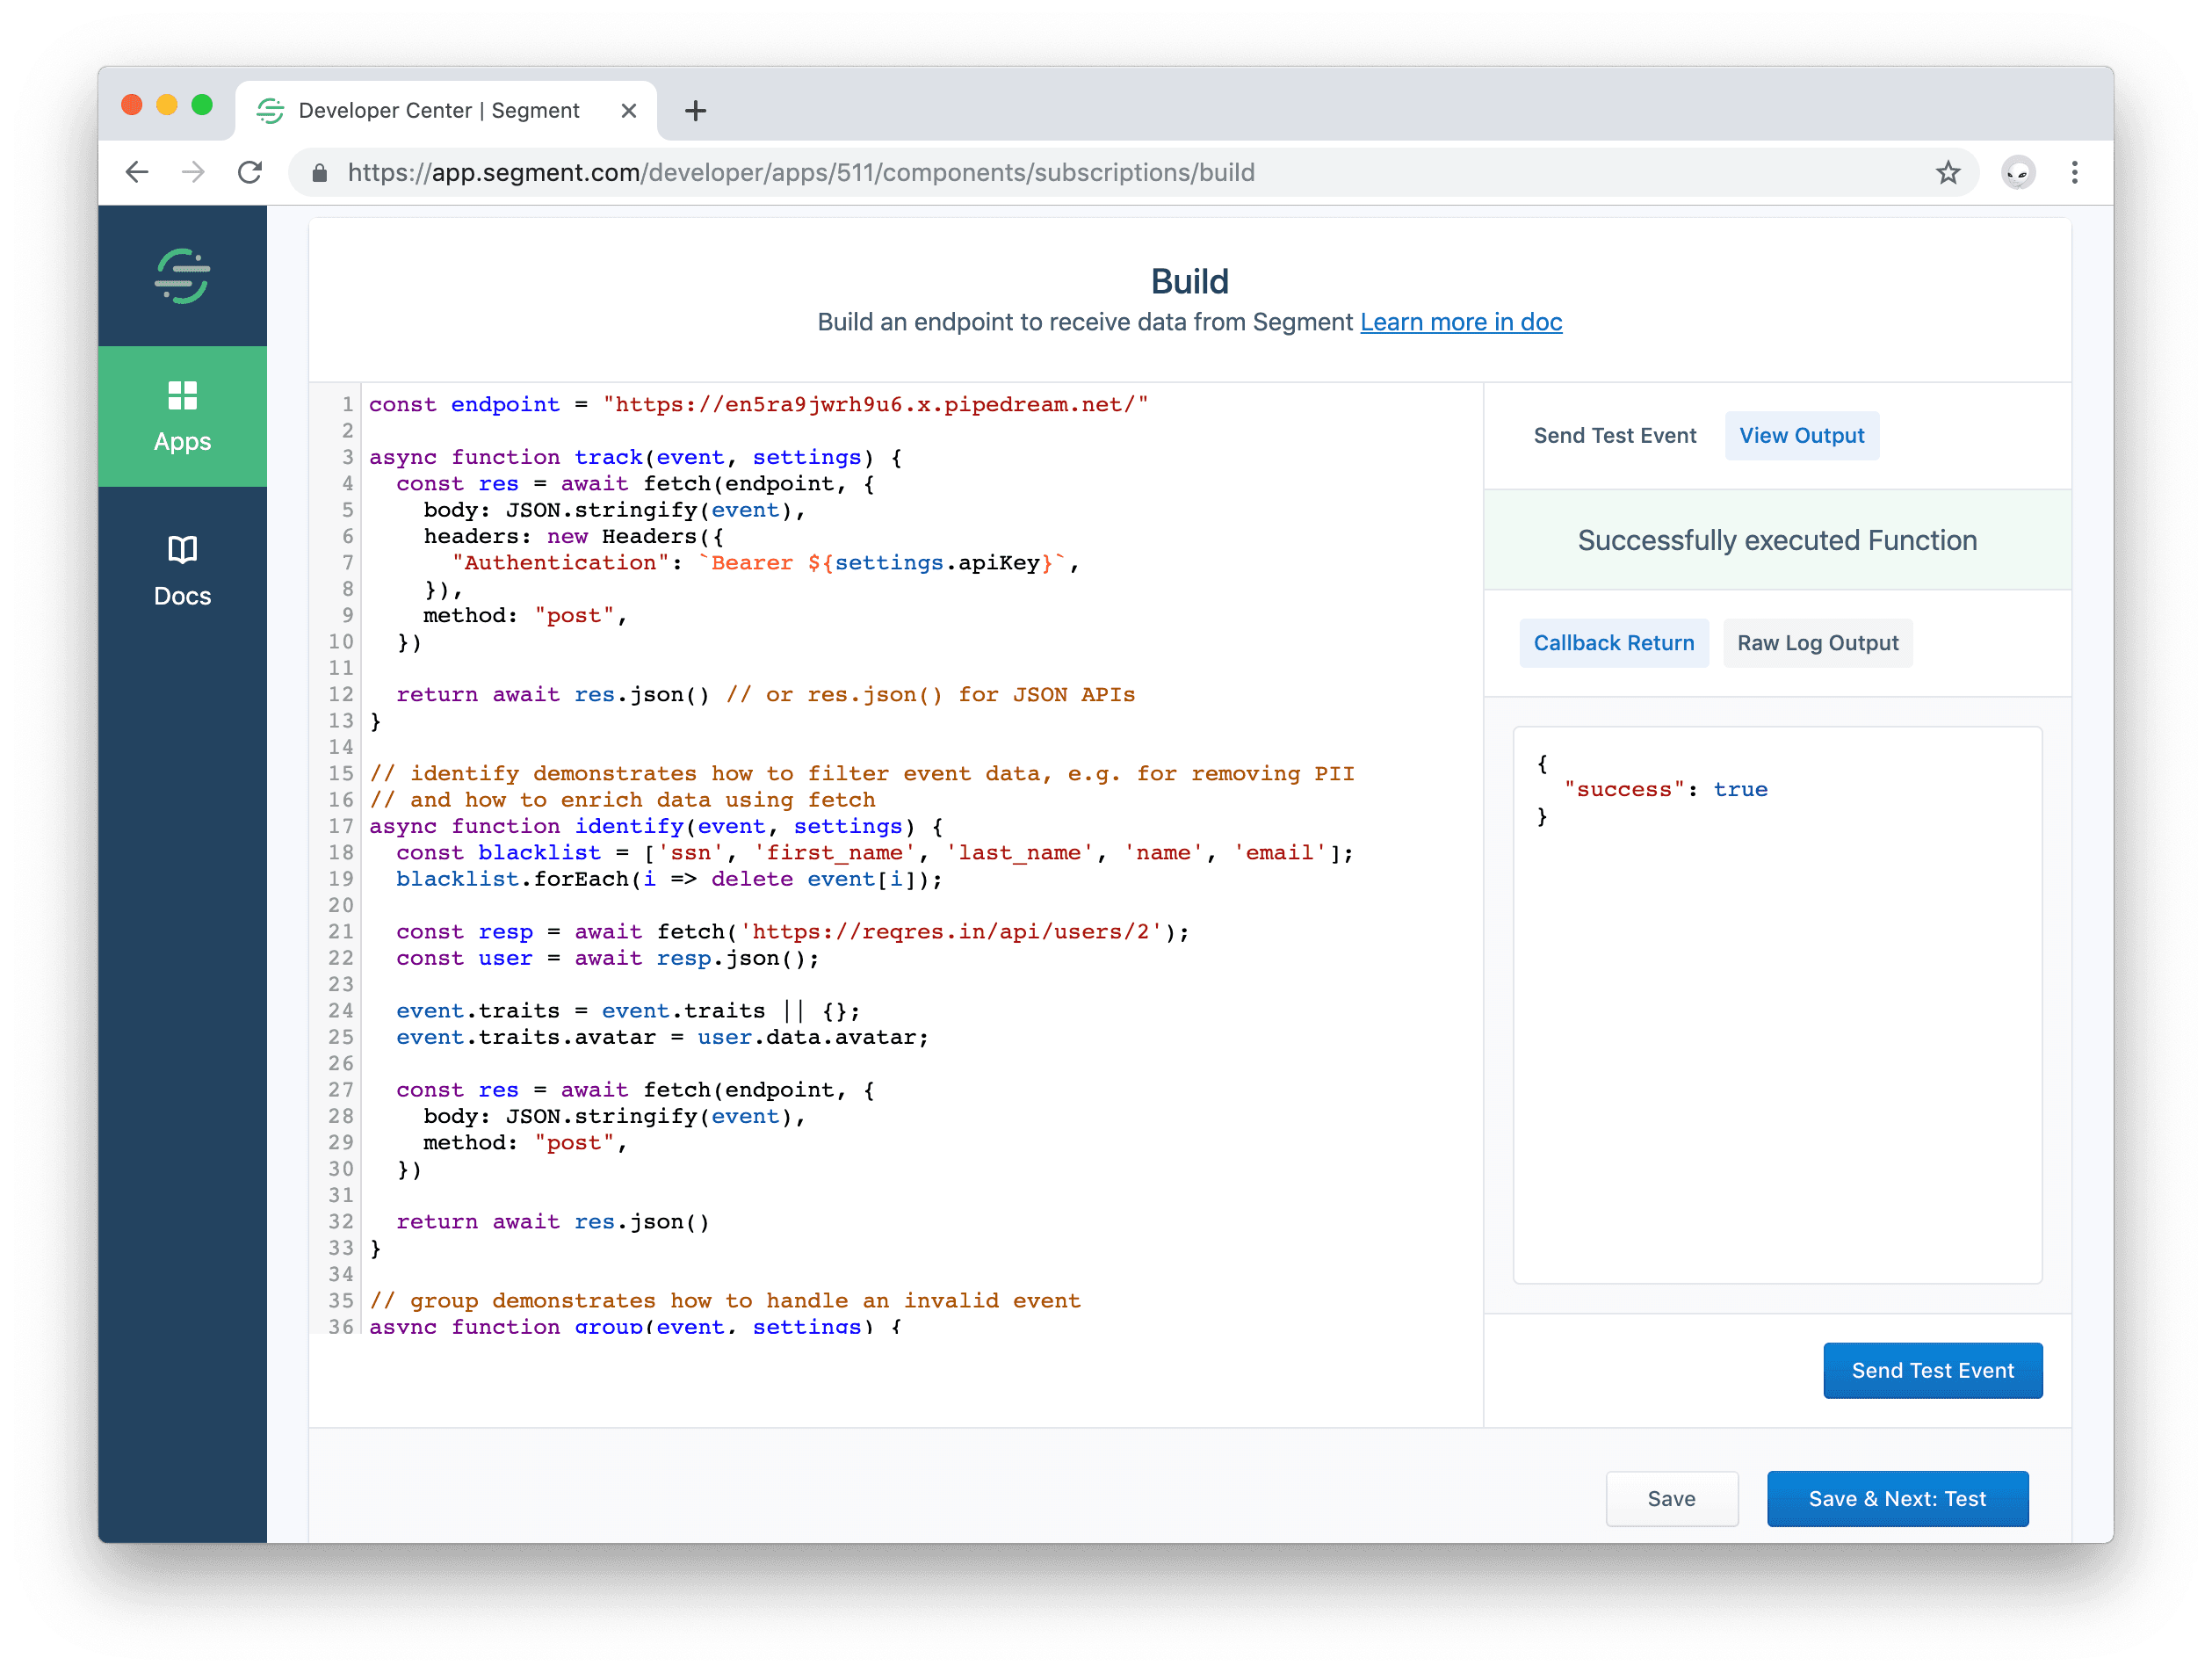
In the debugger panel, check the two outputs. The Callback Return and the Log Output.
- Callback Return - What data your function returned or error it threw.
- Log Output - The raw log. Any messages to
console.log()from your function appear here.
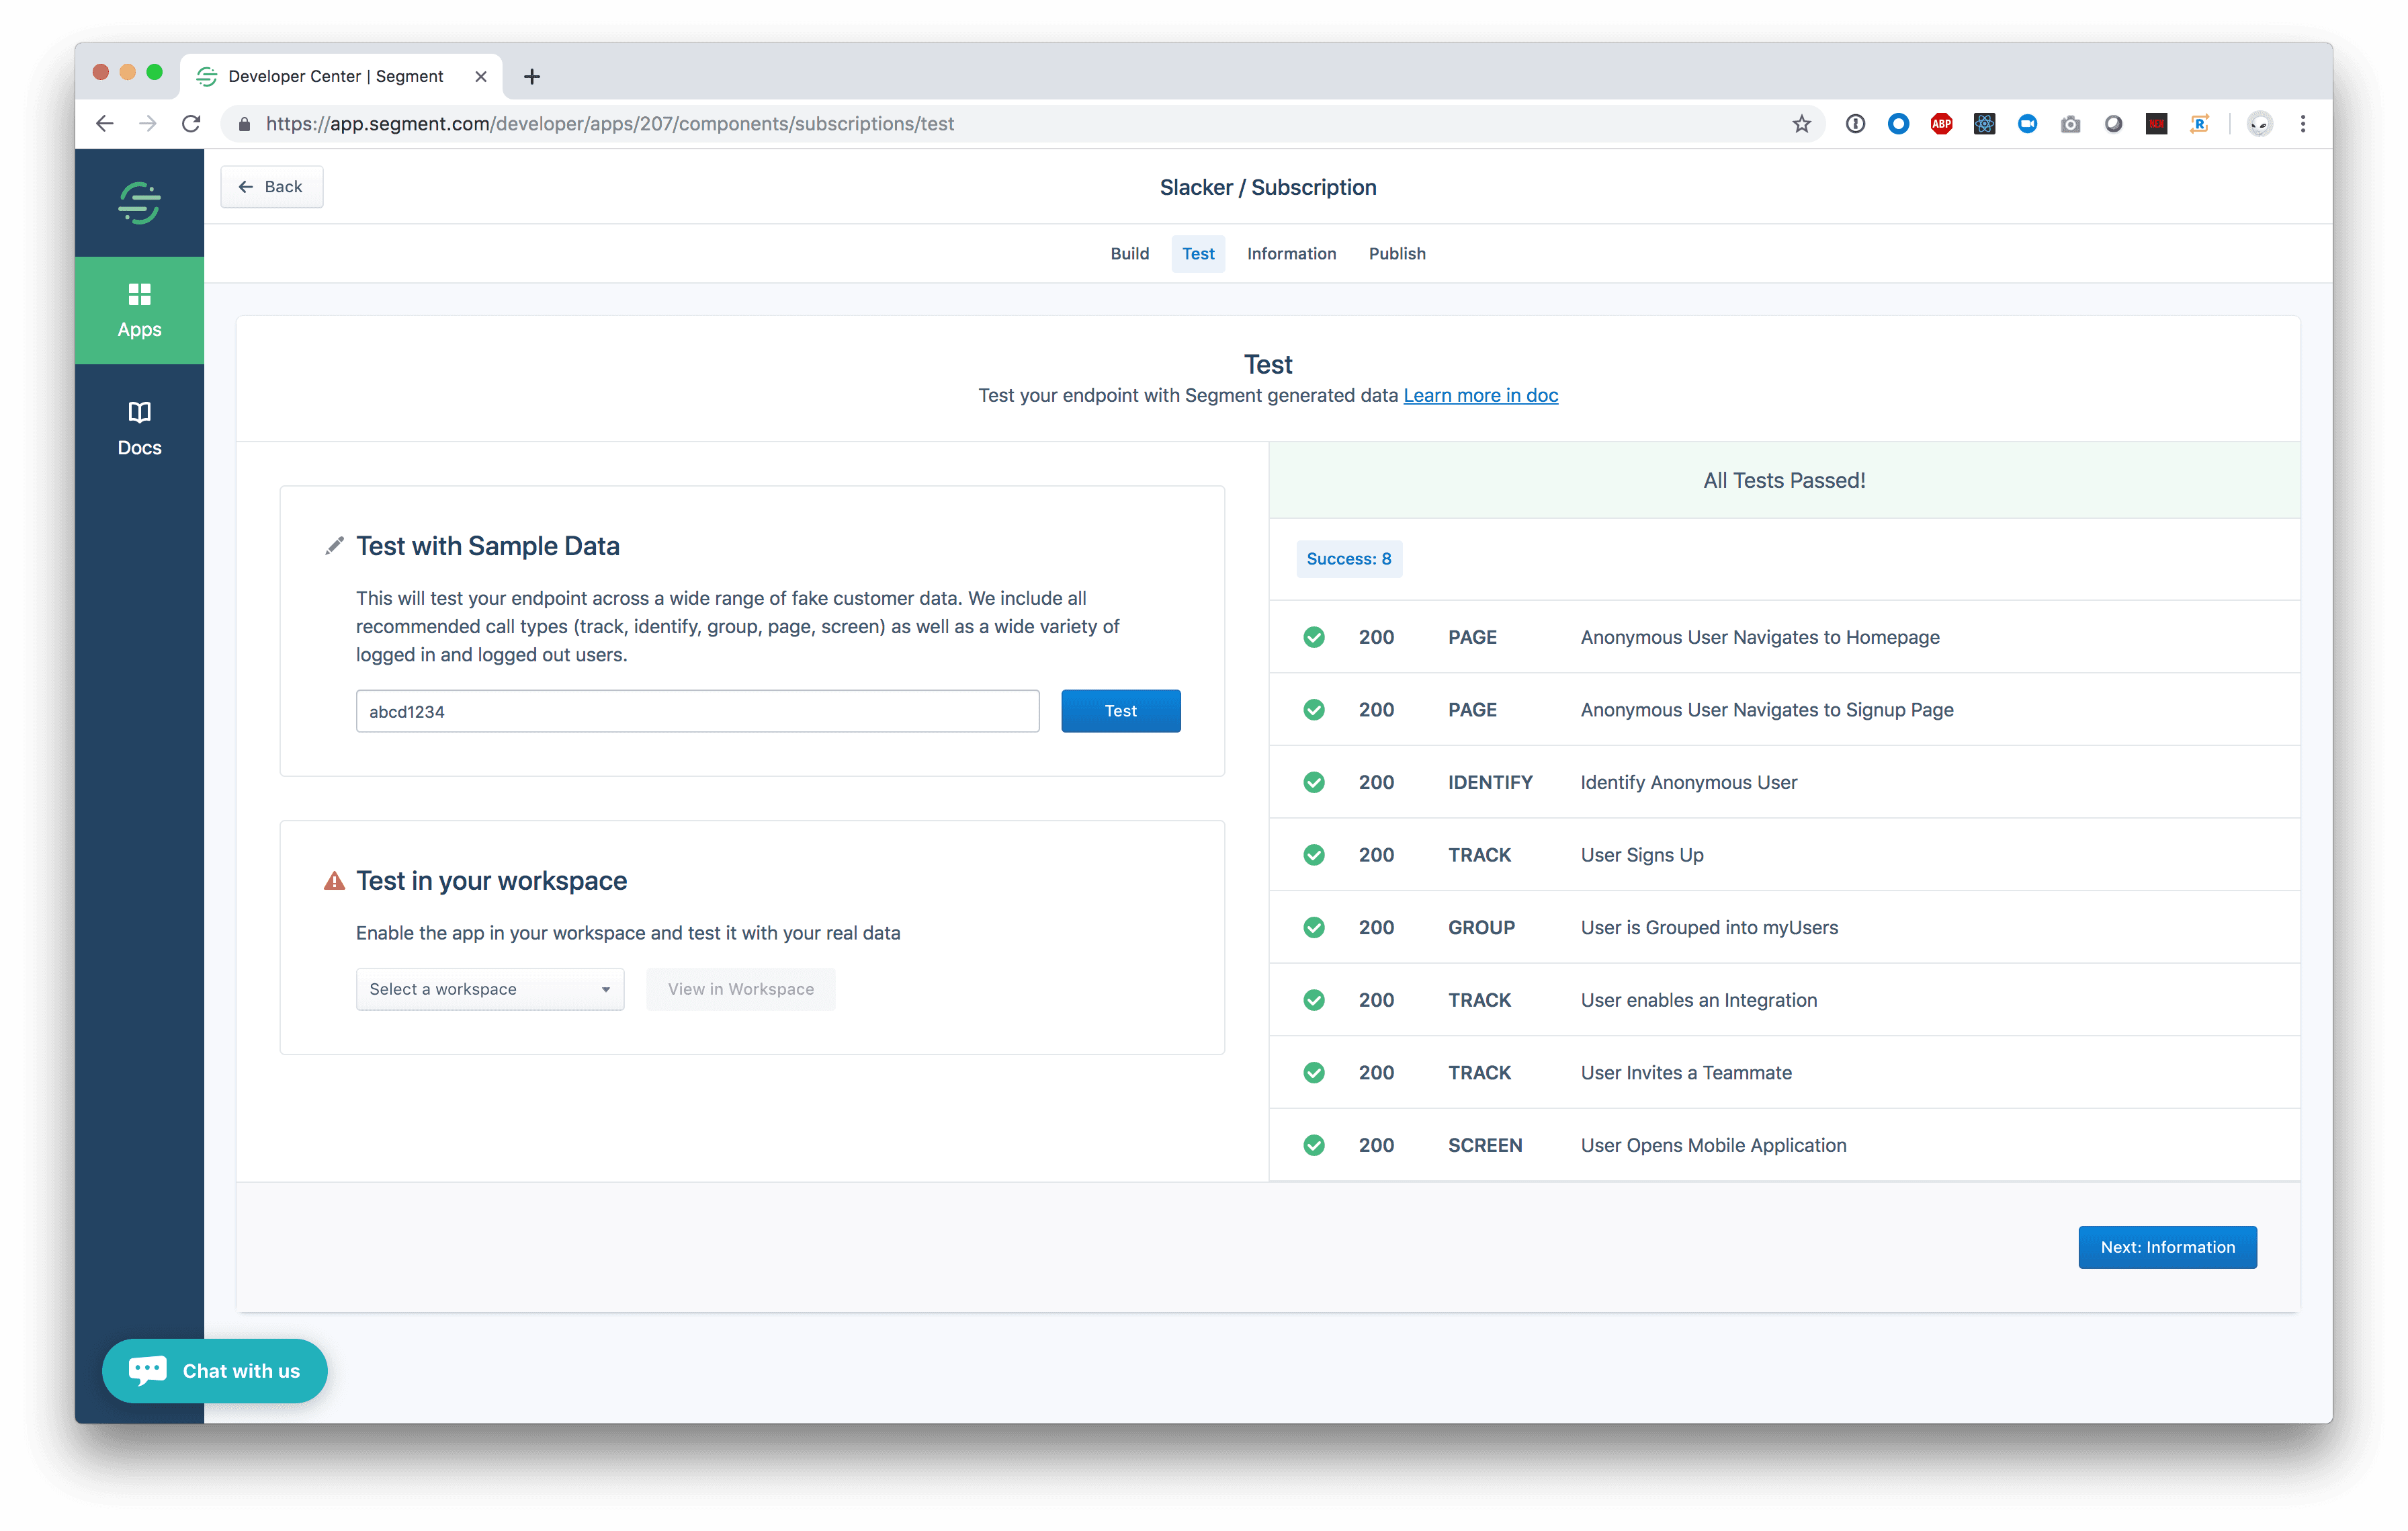
When your code is working with one event you can test it with a suite of more Segment events. Click Save and Next: Test, fill in an API Key and click Test. You will see the results of additional types of Segment data.
The ultimate goal is for Partners like yourself to create and publish high quality Destinations in the Segment Catalog. Your Segment account doubles as a sandbox account to test your destination while you are still in a private "building" state.
To test your Destination in the Catalog, click the "Test" tab in the Developer Center Component builder. In the "Test in your workspace" section, select your personal workspace and click "view". This redirects to you a URL like https://app.segment.com/WORKSPACE-SLUG/destinations/catalog/APP-SLUG, which is your catalog entry.
From here, click "Configure App", select a Source, and click "Confirm Source". You can now configure your destination by setting the "API Key", then clicking the toggle to enable the destination.
Next you can click the "Event Tester" tab to send data to your destination. Here you can see what requests Segment sends to your destination and introspect the response you are returning. Learn more about the event tester in the Event Tester docs.
Now you can use the JavaScript SDK in a browser to generate real analytics events.
Finally you should verify the data in your service.
Complete the remaining steps as outlined in the Developer Center Overview.