Integrate Flex with Salesforce
With out-of-the-box support for Salesforce Open Computer Telephony Integration (Open CTI), you can power your Salesforce environment with the omnichannel communications offered by Flex. Both Salesforce Classic and Lightning Experience integrations are supported, allowing you to use Flex directly within your Salesforce instance.
This guide explains how to configure Flex within Salesforce, configure outbound calling, enable Single Sign-On (SSO), and launch your integration.
Info
- Need to create a new Salesforce organization for your proof of concept? Create a Salesforce developer account at https://developer.salesforce.com.
- Looking to integrate other Twilio products with Salesforce? See Twilio for Salesforce.
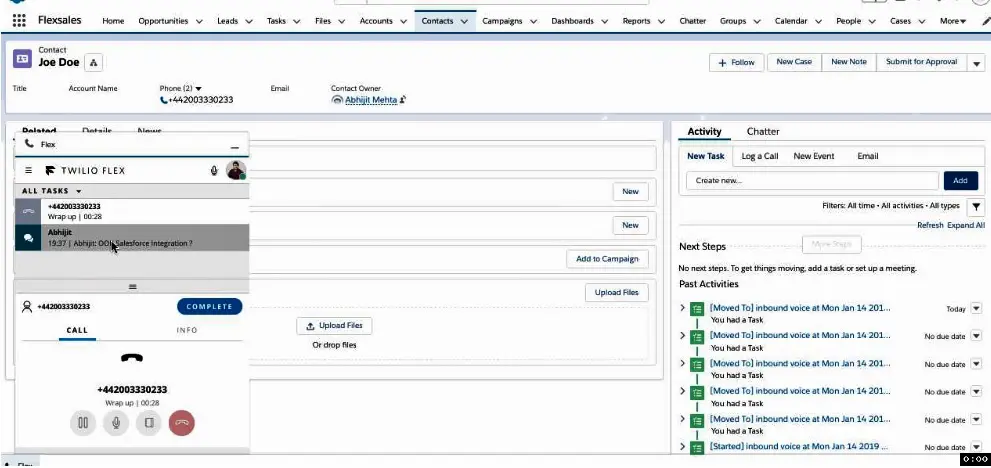
The Flex Salesforce integration embeds the Flex agent user interface directly into the Salesforce application and creates a single source of truth for agents.
As part of the Salesforce integration, the following features are supported within Flex:
- Native digital engagement: supported interaction with customers on various communications APIs, such as Voice, Web Chat, SMS, and WhatsApp
- Personalization: route any Salesforce Object (case, lead, contact, or other custom object) and blend it with other channels
- Programmability: tailored look and feel of the application, possibility to code in adjustments
- Pre-built native features: click-to-dial, screen pop with search capabilities, context switching, activity logging, SSO integration
- Multiple deployment scenarios: Flex can be embedded inside of Salesforce, or Salesforce can be embedded within Flex
- The Copy Download Link feature doesn't work in Flex Insights when Flex is embedded within Salesforce
- When making an outbound call, ensure the relevant Salesforce record for the phone number is open before beginning the call. Otherwise, activity logs of the outbound call may not be reflected on the correct Salesforce record.
- Open Twilio Console.
- Go to Flex > Contact center settings > Integrations.
- On the Salesforce tile, click Configure.
- Under Status, toggle the integration plugin on.
- Under Configuration, click Edit Configuration, and set up your Salesforce Integration for your organization with the following parameters:
| Parameter Name | Description |
|---|---|
| Workflow SID (Optional) | If you want to use a different Workflow than your default Workflow, enter the Workflow SID. If not, leave it empty. If you aren't sure what this is, then leave it empty. |
| Task Channel SID (Optional) | If you want to use a different Task Channel than the default Voice Channel, enter the Task Channel SID here. If not, leave it empty. If you aren't sure what this is, then leave it empty. |
| Salesforce Base URL (Required) | Register your Salesforce domains on the Embed Flex as an iframe page in the Twilio Console. For more details, see Securely iframe Flex in your application. |
| SSO | Select this option if you want to deploy the Flex-Salesforce Integration using Single Sign-On (SSO). Always check this option if you are operating in a production environment. Leave this unchecked if you are planning to test the integration using your Twilio Account or Project login credentials. |
| Log | Decide when you'd like to log a task in Salesforce: when a task starts, is completed, or switched. |
- Click Apply.
- Log in to your Salesforce instance.
- From Flex Console, go to Admin > Integrations.
- On the Salesforce tile, click Configure.
- Under Set up your Salesforce integration, click Download Twilio Flex CTI connector. The Twilio Flex CTI connector page opens in the Salesforce AppExchange.
- Click Get It Now to install the Flex CTI connector in your Salesforce instance.
- Select your installation preferences and click Install. Once installed, you'll see the managed package show in your Installed Packages page in Salesforce.
- In Salesforce, go to Setup > Trusted URLs and click New Trusted URL.
- Add
https://flex.twilio.comas a URL. Check all CSP directives. - From this page, click the Session Settings link and select the following:
- Under Referrer URL Protection, select Include Referrer-Policy HTTP header.
- Under Content Security Policy (CSP) Directive Rendering, select Adopt updated CSP directives.
- Under Browser Feature Permissions, select Include Permissions-Policy HTTP header.
For more details on setup, see Salesforce's Manage Trusted URLs.
- In Salesforce, click the App Launcher and search for Flex CTI.
-
In
Twilio Flex CTI for Salesforce
, select a configuration option. If you already have a Twilio and Flex account, enter your
AccountSID
, which you can find in
Console
.
Note
If you enter an incorrect AccountSID here, you will need to
uninstall the package
then re-install to configure with the correct AccountSID.
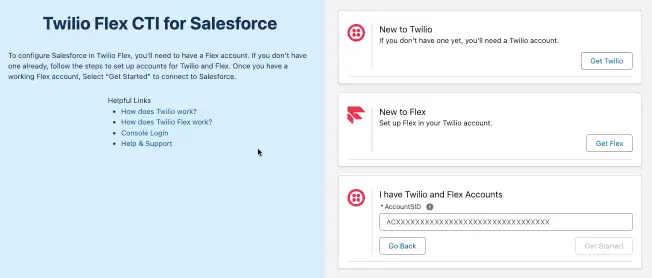
- Click Get Started.
- In the Setup Wizard, follow the steps to complete setup. You can choose steps for Lightning or Classic by selecting the tab at the top of the page.
Once setup is complete, Salesforce users in your Contact Center can see the Flex agent UI in your chosen App in Salesforce.
To start handling calls, see Manage Flex-Salesforce call flows.
Agents must search for the Salesforce record of the relevant phone number before beginning an outbound call. This is to ensure the outbound call will be logged to the correct Salesforce record.
To uninstall the package in Salesforce, follow Salesforce's Uninstall a Managed Package.
To learn more about customizing your integration and managing interactions with your users: