Set up your Python and Flask development environment
In this guide, we'll cover how to set up your Python development environment for a Flask project. We'll use virtual environments to isolate our dependencies, and pip for package management. Also, we'll talk about a couple of helpful tools that we recommend for prototyping Python applications that use Twilio: ngrok and the Twilio Python SDK.
There are two different versions of Python in widespread use today: Python 2 and Python 3. If you're new to Python, choosing the right version for your project can be confusing.
Python 3 was first released in 2008, but some parts of the Python community continue to prefer Python 2 for various reasons. You can read more about the history of Python 2 vs. Python 3 here.
Twilio's Python server-side SDK supports Python versions 3.6+.
1# Check your Python version2$ python --version3Python 3.7.0
If Python is already installed on your system, you can check its version by running python --version.
How you install Python varies depending on your operating system.
| Operating System | Instructions |
|---|---|
| OS X | OS X already has Python installed, but we recommend configuring your own Python installation. Homebrew is our tool of choice for getting Python 2 or 3 installed on OS X. You can find detailed instructions here. |
| Windows | The best way to install Python on Windows is using the official installer from the Python Software Foundation. The x86 (32-bit) version will tend to have better compatibility with third-party packages. |
| Linux | The exact instructions to install Python vary by distribution. Find instructions for Ubuntu, CentOS, and other distributions here. |
Before we can start our Python project, we'll need something to write it with.
If you already have a code-writing tool of choice, you can stick with it for developing your Python application. If you're looking for something new, we recommend trying out a few options:
- Sublime Text is a text editor popular for its ease of use and extensibility. Start here if you're eager to get coding and don't think you'll want a lot of frills in your development environment.
- Visual Studio Code is another text editor that's free, easy to set up, and available on all platforms.
- PyCharm is a fully Integrated Development Environment (IDE) for Python. It takes longer to set up but comes with more helpful tools already installed.
- Python Tools for Visual Studio is a great option if you're already a Visual Studio user.
- Vim is a perennial favorite text editor among advanced users
If you're new to programming, we recommend giving Sublime Text and PyCharm each a try before you settle on your favorite.
Before starting any new Python project, we should create a virtual environment for it.
Virtual environments (shortened as "virtualenv") separate our new project's Python dependencies from our other projects and from the Python libraries our operating system uses. If you don't use a virtualenv, there's a good chance you might break part of your OS.
If you have Python 3.3 or above you don't need to install anything - the standard library provides virtualenv under the module "venv".
If you have an older version, you'll need to install this Python utility which allows you to create and manage Python virtual environments. Use the virtualenv command to create a new virtual environment, using its sole argument to name your new environment. The instructions to activate your new virtualenv vary by operating system:
1# Create a new virtualenv named "myproject"23# Python 3.3+4$ python -m venv myproject56# Python pre 3.37$ virtualenv myproject8New python executable in myproject/bin/python9Installing setuptools, pip, wheel...done.1011# Activate the virtualenv (OS X & Linux)12$ source myproject/bin/activate1314# Activate the virtualenv (Windows)15$ myproject\Scripts\activate
You'll need to activate your virtual environment every time you work on your Python project. In the rare cases when you want to deactivate your virtualenv without closing your terminal session, just use the deactivate command.
We're almost ready to start writing our Flask web application, but first, we need to install the Flask library in our virtual environment.
1# Use pip to install the Flask and twilio libraries2$ pip install Flask twilio3Collecting Flask4Using cached Flask-0.11.1-py2.py3-none-any.whl5Collecting twilio6Collecting click>=2.0 (from Flask)7Collecting itsdangerous>=0.21 (from Flask)8Collecting Werkzeug>=0.7 (from Flask)9Using cached Werkzeug-0.11.11-py2.py3-none-any.whl10Collecting Jinja2>=2.4 (from Flask)11Using cached Jinja2-2.8-py2.py3-none-any.whl12Collecting pytz (from twilio)13Using cached pytz-2016.7-py2.py3-none-any.whl14Collecting six (from twilio)15Using cached six-1.10.0-py2.py3-none-any.whl16Collecting httplib2>=0.7 (from twilio)17Collecting MarkupSafe (from Jinja2>=2.4->Flask)18Installing collected packages: click, itsdangerous, Werkzeug, MarkupSafe, Jinja2, Flask, pytz, six, httplib2, twilio19Successfully installed Flask-0.11.1 Jinja2-2.8 MarkupSafe-0.23 Werkzeug-0.11.11 click-6.6 httplib2-0.9.2 itsdangerous-0.24 pytz-2016.7 six-1.10.0 twilio-5.6.0
Python uses pip to manage dependencies, so the command to pull Flask and the Twilio SDK into our development environment is pip install Flask twilio.
After you get your dependencies installed and confirm they're doing the trick for you, you'll probably want to keep track of and control what versions of the dependencies you're using. Pip allows us to "freeze" our dependencies, and record which versions we are using in a file that (by convention) is called requirements.txt. Create a requirements file with this command:
pip freeze > requirements.txt
If later on, you wish to install this same set of dependencies again, you can install them from this file with the following command:
pip install -r requirements.txt
We can test that our development environment is configured correctly by creating a simple Flask application. We'll grab the nine-line example from Flask's homepage and drop it in a new file called app.py.
1from flask import Flask2app = Flask(__name__)34@app.route("/")5def hello():6return "Hello World!"78if __name__ == "__main__":9app.run()
We can then try running our new Flask application with the command python app.py. You can then open http://localhost:5000 in your browser, and you should see the "Hello World!" response.
Note: If you're using a virtual machine for your development environment, like Vagrant, you might not be able to see your Flask application at the localhost hostname. Continue to the ngrok section for an easy way to fix this.
While Flask is a micro-framework that can be extended with various libraries, Django is another popular web framework that provides a lot more out of the box. If you're interested in using Django, we recommend following their guides to get started with it.
Once you see your sample Flask application's "Hello World!" message, your development environment is ready to go. But for most Twilio projects you'll want to install one more helpful tool: ngrok.
Most Twilio services use webhooks to communicate with your application. When Twilio receives an incoming phone call, for example, it reaches out to a URL in your application for instructions on how to handle the call.
When you're working on your Flask application in your development environment, your app is only reachable by other programs on the same computer, so Twilio won't be able to talk to it.
Ngrok is our favorite tool for solving this problem. Once started, it provides a unique URL on the ngrok.io domain which will forward incoming requests to your local development environment.
To start, head over to the Ngrok download page and grab the binary for your operating system: https://ngrok.com/download
Once downloaded, make sure your Flask application is running and then start Ngrok using this command: "./ngrok http 5000". You should see output similar to this:
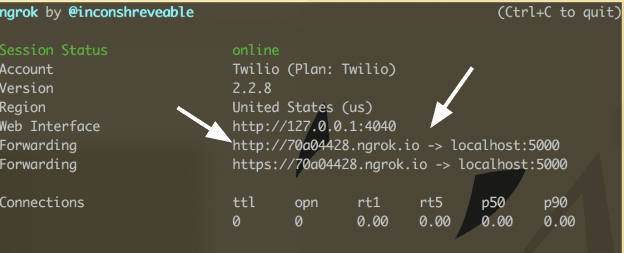
Look at the "Forwarding" line to see your unique Ngrok domain name (ours is "aaf29606.ngrok.io") and then point your browser at that domain name.
If everything's working correctly, you should see your Flask application's "Hello World!" message displayed at your new Ngrok URL.
Anytime you're working on your Twilio application and need a URL for a webhook you should use Ngrok to get a publicly accessible URL like this one.
You've learned about ngrok, pip and virtual environments, and now you're ready to build out your Flask application. Learn more with the following resources: