How to capture your first payment using <Pay>
Learn to securely collect payment details during interactive voice response sessions with Twilio Programmable Voice by using the TwiML <Pay> verb to route transaction data to payment providers like Stripe. You can use this guide to create self-service automation, create inbound and outbound call centers, and send voice notifications.
See Related reference documentation to learn more about the TwiML elements used in this guide.
In this tutorial, you'll create an interactive voice response (IVR) that collects payment details from a customer and passes the information in a PCI-compliant manner to your payment processor of choice. You'll use a TwiML Bin with the <Pay> verb and the Stripe Pay Connector to charge a credit card.
In this tutorial you will learn how to:
- Enable PCI Mode on your account
- Create a Stripe account
- Configure a Stripe Pay Connector
- Create a TwiML Bin with
<Pay> - Create a Twilio Function that handles the payment result and provides new TwiML instructions
- Buy a Twilio phone number
- Configure the Twilio phone number to use the TwiML Bin for incoming calls
- Test capturing credit card details and see the resulting charge on your Stripe account
To use Twilio's Pay Connectors, you must enable PCI mode in the Twilio Console. This ensures Twilio captures payment details in a PCI-compliant manner and redacts sensitive PCI information from all call logs. Learn more about PCI workflows.
Danger
PCI Mode will redact sensitive information from ALL of your account's logs. Turning on PCI Mode cannot be undone.
If you want to avoid redacting information from all logs on an account, consider creating another Twilio account, enable PCI Mode on that account, and use that account when collecting payments with <Pay> or Agent Assist/Payment API.
To enable PCI Mode, complete the following steps:
- Open Voice > Settings > General in Twilio Console or the legacy Console.
- Select Enable PCI Mode.
- In the dialog, select I Agree to accept Twilio's Terms of Service.
- Select Save.
<Pay> allows you to use a variety of payment providers; we will use Stripe for this tutorial.
To get started, head over to Stripe to create your account.
In order to authorize Twilio to create charges and create tokens on your behalf, you must connect your Stripe account to Twilio's Stripe Connect platform. Complete the following steps:
-
Open Pay Connectors in Twilio Console or the legacy Console. Select the Stripe Connector tile.
-
Select Install.
-
In the dialog, read the Terms of Service. Select the checkbox next to I agree to Twilio Inc's Terms of Service, then select Agree & Install.
-
Enter Default for the UNIQUE NAME.
You can create one Pay Connector per Twilio account with the name Default. When
<Pay>is invoked, if thepaymentConnectorattribute is not specified then theDefaultPay Connector is used. -
Select Connect with Stripe, which redirects you to Stripe. Enter your Stripe credentials and answer the prompts with your business details. If your Stripe account has not been activated to accept payments in live mode, bypass entering your business details by selecting Skip this account form at the top. You are then redirected back to Twilio.
-
You are directed back to the Stripe Connector page in the Twilio Console. Notice that the STRIPE ACCOUNT ID (
acct_XXXXXXXXXXXXXXX) is now shown on the page. If you have multiple Stripe accounts for Dev/Stage/Prod, the Account ID helps you differentiate these accounts for each Stripe Connector Instance
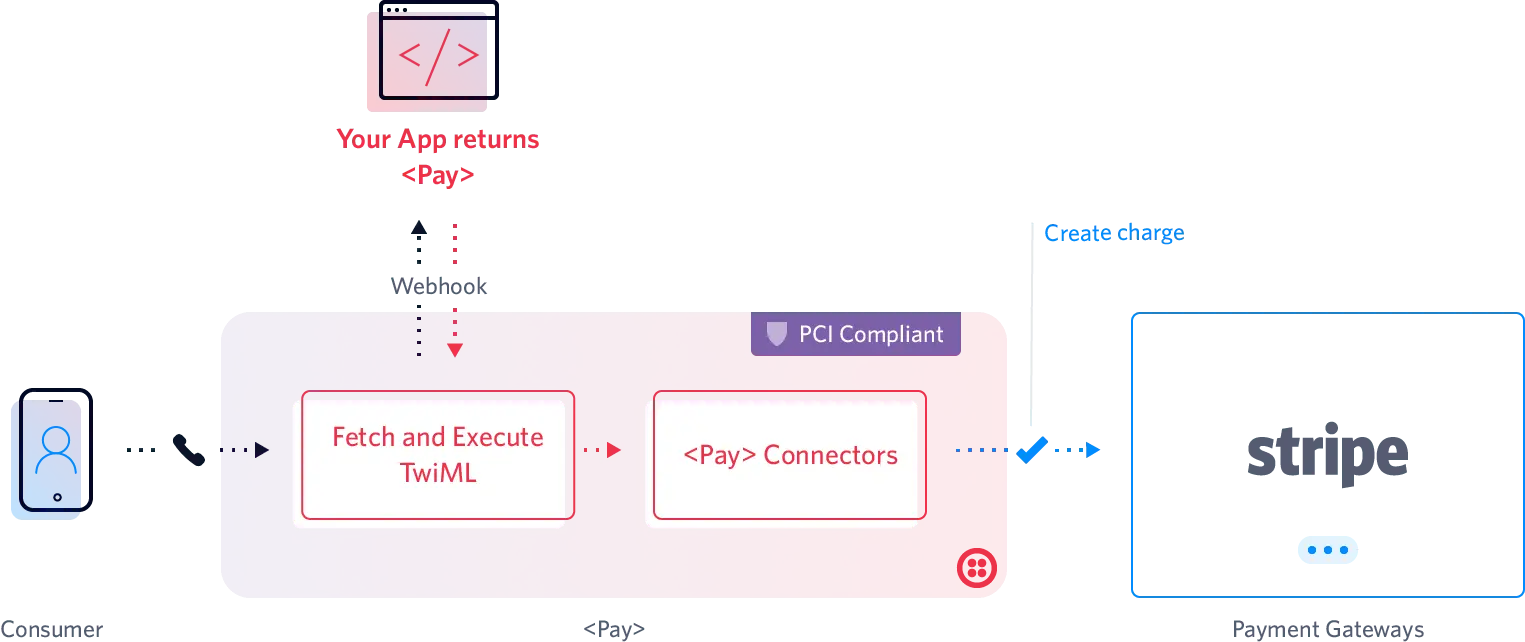
Next, we'll use a TwiML Bin to provide Twilio with the <Pay> TwiML instruction. When Twilio executes the <Pay> verb, a customer will hear prompts to enter their payment information.
-
Open TwiML Bins in Twilio Console or the legacy Console.
-
Select the + button to create a new TwiML Bin.
-
Give the TwiML Bin a FRIENDLY NAME of "<Pay> with Stripe"
-
Copy and paste the following TwiML into the TWIML input box:
1<?xml version="1.0" encoding="UTF-8"?>2<Response>3<Say>Calling Twilio Pay</Say>4<Pay paymentConnector="Default" action="" chargeAmount="20.45"/>5</Response>Notice how the
<Pay>verb has three attributes:paymentConnector,action, andchargeAmount.
ThepaymentConnectorattribute's value is the Pay Connector you want to use with this<Pay>verb. In this case, it's the Generic Pay Connector you just created called "Default".
Theactionattribute is left blank for now. This attribute will be a URL. Upon the completion of a<Pay>transaction, Twilio will send a webhook to youractionURL to get a new set of TwiML instructions. We'll create an endpoint in the next step that handles the request to thisactionattribute.
ThechargeAmountattribute is set to20.45, representing a charge of $20.45. (If you wanted to create a tokenize transaction, you would set this attribute value to 0 or omit the attribute altogether.) -
Select Save at the bottom of the page.
When <Pay> completes capturing the consumers' credit card, the Pay Connector initiates a transaction with the Payment Provider. Next, the Twilio sends an HTTP request to <Pay>'s action URL with a status returned.
You will use Twilio's Serverless Functions to write and host the endpoint for our action URL. Twilio Functions allow you deploy Node.js-based applications without needing to install anything locally on your own machine.
-
Open Functions & assets > Services in Twilio Console, or Functions > Services in the legacy Console.
-
Select Create Service to create a new Functions service.
-
In the Name your Service dialog, give your service the name
pay-with-stripe-action-url. -
Select Next on the Name your Service dialog.
-
In the Functions pane, rename the
/path_1Function to/payand press Enter. -
Next to the /pay path name, you'll see a lock icon (hovering over it shows a Protected tooltip). Select the lock icon, then select Public.
-
Select all of the provided sample code in the code editor pane and delete it.
-
Copy and paste the following code into the code editor of your /pay function:
1exports.handler = function(context, event, callback) {2console.log("in Pay");3console.log(event);4console.log(event.Result);56let twiml = new Twilio.twiml.VoiceResponse();78switch (event.Result) {9case "success":10text = "Thank you for your payment";11break;12case "payment-connector-error":13text = "The Payment Gateway is reporting an error";14console.log(decodeURIComponent(event.PaymentError));15break;1617default:18text = "The payment was not completed successfully";19}20twiml.say(text);21callback(null, twiml);22};Your Functions editor should now look like this: \
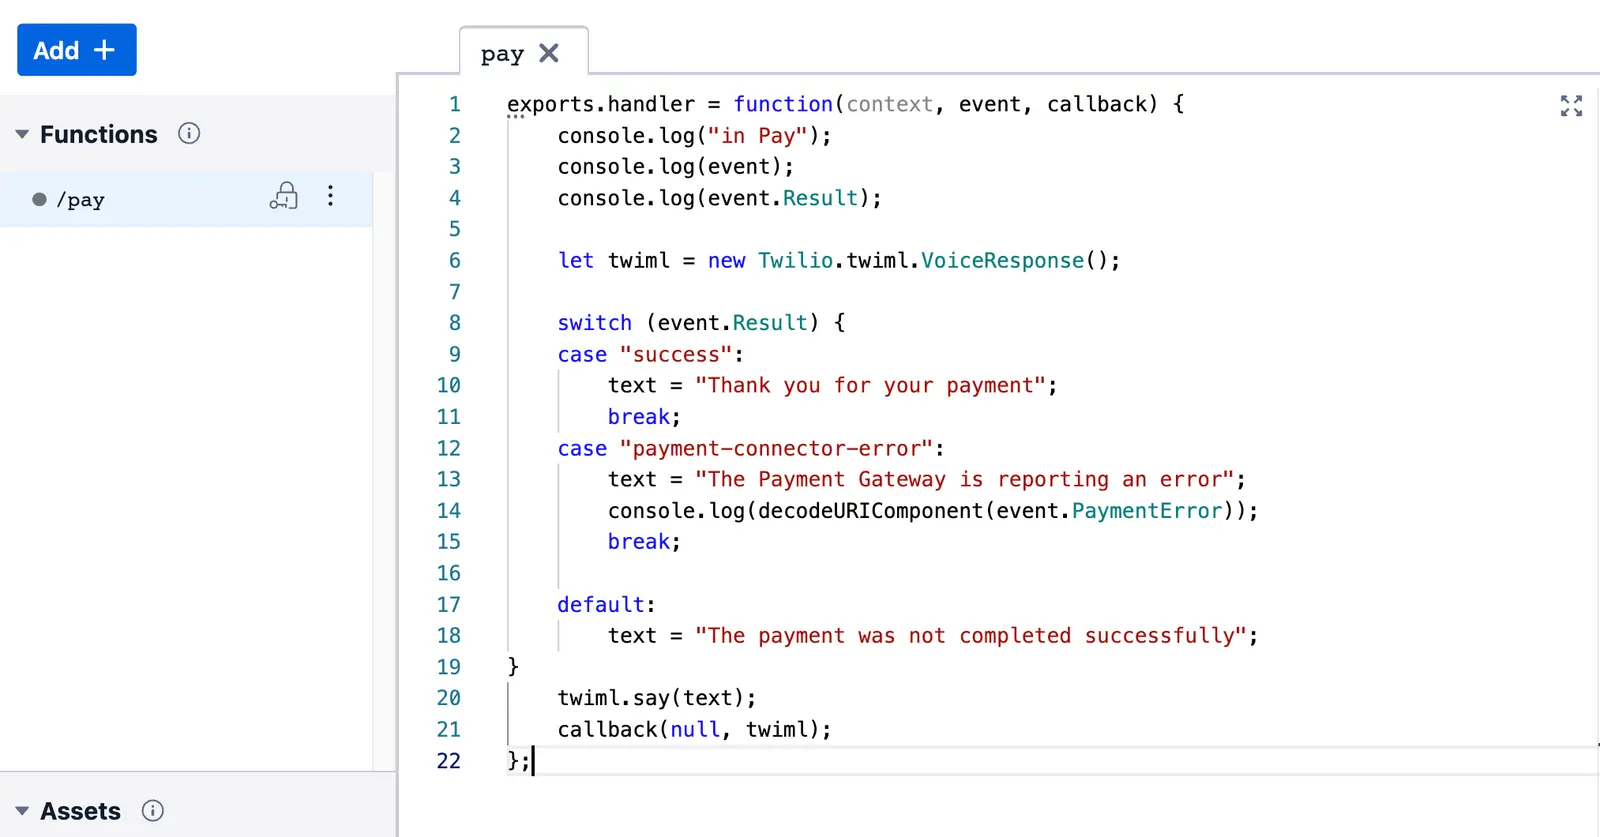
This Function checks theResultproperty in the request from Twilio. If theResultis"success", the Function returns the following TwiML:1<?xml version="1.0" encoding="UTF-8"?>2<Response>3<Say>Thank you for your payment</Say>4</Response>If the Result is
"payment-connector-error", the function returns the following TwiML:1<?xml version="1.0" encoding="UTF-8"?>2<Response>3<Say>The payment was not completed successfully</Say>4</Response> -
Select Save at the bottom of the code editor pane.
-
Select Deploy All at the bottom of the page. This deploys your Twilio Function to the internet.
-
Turn on the Enable live logs switch so that you'll see live logs when your /pay endpoint receives a request from Twilio.
-
Copy the URL for your new endpoint by selecting Copy URL next to the Live logs on toggle.
-
In a new browser tab, open the <Pay> with Stripe TwiML Bin you created earlier. Find it in Twilio Console or the legacy Console.
-
Paste the Function URL from step 12 between the double quotation marks after
action=(i.e. in the place ofhttps://example.com/paybelow).1<?xml version="1.0" encoding="UTF-8"?>2<Response>3<Say>Calling Twilio Pay</Say>4<Pay paymentConnector="Default" chargeAmount="20.45"5action="https://example.com/pay"/>6</Response> -
Select Save on the TwiML Bin page.
Now it's time to purchase Twilio phone number and configure it to use the <Pay> instructions in the TwiML Bin.
If you don't already own a Twilio Voice-enabled phone number, complete the following steps:
- Open Buy a number in Twilio Console or the legacy Console.
- Make sure the Voice checkbox is selected and select Search.
- You'll see a list of available phone numbers and their capabilities. Find a number that you like and select Buy.
- In the Review Phone Number dialog, review the information and select Buy (xxx) xxx-xxxx to confirm your purchase.
Now you'll navigate to the configuration page for the phone number and configure it to use your <Pay> with Stripe TwiML Bin when someone calls the number.
- If you see the Number Purchased modal from the last step, select Configure (xxx) xxx-xxxx. Otherwise, go to Phone Numbers > Active numbers and select the phone number you bought.
- Give the phone number a FRIENDLY NAME of "<Pay> Tutorial".
- Scroll down to the Voice & Fax section.
- Find the A CALL COMES IN label.
- Select the Webhook list, then select TwiML Bin.
- In the Select a TwiML Bin list, select <Pay> with Stripe.
- Select Save at the bottom of the page.
Before you call your Twilio phone number, review what should happen:
- You dial your Twilio phone number
- The phone number's configuration points to the <Pay> with Stripe TwiML Bin.
- Twilio executes the
<Pay>verb, so you hear prompts to enter your payment details. - You enter your payment details.
- Twilio sends a request to Stripe via your Default Stripe Pay Connector.
- Stripe returns a response to Twilio.
- Twilio sends a request with the result of the payment to your Twilio Function (the URL of
<Pay>'sactionattribute). - The payment is successful, so your Twilio Function sends
<Say>Thank you for your payment.</Say>TwiML back to Twilio. - You hear "Thank you for your payment" and the call ends.
-
Call your Twilio number.
-
Enter your test payment information:
- Credit card number:
4242 4242 4242 4242 - Expiry date (MM/YY):
12 25(pick a date in the future) - Zip code:
94105 - CVC security code:
333
- Credit card number:
-
To verify that your application correctly captured this data, open your call logs in Twilio Console or the legacy Console and select your most recent call. Scroll down to see the Request Inspector. Expand the parameters on the second
POSTfor your call. -
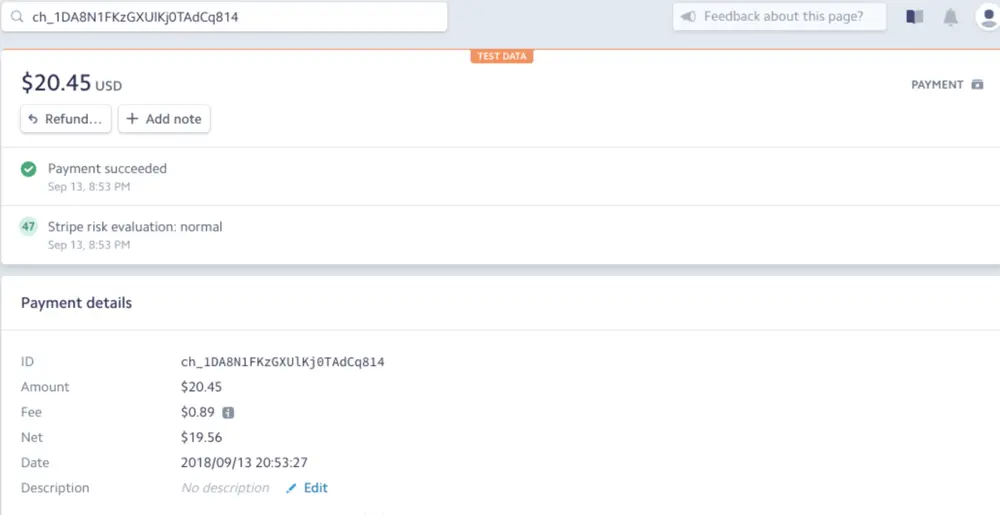
You can navigate over to your Stripe Dashboard, copy the "PaymentConfirmationCode" "ch_xxxxx," and paste into the Stripe search. You should see the following:
You can add the line console.log(event); in your Twilio Function's code. (Don't forget to save and deploy the changes.) This prints out the request parameters in the Log to let you inspect the contents.
You can also navigate to your Call Logs in the Console and view the call in more detail.
You will notice a POST request to <Pay>'s action URL for each stage of the call, first ringing state, and then in-progress.
If you expand the second POST request parameters you will see the call status in-progress. The Result field shows information on error causes. Read the <Pay> documentation for more information.
When Stripe rejects a transaction the result is payment-connector-error and you can get further insight by inspecting the PaymentError field.
For instance, if instead of entering 4242 4242 4242 4242 you enter another card then you will see the following:

Stripe offers a list of test card numbers to help with error handling:
- 4100 0000 0000 0019 - Card declined
- 4000 0000 0000 9995 - Card has insufficient funds
- 4000 0000 0000 0069 - Card expired
See Stripe's full list of test cards.
If you want a POST request after each payment detail is collected, you can use <Pay>'s statusCallback attribute.
This guide teaches the basics required for the following use cases:
You can use this guide to automate outbound or inbound calls that gather credit card details using the keypad for self-service automation. For example, you can create utilities or appointment workflows that allow customers to pay outstanding balances, settle bills, or buy add-ons securely by pressing numbers on their keypad.
To learn more advanced features that you can use with self-service automation, see Voice self-service automation.
You can use this guide to equip your support teams with the ability to collect secure payments during incoming support requests. When a customer calls in to resolve an issue or renew a service, agents can trigger a secure payment session that captures billing information without disconnecting the call.
To learn more advanced features that you can use with inbound call center payments, see Voice inbound call center.
You can use this guide to enable your inside sales or collections teams to securely process transactions during outbound outreach. Agents can programmatically dial clients and, once connected, seamlessly initiate a payment workflow to close a sale or collect a balance on the spot.
To learn more advanced features that you can use with outbound call center payments, see Voice outbound call center.
You can use this guide to handle actions following proactive alerts. For example, you can programmatically call customers to notify them of an overdue invoice or a pending subscription renewal, and offer them an immediate, secure channel to complete their payment directly inside the phone interaction.
To learn more advanced features that you can use with voice notifications, see Voice notifications.
After following this guide, you can capture a credit card payment securely over a phone connection using Twilio Programmable Voice and the <Pay> verb. You have also configured an operational workflow that passes information to a payment gateway and routes subsequent TwiML instructions based on whether the charge succeeded or failed.
Explore the following guides to build on what you've learned in this guide:
- Make outbound calls with Twilio Programmable Voice: Use Twilio's REST API to programmatically place outbound calls and execute dynamic TwiML instructions.
- Gather user input by using the keypad (DTMF Tones): Combine numerical keypad inputs alongside payments to build multi-functional automated voice systems.
- Build an Interactive Voice Response (IVR) phone tree: Route inbound callers to financial menus or live agents by creating nested voice menu architecture.