How to Configure iOS Push Notifications
Danger
Twilio deprecated Notify in October 2022 and no longer supports it. Learn more about transitioning off Notify.
If you're starting a new project, use Programmable Messaging for SMS notifications. For push notifications, integrate directly with platform-specific services such as APNs for iOS or FCM for Android. If you've already built on Notify, visit the transition guide to learn about your options.
In this guide, we'll go through all the necessary steps to get your Apple push credentials configured for Twilio Notifications. The end result is a Twilio Credential which you can then use to receive notifications in your iOS app. Let's get started!
These are the steps you'll take:
- Set up an App ID
- Create a certificate
- Create a credential SID for Twilio
- Configure your Twilio Service to use your APNS credentials
Log into your Apple development account and click on Identifiers under the Certificates, Identifiers & Profiles section. This will show a list of identifiers, including App IDs.
If your App ID is already on this list, click on it, and a list of capabilities will pop up.
- Check the Push Notifications option.
- Don't worry about the Configure button right now, just click the Save button in the upper right of the page.
If your App ID isn't on this list, click the + symbol to add a new App ID.
- Choose App IDs and click the Continue button in the upper right of the page.
- Give your app a description.
- Enter an Explicit Bundle ID that matches the bundle identifier (such as
com.twilio.notify.NotifyQuickstart) of your app in Xcode. - Under Capabilities check Push Notifications.
- Click the Continue button.
- Click the Registerbutton to confirm your new App ID and create it.
Now you'll need to create a push notification certificate. This will enable your app to receive notifications. You can either make a development certificate or a production certificate. For this guide, we'll make a development certificate. We recommend you use Xcode managed certificate.
-
In your Xcode project, go to the General pane of the target for your iOS application:

-
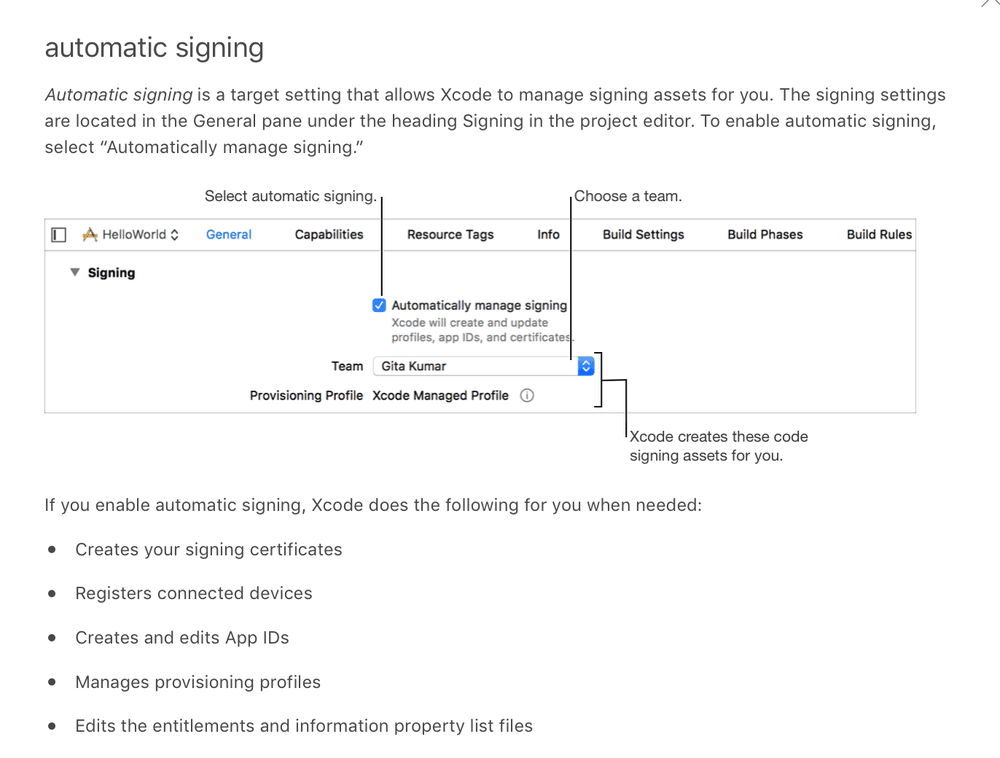
In the Signing section, check Automatically manage signing:
-
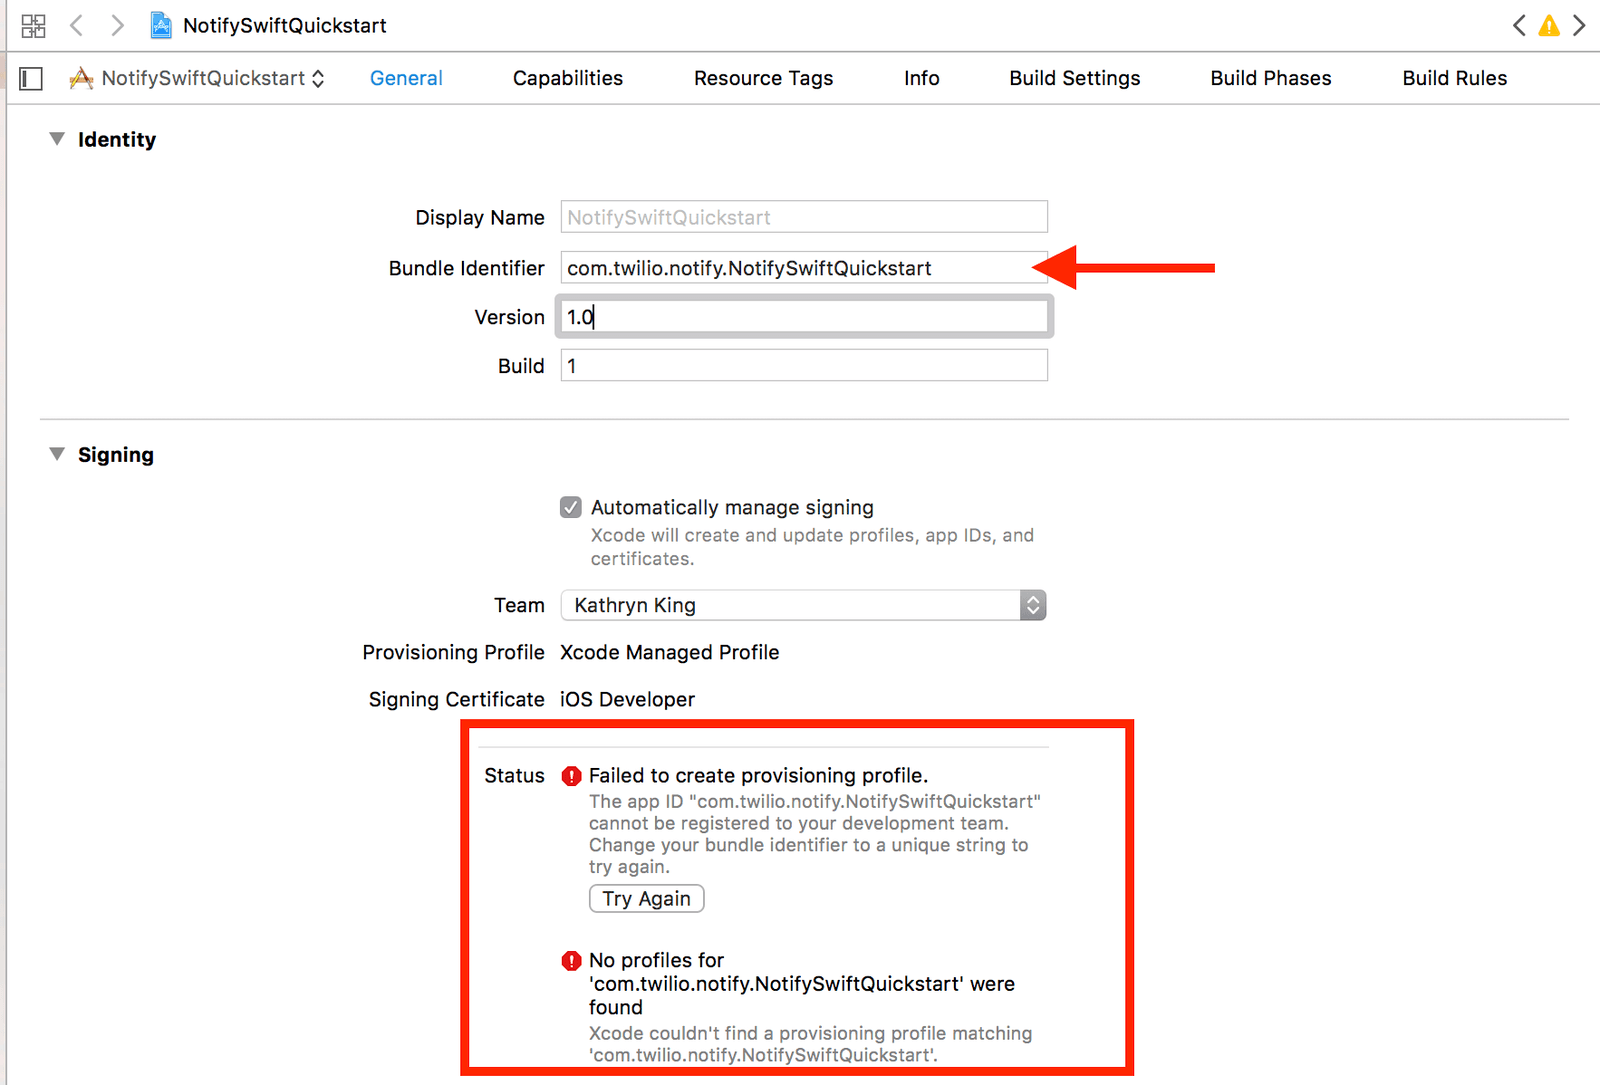
If you are using the Quickstart app and see a provisioning error message, you may need to rename the bundle ID to a unique identifier:
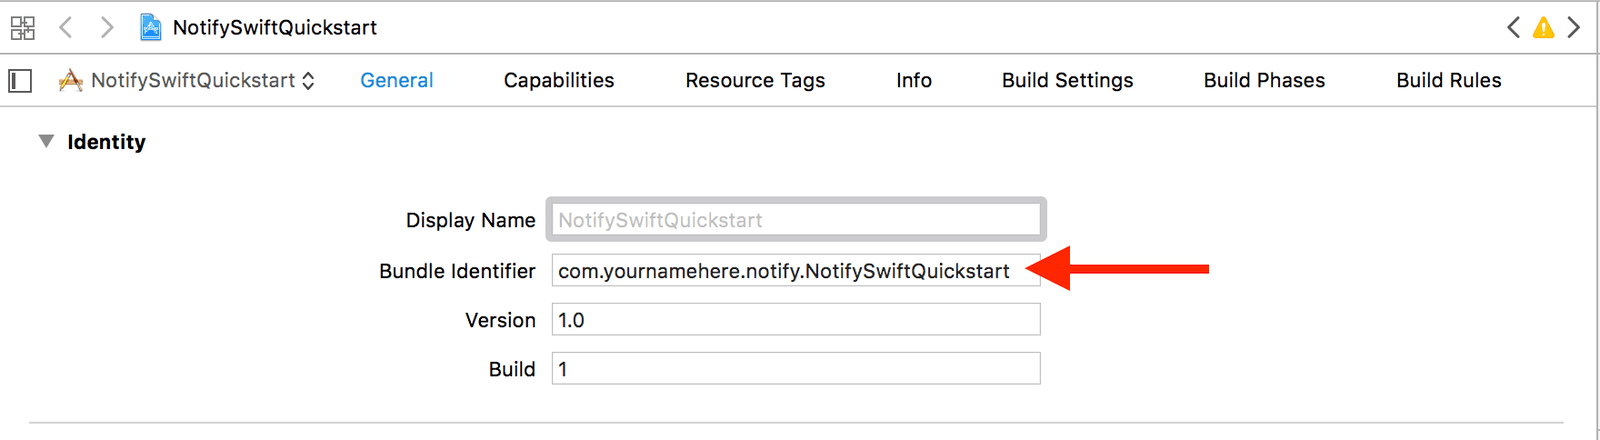
To do so, go to https://developer.apple.com/account/resources/certificates/list and give the bundle a new name. Then, enter your new identifier in the Identity section of the General pane:
-
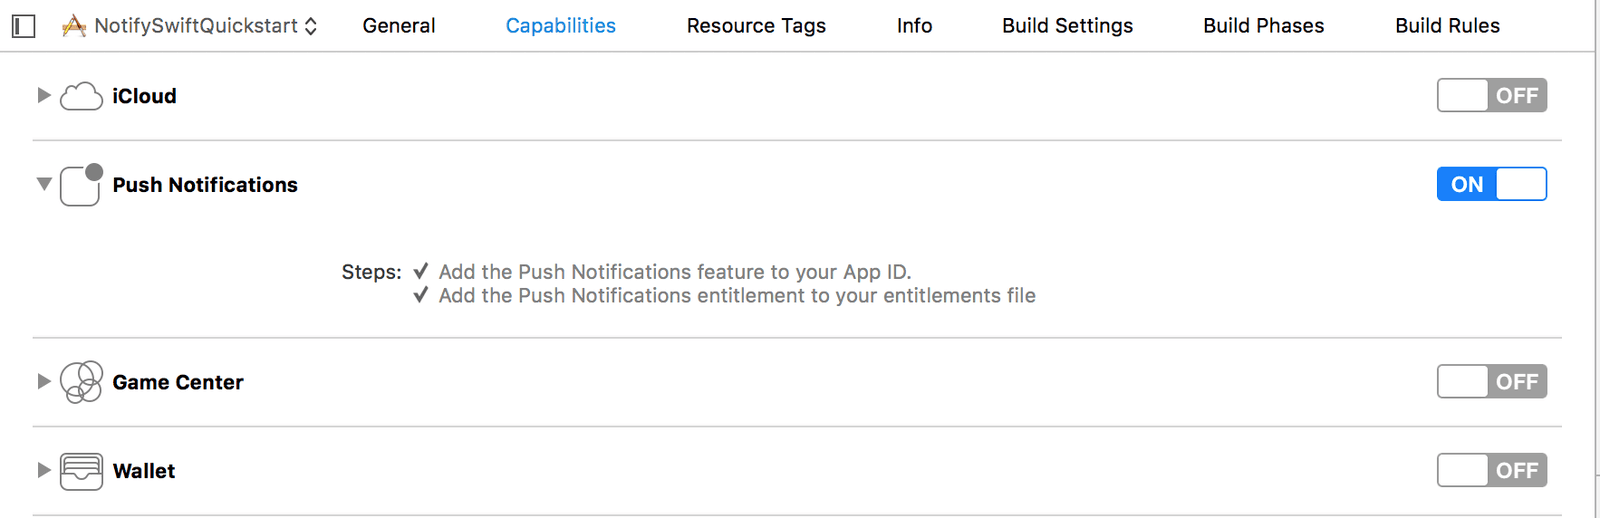
Go to the Capabilities tab and make sure that Push Notifications are enabled:
-
You can verify that your certificates have been created in a few different ways. For more information on Apple Certificates, click this link.
-
Via the Apple developer portal:
- Sign in to the Apple developer portal and click on Certificates, IDs & Profile.
- In the Certificates section at the top, select Development or Production depending on the type of certificate you want to verify.
-
Make sure your certificate is stored in your keychain:
- On your Mac, go to Applications > Utilities > Keychain Access and select Certificates at the top. Search for
iPhoneto filter for iPhone certificates. - Double-check that your certificate has a disclosure triangle next to it. This indicates the existence of your private key in the keychain.
- On your Mac, go to Applications > Utilities > Keychain Access and select Certificates at the top. Search for
-
-
Congratulations! You just created an Apple Development iOS Push Services certificate. If you run into problems during this process, please see this guide from Apple.
While we recommend you use Xcode managed certificates for your application, you may prefer to create your certificate manually.
- Add a certificate on the Apple Developer Portal.
- Under Services, select Apple Push Notification service SSL (Sandbox & Production).
- Click Continue.
- In the text box, select the App ID you created previously.
- Click Continue again.
- You will be prompted to create a Certificate Signing Request (CSR), and given instructions on how to do it. Create one.
- Once you've created a CSR, click Continue.
- Upload it.
- Click Generate to generate your certificate.
Well done! You just created an Apple Development iOS Push Services certificate. Now you can download it and double-click on it to add it to your Mac's keychain.
On your Mac, open Applications > Utilities > Keychain Access, and go to the My Certificates Category at the top.
- Right-click your new certificate. It should be labeled
Apple Development iOS Push Services. - Choose Export.
- Save it as
cred.p12— make sure you leave the password blank.
This is your credential file. You will extract your certificate key and private key from this file — you need these two keys to create a Twilio credential. First, run this command in Terminal:
openssl pkcs12 -in cred.p12 -nokeys -out cert.pem -nodes
cert.pem is your certificate key file. Now run the following command in Terminal:
openssl pkcs12 -in cred.p12 -nocerts -out key.pem -nodes
key.pem is your private key file. Now run this command to process this key:
openssl rsa -in key.pem -out key.pem
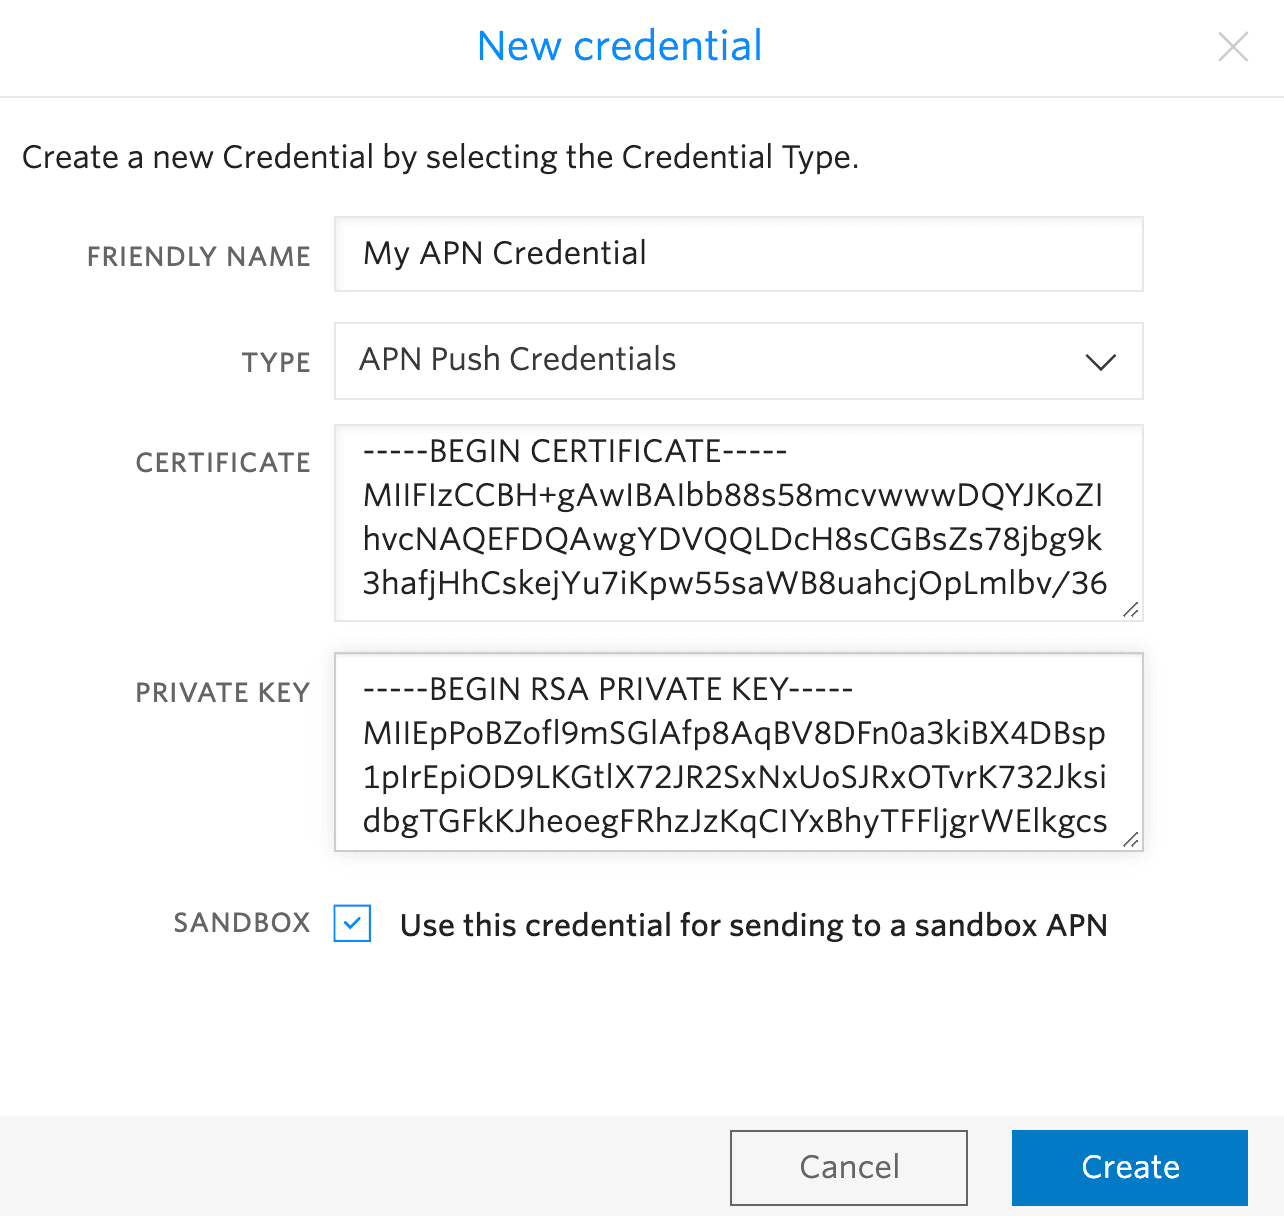
You can now paste your credentials into the modal found in the Twilio Console to upload them.
Make sure that you strip anything outside of the -----BEGIN CERTIFICATE----- and -----END CERTIFICATE----- boundaries and outside of the -----BEGIN RSA PRIVATE KEY----- and -----END RSA PRIVATE KEY----- boundaries before pasting your credentials. Check the Sandbox button if you made a development certificate. Sandbox is synonymous with development mode:
Warning
Once a Credential is saved, CERTIFICATE and PRIVATE KEY fields will be hidden for security reasons.
After you've pasted them in, click Save. If everything went well, you'll see an SID appear on the new page. Copy it to your clipboard — you will need it in the next step.
Congratulations, you just made a Twilio Push Credential!
Twilio allows you to build multiple applications within a single account. To separate those applications, you need to create Service instances that hold all the data and configuration for a given application.
Specifically, you need to configure your Service instance to use the Credential that contains your APNS certificate and private key. You can do that using the Services page in the Console. You'll need to update your Service with the Twilio Push Credential SID:
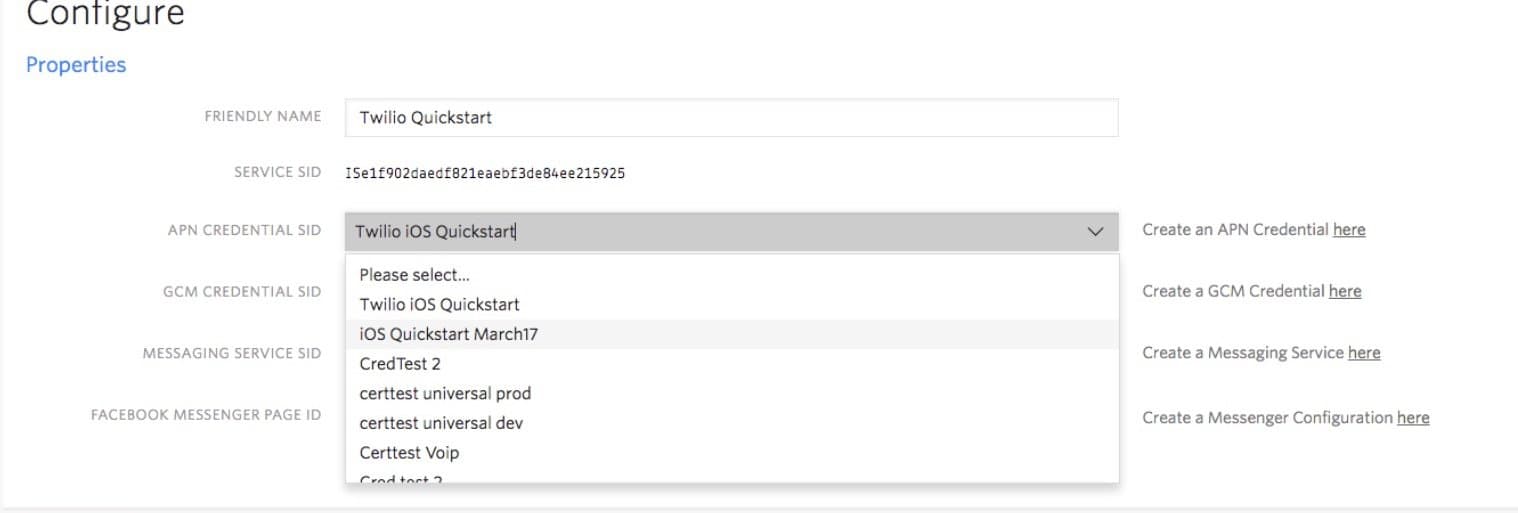
If you are just getting started, set up this APN credential first, then create your Service by clicking the blue plus button on the Services Console page.
You are ready to go. You can now check out the iOS Quickstart to start sending notifications.