Verification Channels
Choosing the right channels for your application can help increase 2FA adoption and keep your customers secure. Twilio's Verify API supports several independent channels for verification and authentication:
- SMS with RCS upgrade
- Voice
- Silent Network Auth
- Passkeys
- Push
- Silent Device Approval
- Time-based one-time passwords (TOTP)
Each channel has various pros and cons, covered below. Many companies offer an assortment of channels to their customers so that customers can choose their preferred channel.
SMS is the most popular channel for two-factor authentication (2FA). That's because most people can receive text messages and onboarding is seamless. Plus, SMS 2FA works: Google found that SMS 2FA helped block "100% of automated bots, 96% of bulk phishing attacks, and 76% of targeted attacks."

SMS has documented security weaknesses, which means it might not be the best choice for high profile end users like elected officials or celebrities. This is why we recommend offering a spectrum of 2FA options. Because SMS relies on telephony, deliverability and per-verification cost is dependent on underlying messaging infrastructure in the various countries where your business operates. In some countries like the US and UK, cost is low and deliverability is high so this might not be a concern. Software based solutions like TOTP and Push help mitigate this.
RCS is an enhancement of the SMS channel, delivering messages over Wi-Fi and cellular to the default SMS messaging app on Android, Messages by Google. RCS messages are more secure, because they are encrypted between Twilio and Google's servers and between Google's servers and the end-user's device. They can also have lower delivery latency. RCS only works on compatible devices and a limited set of countries. Twilio Verify will automatically upgrade delivery of your OTP messages via RCS instead of SMS whenever possible; and if we determine that it exhibits the same or better performance, as measured by Verification Success Rate and Messaging Cost Per Successful Verification.
1// Download the helper library from https://www.twilio.com/docs/node/install2const twilio = require("twilio"); // Or, for ESM: import twilio from "twilio";34// Find your Account SID and Auth Token at twilio.com/console5// and set the environment variables. See http://twil.io/secure6const accountSid = process.env.TWILIO_ACCOUNT_SID;7const authToken = process.env.TWILIO_AUTH_TOKEN;8const client = twilio(accountSid, authToken);910async function createVerification() {11const verification = await client.verify.v212.services("VAaaaaaaaaaaaaaaaaaaaaaaaaaaaaaaaa")13.verifications.create({14channel: "sms",15to: "+15017122661",16});1718console.log(verification.sid);19}2021createVerification();
Response
1{2"sid": "VEaaaaaaaaaaaaaaaaaaaaaaaaaaaaaaaa",3"service_sid": "VAaaaaaaaaaaaaaaaaaaaaaaaaaaaaaaaa",4"account_sid": "ACaaaaaaaaaaaaaaaaaaaaaaaaaaaaaaaa",5"to": "+15017122661",6"channel": "sms",7"status": "pending",8"valid": false,9"date_created": "2015-07-30T20:00:00Z",10"date_updated": "2015-07-30T20:00:00Z",11"lookup": {},12"amount": null,13"payee": null,14"send_code_attempts": [15{16"time": "2015-07-30T20:00:00Z",17"channel": "SMS",18"attempt_sid": "VLaaaaaaaaaaaaaaaaaaaaaaaaaaaaaaaa"19}20],21"sna": null,22"url": "https://verify.twilio.com/v2/Services/VAaaaaaaaaaaaaaaaaaaaaaaaaaaaaaaaa/Verifications/VEaaaaaaaaaaaaaaaaaaaaaaaaaaaaaaaa"23}
The WhatsApp channel has many of the same usability benefits of SMS with the added bonus of being the most popular messaging service in over 100 countries. Adding WhatsApp for one-time passcode (OTP) delivery can boost your overall verification conversion rate because it works with just a Wi-Fi connection.
As a software channel, WhatsApp won't charge for undelivered messages and isn't exposed to fraud that exploits the telecom network. Verify auto-creates authentication message templates in multiple languages that you can use with your own brand and provide end users with a copy code button to enhance their experience.
Learn more about how to get started with WhatsApp.
1// Download the helper library from https://www.twilio.com/docs/node/install2const twilio = require("twilio"); // Or, for ESM: import twilio from "twilio";34// Find your Account SID and Auth Token at twilio.com/console5// and set the environment variables. See http://twil.io/secure6const accountSid = process.env.TWILIO_ACCOUNT_SID;7const authToken = process.env.TWILIO_AUTH_TOKEN;8const client = twilio(accountSid, authToken);910async function createVerification() {11const verification = await client.verify.v212.services("VAaaaaaaaaaaaaaaaaaaaaaaaaaaaaaaaa")13.verifications.create({14channel: "whatsapp",15to: "+15017122661",16});1718console.log(verification.sid);19}2021createVerification();
Response
1{2"sid": "VEaaaaaaaaaaaaaaaaaaaaaaaaaaaaaaaa",3"service_sid": "VAaaaaaaaaaaaaaaaaaaaaaaaaaaaaaaaa",4"account_sid": "ACaaaaaaaaaaaaaaaaaaaaaaaaaaaaaaaa",5"to": "+15017122661",6"channel": "whatsapp",7"status": "pending",8"valid": false,9"date_created": "2015-07-30T20:00:00Z",10"date_updated": "2015-07-30T20:00:00Z",11"lookup": {},12"amount": null,13"payee": null,14"send_code_attempts": [15{16"time": "2015-07-30T20:00:00Z",17"channel": "SMS",18"attempt_sid": "VLaaaaaaaaaaaaaaaaaaaaaaaaaaaaaaaa"19}20],21"sna": null,22"url": "https://verify.twilio.com/v2/Services/VAaaaaaaaaaaaaaaaaaaaaaaaaaaaaaaaa/Verifications/VEaaaaaaaaaaaaaaaaaaaaaaaaaaaaaaaa"23}
Voice is Twilio's primary backup to SMS for non-smartphone authentication. WhileSMS delivery rates vary over the globe, Voice is prioritized on carrier networks and gives the greatest reliability. To ensure there is a live user at the other end of the call and not a voicemail that can be intercepted, the Verify API will challenge a user with a random keypad digit before reading them the token.
Voice supports localization for dozens of languages.
To start a verification over the Voice channel, set the Channel parameter to call. Note that voice is not a valid Channel value, as shown in the following example.
1// Download the helper library from https://www.twilio.com/docs/node/install2const twilio = require("twilio"); // Or, for ESM: import twilio from "twilio";34// Find your Account SID and Auth Token at twilio.com/console5// and set the environment variables. See http://twil.io/secure6const accountSid = process.env.TWILIO_ACCOUNT_SID;7const authToken = process.env.TWILIO_AUTH_TOKEN;8const client = twilio(accountSid, authToken);910async function createVerification() {11const verification = await client.verify.v212.services("VAaaaaaaaaaaaaaaaaaaaaaaaaaaaaaaaa")13.verifications.create({14channel: "call",15to: "+15017122661",16});1718console.log(verification.sid);19}2021createVerification();
Response
1{2"sid": "VEaaaaaaaaaaaaaaaaaaaaaaaaaaaaaaaa",3"service_sid": "VAaaaaaaaaaaaaaaaaaaaaaaaaaaaaaaaa",4"account_sid": "ACaaaaaaaaaaaaaaaaaaaaaaaaaaaaaaaa",5"to": "+15017122661",6"channel": "call",7"status": "pending",8"valid": false,9"date_created": "2015-07-30T20:00:00Z",10"date_updated": "2015-07-30T20:00:00Z",11"lookup": {},12"amount": null,13"payee": null,14"send_code_attempts": [15{16"time": "2015-07-30T20:00:00Z",17"channel": "SMS",18"attempt_sid": "VLaaaaaaaaaaaaaaaaaaaaaaaaaaaaaaaa"19}20],21"sna": null,22"url": "https://verify.twilio.com/v2/Services/VAaaaaaaaaaaaaaaaaaaaaaaaaaaaaaaaa/Verifications/VEaaaaaaaaaaaaaaaaaaaaaaaaaaaaaaaa"23}
Silent Network Auth (SNA) is a secure verification channel that verifies user possession of a mobile number without explicit user intervention by using its built-in connectivity to the mobile network operator (carrier). In the background, Twilio verifies the phone number by confirming directly from the carrier that the number corresponds to the SIM card located in the device requesting the authentication. This all happens without one-time password prompts or visible redirects for the end-user.
Get started with Silent Network Auth.
1// Download the helper library from https://www.twilio.com/docs/node/install2const twilio = require("twilio"); // Or, for ESM: import twilio from "twilio";34// Find your Account SID and Auth Token at twilio.com/console5// and set the environment variables. See http://twil.io/secure6const accountSid = process.env.TWILIO_ACCOUNT_SID;7const authToken = process.env.TWILIO_AUTH_TOKEN;8const client = twilio(accountSid, authToken);910async function createVerification() {11const verification = await client.verify.v212.services("VAaaaaaaaaaaaaaaaaaaaaaaaaaaaaaaaa")13.verifications.create({14channel: "sna",15to: "+15017122661",16});1718console.log(verification.sid);19}2021createVerification();
Response
1{2"sid": "VEaaaaaaaaaaaaaaaaaaaaaaaaaaaaaaaa",3"service_sid": "VAaaaaaaaaaaaaaaaaaaaaaaaaaaaaaaaa",4"account_sid": "ACaaaaaaaaaaaaaaaaaaaaaaaaaaaaaaaa",5"to": "+15017122661",6"channel": "sna",7"status": "pending",8"valid": false,9"date_created": "2015-07-30T20:00:00Z",10"date_updated": "2015-07-30T20:00:00Z",11"lookup": {12"carrier": {13"mobile_country_code": "311",14"type": "mobile",15"error_code": null,16"mobile_network_code": "180",17"name": "T-Mobile USA, Inc."18}19},20"amount": null,21"payee": null,22"send_code_attempts": [23{24"time": "2015-07-30T20:00:00Z",25"channel": "sna",26"attempt_sid": "VLaaaaaaaaaaaaaaaaaaaaaaaaaaaaaaaa"27}28],29"sna": {30"url": "https://mi.dnlsrv.com/m/id/ANBByzx7?data=AAAglRRdNn02iTFWfDWwdTjOzM8o%2F6JB86fH%2Bt%2FFftUPj0pFA0u8%2FibWuYwzmMeMOtdTwYlsO8V%2FXF%2BJmngMhbeGKYhHeTOF2H9VrGEYKcEEklPxHgb5GgL3XtYa33j3lIU%2By6InvoV%2FowWHBzA0QeFPBh6vmJ8LoUPJqGE7q0PRz618Z4ym1AGq%2BaomSq9PlP4rCduv9Cmtxu%2FrvPSBwocs0GCWDE8seK8t9epmPQW7gwODxkAiKr9UxhJd9KvmBVuAQPf%2BoFQVo86USXkhXqTvUzB2bNUYY9FCy3CWgZFTOa1D3H1CVxf1eHzYIswNA7SmOzP%2FBX8g6%2B0hkzwMRkcit3gBNs4evAVJiqAgYvUlrtGwwv9bFx4X7jWSHY4%3D&cipherSalt=yANeDq09bwM38SJs"31},32"url": "https://verify.twilio.com/v2/Services/VAaaaaaaaaaaaaaaaaaaaaaaaaaaaaaaaa/Verifications/VEaaaaaaaaaaaaaaaaaaaaaaaaaaaaaaaa"33}
Info
Verify Automatic SMS Fallback is currently in the Pilot maturity stage, please contact sales to request access to this feature.
Automatic Channel Selection attempts to verify with Silent Network Auth (SNA) and uses SMS as a fallback if needed.
SNA is a very secure authentication channel that uses direct carrier connections to verify the possession of a phone number without requiring user input. However, SNA cannot be used in some cases due to carrier or network restrictions. Automatic Channel Selection works by proactively checking if an end user's IP address can support using SNA. If it doesn't, or if other restrictions or errors in the SNA process exist, the SMS channel is used as a back up.
Get started with Automatic Channel Selection.
1// Download the helper library from https://www.twilio.com/docs/node/install2const twilio = require("twilio"); // Or, for ESM: import twilio from "twilio";34// Find your Account SID and Auth Token at twilio.com/console5// and set the environment variables. See http://twil.io/secure6const accountSid = process.env.TWILIO_ACCOUNT_SID;7const authToken = process.env.TWILIO_AUTH_TOKEN;8const client = twilio(accountSid, authToken);910async function createVerification() {11const verification = await client.verify.v212.services("VAaaaaaaaaaaaaaaaaaaaaaaaaaaaaaaaa")13.verifications.create({14channel: "auto",15deviceIp: "0.000.00.000",16to: "+15017122661",17});1819console.log(verification.sid);20}2122createVerification();
Response
1{2"sid": "VEaaaaaaaaaaaaaaaaaaaaaaaaaaaaaaaa",3"service_sid": "VAaaaaaaaaaaaaaaaaaaaaaaaaaaaaaaaa",4"account_sid": "ACaaaaaaaaaaaaaaaaaaaaaaaaaaaaaaaa",5"to": "+15017122661",6"channel": "auto",7"status": "pending",8"valid": false,9"date_created": "2015-07-30T20:00:00Z",10"date_updated": "2015-07-30T20:00:00Z",11"lookup": {12"carrier": {13"mobile_country_code": "311",14"type": "mobile",15"error_code": null,16"mobile_network_code": "180",17"name": "T-Mobile USA, Inc."18}19},20"amount": null,21"payee": null,22"send_code_attempts": [23{24"time": "2015-07-30T20:00:00Z",25"channel": "sna",26"attempt_sid": "VLaaaaaaaaaaaaaaaaaaaaaaaaaaaaaaaa"27}28],29"sna": {30"url": "https://mi.dnlsrv.com/m/id/ANBByzx7?data=AAAglRRdNn02iTFWfDWwdTjOzM8o%2F6JB86fH%2Bt%2FFftUPj0pFA0u8%2FibWuYwzmMeMOtdTwYlsO8V%2FXF%2BJmngMhbeGKYhHeTOF2H9VrGEYKcEEklPxHgb5GgL3XtYa33j3lIU%2By6InvoV%2FowWHBzA0QeFPBh6vmJ8LoUPJqGE7q0PRz618Z4ym1AGq%2BaomSq9PlP4rCduv9Cmtxu%2FrvPSBwocs0GCWDE8seK8t9epmPQW7gwODxkAiKr9UxhJd9KvmBVuAQPf%2BoFQVo86USXkhXqTvUzB2bNUYY9FCy3CWgZFTOa1D3H1CVxf1eHzYIswNA7SmOzP%2FBX8g6%2B0hkzwMRkcit3gBNs4evAVJiqAgYvUlrtGwwv9bFx4X7jWSHY4%3D&cipherSalt=yANeDq09bwM38SJs"31},32"url": "https://verify.twilio.com/v2/Services/VAaaaaaaaaaaaaaaaaaaaaaaaaaaaaaaaa/Verifications/VEaaaaaaaaaaaaaaaaaaaaaaaaaaaaaaaa"33}
One time passcodes (OTP) sent to email can help protect your users if their password is brute-forced or phished. Like SMS, it doesn't require downloading another app so onboarding will be quick and seamless.
The problem with email as a 2FA delivery channel is that the most common first factor, a password, can usually be reset via an email. That means that an attacker only has to compromise one factor, your email inbox, to take over your account. This can happen if they know your email account password or if they have access to a live session (e.g. if you leave your email logged into a shared computer). Learn more about email 2FA tradeoffs.
1// Download the helper library from https://www.twilio.com/docs/node/install2const twilio = require("twilio"); // Or, for ESM: import twilio from "twilio";34// Find your Account SID and Auth Token at twilio.com/console5// and set the environment variables. See http://twil.io/secure6const accountSid = process.env.TWILIO_ACCOUNT_SID;7const authToken = process.env.TWILIO_AUTH_TOKEN;8const client = twilio(accountSid, authToken);910async function createVerification() {11const verification = await client.verify.v212.services("VAaaaaaaaaaaaaaaaaaaaaaaaaaaaaaaaa")13.verifications.create({14channel: "email",15to: "customer@example.com",16});1718console.log(verification.sid);19}2021createVerification();
Response
1{2"sid": "VEaaaaaaaaaaaaaaaaaaaaaaaaaaaaaaaa",3"service_sid": "VAaaaaaaaaaaaaaaaaaaaaaaaaaaaaaaaa",4"account_sid": "ACaaaaaaaaaaaaaaaaaaaaaaaaaaaaaaaa",5"to": "customer@example.com",6"channel": "email",7"status": "pending",8"valid": false,9"date_created": "2015-07-30T20:00:00Z",10"date_updated": "2015-07-30T20:00:00Z",11"lookup": {},12"amount": null,13"payee": null,14"send_code_attempts": [15{16"time": "2015-07-30T20:00:00Z",17"channel": "SMS",18"attempt_sid": "VLaaaaaaaaaaaaaaaaaaaaaaaaaaaaaaaa"19}20],21"sna": null,22"url": "https://verify.twilio.com/v2/Services/VAaaaaaaaaaaaaaaaaaaaaaaaaaaaaaaaa/Verifications/VEaaaaaaaaaaaaaaaaaaaaaaaaaaaaaaaa"23}
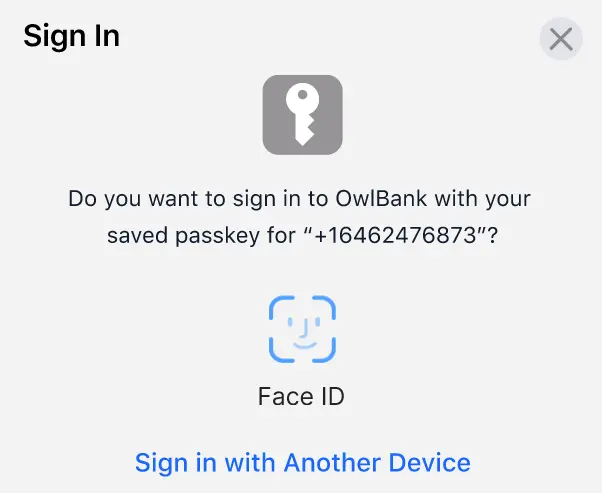
Passkeys, also known as FIDO/WebAuthn, is an industry-standard authentication method that is more seamless and secure than passwords. Many consumer apps are adding support for Passkeys, including Google making Passkeys its default sign-in option.
Push authentication is the best solution for balancing user convenience and security. Authentication can happen through a 'push notification' or message sent to a device, alerting the user that authentication is being requested for some login or action. This is the only authentication channel that allows users to explicitly deny an authentication request, which could help alert your business to fraudulent activity. Push is also one of the fastest authentication channels and offers increased security compared to SMS, preventing "100% of automated bots, 99% of bulk phishing attacks and 90% of targeted attacks" in Google's research.

Push authentication uses public key cryptography, which means that each authentication request is tied to a device and the method is resistant to phishing. Authentication happens through a separate notification channel which opens the approval dialog so there is no need for the user to manually open an app and scroll to find your site.
Push authentication is a great solution for companies that already have a lot of mobile app users since you can embed the authentication workflow directly into your application. However, the method does require additional development work and requires that your users have downloaded the application.
The same API behind Verify Push can also be used to perform Silent Device Approval authentications, which are invisible to the end-user and don't require push notifications.
Silent Device Approval works by allowing your application to register trusted devices and use them as authenticators. When the authentication is performed on the registered device, everything can happen silently in the background without any user involvement. This lowers friction, increases usability, and still provides strong security.
Get started with Silent Device Approval.
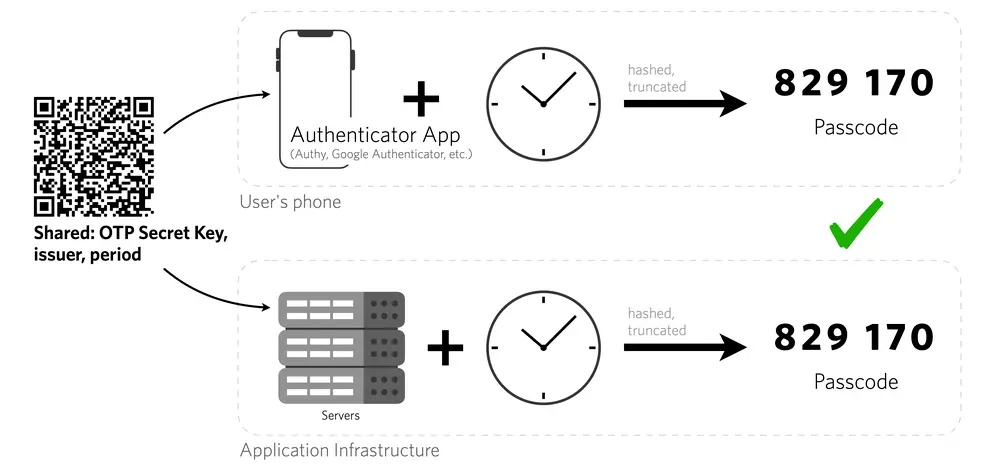
Time-based one-time passcode (TOTP) is an excellent choice for users who can download an application for their mobile device or computer. Unique numeric passwords are generated with an algorithm that uses the current time as an input. This method relies on symmetric key cryptography and tokens automatically expire, offering increased security. As long as a device's time is synced, they will even work offline. Twilio'sAuthy app automatically counters clock drift and network time synchronization errors by opportunistically refreshing the clock whenever it has network access.
This method does require that the end user installs a special app like Authy or Google Authenticator, which some users may be unwilling to do. One study observed that TOTP setup was 2.5x slower than SMS for 2FA, which could discourage some users from enabling the second factor.
Even so, TOTP scored the highest usability rating among second factors. Overall TOTP is a solid option and we see a lot of security conscious companies adding TOTP as a 2FA option.
Questions?
Not sure which channel is right for you? Get in touch and we can help you decide.