Integrate Flex with Zendesk
By deploying the new Zendesk CTI Flex integration, teams using Zendesk as their ticketing system can now interact with their customers across multiple communication channels. By allowing Flex to take care of the ticket housekeeping, teams can focus on solving customer issues.
This integration is Generally Available and supports the following features:
Search and Screenpop: Available across all channels. Use information gathered in the triage phase of customer interaction to automatically look up and display relevant Zendesk tickets or user records.
Interaction logging: Automatically log Flex interactions into a related Zendesk ticket.
Context Switching: Set your Zendesk Screen to change to a related Zendesk ticket or user automatically when you multitask.
Chat Transcripts: Automatically save Chat Transcripts for non-voice channels as Internal Ticket Comments.
Voice Recording: Enable Flex Voice Recording for inbound voice calls.
Configurable Ticket and User Creation/Display: Configure automatic ticket and/or user creation and navigation in response to Customer Engagements.
Click to Dial*: Let Agents place an outbound call with the click of a button.
* This feature is currently in beta.
-
Start by navigating to https://flex.twilio.com in Google Chrome.
-
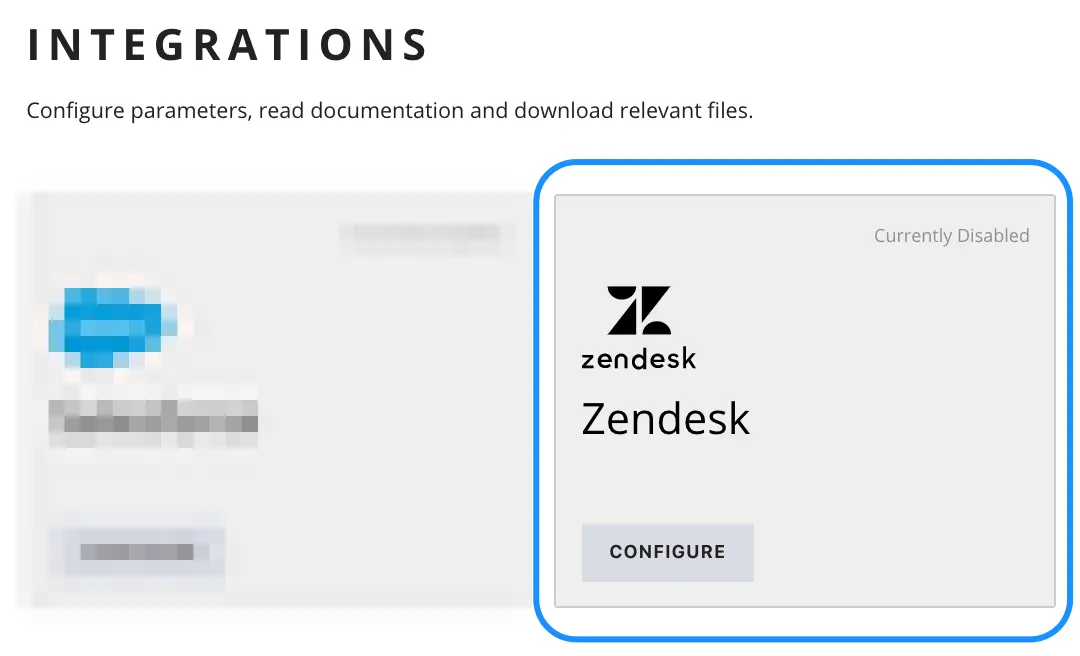
Browse to Admin > Integrations.
-
Click on the Zendesk card to reach the configuration screen:
-
Configure your Flex Zendesk Integration according to your organisation's requirements by setting some or all of the following parameters:
| Parameter Name | Mandatory | Description |
|---|---|---|
| Outbound Caller ID | Yes* | This will be the caller-Id used for outbound calls from the Flex-Zendesk Integration (via Click to Dial) if an agent does not have a defined caller ID.*If the Flex Dialpad is enabled, this option is not needed. You can configure the Dialpad to set your outbound caller ID. |
| Zendesk Base URL | Yes | Register your Zendesk domain(s) on the Embed Flex as an iframe page in the Twilio Console. For more details, refer to Securely iframe Flex in your application. |
| Workflow SID | No | If you want to use a Workflow other than the default Workflow, specify its SID here. If you aren't sure what your Workflow SID is, leave this field empty. |
| Task Channel SID | No | If you want to use a Task Channel other than the default voice channel, specify its SID here. If you aren't sure what your Task Channel SID is, leave this field empty. |
| New ticket description | No | The description Flex uses for automatic ticket creation. |
| New ticket subject | No | The subject Flex uses for automatic ticket creation. |
| Automatic Logging | No | You can configure the task stages when task metadata should be logged as an internal note in the relevant Zendesk ticket. You can choose any, or none, of these three stages:
|
| Log Chat details as Internal Note | No | Select this option if you want chat transcripts for non-voice channels to be recorded as an internal note in the relevant Zendesk ticket, when applicable. If selected, the transcript of the chat is stored in Zendesk when a task is completed. |
| Navigate | No | Select the nature of the screenpop shown when an agent accepts or selects a task. Available options are:
|
| Create | No | Select if and when you want a new ticket or user to be created. For cases when an invalid ticket number has been provided, or no ticket numbers are provided, you can choose to:
|
Danger
When enabling any of the features that result in data being transferred over from Flex to Zendesk, you should be aware that any such data will be governed by Zendesk's privacy policy.
You should also understand that once data has been copied to Zendesk, it's your responsibility to handle appropriately, and if necessary delete, any data copied from Twilio to Zendesk through the Flex app. This includes both data with personally identifiable information (PII) and data without PII.
Please read the Flex Zendesk Integration terms for details.
-
Turn on your Zendesk Integration using the Status toggle:
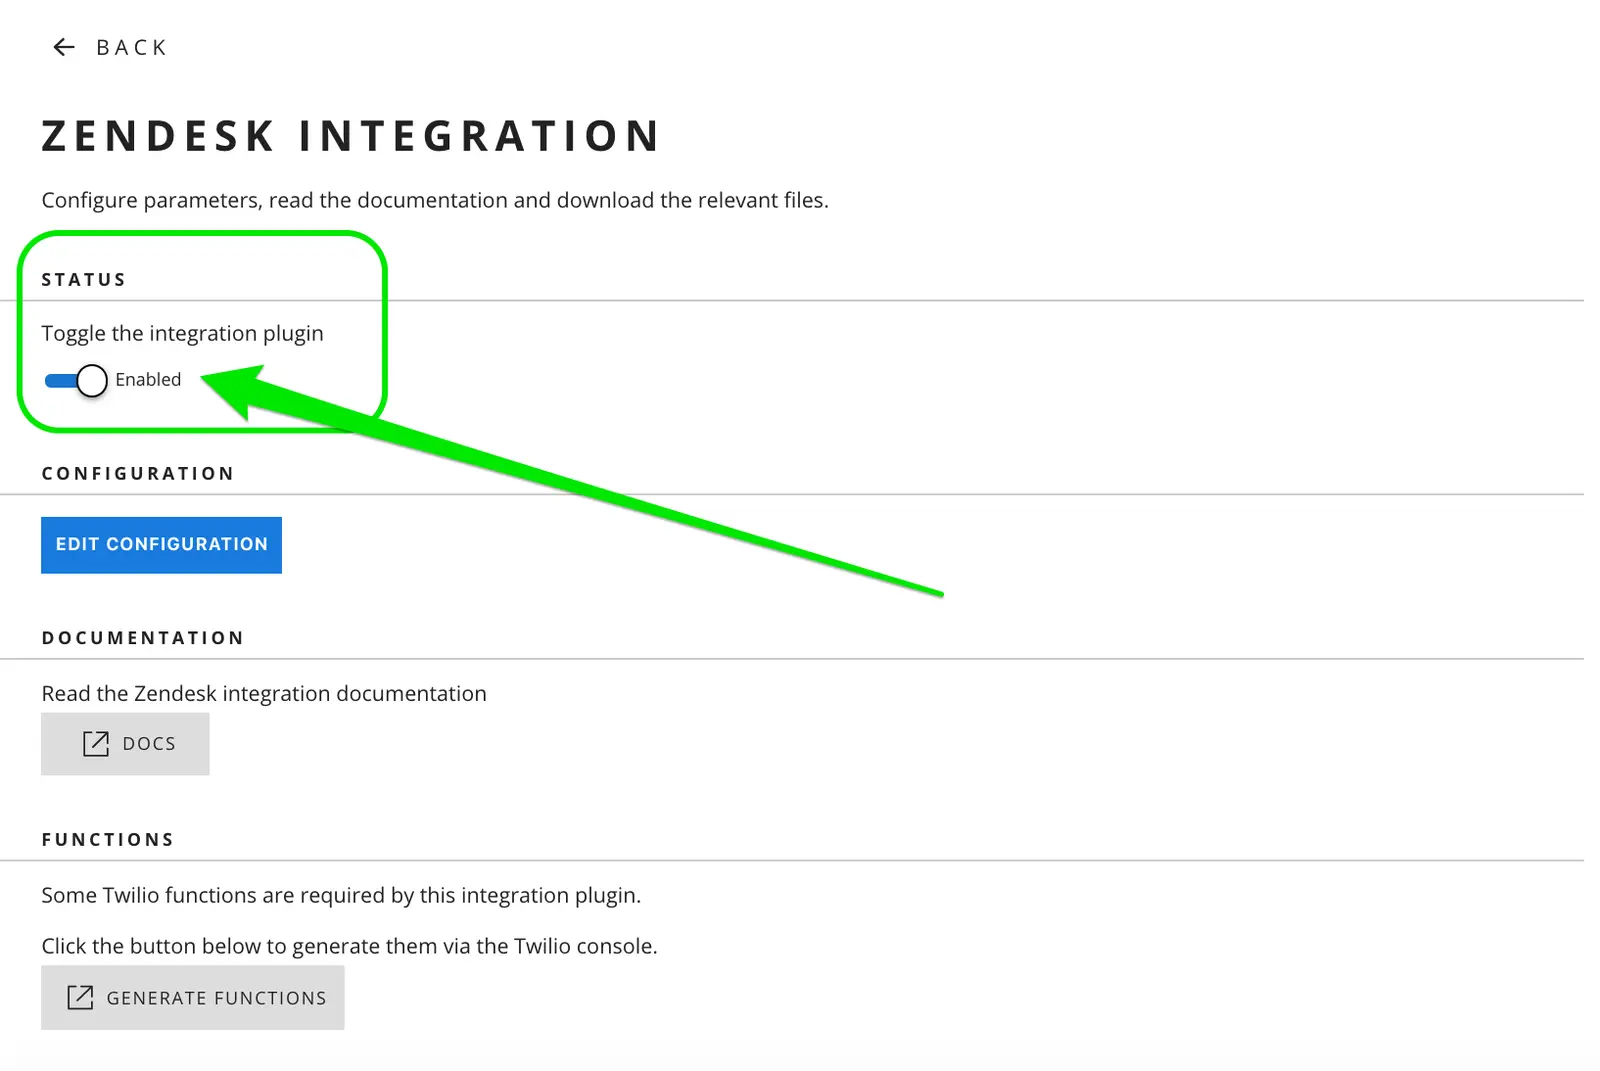
Your Flex configuration is now complete. Now install the Twilio Flex app in your Zendesk instance.
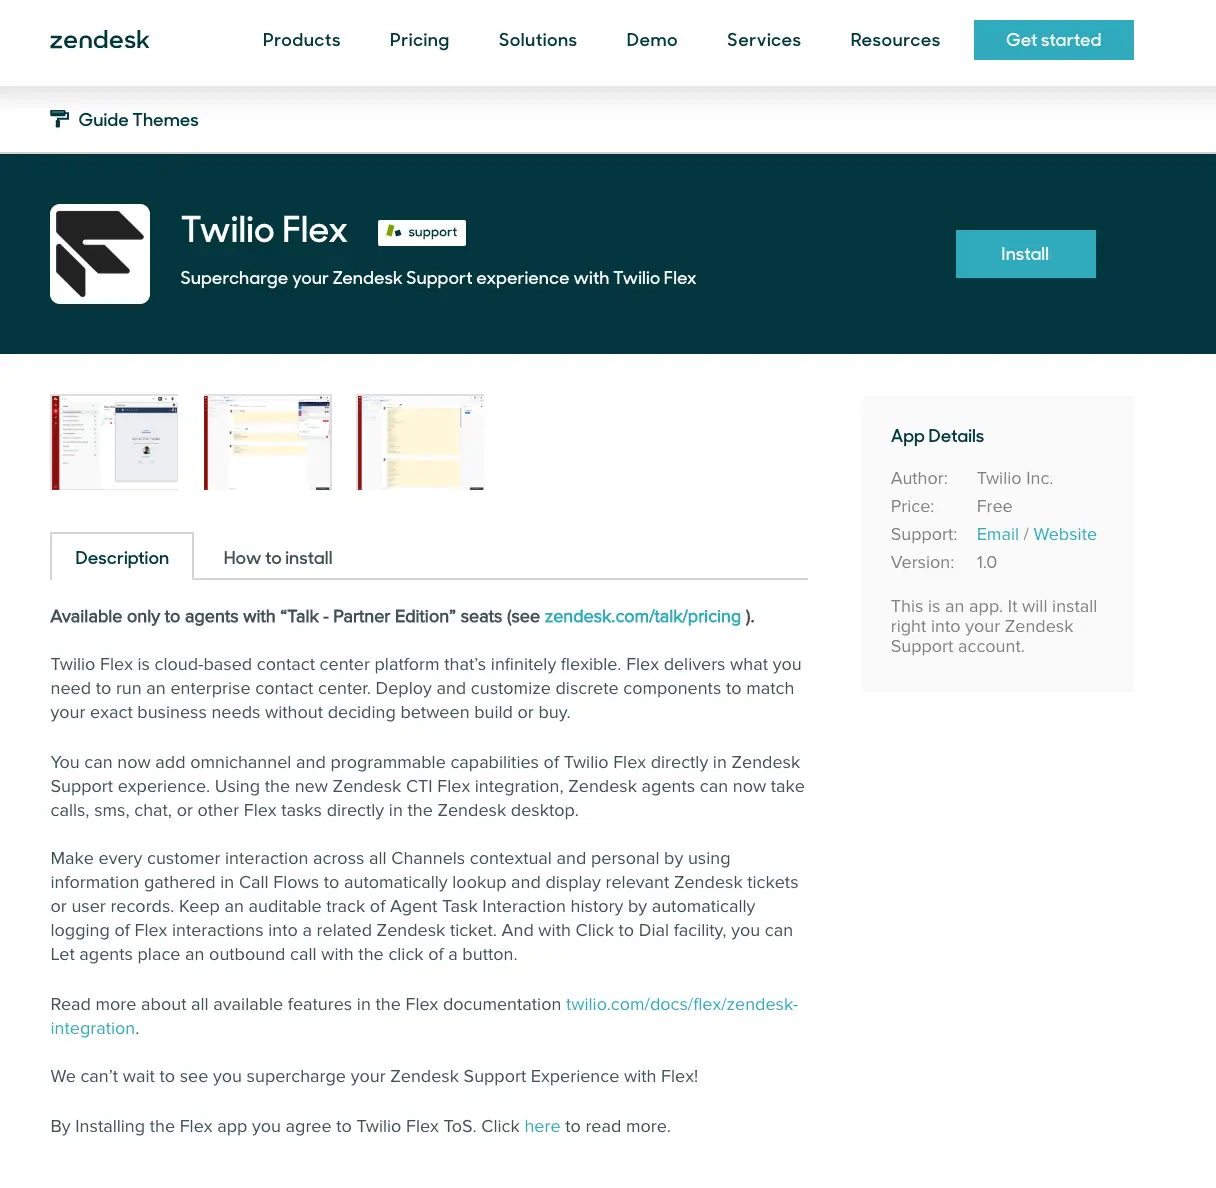
- While you're logged in to your Zendesk instance/Domain/Org, navigate to Zendesk Marketplace and either search for Twilio Flex or navigate directly to the app by clicking this URL. Read the Description to learn more about the Twilio Flex app. When you're ready, click the Install button:
- Continue with each of the steps show in the following screen. Modify the parameters if you need to:
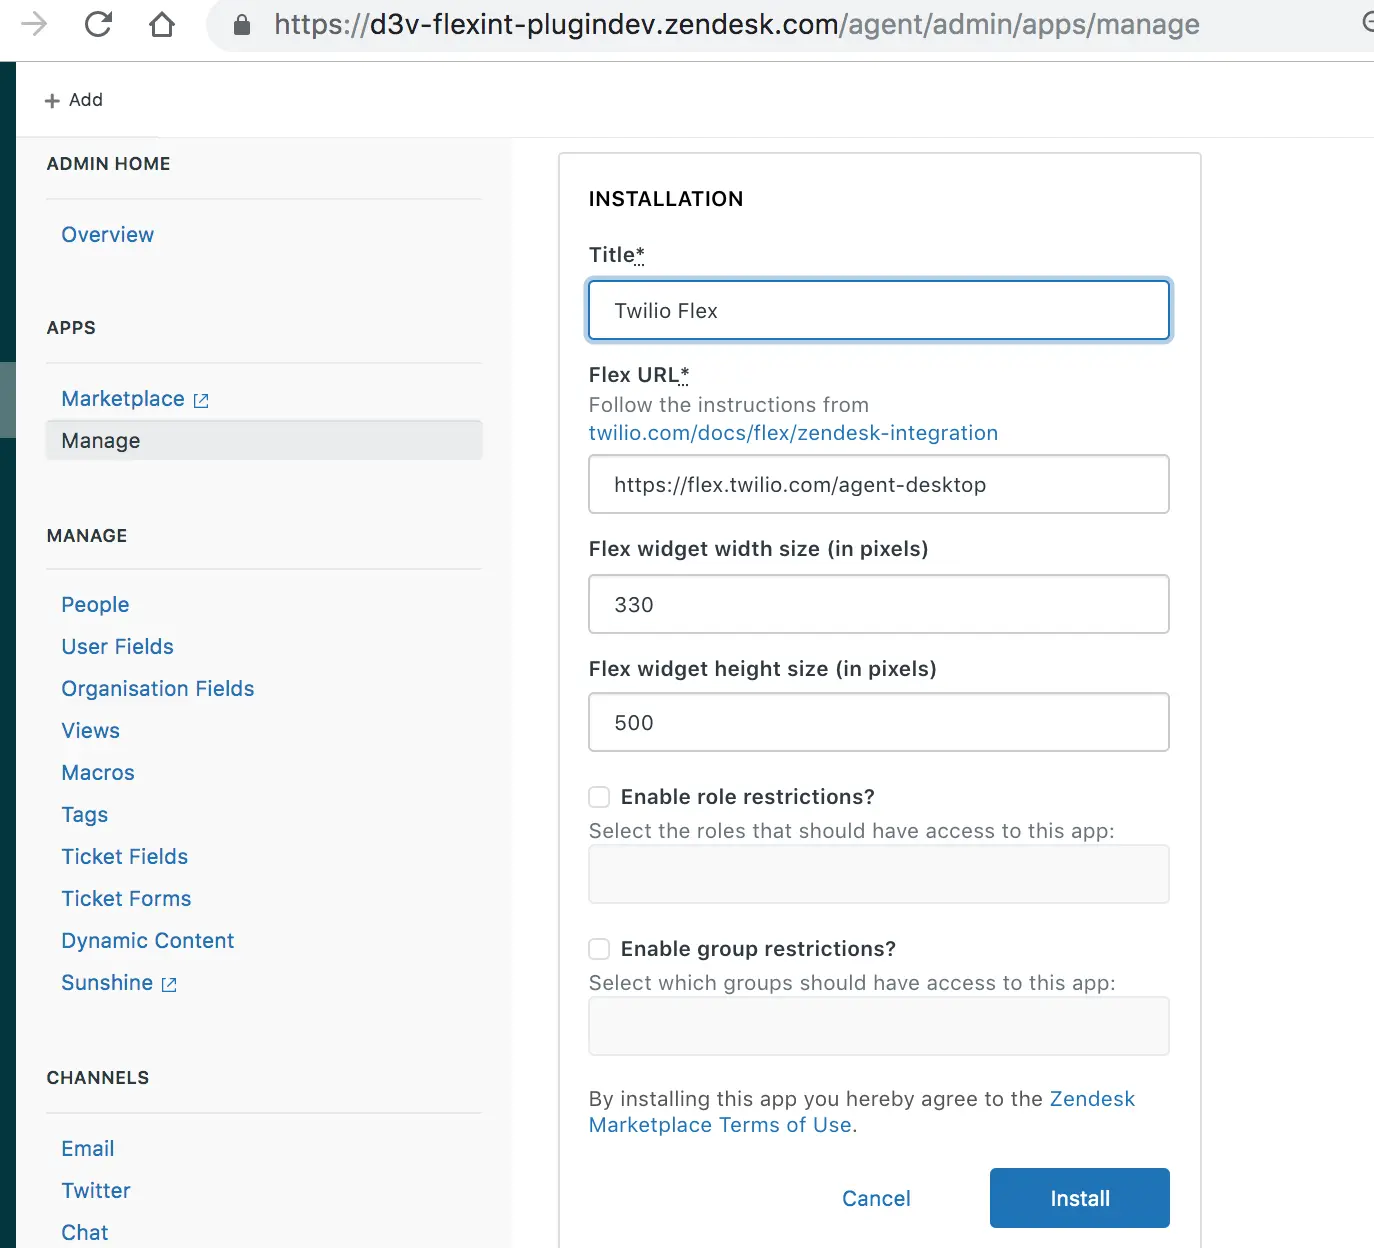
These are the parameters that you will or may need to change:
| Parameter name | Mandatory? | Description |
|---|---|---|
| Flex URL | Yes | This field tells the Twilio Flex app in Zendesk where Flex is hosted. Leave it as is if you're using Hosted Flex, or if you're not sure what the correct value should be. If you're hosting Flex on your own infrastructure, you should change this to the URL of your Flex instance. The URL must contain ?path=/agent-desktop. Otherwise, Admin users will be unable to initialize the integration correctly. https://flex.twilio.com/yourRuntime-Domain-3869?path=/agent-desktop |
| Flex Widget width | Yes | Specify, in pixels, the width of the Flex app within your Zendesk UI. An important thing to consider when deciding width is that a wider Flex app is useful if you intend to use non-voice channels as it gives a better Chat Experience to your Support staff. |
| Flex Widget height | Yes | Specify, in pixels, the height of the Flex app within your Zendesk UI. An important thing to consider when deciding height is that a taller Flex app is useful if you intend to use non-voice channels as it gives a better Chat Experience to your Support staff. |
Info
- You don't need to change anything on this screen unless you want to customize it. If you're not sure what values to enter, keep the default values.
- If you want to restrict application access to selected roles or groups in your organization, select the restrictions that apply.
The Flex app should now be installed in your Zendesk instance. Users with permitted roles and or in permitted groups will now be able to see the Flex app when they login to their Zendesk accounts:
Now that you've integrated Flex into your Zendesk instance, learn more about customizing your integration and managing interactions with your users:
- Learn how to manage your Flex-Zendesk call flows
- Customize your Flex-Zendesk integration
- Securely embed Flex as an iframe