How to use ngrok with Windows and Visual Studio to test webhooks
Let's take a look at how a Windows developer building ASP.NET web apps can put ngrok to work. ngrok makes your local development machine securely accessible from the public Internet. Want to give your client a preview of the site you're working on? Do you need to debug a webhook for Twilio, GitHub, or another API provider? Use ngrok to get a public URL for your local web application.
The quickest way to get started with ngrok and Visual Studio is to use an open source extension for Visual Studio that will start ngrok for any web applications that are part of the currently open solution. It will figure out the ports for you and fire up the necessary tunnels for your app(s).
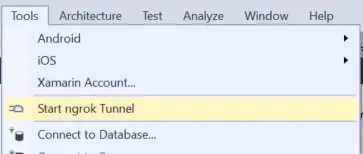
Choose "Start ngrok Tunnel" from the Visual Studio "Tools" menu, ngrok will start, and you'll see your app's new public URL.
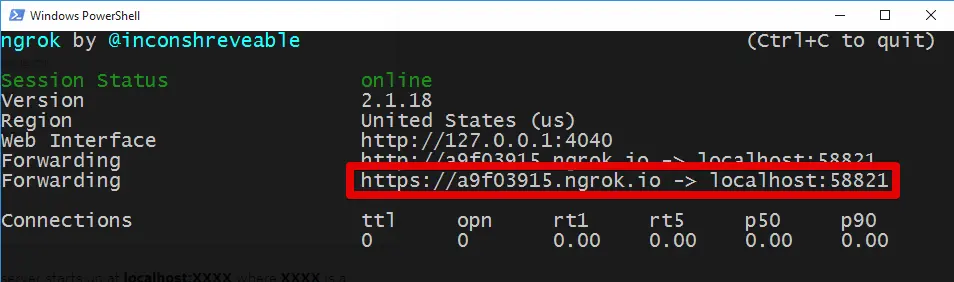
Here, ngrok gave us the URL of https://a9f03915.ngrok.io. Make sure you've started your application in Visual Studio and then try to open that URL in your browser. It should load the app from your local development machine. Now, you have a URL you can give to anyone or use in a webhook configuration (like in the Twilio console), and it will hit the app running on your machine. You can set breakpoints in your code and do pretty much anything you're used to when running your app locally.
You can leave ngrok running while you are working on your app. If you stop your app, ngrok can continue to run and will resume serving traffic to your app when you restart your app. If you do shut down ngrok, then you will be given a new URL when it restarts. This means if you've configured a webhook with your ngrok URL, you will need to update it each time you restart ngrok.
Warning
Make sure your project is configured to not use SSL. ngrok cannot tunnel to an SSL-enabled host. In Visual Studio, make sure your "Enable SSL" option is turned off in the Debug tab of the App Properties.
When you use the Visual Studio extension, it will automatically download and install ngrok for you. However, if you aren't using Visual Studio, you will need to install ngrok yourself.
If you use the Chocolatey package manager (highly recommended), installation simply requires the following command from an elevated command prompt:
choco install ngrok.portable
This will install ngrok in your PATH so you can run it from any directory.
Installing ngrok manually involves a few more steps:
- Download the ngrok ZIP file
- Unzip the ngrok.exe file
- Place the ngrok.exe in a folder of your choosing
- Make sure the folder is in your PATH environment variable
To test that ngrok is installed properly, open a new command window (command prompt or PowerShell) and run the following:
ngrok version
It should print a string like "ngrok version 2.x.x". If you get something like "'ngrok' is not recognized" it probably means you don't have the folder containing ngrok.exe in your PATH environment variable. You may also need to open a new command window.
Once you've got ngrok installed, it's time to make use of it with your Visual Studio projects.
When you host an ASP.NET application with Visual Studio, it usually uses IIS Express but may use other web server software depending on what version of Visual Studio you are using and how you have your application configured. Regardless of the setup, there is one, easy command you need to run to create a new public tunnel to your app:
ngrok http -host-header="localhost:[port]" [port]
In order to know what port on which your app is running, run the app from Visual Studio. It will launch a web browser with your new app and you will see the URL in the address bar:
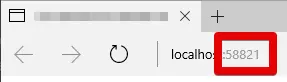
In this example, the port number is 58821, but you will find that Visual Studio assigns a random port number to each new ASP.NET project you create. Thankfully, it remains the same for the specific project you are working on.
For this example, then, the ngrok command would be:
ngrok http -host-header="localhost:58821" 58821
ngrok will start, and you'll see your app's new public URL.
Here, ngrok gave us the URL of https://a9f03915.ngrok.io. Make sure you've started your application in Visual Studio and then try to open that URL in your browser. It should load the app from your local development machine. Now, you have a URL you can give to anyone or use in a webhook configuration (like in the Twilio console), and it will hit the app running on your machine. You can set breakpoints in your code and do pretty much anything you're used to when running your app locally.
You can leave ngrok running while you are working on your app. If you stop your app, ngrok can continue to run and will resume serving traffic to your app when you restart your app. If you do shut down ngrok, then you will be given a new URL when it restarts. This means if you've configured a webhook with your ngrok URL, you will need to update it each time you restart ngrok.
ngrok offers paid plans that let you use custom domains such as "my-cool-app.ngrok.io". You can use the domain each time you start up ngrok, so there's no need to update webhook configurations. When you get a paid plan, you'll be given an authtoken that you need to install. You only need to run the command once:
ngrok authtoken [yourtoken]
Then, reserve your domain name and add the -subdomain argument to the command line:
ngrok http -host-header="localhost:58821" -subdomain my-cool-app 58821
Now, you can use https://my-cool-app.ngrok.io consistently to access your development environment.
Info
If you are using the Visual Studio extension, specify the subdomain you would like it to use in the appSettings section of your web.config file like so:
1<?xml version="1.0" encoding="utf-8"?>2<configuration>3<appSettings>4<add key="ngrok-subdomain" value="my-cool-app"/>5... more appSettings omitted ...6</appSettings>7... more config omitted ...8</configuration>
Sometimes things can go wrong and when you can't seem to get your ngrok tunnel working, here are some things to try or consider:
- Is your app running? Not only does the tunnel need to be running, but your app also needs to be running in order to respond to requests.
- Did you start ngrok with the correct port number? Make sure the port that ngrok is forwarding traffic to matches the port that your application is listening on.
- Have you tried running ngrok manually? If you are using the Visual Studio extension and are having trouble, try running ngrok manually from the command line following the instructions in this guide. If you can get it working that way, please submit that feedback so we can improve the Visual Studio extension.
- Make sure your project is configured to not use SSL. ngrok cannot tunnel to an SSL-enabled host. In Visual Studio, make sure your "Enable SSL" option is turned off in the Debug tab of the App Properties.
- Is your computer a company-managed machine? In some cases, computers managed by your company's IT department may be locked down to prevent external tunneling software from working correctly. If this is the case, you could ask for an exception or you may need to use a public web host like Microsoft Azure to host your application publicly.
Perhaps you have some C# code that looks at the Request object to try to figure out the hostname to use in an absolute URL. You might be doing something to insert a fully qualified URL into an email or maybe you're using the Twilio API to provision a phone number with a webhook URL to receive phone calls (that's a great idea, pat yourself on the back for thinking of that).
Regardless of the reason why, usually in ASP.NET when you want the hostname, you use the Url.Host on the current request:
var myHostName = Request.Url.Host;
You probably combine that with Url.Port to make sure you're on the right port since your local development environment isn't on a default port:
var myHostNameWithPort = Request.Url.Host + ":" + Request.Url.Port;
So, if you open "http://localhost:1234/Home", you will get "localhost:1234". What if you are running your app through ngrok? Perhaps unexpectedly, the above code will still return "localhost:1234" even though you accessed the page with an ngrok URL like "https://foo123.ngrok.io/Home". This is because in order to get Visual Studio (and the IIS Express web server under the hood) to allow requests into your local environment, we had to instruct ngrok to rewrite the host header. Thankfully, there's an easy way around this because ngrok will pass us a X-Original-Host header that we can use.
Here's a C# function that will use the X-Original-Host if it is present, otherwise it will use the Url property like before:
1public static string GetDomainAndPort(HttpRequestBase request)2{3if (request.Headers["X-Original-Host"] != null)4{5// Assume default port for protocol (http=80, https=443)6return request.Headers["X-Original-Host"];7}89// Leave off port if it's the default 80/44310if (request.Url.Port == 80 || request.Url.Port == 443)11{12return request.Url.Host;13}14return request.Url.Host + ":" + request.Url.Port;15}
If you're building a full URL, you probably want to know if you should prefix it with "http" or "https". ngrok supports both, so you could just default to https and be safe. If you want to know which protocol the user actually used, then you can check the X-Forwarded-Proto header:
1public static string GetProtocol(HttpRequestBase request)2{3if (request.Headers["X-Forwarded-Proto"] != null)4{5return request.Headers["X-Forwarded-Proto"];6}78return request.IsSecureConnection ? "https" : "http";9}
X-Forwarded-Proto is a fairly common header for front-end proxy servers, so the code is reusable whether you're running with ngrok in development or behind an AWS Elastic Load Balancer in production.
The other common header that is passed by proxies like ngrok is X-Forwarded-For. This header is used to provide the original IP address of the client making the HTTP request. If you only use the typical UserHostAddress property of the current request object, then you will always get the IP address of the proxy server (in our case, one of ngrok's servers). Here's the correct way to detect the IP address of the client whether a proxy is in the mix or not:
1public static string GetIpAddress(HttpRequestBase request)2{3return request.Headers["X-Forwarded-For"]4?? request.UserHostAddress;5}
Putting those three functions together, here's an example of how you might call them from a controller:
1public class TestController : Controller2{3// GET: Test4public ActionResult Index()5{6var html = "<html><body><pre>\n" +7"Your Protocol: " + ProxyHelper.GetProtocol(Request) + "\n" +8"Your Domain:Port: " + ProxyHelper.GetDomainAndPort(Request) + "\n" +9"Your IP Address: " + ProxyHelper.GetIpAddress(Request) + "\n" +10"</pre></body></html>";11return Content(html);12}13}
ngrok is a fantastic tool for debugging webhooks and for web development in general. Hopefully, this guide has provided you with the skills you need to make ngrok work harmoniously with Visual Studio.