Queued Callback and Voicemail (Flex UI 1.x.x)
Pre-built Queued Callback and Voicemail plugin is available in Flex UI 2.x.x
This guide is only for Flex UI 1.x.x, which reached End of Life on June 30, 2024. To build on a current version, we recommend you upgrade to Flex UI 2.x.x and install the ready-to-use Queued Callback and Voicemail plugin. You must be logged in to Twilio Console to access the Flex Plugin Library.
Warning
This solution features sample code that is provided "as is" and is not production grade. The featured code does not account for edge case handling, scalability, and reliability. It is not covered under Twilio's Service Level Agreement (SLA) and support plans.
Warning
This solution supports Flex applications that can handle up to 1 call per second. We do not recommend this solution if your contact center exceeds that limit as you will run into API limits enforced by TaskRouter.
The Queued Callback and Voicemail for Flex solution helps Flex admins automate handling of agent callback requests from customers instead of having them wait longer in a queue. In this solution, the customer hears the callback menu options as soon as they call the number provisioned on your Flex application. Your contact center agents will receive the details including the requested callback number, and a localized time for the customer's inbound call.
The call is on hold for the period of time that you've configured within queue-menu.protected.js. When the time period expires, it will go on and route according to the workflow configuration.
User leaving a voicemail message or requesting a callback from an agent

Agent calling the user

This solution leverages Twilio Studio and Twilio Functions & Assets (Serverless) to give the customer options to register for a callback or leave a voicemail. When the customer decides on:
-
Registering for a callback
- A new Callback task is created in TaskRouter
- The task is routed to the same workflow that the originating call was on, which means that it follows the same logic of routing calls to agents as the originating call placed by the customer
-
Leaving a voicemail message
- Limitation: 20-30 second audio recording and transcription
- After the agent gives the customer a callback (3 attempts), they get the option to delete the recording
To deploy this solution, you will need:
-
An active Twilio account with Flex provisioned. Refer to the Flex Quickstart to create one.
-
npm version 6.0.0 or higher (type
npm -vin your terminal to check) -
A Node.js long-term-support (LTS) version installed, 14 recommended (type
node -vin your terminal to check) -
Twilio CLI along with the Flex CLI Plugin and the Serverless Plugin. Run the following commands to install them:
1# Install the Twilio CLI2npm install twilio-cli@2.0 -g3# Install the Serverless and Flex as Plugins4twilio plugins:install @twilio-labs/plugin-serverless5twilio plugins:install @twilio-labs/plugin-flex
Info
If you're running Linux, click on the Linux tab for the Twilio CLI installation instructions. If you're running Windows, make sure to run the Windows command prompt as an administrator to install the Serverles/Flex plugins for the Twilio CLI. The Windows commands in this guide use PowerShell (for Node.js/npm installation).
Info
To provision Twilio resources and deploy this solution using a script, skip to the download step. After installing the dependencies, run node provision and follow the instructions.
Make sure to activate the correct Twilio account before deploying the Flex plugin.
After the script is complete, enable the plugin on your Flex application.
30-45 minutes
- Flex v1.18.1 - 1.30.1
- macOS / Unix
- Windows 10
In order to use the solution, you need to prepare your Flex Task Assignment workspace.
Navigate to your Flex project in the Twilio Console. Copy your ACCOUNT SID and AUTH TOKEN, and create a new Twilio CLI profile using those credentials:
twilio profiles:create
You will be prompted to enter your Twilio Account SID, Auth Token, and a shorthand identifier for your profile. When choosing a shorthand identifier, pick one that is meaningful and that you can remember. Once your profile has been created, activate it by running:
twilio profiles:use PROFILE_ID
Keep in mind that this account will be used for the rest of the deployment. In order to switch accounts, use the following command:
twilio profiles:use DIFFERENT_PROFILE_ID
Retrieve your Flex Task Assignment workspace ID:
1twilio api:taskrouter:v1:workspaces:list2
Example Workspace SID
1SID Friendly Name Prioritize Queue Order2WSXXXXXXXXXXXXXXXXXXXXXXXXXXXXXXXX Flex Task Assignment FIFO3
To retrieve your Flex workspace SID from the Twilio Console, navigate to the TaskRouter Dashboard.
In the Twilio Console, select your Flex project and navigate to All Products & Services > TaskRouter > Workspaces > Flex Task Assignment > Task Channels. Create two task channels: one for callback and one for voicemail, so you can route the associated tasks to available agents.
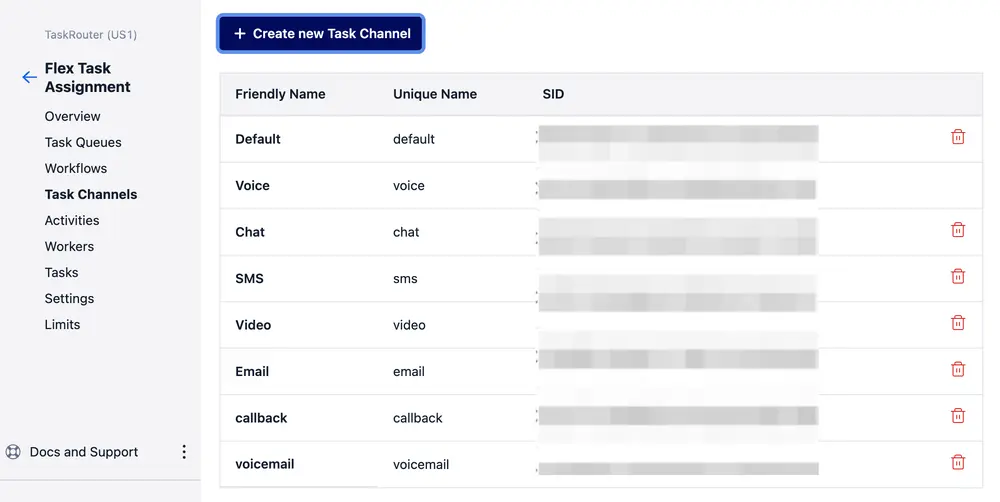
Info
Make sure the unique names are set to "callback" and "voicemail". Also, before you proceed to the next step, note that this solution is for use cases that may see up to 1,000 callback requests and voicemails queued at any given time. If you require more than that, please contact our Professional Services team to work with you on the appropriate architecture design.
Create a task queue for callback and voicemail tasks named CallbackandVoicemailQueue. Make sure to pass 1==0 as the queue expression. This effectively "queues" callback and voicemail tasks.
Create workflow filters for each callback attempt. In this guide, we will modify the "Assign To Anyone" workflow and configure three filters. Run the following command in a command shell:
- For each filter, replace the
queuefields in the JSON configuration with the SIDs of the "Callback and Voicemail" queue(WQXXX)and the "Everyone" queue(WQYYY). - Pass the "Assign to Anyone" workflow SID
(WWXXX)to the--sidCLI flag. - Also set the default queue to the SID of the "Everyone" Queue
(WQYYY). Replace the--workspace-sidvalue(WSYYY)in the API request with your Flex Task Assignment workspace.
1CONFIGURATION=$(cat << EOF2{3"task_routing": {4"filters": [5{6"filter_friendly_name": "Attempt 1",7"expression": "(taskType=='callback' OR taskType=='voicemail') AND placeCallRetry==1",8"targets": [9{10"queue": "WQXXXXXXXXXXXXXXXXXXXXXXXXXXXXXXXX",11"timeout": 1012},13{14"queue": "WQYYYYYYYYYYYYYYYYYYYYYYYYYYYYYYYY"15}16]17},18{19"filter_friendly_name": "Attempt 2",20"expression": "(taskType=='callback' OR taskType=='voicemail') AND placeCallRetry==2",21"targets": [22{23"queue": "WQXXXXXXXXXXXXXXXXXXXXXXXXXXXXXXXX",24"timeout": 2025},26{27"queue": "WQYYYYYYYYYYYYYYYYYYYYYYYYYYYYYYYY"28}29]30},31{32"filter_friendly_name": "Attempt 3",33"expression": "(taskType=='callback' OR taskType=='voicemail') AND placeCallRetry==3",34"targets": [35{36"queue": "WQXXXXXXXXXXXXXXXXXXXXXXXXXXXXXXXX",37"timeout": 3038},39{40"queue": "WQYYYYYYYYYYYYYYYYYYYYYYYYYYYYYYYY"41}42]43}44],45"default_filter": {46"queue": "WQYYYYYYYYYYYYYYYYYYYYYYYYYYYYYYYY"47}48}49}50EOF51)5253twilio api:taskrouter:v1:workspaces:workflows:update --sid="WWXXXXXXXXXXXXXXXXXXXXXXXXXXXXXXXX" --workspace-sid="WSYYYYYYYYYYYYYYYYYYYYYYYYYYYYYYYY" --configuration "$CONFIGURATION"
Example API Response
1SID Friendly Name Document Content Type2WWXXXXXXXXXXXXXXXXXXXXXXXXXXXXXXXX Assign to Anyone null3
To learn about configuring more complex workflows, see Create a Workflow Resource and Configuring Workflows: Complex Routing Example.
Step 1: In your browser, download the plugin source code and unzip the files in a local directory.
Step 2: From plugin-queued-callbacks-and-voicemail-main, run npm install to install the plugin package dependencies.
We will deploy the functions associated with the Callback and Voicemail Flex plugin to your Flex application. The functions are called from the plugin you will deploy in the next step and integrate with TaskRouter, passing in required attributes to generate the callback and voicemail tasks, depending on the customer selection while listening to the in-queue menu options.
Step 1: From the root directory of your copy of the source code, change into serverless and rename .env.example to .env.
1cd serverless && mv .env.example .env2
Step 2: Open .env with your text editor and modify TWILIO_WORKSPACE_SID with your Flex Task Assignment SID.
TWILIO_WORKSPACE_SID=WSXXXXXXXXXXXXXXXXXXXXXXXXXXXXXXXX
Step 3: Run npm install to install your Serverless dependencies.
To deploy your Callback and Voicemail functions and assets, run the following:
1twilio serverless:deploy --assets2
Info
When running on Windows, you may see an error with the Twilio Serverless deployment command. To work around the issue, set your TWILIO_ACCOUNT_SID and TWILIO_AUTH_TOKEN as environment variables. Refer to the previous section for examples of how to set an environment variable in Windows.
Example Output
1Deploying functions & assets to the Twilio Runtime23Username ****************************4Password ****************************5Service Name plugin-queued-callbacks-voicemail-functions6Environment dev7Root Directory /Users/name/Downloads/plugin-queued-callbacks-and-voicemail-main/serverless8Dependencies axios, moment, moment-timezone, twilio-flex-token-validator9Env Variables TWILIO_WORKSPACE_SID10Runtime default1112✔ Serverless project successfully deployed1314Deployment Details15Domain: plugin-queued-callbacks-voicemail-functions-xxxx-dev.twil.io16Service:17plugin-queued-callbacks-voicemail-functions (xxxx)18Environment:19dev (xxxx)20Build SID:21xxxxx22Runtime:23node1624View Live Logs:25https://www.twilio.com/console/functions/editor/xxxx/environment/xxxx26Functions:27[private] https://plugin-queued-callbacks-voicemail-functions-xxxx-dev.twil.io/helpers28[private] https://plugin-queued-callbacks-voicemail-functions-xxxx-dev.twil.io/options29[protected] https://plugin-queued-callbacks-voicemail-functions-xxxx-dev.twil.io/inqueue-callback30[protected] https://plugin-queued-callbacks-voicemail-functions-xxxx-dev.twil.io/inqueue-voicemail31[protected] https://plugin-queued-callbacks-voicemail-functions-xxxx-dev.twil.io/queue-menu32https://plugin-queued-callbacks-voicemail-functions-xxxx-dev.twil.io/inqueue-utils33Assets:34https://plugin-queued-callbacks-voicemail-functions-xxxx-dev.twil.io/assets/alertTone.mp335https://plugin-queued-callbacks-voicemail-functions-xxxx-dev.twil.io/assets/guitar_music.mp3
Copy and save the domain returned when you deploy a function. You will need it in the next step.
If you forget to copy the domain, you can also find it by navigating to Functions > API > Environments in the Twilio Console.
Debugging Tip: Pass the -l or logging flag to review deployment logs. For example, you can pass -l debug to turn on debugging logs.
Step 1: With your Flex project selected, navigate to the Studio Dashboard.
Step 2: Click Create new Flow. Give it a friendly name. For example, "CallbackVoicemailFlow".
Step 3: Select Start from scratch. Click Next.
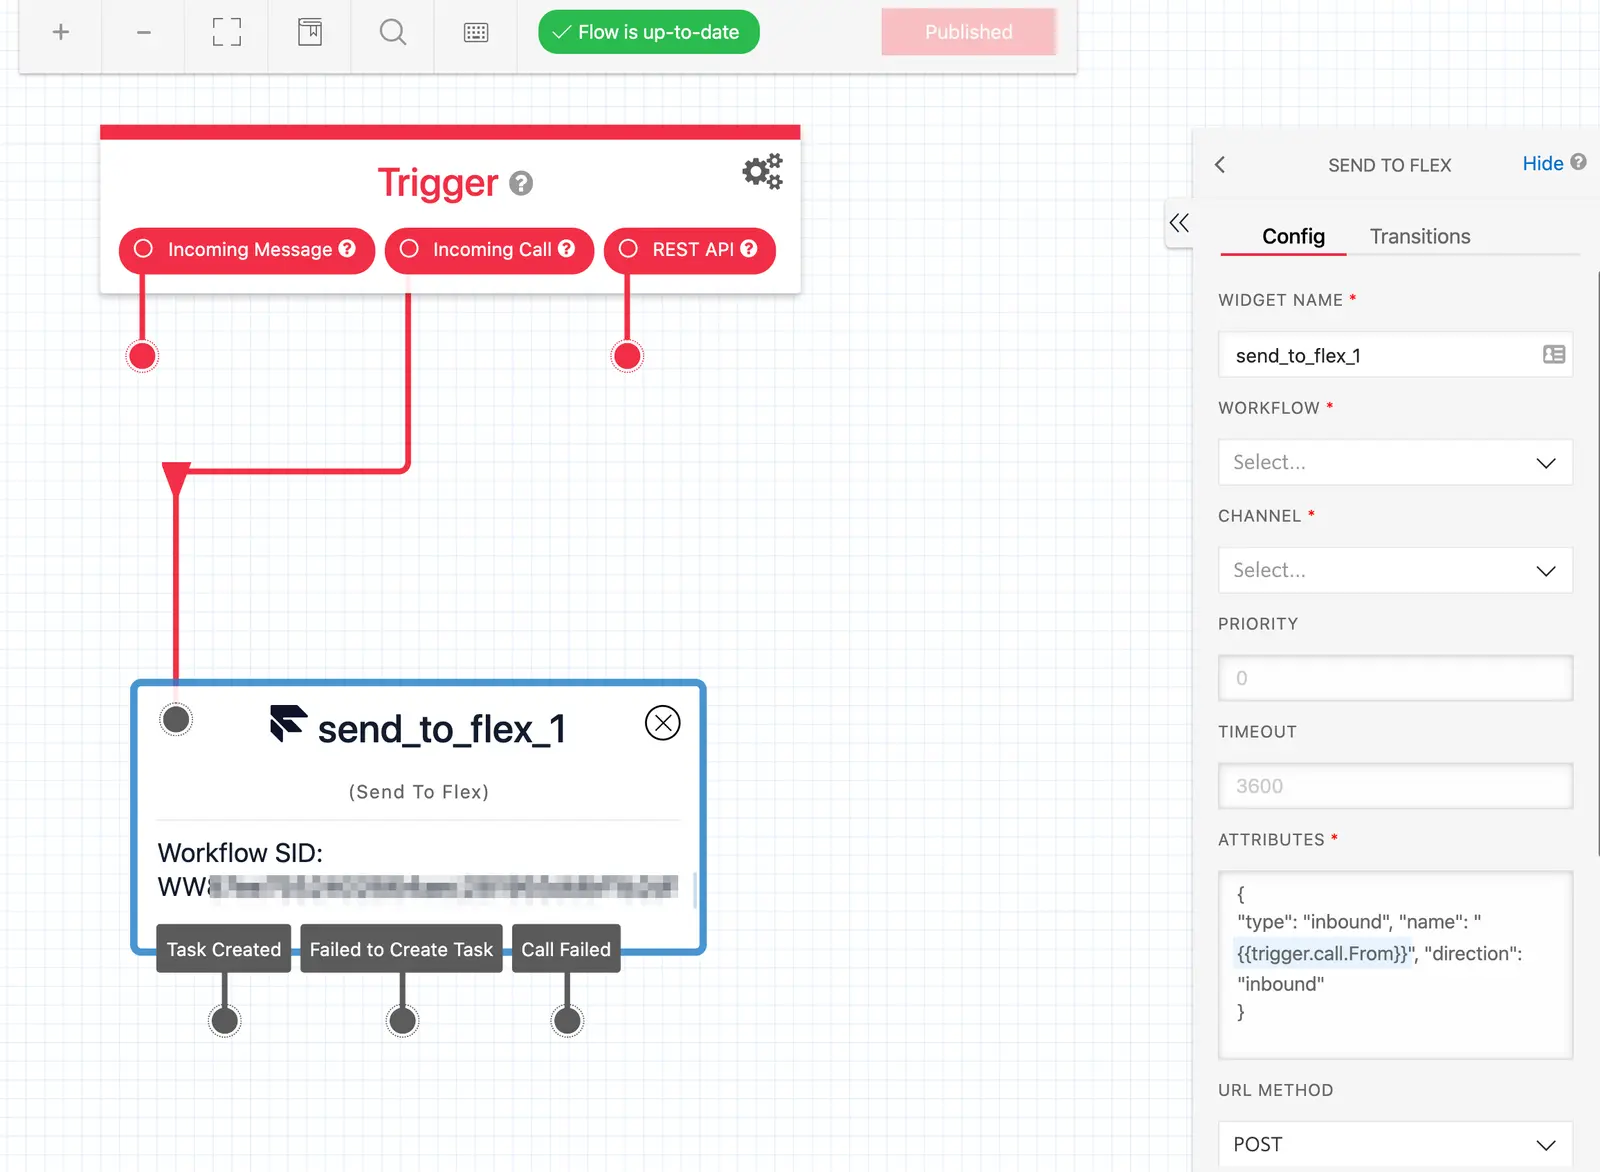
Step 4: Drag and drop Send to Flex from the Widget Library on the right corner of the screen.
Step 5: Connect it with the Incoming Call trigger.
Step 6: Select the Send to Flex widget. In the Config tab, enter the following details:
- Widget Name: Friendly name for your Send to Flex widget
- Workflow: Assign to Anyone
- Channel: Voice
- Attributes:
{ "type": "inbound", "name": "{{trigger.call.From}}", "direction": "inbound" } - URL Method:
POST - Hold Music TwiML URL:
https://<deployment-domain-name>/queue-menu?mode=main(Replace with the value you saved from the Functions and Assets deployment step)
Step 7: Click Save and Publish to apply your changes.
Step 1: Navigate to the Phone Numbers page in the Twilio Console and click on the number associated with your Flex application.
Step 2: In Voice Configuration, update the incoming call trigger with the Studio Flow that you created.
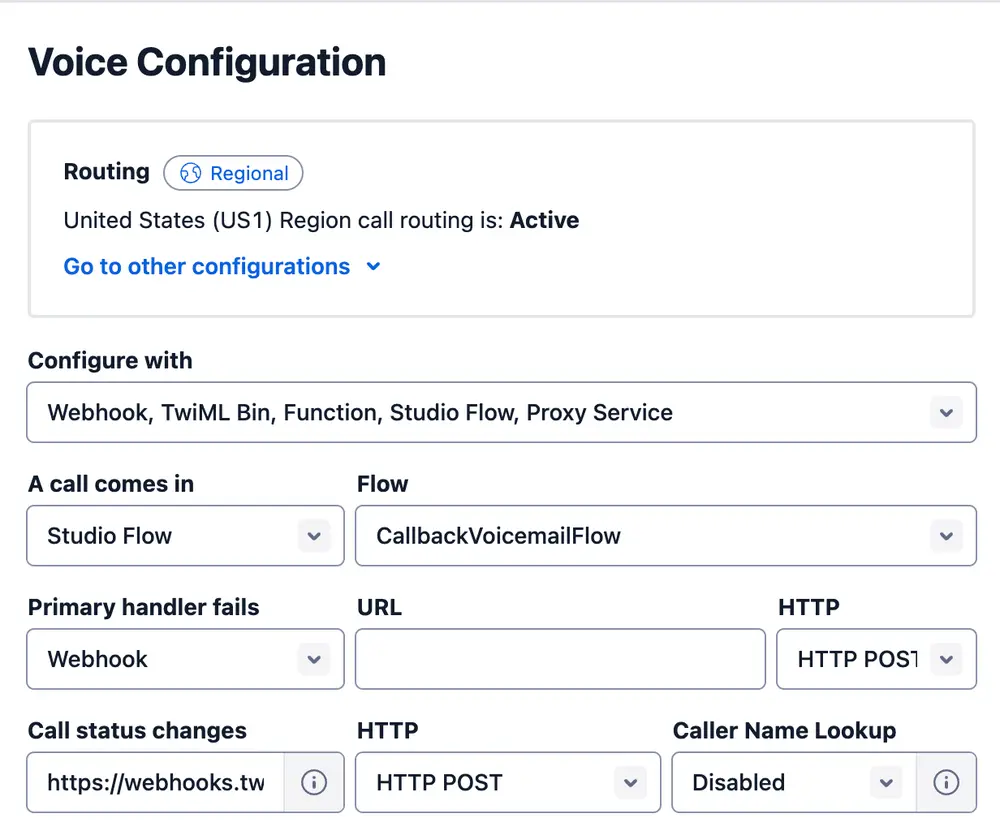
Step 3: Click Save configuration.
Once you have deployed the function, it is time to deploy the plugin to your Flex application.
Run the following commands in the plugin root directory. We will leverage the Twilio CLI to build and deploy the Plugin. First, rename .env.example to .env.
mv .env.example .env
Open .env with your text editor and modify the REACT_APP_SERVICE_BASE_URL property to the Domain name you copied in the previous step. Make sure to prefix it with "https://".
# .env REACT_APP_SERVICE_BASE_URL=https://plugin-queued-callbacks-voicemail-functions-xxx-dev.twil.io
When you are ready to deploy the plugin, run the following in a command shell:
1twilio flex:plugins:deploy --major --changelog "Change plugin to use the latest Flex plugin for the Twilio CLI" --description "Queued Callback and Voicemail Plugin"2
1✔ Validating deployment of plugin plugin-queued-callbacks-and-voicemail2⠧ Compiling a production build of plugin-queued-callbacks-and-voicemail3✔ Compiling a production build of plugin-queued-callbacks-and-voicemail4✔ Uploading plugin-queued-callbacks-and-voicemail5✔ Registering plugin plugin-queued-callbacks-and-voicemail with Plugins API6✔ Registering version v1.0.0 with Plugins API78🚀 Plugin (private) plugin-queued-callbacks-and-voicemail@1.0.0 was successfully deployed using Plugins API910Next Steps:11Run $ twilio flex:plugins:release --plugin plugin-queued-callbacks-and-voicemail@1.0.0 --name "Autogenerated Release 1602189036080" --description "The description of this Flex Plugin Configuration" to enable this plugin on your Flex application1213
The previous step only deploys your plugin. You still need to enable the Plugin on your Flex application. To enable, run the following:
twilio flex:plugins:release --plugin plugin-queued-callbacks-and-voicemail@1.0.0 --name "Queued Callback and Voicemail" --description "Enabling queued callback and voicemail using Solution Guide"
After running the suggested next step, navigate to the Plugins Dashboard to review your recently deployed plugin and confirm that it's enabled for your contact center.
You are all set to test Queued Callback and Voicemail on your Flex application!
Warning
Keep in mind that your Agents need to refresh their browsers in order to get the latest changes.
Step 1: Log in as an admin to the Flex instance where you deployed the plugin.
Step 2: Change your status to Available in the upper right corner of the Flex UI. This enables you to receive incoming calls and messages (SMS or chat).
Step 3: Call the number displayed on the landing page of your Flex application.
Step 4: Press "1" to listen to the menu options:
Press "1" again to remain in the queue.
Press "2" to receive a callback. Follow the callback number confirmation prompt.
Press "3" to leave a voicemail for the agent. Follow the prompt and leave your voicemail message. Press * when you're done. Note that your voicemail will be transcribed up to 30 seconds.
Step 5: When choosing the "callback" option, a preview callback task pops up on the Agent Desktop after the configured "timeout" setting in your workflow filter. In this example, we set it to 10 seconds.
- Accept the task. Upon accepting the task, the agent should see an Info panel with all the callback details as shown in the following image:
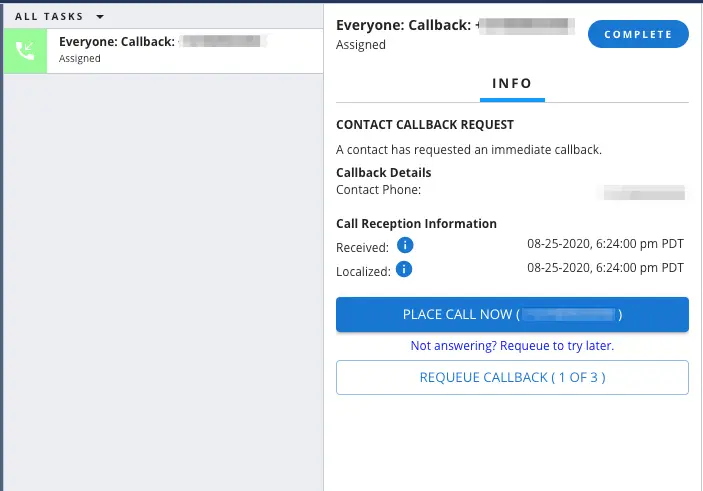
- The agent can either place the callback immediately or forward the call to a queue of other agents.
- After wrapping up the call with the customer, the agent should also complete the callback task.
Step 6: When choosing the "voicemail" option, a preview voicemail task pops up on the Agent Desktop after the configured "timeout" setting in your workflow filter. In this example, we set it to 10 seconds.
- Accept the task. On accepting the task, the agent should see an Info panel with all the voicemail audio and text transcription as shown in the following image:
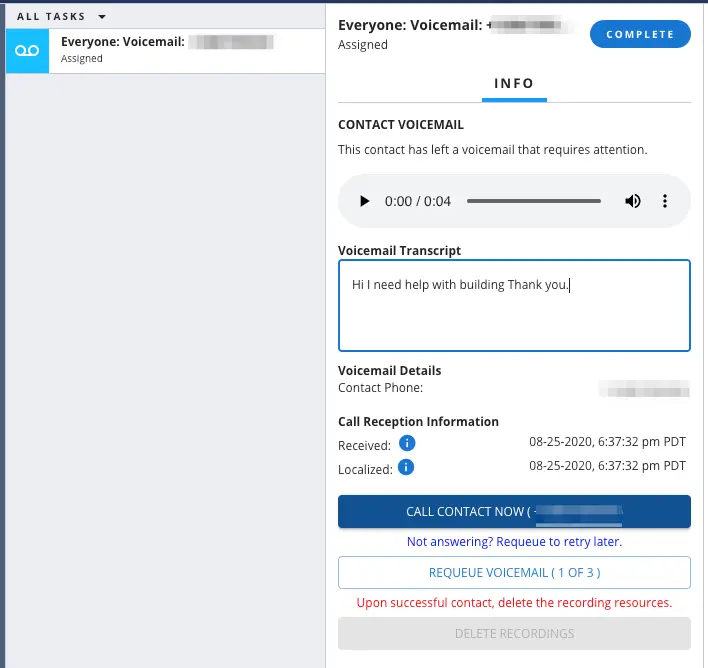
- Similar to the callback task, the agent can either place the callback immediately or forward the call to a queue of other agents. After the third requeue attempt, you then have the option to delete the recording.
- After wrapping up the call with the customer, the agent should also complete the voicemail task.