Pause and Resume Call Recording (Flex UI 1.x.x)
Pre-built Call Recording Pause and Resume plugin is available in Flex UI 2.x.x
This guide is only for Flex UI 1.x.x, which reached End of Life on June 30, 2024. To build on a current version, we recommend you upgrade to Flex UI 2.x.x and install the ready-to-use Call Recording Pause and Resume plugin. You must be logged in to Twilio Console to access the Flex Plugin Library.
Warning
This solution features sample code that is provided "as is" and is not production grade. The featured code does not account for edge case handling, scalability, and reliability. It is not covered under Twilio's Service Level Agreement (SLA) and support plans.
Most contact centers record all voice calls for various reasons including agent training, quality assessments, historical reporting, and analytics. Many contact centers need their agents to take customer payments over the phone, however for security reasons the recording cannot contain the spoken payment details. This solution allows an agent to temporarily pause the call recording while the customer is providing sensitive information such as credit card/social security number (SSN) over the phone, essentially muting that part of the call recording.
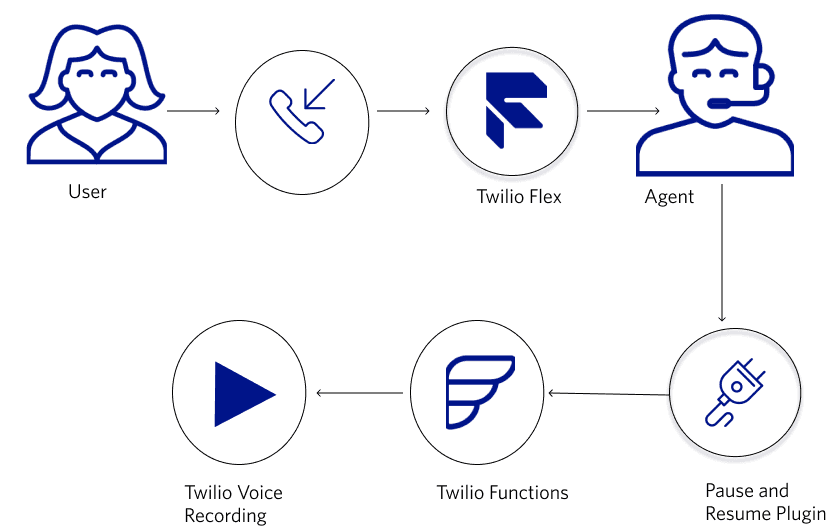
The Pause and Resume Call Recording solution includes a Flex plugin that leverages Twilio Functions to perform start, pause, and resume recording. Agents are now provided with a button on every call with the customer.
When an agent receives a new inbound call or initiates a new outbound call from the Dialpad, the plugin invokes the "Create Call Recording" function which leverages the Twilio Call Recording API resource. The task attribute conversations.media is updated with the recording metadata to allow Flex Insights to play back the call recording. These Recordings are dual-channel, capturing the customer and the agent audio in their own audio channels.


Note the status of a call recording can be processing (initial status), paused, and in-progress (after resuming the recording). The "Pause Recording" function leverages the special Twilio.CURRENT value to reference the currently active recording without requiring an explicit Recording SID.
Twilio.CURRENT can be used for pause, resume, or stop actions on calls with only one active recording. See the Call Recording API documentation for more information.

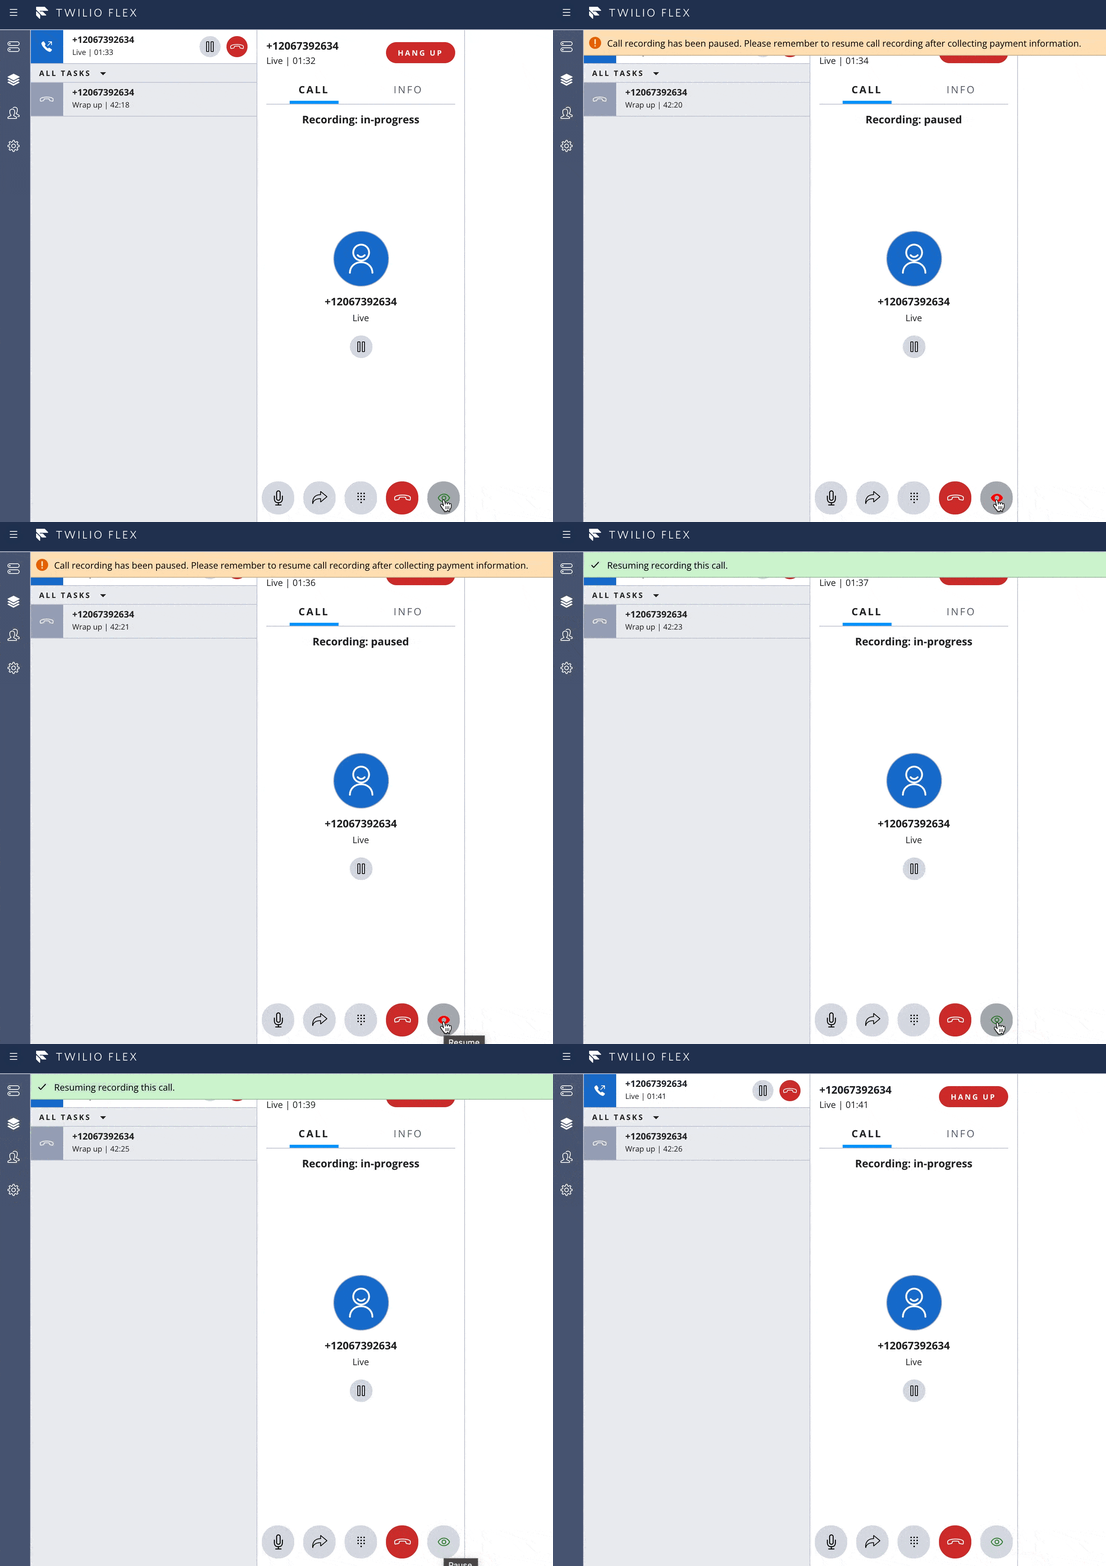
These pop-up messages are implemented using the Flex Notifications framework.
Call Recordings for completed calls are available in the Twilio Console Voice Recordings (with attributes Channels being 2 and Source being StartCallRecordingAPI). For the duration of the "pause", the call recording file will be silent.

To deploy this solution, you will need:
-
An active Twilio account with Flex provisioned. Refer to the Flex Quickstart to create one.
-
npm version 6.0.0 installed (type
npm -vin your terminal to check) -
A Node.js long-term-support (LTS) version installed, 14 recommended (type
node -vin your terminal to check) -
Twilio CLI along with the Flex Plugins CLI and the Serverless Toolkit. Run the following commands to install them:
1# Install the Twilio CLI2npm install twilio-cli@2.0 -g3# Install the Serverless and Flex as Plugins4twilio plugins:install @twilio-labs/plugin-serverless5twilio plugins:install @twilio-labs/plugin-flex
Info
If you're running Linux, click on the Linux tab for the Twilio CLI installation instructions. If you're running Windows, make sure to run the Windows command prompt as an administrator to install the Serverles/Flex plugins for the Twilio CLI. The Windows commands in this guide use PowerShell (for Node.js/npm installation).
30 minutes
- Flex v1.19.0-1.28.0
- macOS / Unix
- Windows 10
In order to use the solution, you need to prepare your Flex Task Assignment workspace.
Navigate to your Flex project in the Twilio Console. Copy your ACCOUNT SID and AUTH TOKEN, and create a new Twilio CLI profile using those credentials:
twilio profiles:create
You will be prompted to enter your Twilio Account SID, Auth Token, and a shorthand identifier for your profile. When choosing a shorthand identifier, pick one that is meaningful and that you can remember. Once your profile has been created, activate it by running:
twilio profiles:use PROFILE_ID
Keep in mind that this account will be used for the rest of the deployment. In order to switch accounts, use the following command:
twilio profiles:use DIFFERENT_PROFILE_ID
Disable the "Call Recording" option in Flex Voice Settings on the Twilio Console by sliding it to OFF. When enabled, Flex records the voice conference on a single-channel or mono recording which we won't need for this custom implementation.
Make sure that you are not enabling Call Recording in any IVR Studio Flows. Verify that your inbound IVR Studio Flows (used to route calls to Flex) do not contain the Call Recording widget.
Download the plugin source code here and unzip the files in a local directory.
You can view the source code on GitHub: https://github.com/twilio-professional-services/pause-recording
Step 1: Run npm install in the functions folder.
1cd serverless2npm install
Deploy the Twilio functions to your account using the Twilio CLI:
twilio serverless:deploy
Info
When running on Windows, you may see an error with the Twilio Serverless deployment command. To work around the issue, set your TWILIO_ACCOUNT_SID and TWILIO_AUTH_TOKEN as environment variables. Refer to the previous section for examples of how to set an environment variable in Windows.
1✔ Serverless project successfully deployed23Deployment Details4Domain: https://pause-recording-XXXX.twil.io5Service:6barge-coach (ZSXXXXXXXXXXXXXXXXXXXXXXXXXXXXXXXX) ...
Your functions will now be present in the Twilio Functions Console and be part of the "pause-recording" service.
Copy and save the domain returned when you deploy a function. You will need it in the next step. If you forget to copy the domain, you can also refer to it by navigating to Functions > API.
Debugging Tip: Pass the -l or logging flag to review deployment logs. For example, you can pass -l debug to turn on debugging logs.
Once you have deployed the function, it is time to deploy the plugin to your Flex instance.
Run the following commands in the plugin source directory. We will leverage the Twilio CLI to build and deploy the Plugin.
cd ../pause-recording-plugin && mv public/appConfig.example.js public/appConfig.js
Run npm install.
Create the plugin config file by copying .env.example to .env.
cp .env.example .env
Update the variable with the appropriate value. Edit .env and set the REACT_APP_SERVICE_BASE_URL variable to your Twilio Functions base URL (this will be available after you deploy your functions).
REACT_APP_SERVICE_BASE_URL=https://pause-recording-xxxx-dev.twil.io
When you are ready to deploy the plugin, run the following in a command shell:
1twilio flex:plugins:deploy --major --changelog "Releasing Pause & Resume recording plugin" --description "Flex pause and resume recording"2
1√ Validating deployment of plugin pause-recording-plugin2| Compiling a production build of pause-recording-pluginPlugin pause-recording-plugin was successfully compiled with some warnings.3√ Compiling a production build of pause-recording-plugin4√ Uploading pause-recording-plugin5√ Registering plugin pause-recording-plugin with Plugins API6√ Registering version v1.0.0 with Plugins API78🚀 Plugin (private) pause-recording-plugin@1.0.0 was successfully deployed using Plugins API910Next Steps:11Run $ twilio flex:plugins:release --plugin pause-recording-plugin@1.0.0 --name "Autogenerated Release 1624517195294" --description "The description of this Flex Plugin Configuration." to enable this plugin on your Flex application1213
The previous step only deploys your plugin. You still need to enable the Plugin on your Flex application. To enable, run the following:
twilio flex:plugins:release --plugin pause-recording-plugin@1.0.0 --name "Autogenerated Release 1624570680076" --description "Enabling Pause and Resume Call Recording for contact center."
After running the suggested next step, navigate to the Plugins Dashboard to review your recently deployed plugin and confirm that it's enabled for your contact center.
Note: Common packages like React, ReactDOM, Redux and ReactRedux are not bundled with the build because they are treated as external dependencies so the plugin will depend on Flex to provide them globally.
You are all set to test Pause and Resume Recording on your Flex application!
Warning
Keep in mind that your Agents need to refresh their browsers in order to get the latest changes.
Step 1: Place an outbound call from Flex to your mobile number or the phone number of another person that can act as the agent. Notice that the Recording toggle button is green and the status is processing.
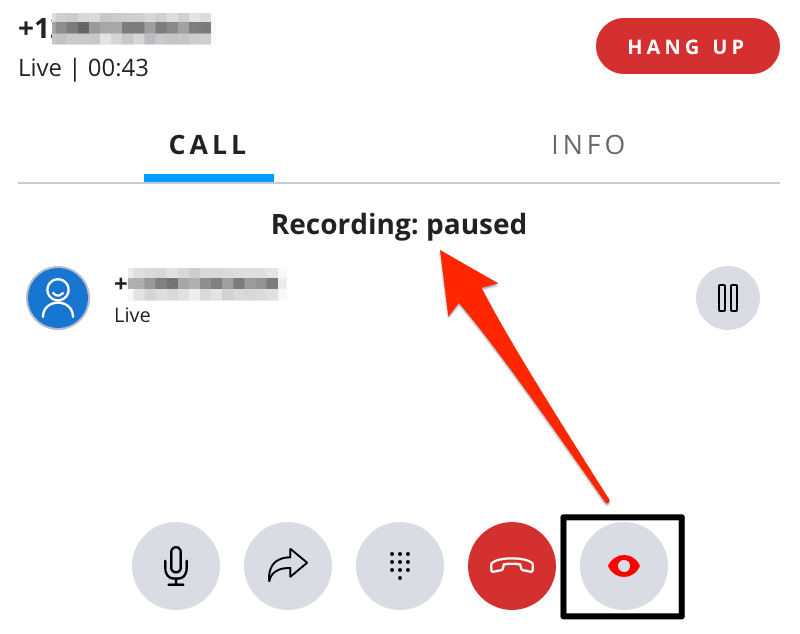
Step 2: Click the Recording toggle button to pause the recording. Notice that the Recording toggle button is red and the status is paused.
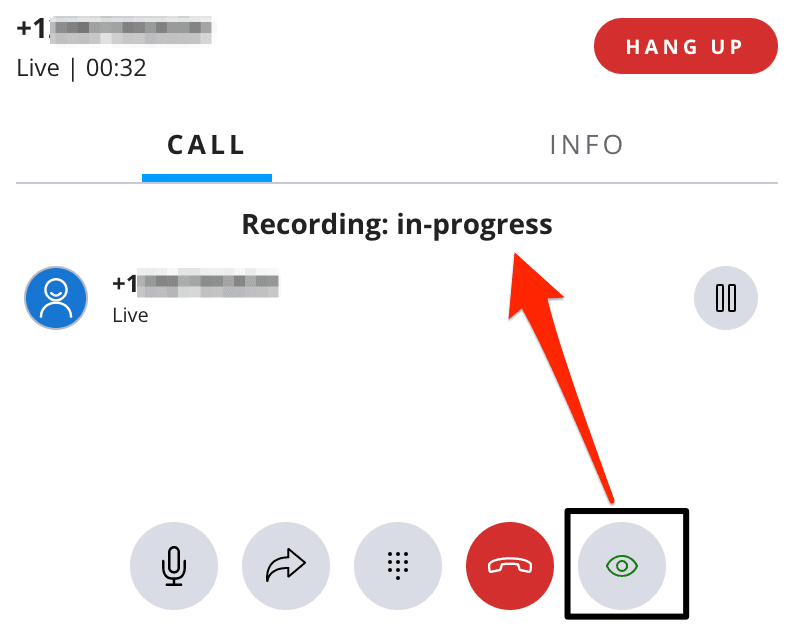
Step 3: Click the Recording toggle button again to resume recording. Notice that the Recording toggle button is green and the status is in-progress.
Step 4: Complete the call by hanging up.
Step 5: Find the recording for your completed call in the Twilio Console Voice Recordings. Verify that the call recording is silent during the pause. Furthermore, for each call, there should only be one recording present. If there is a second recording, more than likely the default Flex Call Recording option is still enabled in the Console and should be disabled (see Configure your Flex Workspace).