Selectable Chat Messages (Flex UI 1.x.x)
Info
This guide is only for Flex UI 1.x.x, which reached End of Life on June 30, 2024. To build on a current version, we recommend you upgrade to Flex UI 2.x.x.
Warning
This solution features sample code that is provided "as is" and is not production grade. The featured code does not account for edge case handling, scalability, and reliability. It is not covered under Twilio's Service Level Agreement (SLA) and support plans.
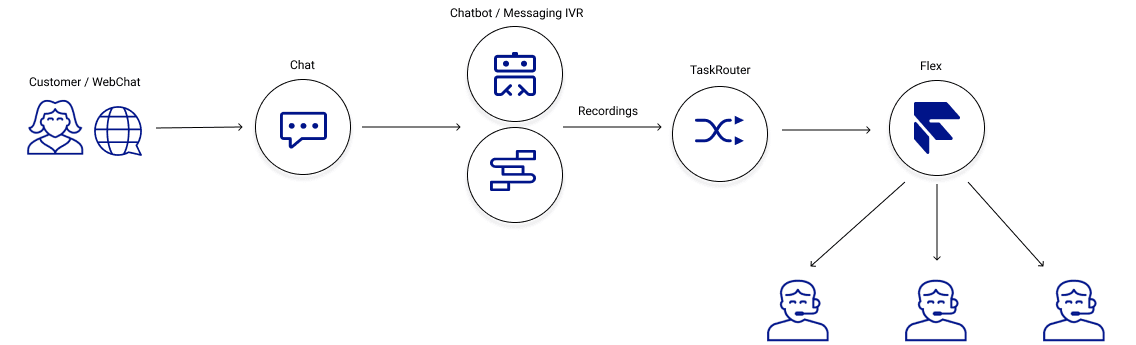
This solution provides the ability to have selectable messages with Web Chat in Flex. The goal behind this is to build a scripted experience to guide the customer through a "self-service" type of chat flow. The solution can be expanded into more robust self-service use cases for Web Chat.

Studio Flow passes attributes of the chat channel to a function, that we subscribe to from the web. Any time the attributes change, the clickablemessage object is pulled and then pushed this into a redux store. The buttons are then rendered based on what is contained within the object. As the customer progresses through the Studio Flow, it pushes the next set of scripted answers as clickable buttons on their end, thus providing a guided experience through the Studio Flow.
To deploy this solution, you will need:
-
An active Twilio account. Sign up if you don't already have one
-
npm version 6.0.0 installed (type
npm -vin your terminal to check) -
A Node.js long-term-support (LTS) version installed, 14 recommended (type
node -vin your terminal to check) -
A Twilio Flex instance where you have admin permissions. See our getting started guide to create one
-
Twilio CLI along with Serverless Plugin. Run the following in a command shell:
1# Install the Twilio CLI2npm install twilio-cli@2.0 -g3# Install the Serverless as Plugin4twilio plugins:install @twilio-labs/plugin-serverless
Info
If you're running Linux, click on the Linux tab for the Twilio CLI installation instructions. If you're running Windows, make sure to run the Windows command prompt as an administrator to install the Serverles/Flex plugins for the Twilio CLI. The Windows commands in this guide use PowerShell (for Node.js/npm installation).
30-45 minutes
Flex UI 1.29.0
In order to use the solution, you need to prepare your Flex Task Assignment workspace.
Navigate to your Flex project in the Twilio Console. Copy your ACCOUNT SID and AUTH TOKEN, and create a new Twilio CLI profile using those credentials:
twilio profiles:create
You will be prompted to enter your Twilio Account SID, Auth Token, and a shorthand identifier for your profile. When choosing a shorthand identifier, pick one that is meaningful and that you can remember. Once your profile has been created, activate it by running:
twilio profiles:use PROFILE_ID
Keep in mind that this account will be used for the rest of the deployment. In order to switch accounts, use the following command:
twilio profiles:use DIFFERENT_PROFILE_ID
Retrieve your Flex Task Assignment workspace SID:
twilio api:taskrouter:v1:workspaces:list
Example Workspace SID
1SID Friendly Name Prioritize Queue Order2WSXXXXXXXXXXXXXXXXXXXXXXXXXXXXXXXX Flex Task Assignment FIFO3
Make sure you have Node.js (https://nodejs.org) as well as npm (https://npmjs.com) installed.
Step 1: In your browser, download the source code and extract the files in a local directory.
Step 2: Run npm install to install the plugin package dependencies.
Step 1: From the root directory of your copy of the source code, change into serverless and rename .env.example to .env.
cd serverless && mv .env.example .env
Step 2: Open .env with your text editor and modify the following:
1ACCOUNT_SID = Found at https://www.twilio.com/console2AUTH_TOKEN = Found at https://www.twilio.com/console3TWILIO_WORKSPACE_SID = WSXXXXXXXXXXXXXXXXXX
Step 3: Run the following to install the Function dependencies in serverless directory:
serverless $ npm install
Step 4: Deploy the Twilio function to your account using the Twilio CLI:
twilio serverless:deploy
Step 5: Copy the domain as you'll need this for the .env as you'll use this when you import the studio flow
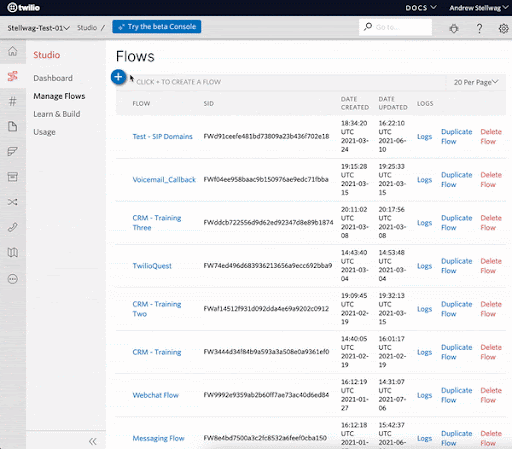
Step 6: Import the Studio Flow located within /serverless/studio_flow to https://www.twilio.com/console/studio/dashboard.
Here is how to import a json within the console:
Step 7: Update the Send-To-Flex widget with your Flex details:
-
Workflow: Select preferred Workflow
-
Channel: Programmable Chat
-
Sample attributes for the required attributes field:
1{"name": "{{trigger.message.ChannelAttributes.from}}",2"channelType": "{{trigger.message.ChannelAttributes.channel_type}}",3"channelSid": "{{trigger.message.ChannelSid}}"}
Step 8: From the root directory of your copy of the source code, change into /public/assets and rename webchat-appConfig.example.js to webchat-appConfig.js
Step 9: In webchat-appConfig.js, change your Account SID and Flex Flow SID:
1accountSID: "ACXXXXXXXXXXXXX"2FlexFlowSID: "FOXXXXXXXXXXXXXX"
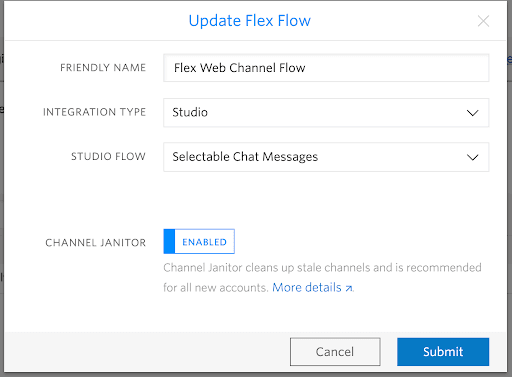
Flex Flow corresponds to the messaging web flow which you will need to edit to point to your imported Studio Flow:
To develop locally, you can use the Webpack Dev Server by running:
flex-selectable-chat-messages $ npm start
This will automatically start up the Webpack Dev Server and open the browser for you. Your app will run on http://localhost:3000. If you want to change that you can do this by setting the PORT environment variable.
When you make changes to your code, the browser window will be automatically refreshed.
When you are ready to deploy your web chat widget, you'll need to run build:
flex-selectable-chat-messages $ npm run-script build
After you have uploaded your Web Chat build and deployed it to your website start a new chat from the web page.
This will trigger a new chat interaction that will flow through the previously published Studio Flow, pushing selectable chat messages as they are updated within the Studio Flow.
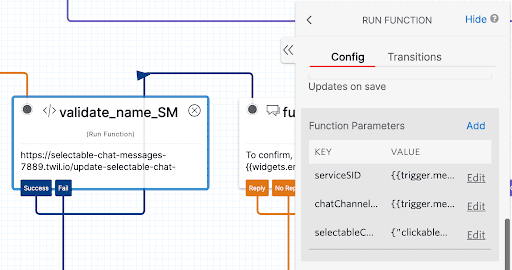
If you examine the Studio Flow widgets, you'll see how we continually update the clickablemessage object within the widgets. As these change, we are subscribing to these changes within our web chat widget from the front end. Any time those change, we push those changes to redux and render the "clickable" messages within the web chat widget front end.
1{2"clickableMessages": [3{ "key": "yes{{flow.variables.count}}", "message": "yes" },4{ "key": "no{{flow.variables.count}}", "message": "no" }5]6}
We are going to get the channel, then add a channel listener (to subscribe to) anytime there are updates to the attributes of the channel. From there we will push the updated clickableMessages object into redux and that is how we are rendering button/component changes as the studio flow push new objects throughout the flow.
1getChannelAttributes() {2const dispatch = this.props.dispatch;34FlexWebChat.manager.chatClient.getChannelBySid(this.props.channelSid)5.then(channel => {6channel.on('updated', ({ channel, updateReasons }) => {7if ( updateReasons.indexOf('attributes') !== -1 &&channel.attributes.status === "INACTIVE") {8FlexWebChat.Actions.invokeAction('RestartEngagement');9return;10}11if (undefined !== channel.attributes.clickableMessages && (updateReasons.indexOf('attributes') !== -1)) {12dispatch({13type: 'SET_CLICKABLE_MESSAGES',14payload: {15clickableMessages: channel.attributes.clickableMessages16}17})18}19});20})21}22}