Make a request to an external API
At some point in your application development process, you may find yourself wanting to include dynamic or external data in your responses to users or as part of your application logic. A common way to incorporate this into your application is by making requests to APIs and processing their responses.
There are as many potential use cases as there are developers, so we can't possibly document every possible situation. Instead, we'll provide you with some examples and useful strategies that we've found over the years for making API calls in your Functions.
There are a wide variety of npm modules available for making HTTP requests to external APIs, including but not limited to:
For the sake of consistency, all examples will use axios, but the same principles will apply to any HTTP request library. These examples are written assuming that a customer is calling your Twilio phone number and expecting a voice response, but these same concepts apply to any application type.
Before you run any of the examples on this page, create a Function and paste the example code into it. You can create a Function in the Twilio Console or by using the Serverless Toolkit.
If you prefer a UI-driven approach, complete these steps in the Twilio Console:
- Log in to the Twilio Console and navigate to Develop > Functions & Assets. If you're using the legacy Console, open the Functions tab.
- Functions are contained within Services. Click Create Service to create a new Service.
- Click Add + and select Add Function from the dropdown.
- The Console creates a new protected Function that you can rename. The filename becomes the URL path of the Function.
- Copy one of the example code snippets from this page and paste the code into your newly created Function. You can switch examples by using the dropdown menu in the code rail.
- Click Save.
- Click Deploy All to build and deploy the Function. After deployment, you can access your Function at
https://<service-name>-<random-characters>-<optional-domain-suffix>.twil.io/<function-path>
For example:test-function-3548.twil.io/hello-world.
You can now invoke your Function with HTTP requests, configure it as the webhook for a Twilio phone number, call it from a Twilio Studio Run Function Widget, and more.
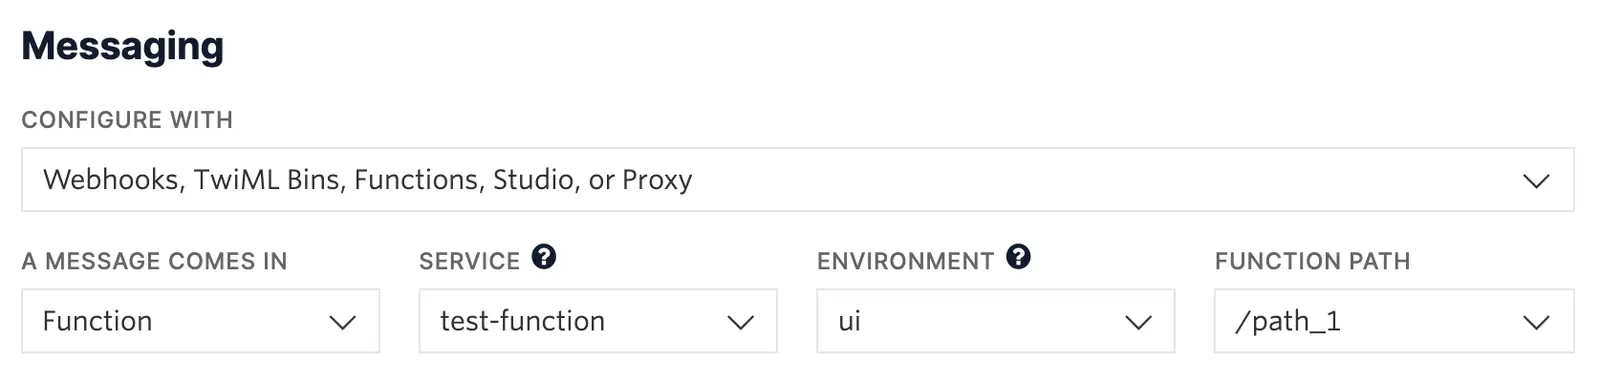
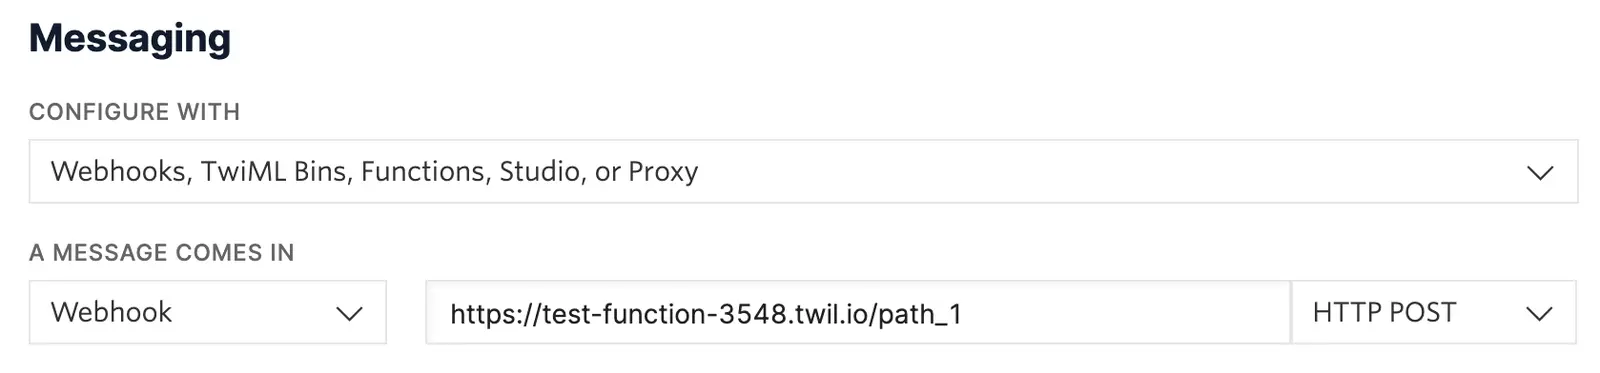
For your Function to react to incoming SMS or voice calls, it must be set as a webhook for your Twilio number. There are a variety of methods to set a Function as a webhook:
Use the Twilio Console UI to connect your Function as a webhook:
- Go to Products & Services > Numbers & Senders > Phone Numbers.
- Select the phone number you'd like to connect to your Function.
- Go to the Configuration Details tab.
- To configure Messaging, choose Edit details in the Messaging section.
- To configure Voice calls, choose Edit details in the Voice and emergency calling section.
- Select the webhook method and provide your webhook URL. Select an HTTP method to handle responses.
- Optional: Configure a secondary webhook in case the primary webhook fails.
- Click the Save button.
Before you can make an API request, you'll need to install axios as a Dependency for your Function. Once axios is installed, copy the following code snippet and paste it as the body of a new, public Function, such as /astro-info. Be sure to use the instructions above to connect this Function as the webhook for incoming calls to your Twilio phone number.
1const axios = require('axios');23exports.handler = async (context, event, callback) => {4// Create a new voice response object5const twiml = new Twilio.twiml.VoiceResponse();67try {8// Open APIs From Space: http://open-notify.org9// Number of people in space10const response = await axios.get(`http://api.open-notify.org/astros.json`);11const { number, people } = response.data;1213const names = people.map((astronaut) => astronaut.name).sort();14// Create a list formatter to join the names with commas and 'and'15// so that the played speech sounds more natural16const listFormatter = new Intl.ListFormat('en');1718twiml.say(`There are ${number} people in space.`);19twiml.pause({ length: 1 });20twiml.say(`Their names are: ${listFormatter.format(names)}`);21// Return the final TwiML as the second argument to `callback`22// This will render the response as XML in reply to the webhook request23// and result in the message being played back to the user24return callback(null, twiml);25} catch (error) {26// In the event of an error, return a 500 error and the error message27console.error(error);28return callback(error);29}30};
This code is:
- Initializing a TwiML Voice Response, for speaking back to the incoming caller
- Using
axiosto perform an API request to theastrosendpoint, which will return the number of people currently in space, and a list of their names - Performing some operations on the data returned by the API, such as isolating the names into a sorted list, and preparing an Intl.ListFormat object for formatting the names
- Generating the message to be returned to the caller, and returning it
- All of this is wrapped in a try/catch block to handle any exceptions, such as a connection error that could be thrown by the API
There are some key points to keep in mind.
Making an HTTP request to an API is what we call an asynchronous operation, meaning the response from the API will come back to us at a later point in time, and we're free to use computing resources on other tasks in the meantime. Calling axios in this code sample creates a Promise, which will ultimately resolve as the data we want, or reject and throw an exception.
The MDN has an excellent series that introduces asynchronous JavaScript and related concepts.
Note that we've declared this Function as async. This means that we can leverage the await keyword and structure our code in a very readable, sequential manner. The request is still fundamentally a Promise, but we can treat it almost like synchronous code without the need for callback hell or lengthy then chains. You can learn more about this async/await syntax at the MDN.
The other key point is that our code only ever calls callback once our code has successfully completed or if an error has occurred. If the await keyword was removed, or we otherwise didn't wait for the API call to complete before invoking the callback method, this would result in incorrect behavior. If we never invoke callback, the Function will run until the 10-second execution limit is reached, resulting in an error and the customer never receiving a response.
Another common situation you may encounter is the need to make one API request, and then a subsequent request which is dependent on having data from the first request. By properly handling Promises in order, and ensuring that callback is not invoked before our requests have finished, you can make any number of sequential requests in your Function as necessary for your use case (while also keeping in mind that the Function has 10 seconds to complete all requests).
1const axios = require('axios');2const qs = require('qs');34exports.handler = async (context, event, callback) => {5// Create a new voice response object6const twiml = new Twilio.twiml.VoiceResponse();7// A pre-initialized Twilio client is available from the `context` object8const twilioClient = context.getTwilioClient();910try {11// Open APIs From Space: http://open-notify.org12// Number of people in space13const response = await axios.get(`http://api.open-notify.org/astros.json`);14const { number, people } = response.data;1516const names = people.map((astronaut) => astronaut.name).sort();1718// Select a random astronaut19const astronautName = names[Math.floor(Math.random() * names.length)];20// Search Wikipedia for any article's about the astronaut21const { data: wikipediaResult } = await axios.get(22`https://en.wikipedia.org/w/api.php?${qs.stringify({23origin: '*',24action: 'opensearch',25search: astronautName,26})}`27);28// Attempt to select the first relevant article from the nested result29const article = wikipediaResult[3] ? wikipediaResult[3][0] : undefined;30// Create a list formatter to join the names with commas and 'and'31// so that the played speech sounds more natural32const listFormatter = new Intl.ListFormat('en');3334twiml.say(`There are ${number} people in space.`);35twiml.pause({ length: 1 });36twiml.say(`Their names are: ${listFormatter.format(names)}`);37// If there's a defined article for the astronaut, message the link to the user38// and tell them they've been sent a message39if (article) {40// Use `messages.create` to send a text message to the user that41// is separate from this call and includes the article42await twilioClient.messages.create({43to: event.From,44from: context.TWILIO_PHONE_NUMBER,45body: `Learn more about ${astronautName} on Wikipedia at: ${article}`,46});4748twiml.pause({ length: 1 });49twiml.say(50`We've just sent you a message with a Wikipedia article about51${astronautName}, enjoy!`52);53}5455// Return the final TwiML as the second argument to `callback`56// This will render the response as XML in reply to the webhook request57// and result in the message being played back to the user58return callback(null, twiml);59} catch (error) {60// In the event of an error, return a 500 error and the error message61console.error(error);62return callback(error);63}64};
Similar to the previous example, copy the following code snippet and paste it as the body of a new, public Function, such as /detailed-astro-info. In addition, you will need to install the qs module as a Dependency so that we can make an API request that includes search parameters. Also, for the text messaging to work, you'll need to set your Twilio phone number as an environment variable titled TWILIO_PHONE_NUMBER.
This code is:
- Initializing a TwiML Voice Response, for speaking back to the incoming caller
- Using
axiosto perform an API request to theastrosendpoint, which will return the number of people currently in space and a list of their names - Performing some operations on the data, and randomly selecting one of the astronaut names
- Performing a second API request. This time, querying Wikipedia for any articles about the astronaut, with their name as the search term.
- Generating the message to be returned to the caller, sending the caller a text message containing a Wikipedia article (if one is found), and returning the voice message to the caller
- All of this is wrapped in a try/catch block to handle any exceptions, such as a connection error that could be thrown by either API
Frequently in applications, we also run into situations where we could make a series of requests one after another, but we can deliver a better and faster experience to users if we perform some requests at the same time.
We can accomplish this in JavaScript by initiating multiple requests, and awaiting their results in parallel using a built-in method, such as Promise.all.
To get started, copy the following code snippet and paste it as the body of a new, public Function, such as /space-info.
In addition to the axios and qs dependencies installed for previous examples, you will want to get a free API key from positionstack. This will enable you to perform reverse geolocation on the International Space Station or ISS. Set the value of the API key to an environment variable named POSITIONSTACK_API_KEY.
1const axios = require('axios');2const qs = require('qs');34exports.handler = async (context, event, callback) => {5// Create a new voice response object6const twiml = new Twilio.twiml.VoiceResponse();78try {9// Open APIs From Space: http://open-notify.org10const openNotifyUri = 'http://api.open-notify.org';11// Create a promise for each API call which can be made12// independently of each other1314// Number of people in space15const getAstronauts = axios.get(`${openNotifyUri}/astros.json`);16// The current position of the ISS17const getIss = axios.get(`${openNotifyUri}/iss-now.json`);1819// Wait for both requests to be completed in parallel instead of sequentially20const [astronauts, iss] = await Promise.all([getAstronauts, getIss]);2122const { number, people } = astronauts.data;23const { latitude, longitude } = iss.data.iss_position;2425const names = people.map((astronaut) => astronaut.name).sort();2627// We can use reverse geocoding to convert the latitude and longitude28// of the ISS to a human-readable location. We'll use positionstack.com29// since they provide a free API.30// Be sure to set your positionstack API key as an environment variable!31const { data: issLocation } = await axios.get(32`http://api.positionstack.com/v1/reverse?${qs.stringify({33access_key: context.POSITIONSTACK_API_KEY,34query: `${latitude},${longitude}`,35})}`36);3738const { label: location } = issLocation.data[0] || 'an unknown location';3940// Create a list formatter to join the names with commas and 'and'41// so that the played speech sounds more natural42const listFormatter = new Intl.ListFormat('en');4344twiml.say(`There are ${number} people in space.`);45twiml.pause({ length: 1 });46twiml.say(`Their names are: ${listFormatter.format(names)}`);47twiml.pause({ length: 1 });48twiml.say(49`Also, the International Space Station is currently above ${location}`50);51// Return the final TwiML as the second argument to `callback`52// This will render the response as XML in reply to the webhook request53// and result in the message being played back to the user54return callback(null, twiml);55} catch (error) {56// In the event of an error, return a 500 error and the error message57console.error(error);58return callback(error);59}60};
This code is:
- Initializing a TwiML Voice Response, for speaking back to the incoming caller
- Using
axiosto create two requests to the Open Notify API, one for astronaut information and the other for information about the ISS's location, and storing references to the resulting Promises. awaiting the result of both requests simultaneously usingPromise.all- Performing a second API request, this time to convert the latitude and longitude of the ISS into a human-readable location on Earth, such as "North Pacific Ocean"
- Generating the message to be returned to the caller based on all of the data gathered so far, and returning the voice message to the caller
- All of this is wrapped in a try/catch block to handle any exceptions, such as a connection error that could be thrown by any of the APIs
Just as you may need to request data in your Serverless applications, there are numerous reasons why you may want to send data to external APIs. Perhaps your Function responds to incoming text messages from customers and attempts to update an internal record about that customer by sending data to an API that manages customer records. Maybe your Function serves as a means to push messages onto a queue, like SQS so that some other microservice can handle clearing out that queue.
Regardless of the use case, you are free to make write requests to external APIs from your Functions (assuming you have permission to do so from the API). There are no restrictions imposed on this by Runtime itself.
Depending on the scenario, making a write request will mostly consist of using the same principles from the above examples, but using HTTP verbs such as POST and PUT instead of GET.
The below example demonstrates a simple use case where a Function:
- Receives an incoming text message
- Derives an identifier from the incoming phone number
- Retrieves a record from an API, based on the derived ID
- Writes an update to that API, and responds to the sender once all operations are complete
1const axios = require('axios');23exports.handler = async (context, event, callback) => {4// Create a new message response object5const twiml = new Twilio.twiml.MessagingResponse();67// Just for this example, we'll use the first digit of the incoming phone8// number to identify the call. You'll want to use a more robust mechanism9// for your own Functions, such as the full phone number.10const postId = event.From[1];1112// Since we're making multiple requests, we'll create an instance of axios13// that includes our API's base URL and any custom headers we might want to14// send with each request. This will simplify the GET and POST request paths.15// JSONPlaceholder is a fake REST API that you can use for testing and prototyping16const instance = axios.create({17baseURL: 'https://jsonplaceholder.typicode.com',18headers: { 'X-Custom-Header': 'Twilio' },19});2021try {22// Get the post based on the derived postId23// If the postId was 1, this is effectively making a GET request to:24// https://jsonplaceholder.typicode.com/posts/125const { data: post } = await instance.get(`/posts/${postId}`);2627const newCount = (post.messageCount || 0) + 1;2829// Use a POST request to "save" the update to the API30// In this case, we're merging the new count and message into the31// existing post object.32const update = await instance.post('/posts/', {33...post,34messageCount: newCount,35latestMessage: event.Body,36});3738console.log(update.data);3940// Add a message to the response to let the user know that everything worked41twiml.message(42`Message received! This was message ${newCount} from your phone number. 🎉`43);44return callback(null, twiml);45} catch (error) {46// As always with async functions, you need to be sure to handle errors47console.error(error);48// Add a message to the response to let the user know that something went wrong49twiml.message(`We received your message, but something went wrong 😭`);50return callback(error);51}52};
Some APIs may not accept write requests that are formatted using JSON (Content-Type: application/json). The approach to handling this situation varies depending on the expected Content-Type and which HTTP library you are using.
One example of a common alternative, which you'll encounter when using some of Twilio's APIs without the aid of an SDK, is Content-Type: application/x-www-form-urlencoded. As detailed in the axios documentation and shown in the example below, this requires some slight modifications to the data that you send, the Headers attached to the request, or a combination of both.
1const axios = require('axios');2const qs = require('qs');34exports.handler = async (context, event, callback) => {5// Create a new message response object6const twiml = new Twilio.twiml.MessagingResponse();78// Just for this example, we'll use the first digit of the incoming phone9// number to identify the call. You'll want to use a more robust mechanism10// for your own Functions, such as the full phone number.11const postId = event.From[1];1213// Since we're making multiple requests, we'll create an instance of axios14// that includes our API's base URL and any custom headers we might want to15// send with each request. This will simply be our GET and POST request paths.16// JSONPlaceholder is a fake REST API that you can use for testing and prototyping17const instance = axios.create({18baseURL: 'https://jsonplaceholder.typicode.com',19headers: { 'X-Custom-Header': 'Twilio' },20});2122try {23// Get the post based on the derived postId24// If the postId was 1, this is effectively making a GET request to:25// https://jsonplaceholder.typicode.com/posts/126const { data: post } = await instance.get(`/posts/${postId}`);2728const newCount = (post.messageCount || 0) + 1;2930// Like before, we're merging the new count and message into the31// existing post object32// In order to send this data in the application/x-www-form-urlencoded33// format, the payload must be encoded via a utility such as qs34const data = qs.stringify({35...post,36messageCount: newCount,37latestMessage: event.Body,38});3940// Use a POST request to "save" the update to the API41const update = await instance.post('/posts/', data);4243console.log(update.data);4445// Add a message to the response to let the user know that everything worked46twiml.message(47`Message received! This was message ${newCount} from your phone number. 🎉`48);49return callback(null, twiml);50} catch (error) {51// As always with async functions, you need to be sure to handle errors52console.error(error);53// Add a message to the response to let the user know that something went wrong54twiml.message(`We received your message, but something went wrong 😭`);55return callback(error);56}57};
API requests aren't always successful. Sometimes the API's server may be under too much load and unable to handle your request, or something simply happened to go wrong with the connection between your server and the API.
A standard approach to this situation is to retry the same request but after a delay. If that fails, subsequent retries are performed but with increasing amounts of delay (also known as exponential backoff). You could implement this yourself, or use a module such as p-retry to handle this logic for you. This behavior is also built into got by default.
To see this more explicitly configured, the following code examples implement some previous examples, but while utilizing an unstable API that only sometimes successfully returns the desired data.
Warning
V5 and newer versions of p-retry are exported as ES Modules, and Functions currently do not support the necessary import syntax. To utilize p-retry (or any other ES Module package) in the meantime, you will need to import it using dynamic import syntax inside of your handler method, as highlighted in the following examples.
1const axios = require('axios');23const getAstronauts = () => axios.get('https://unstable-5604.twil.io/astros');45exports.handler = async (context, event, callback) => {6// We need to asynchronously import p-retry since it is an ESM module7const { default: pRetry } = await import('p-retry');8// Create a new voice response object9const twiml = new Twilio.twiml.VoiceResponse();1011try {12let attempts = 1;13// Open APIs From Space: http://open-notify.org14// Number of people in space15const response = await pRetry(getAstronauts, {16retries: 3,17onFailedAttempt: ({ attemptNumber, retriesLeft }) => {18attempts = attemptNumber;19console.log(20`Attempt ${attemptNumber} failed. There are ${retriesLeft} retries left.`21);22// 1st request => "Attempt 1 failed. There are 3 retries left."23// 2nd request => "Attempt 2 failed. There are 2 retries left."24// …25},26});27const { number, people } = response.data;2829const names = people.map((astronaut) => astronaut.name).sort();30// Create a list formatter to join the names with commas and 'and'31// so that the played speech sounds more natural32const listFormatter = new Intl.ListFormat('en');3334twiml.say(`There are ${number} people in space.`);35twiml.pause({ length: 1 });36twiml.say(`Their names are: ${listFormatter.format(names)}`);37// If retries were necessary, add that information to the response38if (attempts > 1) {39twiml.pause({ length: 1 });40twiml.say(`It took ${attempts} attempts to retrieve this information.`);41}42// Return the final TwiML as the second argument to `callback`43// This will render the response as XML in reply to the webhook request44// and result in the message being played back to the user45return callback(null, twiml);46} catch (error) {47// In the event of an error, return a 500 error and the error message48console.error(error);49return callback(error);50}51};
1const axios = require('axios');2const qs = require('qs');34// The root URL for an API which is known to fail on occasion5const unstableSpaceUri = 'https://unstable-5604.twil.io';6// We'll declare these functions outside of the handler since they have no7// dependencies on other values, and this will tidy up our pRetry calls.8const astronautRequest = () => axios.get(`${unstableSpaceUri}/astros`);9const issRequest = () => axios.get(`${unstableSpaceUri}/iss`);10// Use a common object for retry configuration to DRY up our code :)11const retryConfig = (reqName) => ({12retries: 3,13onFailedAttempt: () => console.log(`Retrying ${reqName}...`),14});1516exports.handler = async (context, event, callback) => {17// We need to asynchronously import p-retry since it is an ESM module18const { default: pRetry } = await import('p-retry');19// Create a new voice response object20const twiml = new Twilio.twiml.VoiceResponse();2122try {23// Create a promise with retry for each API call that can be made24// independently of each other25const getAstronauts = pRetry(astronautRequest, retryConfig('astros'));26const getIss = pRetry(issRequest, retryConfig('iss'));27// pRetry returns a promise, so we can still use Promise.all to await28// the result of both requests in parallel with retry and backoff enabled!29const [astronauts, iss] = await Promise.all([getAstronauts, getIss]);3031const { number, people } = astronauts.data;32const { latitude, longitude } = iss.data.iss_position;3334const names = people.map((astronaut) => astronaut.name).sort();3536// We can use reverse geocoding to convert the latitude and longitude37// of the ISS to a human-readable location. We'll use positionstack.com38// since they provide a free API.39// Be sure to set your positionstack API key as an environment variable!40const { data: issLocation } = await pRetry(41() =>42axios.get(43`http://api.positionstack.com/v1/reverse?${qs.stringify({44access_key: context.POSITIONSTACK_API_KEY,45query: `${latitude},${longitude}`,46})}`47),48retryConfig('iss location')49);5051const { label } = issLocation.data[0] || 'an unknown location';5253// Create a list formatter to join the names with commas and 'and'54// so that the played speech sounds more natural55const listFormatter = new Intl.ListFormat('en');5657twiml.say(`There are ${number} people in space.`);58twiml.pause({ length: 1 });59twiml.say(`Their names are: ${listFormatter.format(names)}`);60twiml.pause({ length: 1 });61twiml.say(62`Also, the International Space Station is currently above ${label}`63);64// Return the final TwiML as the second argument to `callback`65// This will render the response as XML in reply to the webhook request66// and result in the message being played back to the user67return callback(null, twiml);68} catch (error) {69// In the event of an error, return a 500 error and the error message70console.error(error);71return callback(error);72}73};